Many thanks to Christian (IX1CKN) who shares the following field report:
Friedrichshafen: POTA Across Borders
by Christian (IX1CKN)
The Friedricshafen fair is one of the most interesting events for its social aspects, where you can finally put a face to colleagues whose voices you’ve only ever heard. Among the various OM (radio amateurs) I met this year was Gabriele IT9RGY, a flagbearer of the Italian Contest Club. When he recognized Andrea IW0HK and me, he said, referring to our respective SOTA/POTA activities: “You two are the real deal.”
I found that to be a very powerful statement, and I am grateful to him for it. Personally, I try to document each outing to capture the sensations it gave me, but also in the hope of inspiring someone. Andrea is more succinct than I am (if we were all the same, the world would be boring), but his spirit is identical. Parks on the Air (POTA) is a state of mind. It was no coincidence that, being in Germany for the Hamradio Messe, we had planned a series of activations.
Our schedule was tight and ambitious, and just completing it was a source of happiness, but there’s more to tell. In Germany, dinner time isn’t synchronized with Roman schedules. So, on Friday evening, after leaving the restaurant (for dinner with the Summits On The Air group) at 20:23, I looked at Hotel-Kilo and said, “If I go to bed now, I’ll digest in a week; let’s go activate a reserve!”
The easiest option in the area (after a disastrous experience last year in DE-0156, the park in the town center hosting the fair) was DE-0766, the Seewald Landscape Reserve. It’s near the FRN airport (and thus not far from the fairgrounds), in a fully bucolic setting. A narrow road cuts through meadows, with footpaths and bike paths leading into a wooded area.
We parked the car in one of these spots. It took only a moment to set up the vertical antenna in the field, but the presence of a swarm of mosquitoes as big as F-18 Hornets advised us to operate from inside the car to save our skin (literally).
Andrea turned on the KX-3 (10 watts would be our fixed power for this trip), and the 14 MHz calls began. Right away, a very strong IZ3QFG Dario (just 380 km from us) answered, highlighting an unusually short skip.
We logged 20 QSOs in 30 minutes… Many were from Italy (Spartaco from Grosseto at full scale, Mauro I1JQJ always active, and Beppe I1WKN a constant), with two “park to park” contacts. A classic for many OMs in the area, but also a great mood booster and a tasty appetizer for the next day… Continue reading Friedrichshafen: Christian and Andrea’s Multi-Country POTA Rove→
Many thanks to Scott (VO1DR) who shares the following guest post:
Construction Notes – VO1DR Antenna Mount for Camera Monopod
by Scott Schillereff, VO1DR
Further to my article about radio during trip to Portugal, a number of readers asked for details on how I mounted my whip antenna system to my camera monopod for /P use. Here are some photos and notes on this.
General notes:
This is a “straight-through” design. Just direct connections from the BNC center pin to whip (via brass nut), and BNC housing to radial connector.
This is not a cook-book construction article, rather just a show-and-tell of how I built mine. You can use what you have on hand to build something similar.
I suggest you start with your telescoping whip, so you know the size and threads for mounting bolt.
You could use any type of connector for the radial (wingnut, knurled nut, spade lug, alligator clip, whatever you like). I prefer banana jacks since a) I can push in the radial banana plug fast, b) the plug is a weak release point (pulls apart if someone walks into the radial), and c) I can easily attach additional radial wires, if desired.
Use a strong case (metal clamshell or cast aluminum work well). With the whip extended, there can be substantial forces (bending moment) from wind or handling. A tiny plastic case would be fractionally lighter but might fail.
For size, the one I used (25 x 25 x 50 mm; 1” x 1” x 2”) is about as small as I would go. It needs to have a big enough footprint to sit firmly on a camera mount fitting.
Use high heat (e.g., Weller 100-140 W solder gun) when soldering the center pin wire to the brass whip mounting nut. Solder the wire to the brass nut before you epoxy the nut.
I custom made the white plastic insulating bushing (where whip screws in). This was from a nearly-right bit from my junk box. You can be creative here. You could also epoxy on short piece of close-fitting, thick-walled PVC pipe around the outside of the whip mounting hole as a supporting sleeve to give some lateral support to whip when it is screwed in.
Dry-fit everything (before epoxying) to make sure nothing touches that shouldn’t and you can screw in the camera nut and whip fine. Test proper continuity of center pin and radial connections to BNC fitting. Once glued, there’s no going back!
For surfaces to be epoxied (metal nut sides and bottom, insides of mounting case), slightly roughen with sandpaper or jewellers file, then clean with isopropyl alcohol and Q-tip. This will increase adhesion and strength.
Use good-quality, high-strength, long-cure epoxy (e.g., JB Weld), not el-cheapo 5-minute epoxy from the Dollar Store. LET THE EPOXY COMPLETELY CURE BEFORE MESSING WITH IT! Just walk away from it for a day… (your patience will be rewarded).
Figure 1 – VO1DR Antenna Mount, clamped onto top of monopod. Coax goes to BNC on left; whip screws into top; raised radial connects by banana plug on right
Figure 2 – Antenna mount unclamped from top of monopod. The black plastic fitting (at right, with wedge-shape) fits into slot on platform at top of monopod (at left) and clamps in with cam arm. Large steel screw attaches wedge fitting to antenna mount case. Ruler shows scale of things.
Figure 3 – Antenna mount case (right) unscrewed from camera mount fitting. Steel screw is standard camera mount size (1/4-20 thread size). Black silicone cap keeps dust out of BNC connector. If your camera mount does not have a detachable wedge fitting (like the one on the left), you would simply screw the camera mount screw directly into the bottom of the antenna mount case.
Figure 4 – Top of monopod dissembled to show (clockwise from top): black monopod tube with telescoping whip stored inside (stainless steel with 10 mm brass mounting bolt), antenna mount case, detachable camera mount fitting, and round top plate of monopod. For my monopod, I had to remove one tiny screw and apply gentle torque to break a weak glue joint of this round piece on top of the monopod leg. It remains a snug hand fit (no screw needed).
Figure 5 – Fully assembled whip antenna mount with wiring. Radial (blue wire) with tie-off cord (yellow) at left; RG174 coax (5 m) at right. Whip is only ever screwed in hand-tight. Deploying in the field, I first tie off the monopod to something (park bench, picnic table, fence, tree), then screw the collapsed whip into the antenna mount and clamp mount on top of monopod, then plug in radial and tie the yellow cord off to something (straight out at 2 m height or slope down to ground anchor), and finally connect the coax to the rig. When all in place, I carefully raise the whip (slowly, with two hands to reduce bending forces). Take-down is all in reverse.
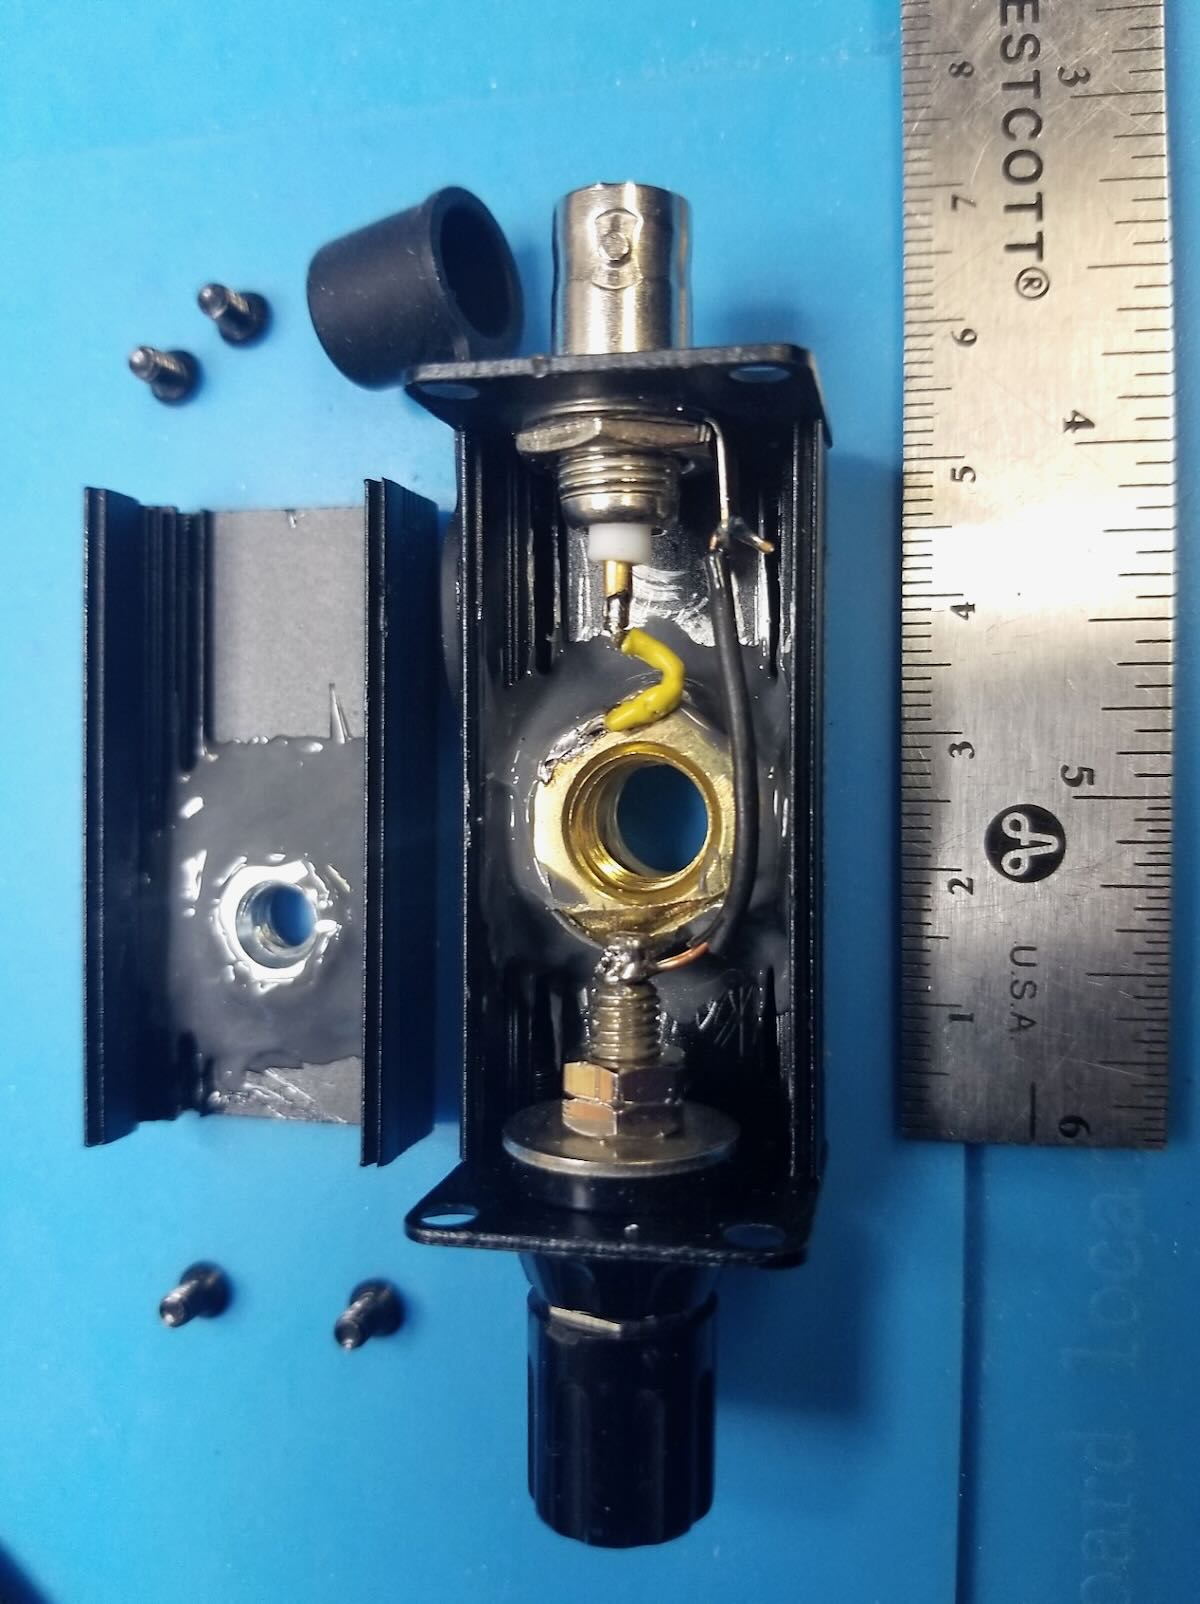
Figure 6 – Detail of antenna mount case. Case is 50 mm x 25 mm x 25 mm aluminum clam shell box with square metal end plates. These end plates are screwed in to hold the two halves together. White plastic bushing provides additional lateral support for the whip when it is screwed in. The bushing is glued to outside of case with CA (Krazy) glue.
Figure 7 – Inside of antenna mount case. On left, a ¼-20 steel nut is epoxied to inside of case with strong JB Weld epoxy. In main case, a 10 mm brass nut is epoxied to inside of case with an insulating washer beneath. This brass nut connects to the whip and is “hot”, so must be insulated from the black aluminum case. Yellow wire connects center of BNC to brass nut (soldered). Black wire connects ground side of BNC to radial banana jack. Use plenty of epoxy; there is a lot of force exerted on the steel and brass nuts.
Figure 8 – Detail of inside of case. Note separation of banana jack solder post and edge of 10 mm brass nut. Solder yellow wire to nut before epoxying in nut.
Hope you find this useful. Just use what you have on hand and some ingenuity to make yours!
Many thanks to Lee (M0VKR) who shares the following field report and video:
SOTA CW Activation on High Willhayes Dartmoor
by Lee (M0VKR)
It was an overcast and breezy morning when wife Joanne and myself Lee, M0VKR set out on our latest SOTA (Summits on the Air) activation adventure. Our destination was High Willhays, the highest point in Devon UK – SOTA G/DC001, Dartmoor is well known for its rugged beauty and challenging terrain.
We parked the car a short distance up the road from the army camp, slung our packs over our backs and set off. The gravel tracks leading to the summit stretched out before us and took a winding path through the moorland.
A few sheep and cattle grazed in the rough grass as we made our way upwards on the gentle slope. It was a breezy morning and we had had rain a short while earlier. Despite the weather our spirits were high, and we were eager to reach the top and get on the air with the Elecraft KH1.
In my pack was my now trusty Elecraft KH1 and an MPAS 2.0 vertical antenna, with the KX3 as backup, a reliable setup for such expeditions. I’m pretty sure I could halve the weight in my pack, but as it’s not a huge walk to the summit I don’t mind ferrying the extra gear to the top. The weather, though overcast, was adding a touch of drama to the landscape, and the breeze kept us cool as we trekked upward.
Joanne, ever the supportive partner, helped carry some of the cooking equipment and victuals and she kept the mood light with her cheerful conversation.
After a brisk hike, we reached the summit of High Willhays. The view, even under the Grey sky, was breathtaking. Rolling green hills and expansive moorland stretched out as far as the eye could see.
I set about preparing the station, using the MPAS 2.0 vertical antenna, which is quick to deploy and ideal for the variable conditions we faced. Despite the less-than-ideal propagation conditions, I was determined to make the activation a success.
Although the MPAS in vertical form isn’t very efficient on 40, I prefer to take advantage of the quick setup that it offers, one of these days I will look at adding a top section to make 40 more efficient, perhaps as a sloping inverted L or something similar, more reading of the manual required!
With everything set up, I made the first call on the 40m band. My Friend Matt MW0KAX answered, he was essentially line of sight from Wales, so his signal was strong. That was the first and last contact on 40m. I changed to 20 meters, where the MPAS was more efficient for the little KH1 and it was able to breathe a bit easier. The tuner in the KH1 is nothing short of amazing, and quite happily tuned 40 meters in a few seconds.
The static crackled, and for a moment, there was silence. Then, a faint reply came through. The thrill of making that first contact was palpable. It still amazes me every time I make those first few contacts that QRP does work, even with a compromised antenna system. Despite the challenging conditions, My limited skill, Plenty of luck and the reliability of the equipment began to shine. All the equipment I was using was off the shelf, I hadn’t made a single thing myself, maybe one day.
One by one, contacts started to come in. Each short QSO contact was a small victory, a testament to perseverance and the joy of ham radio. It is necessary to persevere as a newer CW operator and use QRP power levels and poor propagation conditions. It’s non-negotiable after driving for 2 hours, and a 4km hike that we go home empty handed. I logged each contact meticulously, my excitement growing with every successful connection. Joanne watched on slightly bemused but very supportive of the hobby, sharing in the triumphs that each contact brings and providing much-needed encouragement.
By the end of the activation, We had made several QSOs. While the propagation conditions had been far from ideal, the activation was undeniably a success. We had achieved what we set out to do: connect with fellow hams across the airwaves from the summit of High Willhays for a SOTA activation.
As we packed up our gear, the breeze picked up, and the clouds began to clear slightly, offering a glimpse of blue sky. The trek back down was filled with reflections on the day’s achievements and plans for future activations. We both felt a deep sense of accomplishment. We had braved the elements, navigated the challenging RF conditions, and emerged victorious.
This activation, like many before it, was a reminder of the joys of ham radio, CW and QRP operation and the adventure it can bring. For me and my wife Joanne, High Willhays would always hold a special place in our memories, not just for its height, but for the heights that we reached together on the airwaves.
When our family needs a change of scenery without a long drive, Mount Mitchell State Park is our go-to destination. I’ve mentioned before that it’s my “happy place” here in North Carolina. Mount Mitchell is only about 6 miles from our home as the crow flies, but it takes about 50 minutes to drive there, and it’s not in the direction of any of our usual destinations. Heading up the Blue Ridge Parkway and watching the flora change with elevation makes it feel like a proper getaway.
On Sunday, June 16, 2024, we wanted just such a getaway, as my wife and daughters were treating me to some Father’s Day fun. After visiting my father-in-law in the hospital in the early afternoon, we drove to Mount Mitchell.
Mount Mitchell State Park (US-2747)
Sundays on Mount Mitchell tend to be busy, especially in the summer. However, on this particular Sunday, it was rainy, foggy, and there were storms in and around the area.
Weather like this never bothers us on Mount Mitchell, as it can shift in an instant, as long as thunderstorms don’t intrude.
As soon as we arrived, I grabbed my radio bag from the car and found an empty picnic shelter. I’d been hoping for a free shelter since it was raining, and fortunately, we got our pick!
One of the first things I did after dropping off my pack was to tie Hazel to a picnic table because she was laser-focused on a chipmunk she saw run up a tree next to the shelter. That dog drives chipmunks and squirrels crazy, I’m sure.
My wife and daughters dropped off some art supplies at one of the shelter tables, then went on a short hike while I performed my POTA activation.
Note that Mount Mitchell is also a SOTA summit, but the picnic area is not within the activation zone. I could have easily gone to one of my go-to SOTA spots on the summit and knocked out a SOTA activation quickly (only four contacts are needed), but I wanted to save that for another day. Plus, being in the shelter meant that I could have a nice leisurely, dry activation!
I brought along my Penntek TR-45L and planned to pair it with a random wire antenna for the activation. However, since the weather was iffy—again, my primary concern was any thunderstorms that might sneak up on us—I decided to skip the wire antenna and go tabletop instead.
Fortunately, my Elecraft KH1 lives in my EDC bag at all times, so I set it up for tabletop mode.
You might recall that I have used the Elecraft KH1 adapter in previous activations and I think it works brilliantly. The first version of Elecraft’s adapter had one issue: the parts would fall apart if you weren’t careful with how you attached it to the KH1.
Joshua designed his right-angle adapter with captive components so that it’s all in one piece and can’t come apart.
I should note here that Elecraft actually updated their right-angle adapter design so that it also has captive components as well—so you have two choices! I’ll use the new Elecraft adapter in a future video and field report.
Joshua’s Tufteln design works really well (it’s also less expensive than the OEM adapter), and I like that it’s bright red, which means I’m less likely to leave it in the field!
Gear:
Note: All Amazon, CW Morse, ABR, Chelegance, eBay, and Radioddity links are affiliate links that support QRPer.com at no cost to you.
Many thanks to Sam (WN5C) who shares the following guest post:
Notes from a homebrew POTA adventure
Sam (WN5C)
I recently wrote about the homebrew transceiver I built to operate on a month-long trip through the American Southwest. Upon arriving back in Oklahoma here’s the final outcome: 27 days, 40 parks, and 669 QSOs. I honestly can’t believe that the rig went the distance, or that I made so many contacts on 2 watts or less!
The priority of this trip wasn’t radio, though. I’m an archaeologist and I’m starting a new research project that marries my historical interests with my love of two-way communication. In short, I’m studying the effects of how communication technology aided the American colonization and transformation of the western United States around the turn of the twentieth century. This means I walked and mapped single-wire telephone lines strung up in pine trees in northern New Mexico (used to connect fire lookouts with Forest Service ranger stations), a fascinating story of dramatic changes in land management. I also visited heliograph (sun-mirror signaling) stations established in southeastern Arizona by the U.S. Army Signal Corps in 1886 to assist in apprehending Geronimo.
Working Fort Bowie NHS (US-0815) in Arizona. The peak in the distance, Helen’s Dome, had a heliograph station on top. From the fort telegraph lines would have connected remote operations to the rest of the Army’s 1880s communication network. Next time I’m climbing up on top!
I look forward to relocating and studying the artifacts from more of these heliograph sites (mostly on remote peaks) to reconstruct this communication network and understand the lives of both the soldiers and the Apache, and how this novel surveillance system altered the battlefield. Based on the artifacts I’ve seen so far there are many cans of Army-issued proto-Spam and beer bottles surrounding the signaling station where American Morse Code would have been sent and received via flashes of sunlight. The original Field Day?
But back to radio. I covered a lot of ground and activated parks in Oklahoma, Texas, New Mexico, Arizona, Utah, Colorado, and Kansas.
The POTA sites that I activated (click image to enlarge).
At some locations I was camping so I was able to do multiple long activations and work the lower bands well into the evening. These were some of my favorite moments of the trip, being the only spot on the POTA app and leisurely working with no time or weather-based worries. It also gave me a chance to hear callsigns I was unfamiliar with, essentially exploring a new area of the country.
Working closer states after hours on 30 and 40 meters at Colorado NM (US-0918).
For other times, due to time constraints or weather (thunderstorms or that it was unbearably hot), I got my 10 contacts and moved on. Sometimes I packed the equipment for a long hike, often carried it from the car to a picnic table, and a few times deployed my antenna and operated from my vehicle.
Not every activation was a grand adventure. Sometimes, like here at Rocky Mountain Arsenal NWR (US-0226) in Colorado, I worked from the passenger seat in the car.
Every activation was memorable in its own way. I worked folks from 44 states, five Canadian provinces, and an unforgettable contact from Italy.
A map of the contacts I made (not including those in northern British Columbia, Alaska, and Italy).
The radio held up surprisingly well. Aside from it looking like a Dalí painting as the 3D printed box continued to deform in the heat, and some hot glue remelting, the electronic components worked as they should. I look forward to printing a stronger case and making some upgrades going into the fall. I do now have a real respect for the engineering that goes into designing field radios, especially those that are thrown into a pack!
Setting up a portable shack on Vail Pass in the White River NF in Colorado (US-4410). This was near the end of the trip, the plastic case was looking pretty bad.
After I began feeling less anxious about the homebrew radio (it kept turning on!) I could start focusing on the trip itself: an amazing POTA adventure with an often-uncooperative sun. Here’s a few themes I noted. Continue reading WN5C: Notes from a homebrew POTA adventure→
Many thanks to Scott (VO1DR) who shares the following guest post:
Coffee, Cobblestones and Contacts – Portable in Portugal
by Scott Schillereff, (VO1DR), St. John’s, NL, Canada
On a recent trip throughout Portugal (May 29 – June 12), I operated /P QRP CW at five locations, with varying success. Here are some details and pictures that you might find interesting.
Portugal and /P sites
Figure 1 shows a map of Portugal and the five locations where I operated. On this trip, we were on the move a lot, so radio was tucked in here and there when I found some free time.
Figure 1 – Portugal and operating locations. 1 Lisbon, 2 Faro (Algarve region), 3 Foz do Duoro (near Porto), 4 Funchal (Madeira island; off coast of Morocco), 5 Monte Estoril (coast west of Lisbon).
QRP gear
I was packing the following gear in a small compartmented zip bag:
ATS-V5 CW transceiver for 15, 12, and 10 m (small-run kit from Steve Weber, KD1JV; fits into lid-less Altoids tin). My max P(out) was 1.7 W on 15 m rising to 2.3 W on 10 m.
Homebrew whip antenna system. 2.54 m telescoping whip on top of a 2 m camera monopod; raised radial (coiled up to preset lengths to resonate on each band); no ATU; directly wired via 5 m of RG174 coax to choke at rig.
Homebrew common mode choke – RG174 coax threaded through five FT37-43 toroids and coiled around a larger unknown ferrite core (scavenged from TV).
Homebrew resistive SWR bridge – common design to null out an LED at low SWR; max tuning SWR 2:1; switchable in and out of Tx circuit; direct BNC connector to rig
30,000 mA-hr Lithium-ion battery– car jump-starter; lightweight (284 g); 15V and 5V no-load outputs; 15V output through voltage controller to rig. One charge did entire trip.
Homebrew Voltage Controller – simple design based on LM317T regulator and small V-A display (see article in SPRAT #195, p.24). Vin max 40V; Vout 1.2-37V; Iout up to 1.5A.
Homebrew single paddle key, made with popsicle stick inside a plastic screw-top vial.
I chose a whip- versus a wire-based antenna system because I anticipated setups on hotel balconies, beaches or in city parks, not “off in the woods”. Wire antennas are certainly more portable and could be taken in carry-on without worry, but might be more noticeable during setups in city parks. Wire antennas are also not much good on beaches or balconies (without distant anchor points). I wanted to be less conspicuous, and didn’t need to worry about weight.
Air travel with radio gear
I put all my QRP gear and antenna in my checked bag and had no trouble anywhere. I added a note in English and Portuguese stating that this was amateur radio gear for hobby use, and included a copy of my Canadian licence. I probably could have taken the works in carry-on, but I was a bit uncertain about the metal monopod and whip (might be perceived as a weapon) so I just checked it all.
1. Lisbon Old Town
Due to a *two-day* travel disruption on the way to Portugal (thanks to Air Canada at Toronto Pearson airport; another story), we only had one night in Lisbon. Our hotel was a four-storey concrete and steel building in a narrow street. Our 3rd storey room had two little balconies about 3 m apart, with metal rails. To test the waters, I mounted the monopod and whip on one balcony and tied off the radial to the other balcony. The antenna impedance match was fine but, either due to band conditions, night time, or metal in the buildings, all three bands (15-10 m) were dead. Not a single signal; not even the ghoulish drone of digital signals; a total bust. Not a great start, but things improved later – read on!
Figure 2- Tram on steep street in Lisbon Old Town, close to our hotel
2. Faro (Algarve Region)
We travelled by wonderful inter-city Portuguese train to Faro in the Algarve. Faro is a hub city in this sun-drenched and slow-moving southern region of Portugal; a region where everyone seems to be in second gear, and quite content there. Being a coastal city, I had hopes of good propagation. Our schedule meant I could only play radio at our hotel late one afternoon. I set up in a quiet corner of a concrete-walled, 2nd storey courtyard with an open roof. The top of the whip extended ~1 m above the concrete wall, but the radial was deployed entirely within the courtyard. An improvement on the air – I could hear a number of stations, mainly on 15 m, and worked LY2NK (Lithuania, 3,119 km). I was amazed at what 1.7 W and a whip antenna with a single raised radial could do!
Figure 3 – Walking street in Faro, 5 min from our hotel.Figure 4 – Boats at Ilha da Culatra, on day trip out of Faro
3. Porto and Foz do Duoro (“mouth of the Duoro”)
We travelled on a delightful high-speed train (complete with coffee and snacks trolley down the aisle!) up to Porto in the north of Portugal. Porto has a much different vibe than the Algarve. A more working-class, energetic, commercial feel, and steeped in the wine- and port-making industry along the picturesque Duoro River. The Duoro Valley is a huge viticulture region and, yes, they still stomp grapes with bare feet on harvest day (don’t worry – in the making of port, fortification with 60% alcohol (aguardente) abruptly stops sugar fermentation and kills every living microbe in the batch!).
One afternoon, we took a clattering electric tram from downtown Porto west to Foz do Duoro, a seaport town 6 km away where the Duoro R. empties into the Atlantic. After an espresso in an outdoor café, I set up the radio in a city park adjacent to the ocean – monopod lashed to a park bench and a radial tied off to a palm tree. Figure 5 shows my park bench set up with a sea wall and Atlantic in the distance. In QRP radio, as in real estate, “localização, localização, localização”! Conditions were great here and I worked these stations on 15 m: TM56JO (France; 1,087 km); HA0DD (Hungary; 2,476 km); OU5U (Denmark; 2,146 km); LY2PX (Lithuania, 2,903 km); and 9A2N (Croatia, 2,119 km). Very exciting! And, again, passers-by took no notice.
Figure 5 – Radio set up on park bench, Foz do Duoro, Portugal. View west to Atlantic Ocean in distance.Figure 6 – Detail of my radio set up. Clockwise from L to R: paddle key in clear plastic vial; blue floss container with volume control for ear buds; ATS-V5 rig (green cover) in bottom of Altoids tin; oltage controller in bright blue Altoids tin; Li-ion battery pack (black rectangle); common mode choke (red sleeve); resistive SWR bridge (silver top with LED). Zippered back for this gear is immediately to right. The whip collapses to about 14 in and fits inside the camera monopod for transport.
4. Madeira
Air travel is fairly cheap within Portugal, so we detoured to Madeira, an autonomous Portuguese island in the Atlantic ocean ~1,000 km southwest of Lisbon. The main city (Funchal) is about even with Casablanca on the Moroccan coast. Madeira is a very rugged volcanic island with its highest point (Pico Ruivo) 1,862 m (6,109 ft) above sea level. We were based in Funchal and toured around to see the sweeping vistas, mountain-scapes, and steep coastal cliffs. Continue reading VO1DR Portable in Portugal: Coffee, Cobblestones and Contacts!→
Field Day 2024 started out with the best of plans to be spent with the best of friends and ended up totally different – and, unexpectedly, I had a hoot! With my carefully made plan behind me, my new last-minute plan was to run solo for Field Day in the backcountry of Kananaskis Country and bring along my new-to-me Nikon D3400 and lenses and rekindle my interest in (D)SLR photography at the same time as doing some experimentation with radio gear.
I grew up in a home with a scratch-built enlarger and a darkroom, so a love of taking pictures has been with me for a long time. My Father taught me patience to get the shot as he would set up a 120 format bellows camera on an air-triggered remote release to get closeups of chipmunks while we were camping, a process that took hours and yielded excellent results. My Brother, AG7GM, has attempted to instill within me the basics of composition, rule of threes and such and his wonderful skill in editing both stills and live video. While I have plenty of patience, with composition I think I’m fair to middling at best.
Thus photography has always been on my mind.
With a recent sale of a few ham radio related items, I had fun money, so just for fun I started looking [on Thursday before I activated] at used DSLRs and was shocked at how much camera I can get for such a relatively low cost compared to new. I had said once, 25 years ago when I divested out my 35mm kit, that when I could get a DSLR with a 25 to 300mm lens for <$500 I’d jump in… and finally that day is here, even if it means carrying two lenses. Of course, I started looking on the day before Field Day for deals – and scored them too! 🙂 Around these parts, good quality pre-owned consumer grade DSLRs are easily available. I purchased this as much for still photography as for ability in shooting high-quality video for my YouTube channel.
These peaks form part of the border between Alberta and British Columbia to the west
For me, Field Day has always been about the experimentation rather than chasing points. Trying new things. Changing up from the normal way I operate in the field. Comparing, analyzing and making notes as I go.
For example, and as a tribute to Chip Margelli K7JA (SK) after corresponding with his brother David, last year I attempted to wet a piece of string and see if the KX3’s tuner would match it and radiate a signal. Chip was known for many things, among them his proficiency in CW as he demonstrated on The Tonight Show with Jay Leno in 2005. David told me that he and Chip would do crazy and fun experiments like loading up clotheslines and wet string to experiment .. and it fostered a new direction I could take each FD and on some days between. The string experiment was a failure last year but I haven’t given up yet!
I wanted to know, in no uncertain terms, that the Charmast would or wouldn’t be as quiet as my trusty Talentcell LiFePO4 pack. The Charmast is also used in my field soldering kit with a Pinecil as it delivers USB-C PD. What better way to test this out than to head as far away from noise sources as possible, see the Canadian Rockies in their early summer glory with snow on the peaks, rivers running high (and cold) and the sun in the sky? Just for grins I would ensure that I was in POTA entities while doing Field Day.
That Thursday morning, we organized a shelf-building party to assemble a shipment of new shelves we’re going to use to house our collection in a new space A-B Tech has given us on the third floor of the Elm building.
We’re super excited about the new space not only because it’s much larger, but there’s even a dedicated workbench where we can invite students and guests to learn some soldering and repair skills.
If you’re ever in the Asheville, North Carolina area, I’d strongly encourage you to check out the Asheville Radio Museum. Check our website for directions and hours.
We ended up working on the shelves for a couple of hours, and once assembled, I decided to grab lunch at Bridge & Tunnel Coffee in the Coman Student Activity Center next door. The food and coffee were absolutely amazing. A-B Tech students are so lucky to have a café of this caliber on campus!
I spent more time hanging with my friends at lunch than I had planned. No regrets there.
I knew there was still plenty of time to make my way to the Vance Historic Birthplace and fit in a POTA activation! Twenty minutes of driving later, and I was pulling into the Vance parking lot.
Zebulon B. Vance Birthplace (US-6856)
As I made my way around the visitor’s center, I was very pleased to see that the picnic shelter was unoccupied. School was still in session for many districts in the area and field trips tend to take place near the end of the term. Had there been a school group at this small historic site, I would have gone elsewhere to activate so as not to disturb them.
The weather was pretty amazing – the perfect day to be outdoors playing radio.
Speaking of radio, I brought a special one with me that day.
The Mission RGO One
As I mention in my activation video below, I receive more questions about this radio than any others I take to the field. Some have seen it in previous activation videos, and many see it in my QRPer.com banner rotation.
Typically, I’ll get a message with the following question, “Thomas, what is that cool radio with the white faceplate I see in the banner on QRPer?”
It’s no wonder I get a lot of questions about it. The Mission RGO One is a very low-production run modular transceiver – the creation of Boris Sapundzhiev (LZ2JR).
Boris produces the Mission RGO One in small batches at his facility in Bulgaria. This is very much a cottage industry radio – one you won’t find in many shacks or on Field Day because there just aren’t a lot out there (compared with Yaesu, Elecraft, Icom, etc.).
I’m a massive fan of the RGO One. So much so, that if I had to pare down my radio collection to only two HF transceivers, the RGO One would be one of those two.
I love the RGO One’s legacy design and the fact it’s a down-conversion superhet receiver with 9MHz IF. The receiver is absolutely amazing.
You don’t see the RGO One in many of my POTA videos mainly because I tend to use my smaller, portable radios in the field. That said, the RGO One was designed with field operating in mind – it’s a very capable radio and lightweight compared to other tabletop radios.
The RGO One is my main HF radio in the shack, so it actually gets heavy use. If I’ve ever hunted you at the QTH while you were activating a park or summit, it was likely with the Mission RGO One.
As I mention in the video, I will plan to make a “Getting To Know You” video with the RGO One in the near future, so I’ll speak a bit more about it then.
I decided to deploy my KM4CFT EFHW kit that I trimmed for 30 meters with a 40-meter extension. This antenna is brilliant because it resonates on 30 and 17 meters as a 30-meter EFHW, then if you link the 40-meter extension, it’ll give you 40, 20, 15, and 10 meters. That’s six bands on one antenna without the need for an ATU.
Next, I paired my Begali Traveler paddles with the RGO One.
Although the RGO One has a maximum output power of 50 or 55 watts, I had it set to my standard 5 watts QRP.
Gear
Note: All Amazon, CW Morse, ABR, Chelegance, eBay, and Radioddity links are affiliate links that support QRPer.com at no cost to you.
Being in the early afternoon, I decided to hop on 20 meters first, as I assumed it might be one of the more productive bands. Conditions – as we all know – have been quite rough as of late, so I tend to start my activation on the band where I think I’ll accumulate the most contacts. Continue reading On a POTA Mission with the RGO One!→
Many thanks to Lee (M0VKR) who shares the following field report and video:
Activating Lewesdon Hill with the Elecraft KH1
by Lee (M0VKR)
After taking a day off from work my wife Joanne and I pondered about what we could do. “Shall we go over to Dorset to that hill you have spoken about and take your new radio?” There is no need to ask me twice to get outside and activate so we were quickly packed.
The KH1 came as the Edgewood package, so everything is contained in its own pack, ready for moments just like this. I grabbed it off the shelf in the shack, along with a KX3 as backup.
Within 10 minutes we had our labradors Toby and Konnie in the car and set off on a new CW ham radio adventure to activate Lewesdon Hill in Dorset for a SOTA activation. It was mid-morning by this point and things looked promising for a perfect day of outdoor radio operation.
With my Elecraft KH1 and KX3 as a backup snugly packed, along with my trusty home brew antennas, we embarked on the journey. The drive was scenic, with the rolling hills of the Dorset countryside providing a beautiful backdrop, Traffic was light too – Perfect.
After 45 minutes or so we arrived at the base of Lewesdon Hill. I took a moment to appreciate the tranquility of the area, breathing in the fresh air. The only downside was no nearby carpark, so we parked the car in a layby making sure it wasn’t going to be in the way of any farm traffic.
Finding the right spot to set up was the first small challenge.
Lewesdon Hill is only 279 meters (915 feet) to the summit, not exactly a mountain but it is the highest point in Dorset. We set off up the concrete driveway to a local farm, then turned right through a gateway and began ascending. The ascent is marked as a footpath and is pretty much through woodland until you get to the summit. It is a relatively steep climb, and we stopped every so often to take in the expanding view of the countryside through the trees.
Joanne had completed a 10K run a few days before so was happy to stretch her legs.
We arrived at the summit in good time. I needed a location with good elevation and a clear view to maximize my reach.
After a brief walk 1KM’ish, Joanne found the perfect spot—a clearing with a panoramic view of the surrounding area and a fallen tree which made the perfect workstation. I could already feel the anticipation building as I began unpacking my gear.
Setting up the antenna is always a mix of art and science, but mostly just plain luck. Today, I was using my favourite home brew random wire, which had served me well in previous activations. I found a stone to act as a weight and tossed the wire into a tree on the first shot and with a few quick adjustments, it was up and ready. Next came the radios.
The Elecraft KH1 and KX3 are compact yet powerful, ideal for portable operations like this. Because the KH1 had been configured already at home and previous activations, I hit the tune button. It tuned the random wire within a second or so and I double checked the keyer speed and set it to 16 WPM. Luckily, there was good phone service, so I sent out a spot on the SOTA website and I was ready to start.
The band conditions were not exactly favourable, however the clear blue skies hinted at a good run. I powered up the KH1 and began calling CQ. A station in Northern Ireland came back instantly and exploded out of the speaker, at a lovely cadence. One by one, contacts started rolling in. Each successful connection was a small victory, a testament to the power of CW communication and the effectiveness of my setup and of course the superb performance of the Elecraft KH1.
The weather was kind, with a gentle breeze keeping things cool. Throughout the activation, I logged 4 contacts, each one a story in itself. Notable among them was a contact from my good friend Steve MW0SAW from across the Bristol Channel in Wales, a testament to the reach of my modest setup. Steve and I had been in the same CWOPS class last year, so it’s always great to get him on air, even though we speak most days on the phone.
By the end of the session, I had made 4 contacts. I was really satisfied and could have sat for longer working the bands but, content, we decided to pack up and go grab some lunch from the nearby bakery in the village of Beaminster. The KH1 had performed flawlessly, and the homebrew wire antenna had once again proven its worth and overall, it had been a successful activation.
Reflecting on the day’s achievements as we hiked back down, the sun now a little higher in the sky, I couldn’t help but feel a sense of accomplishment. Having just completed a 10 week comprehensive ICR course with CW innovations and being a relatively new CW operator, I was pleased that the contacts had come back at a predictable pace. This made copying the callsigns easy. As I complete more activations, I am finding each activation is a unique experience, and today with the Elecraft KH1 was no exception. We are looking forward to the next adventure, with new challenges and new stories to tell.
Back at home, I reviewed the logs and relived the day through the video footage I had been encouraged to make by my family and friends. For those who want to see the activation in action, you can check out this video on my YouTube channel:
73 and see you on the airwaves!
Lee (M0VKR)
Readers: Would you do me a favor and subscribe to Lee’s new YouTube channel? Lee kindly shared his field report at my request and this activation video was a first for his new channel. Let’s support him by giving his video a thumbs up and subscribing! Thanks for sharing your report, Lee! -Thomas (K4SWL)
Most readers of this blog are probably familiar with Bletchley Park and the significance of this place in breaking the codes used by the axis military forces during the second world war.
The electromechanical systems developed and used here to aid the codebreakers in their daily work led directly to the electronic digital computers of the mid-twentieth century, and then to the modern world as we know it.
After boarding the London Northwestern Railway at Euston station, the hour long train journey took us from central London, through the suburbs, then the pastoral English countryside to the station at Bletchley, just south of Milton Keynes.
Bletchley Park is a five minute walk from the train station at Bletchley, the town of the same name. In keeping with the formerly clandestine nature of the work at Bletchley Park, there are no loud signs to welcome you, just the Union Jack flying over the nondescript visitor center in Block C.
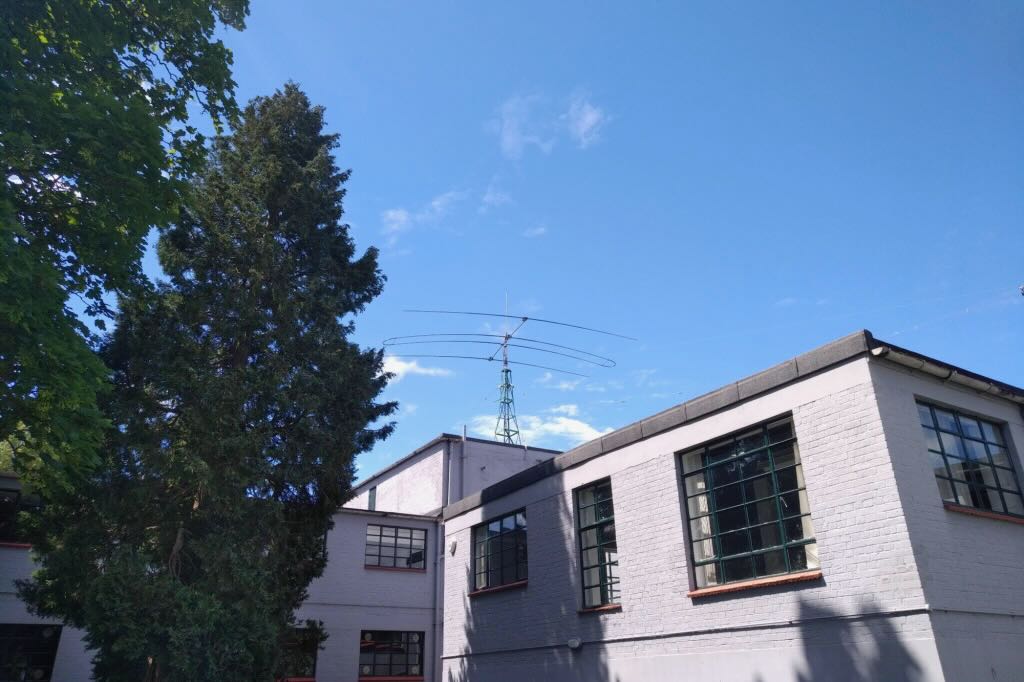
Exiting the visitor center, any ham will quickly spot the three-element SteppIR Yagi perched atop a roof-mounted tower. Also from the tower, a folded dipole extends over the the Block B building which houses the Alan Turing museum exhibits. The other end of this antenna farm is plugged into GB3RS, the amateur radio station for the National Radio Centre of the RSGB.
The friendly and helpful staff of amateurs at the NRC played a crucial role in my hoped-for plan of activating Bletchley Park for Parks On The Air.
Surprisingly, the POTA page for GB-0507 showed only a handful of activations of this iconic location. Seeing as this is a heritage site, I sent an email to the NRC about week before my visit asking for advice on how to be a welcome guest POTA operator.
Note, the NRC is colocated on the grounds of the museum but they are not a part of Bletchley Park. The NRC is a separate organization.
Martyn G0GMB, the Director of the NRC, kindly responded to my enquiry and informed me that individual amateur radio activity is not generally permitted on the grounds of Bletchley Park due to the number of visitors they receive and concerns about RF safety. This could explain the low number of activations.
The sharp eyed will spot the GB3RS beam across the pond.
Martyn suggested I could set up in the overflow car park few minutes walk down the road from the visitor center. While not on the grounds of Bletchley Park proper, the parking lot operation would still be in the spirit of POTA and would reasonably count as a valid activation location.
When I arrived at Bletchley Park on Friday afternoon, I was met by Mervyn G4KLE who was expecting me thanks to a note left by OM G0GMB. Mervyn asked where all my equipment was and I motioned to the pack on my back.
Because my radio and antenna was a low impact, minimal footprint QRP setup, I was told that I could make use of the picnic table just out the side door of the GB3RS shack, with my antenna setup just beside it. This dead-end spot was not on any of the paths frequented by park visitors and my antenna would not be easily visible.
The antenna is low profile
This was a much better arrangement than trying to activate from a car park without a car! I quickly deployed a GRA-GNT micro tripod with center spike pushed easily into the soft ground. The GRA-7350T loaded vertical and a set of short radials provided an SWR of 1.05 to 1.
I chose the QMX as a travel radio while in Britain because with it, the overall kit is very lightweight and compact. With the exception of the tripod the whole kit fits in my carry-on. The GRA-GNT antenna mounting kit has to fly in checked baggage due to several aggressive looking spikes that would certainly be flagged by airport security. Continue reading UK POTA Rain and Shine→
QRP radios, product announcements, reviews, news and more. Low power amateur radio fun!
Please support QRPer by adding us to your whitelist in your ad blocker. Ads are what helps us stay online. All of our ads are ham radio related--no junk, we promise! Thank you!

 The easiest option in the area (after a disastrous experience last year in DE-0156, the park in the town center hosting the fair) was DE-0766, the Seewald Landscape Reserve. It’s near the FRN airport (and thus not far from the fairgrounds), in a fully bucolic setting. A narrow road cuts through meadows, with footpaths and bike paths leading into a wooded area.
 We parked the car in one of these spots. It took only a moment to set up the vertical antenna in the field, but the presence of a swarm of mosquitoes as big as F-18 Hornets advised us to operate from inside the car to save our skin (literally).
 Andrea turned on the KX-3 (10 watts would be our fixed power for this trip), and the 14 MHz calls began. Right away, a very strong IZ3QFG Dario (just 380 km from us) answered, highlighting an unusually short skip.
 We logged 20 QSOs in 30 minutes… Many were from Italy (Spartaco from Grosseto at full scale, Mauro I1JQJ always active, and Beppe I1WKN a constant), with two “park to park” contacts. A classic for many OMs in the area, but also a great mood booster and a tasty appetizer for the next day… Continue reading Friedrichshafen: Christian and Andrea’s Multi-Country POTA Rove