Tag Archives: Guest Post

Guest Post: Combining POTA with an FBLA national competition road trip!

Many thanks to Doug (KO4WDE) for sharing the following guest post:


POTA and FBLA

by Doug (KO4WDE)

I have recently found myself fully immersed in the world of Future Business Leaders of America, as my wife is the chapter leader for the middle school where we teach.  She started the program with just a handful of kids, and they performed so well their first year that six students qualified for national competition in Atlanta, Georgia last year.

To save money, and help provide this experience, we loaded them in our camper and took to the road.  Fast forward to this year and they have continued to grow and develop to the point where they now have more than twenty four members!  Now here’s the cool part: they didn’t just grow, they have developed into a powerhouse of Kentucky’s FBLA. Of the twenty four members, fifteen placed either 1st, 2nd, or 3rd at the state level competitions and qualified for national competition in Orlando Florida this summer.  Of those fifteen, eleven went to Florida.

The costs for this trip were huge.  Fuel alone for the vehicles to get us there was nearly $1000, and lodging, registration fees, and food drove the cost per student to well above $1500 per student.   The students voted that they would not go unless they could all go.  So they hit their computers and applied for grants and scholarships.  They were successful in obtaining a local  grant for $3500 to cover their registration fees, and came up with a battle plan for fundraising as much as possible. They formed a team that would go out into the community and present to local business owners in efforts to gain sponsorships to help lower the cost of the trip.

Goal Achieved

To say that they were successful was an understatement.  The students were able to gain enough financial support to lower the cost of the trip to $300 each.  This includes opportunities for the kids, (some of whom have never been out of Kentucky) to see the ocean, and experience many attractions that Orlando has to offer including Universal Studios and downtown St. Augustine.

That Ocean experience is where POTA plays a part.  Our travel plan had us staying at Anastasia State Park (US-1832) for two nights.  A couple of the FBLA members attending are also members of the School’s radio club (KQ4CWT) and were looking forward to the club’s first POTA activation (although the ocean was far more fun for them).  I had not activated Florida  myself and was greatly looking  forward to the experience.

Traveling with fourteen people total, in two vehicles (a Nissan Armada, and a Honda Pilot) space is extremely limited so I started the process of streamlining several separate systems into one specific mission bag.

The Field Kit

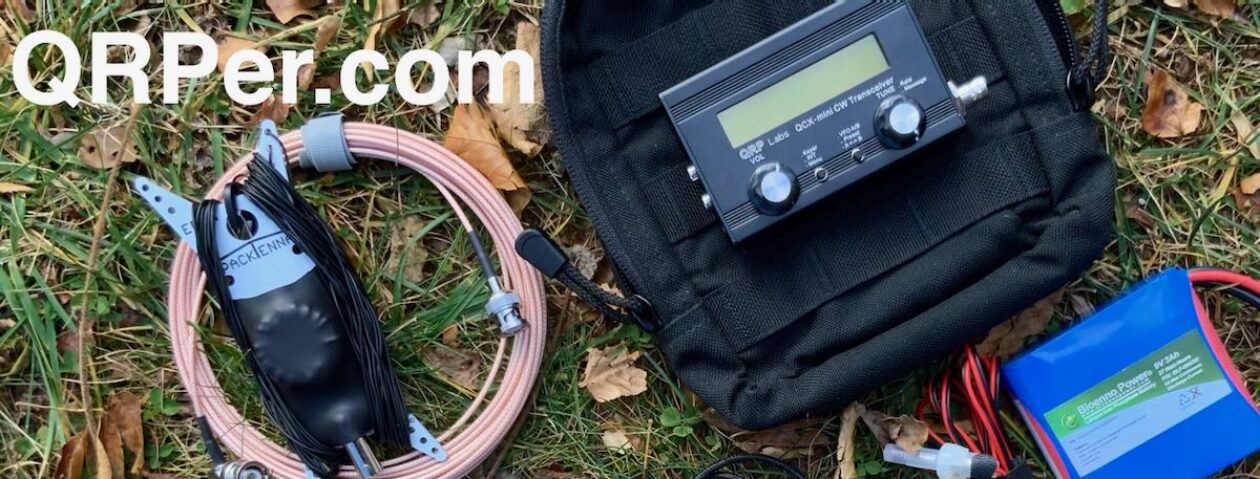
The host radio was my Xiegu G90 kit seen here combined with a small folding camp table and a Wolf River Coils vertical antenna to use on the beach.  My G90 kit is designed to be as simple possible for voice and digital modes, but it is completely based on using trees and wire antennas to get on the air, and picnic tables to operate from, so a few changes needed to be planned.

The nature of the beach itself is the most important change to plan for: no trees… no wire antennas.  I don’t own a mast, so the WRC needed to be in the kit.  Secondly, we would be on the beach for our planned activation, so I would need a small portable table to keep the gear out of the sand.  I chose a cheap amazon table [QRPer affiliate link] that is small enough to fold up into my host backpack (a maxpedition Riftcore) and sturdy enough to hold the G90 and my Evolve III laptop.  Preliminary testing on this little table was promising.

Testing the Amazon table

The Bioenno battery can wedge under the table while also supports lowering the center of gravity and freeing up the table top. The radio itself has lost the cooling stand as it was just too big and clunky for my go kit.  It now rests on a small laptop stand [affiliate link] that is suspiciously similar to the radioddity version for a quarter of the price.  I planned on sitting in the sand, under an umbrella using this little table to activate the park.

The Merging of the Bags

The G90 bag consists of the radio, battery, laptop, coax, power cables and adapters, stand, Digirig and backup wire antennas and tree line kit.  The coax has been replaced with RG-316 to save weight but the kit is essentially the same as seen in the article linked.

The Wolf river coil bag is an old camelback hydration pack.  It contains the SB-1000 coil, three legs, three radials, a 25 foot run of RG8X, and the whip.

The Riftcore has two main compartments and two secondary compartments. The front the main compartments consist of a large deep area in the back, and a slightly smaller and thinner area directly in front of that.  The main compartment holds the table top, the table frame, and the WRC system with just enough room to zip up.  The zippered pouch opposite holds the coax.

The main rift core compartment

The second compartment holds the radio, battery, stand, and ground coverings that double as padding and chargers, as well as the evolve III POTApotamus laptop.

The secondary rift core compartment

The front compartments hold the backup wire antenna, tree kit, power cables and Digirig.

The small outer rift core compartment

The kit, as planned, was much larger and heavier than the Redrock outdoors bag I’m used to carrying, but I thought it to be better since I would only have to keep up with one bag.  Especially since I would be carrying other beach gear out to the beach, and would have the kids with me.

Success All-Around

So how did it go? Success, and major FBLA success!

We arrived in St. Augustine around 7:00pm.  The boys and I setup camp, three tents.  A boys tent dubbed “Brozone Zero”, a girls tent “The She Shack”, and “Smalls” a small tent for my youngest daughter, my wife and me. The girls took the Armada into town to get pizza for dinner on the beach.

I usually RV camp, but when I do tent camp it’s in a Kelty.  Our little tent wasn’t a Kelty. We stayed in a Walmart special 3 man tent while the ladies enjoyed the Kelty tent.

When they arrived back, my wife laughed at our little tent and asked if it was like the magic one in Harry Potter.  Bigger on the inside.

It wasn’t.

The boys blowing up floats to use as mattresses in “brozone zero”
Pizza on the beach

The kit worked out better than I had planned. I was able to snag eleven SSB contacts between rain storms on the beach.  I was unable to sit down and really do an activation because of a change in plans. We planned to stay two nights but we canceled one and moved to the local Hilton to avoid tent camping storms the second night, so it was more of a “set up as fast as you can and get ten” type deal.

The table worked perfectly, although the beach wind blew my WRC vertical over.  Propagation was fair on 20 meters and I was able to get my last couple contacts via P2P hunting.  I was excited to add Florida to my list of activated states.

Admittedly, it was a fun challenge to setup and get those contacts as fast as possible and repack. I need to pack some flags for the radials in the future.

The camp table was perfect
Even with the feet of the WRC dug into the compacted sand the wind still managed to knock the system over

Once we left the beach for the hotel, radio time was over and I dedicated myself to the FBLA mission at hand. We spent five days competing and exploring Orlando. Our FBLA chapter performed very well overall and my daughter placed 2nd in the nation for her performance in the learning strategies competition.

My lovely wife was named the middle school chapter advisor of the year!  We had many, many more successes across the event but we will learn final scores in August.

My daughter winning 2nd place
The entire chapter before the closing ceremony party

This adventure was so much fun. It was very tiring, but worth every second of work to make it happen, and of course it’s always okay to sneak a little radio wherever you go.

73!

Doug (KO4WDE)

Construction Notes: VO1DR Monopod Antenna Mount

Many thanks to Scott (VO1DR) who shares the following guest post:


Construction Notes – VO1DR Antenna Mount for Camera Monopod

by Scott Schillereff,  VO1DR

Further to my article about radio during trip to Portugal, a number of readers asked for details on how I mounted my whip antenna system to my camera monopod for /P use.  Here are some photos and notes on this.

General notes:

  • This is a “straight-through” design.  Just direct connections from the BNC center pin to whip (via brass nut), and BNC housing to radial connector.
  • This is not a cook-book construction article, rather just a show-and-tell of how I built mine.  You can use what you have on hand to build something similar.
  • I suggest you start with your telescoping whip, so you know the size and threads for mounting bolt.
  • You could use any type of connector for the radial (wingnut, knurled nut, spade lug, alligator clip, whatever you like).  I prefer banana jacks since a) I can push in the radial banana plug fast, b) the plug is a weak release point (pulls apart if someone walks into the radial), and c) I can easily attach additional radial wires, if desired.
  • Use a strong case (metal clamshell or cast aluminum work well).  With the whip extended, there can be substantial forces (bending moment) from wind or handling. A tiny plastic case would be fractionally lighter but might fail.
  • For size, the one I used (25 x 25 x 50 mm; 1” x 1” x 2”) is about as small as I would go.  It needs to have a big enough footprint to sit firmly on a camera mount fitting.
  • Use high heat (e.g., Weller 100-140 W solder gun) when soldering the center pin wire to the brass whip mounting nut.  Solder the wire to the brass nut before you epoxy the nut.
  • I custom made the white plastic insulating bushing (where whip screws in). This was from a nearly-right bit from my junk box.  You can be creative here.  You could also epoxy on short piece of close-fitting, thick-walled PVC pipe around the outside of the whip mounting hole as a supporting sleeve to give some lateral support to whip when it is screwed in.
  • Dry-fit everything (before epoxying) to make sure nothing touches that shouldn’t and you can screw in the camera nut and whip fine.  Test proper continuity of center pin and radial connections to BNC fitting.  Once glued, there’s no going back!
  • For surfaces to be epoxied (metal nut sides and bottom, insides of mounting case), slightly roughen with sandpaper or jewellers file, then clean with isopropyl alcohol and Q-tip.  This will increase adhesion and strength.
  • Use good-quality, high-strength, long-cure epoxy (e.g., JB Weld), not el-cheapo 5-minute epoxy from the Dollar Store.  LET THE EPOXY COMPLETELY CURE BEFORE MESSING WITH IT!  Just walk away from it for a day… (your patience will be rewarded).

Figure 1 – VO1DR Antenna Mount, clamped onto top of monopod.  Coax goes to BNC on left; whip screws into top; raised radial connects by banana plug on right

Figure 2 – Antenna mount unclamped from top of monopod.  The black plastic fitting (at right, with wedge-shape) fits into slot on platform at top of monopod (at left) and clamps in with cam arm.  Large steel screw attaches wedge fitting to antenna mount case. Ruler shows scale of things.

Figure 3 – Antenna mount case (right) unscrewed from camera mount fitting.  Steel screw is standard camera mount size (1/4-20 thread size).  Black silicone cap keeps dust out of BNC connector.  If your camera mount does not have a detachable wedge fitting (like the one on the left), you would simply screw the camera mount screw directly into the bottom of the antenna mount case.

Figure 4 – Top of monopod dissembled to show (clockwise from top): black monopod tube with telescoping whip stored inside (stainless steel with 10 mm brass mounting bolt), antenna mount case, detachable camera mount fitting, and round top plate of monopod.  For my monopod, I had to remove one tiny screw and apply gentle torque to break a weak glue joint of this round piece on top of the monopod leg.  It remains a snug hand fit (no screw needed).

Figure 5 – Fully assembled whip antenna mount with wiring.  Radial (blue wire) with tie-off cord (yellow) at left; RG174 coax (5 m) at right.  Whip is only ever screwed in hand-tight.  Deploying in the field, I first tie off the monopod to something (park bench, picnic table, fence, tree), then screw the collapsed whip into the antenna mount and clamp mount on top of monopod, then plug in radial and tie the yellow cord off to something (straight out at 2 m height or slope down to ground anchor), and finally connect the coax to the rig.  When all in place, I carefully raise the whip (slowly, with two hands to reduce bending forces).  Take-down is all in reverse.

Figure 6 – Detail of antenna mount case.  Case is 50 mm x 25 mm x 25 mm aluminum clam shell box with square metal end plates.  These end plates are screwed in to hold the two halves together.  White plastic bushing provides additional lateral support for the whip when it is screwed in.  The bushing is glued to outside of case with CA (Krazy) glue.

Figure 7 – Inside of antenna mount case.  On left, a ¼-20 steel nut is epoxied to inside of case with strong JB Weld epoxy.  In main case, a 10 mm brass nut is epoxied to inside of case with an insulating washer beneath.  This brass nut connects to the whip and is “hot”, so must be insulated from the black aluminum case.  Yellow wire connects center of BNC to brass nut (soldered).  Black wire connects ground side of BNC to radial banana jack.  Use plenty of epoxy; there is a lot of force exerted on the steel and brass nuts.

Figure 8 – Detail of inside of case.  Note separation of banana jack solder post and edge of 10 mm brass nut.  Solder yellow wire to nut before epoxying in nut.

Hope you find this useful.  Just use what you have on hand and some ingenuity to make yours!

Best 72, Scott  VO1DR

Scott’s “Fun Harbour-Side POTA”

Many thanks to Scott (VA3EKR) who shares the following field report:


Apr. 15, 2024, Great Lakes Waterfront Trail Recreation Site (CA-6003)

by Scott (VA3EKR)

Decided to try the other side of the harbour for the activation, in Tannery Park.

For the setup, I picked a picnic table on the north side of Walker Street, as there were larger trees there.

This is the view of the harbour from the picnic table.

The bands were misbehaving, and interestingly, I have never experienced listening to the band go very quiet suddenly, due to the solar flare and the R1 radio blackout that resulted.

I used the trusty QRP-Guys random-wire antenna with 9:1 matching transformer.

Here is a map of the QSOs. The longest distance was to the Czech Republic, 6,970km away. I also pleased at getting some California QSOs, especially using only 10 watts. Three park-to-park QSOs. Orange markers indicate 20m, Turquoise represents 15m, and Red is 17m.

Screenshot

After the activation, I scouted the other side of the park. This is a fairly newly-renovated park, and so I was interested in seeing what they had done with it.

I met a new friend, Pierre, who is retired from IBM, and is very into astronomy. He showed me a very nice image of the sun with sun-spots. He even has a virtual-reality display that allows you to see the images! This was nice, as my recent viewing of the solar eclipse was a complete wash-out.

The Bronte Astronomy Group has public viewings, so I will have to monitor the Facebook page and go out some time to see some nice astronomy images!

The last thing I noticed is that the sculpture they put up, is rusty and tall.

I am hoping that next time I can bring an alligator-clip, a small counterpoise wire, and I can attempt to tune up this and use it as an absurd but fun antenna!

16th Floor QRP: Coffee break portable at the office

Many thanks to Bill (KG4FXG) who shares the following guest post:


Return to the Office:  Operating portable during coffee breaks (Atlanta to England)

by Bill Carter (KG4FXG)

Have you ever thought about operating from your work location?  Perhaps during lunch or a coffee break?  What if that location was downtown in a big city?

In my case, I work in a 17 floor Skyscraper.

The building has several large outside balconies on the 5th, 10th, and 17 floors.  There is also a green space on the 5th floor that is a grassy area with a lawn and trees.  What are all the possibilities here for portable operation? Let’s find out!

Amateur Radio is about learning, and to that end we may build antennas, perhaps QRP Rigs, and other things.  I’ve been building many QRPGuys and Tufteln antennas.  I also use a few that I’ve purchased, such as the Chelegance MC-750, AX1, Gabil Vertical Antenna GRA-7350TC [gear links below].

Sometimes, the weather does not play nice and I’m forced to try operating indoors.  Here I am using the Chelegance MC-750 on the 16th floor where I have clearance all the way to the top of the 17th floor.

The antenna almost touches the ceiling on the 17th floor.  I was able to make a contact in England: John G4RCG.  His location was in Kirkhamgate, Wakefield–about 11 miles from Leeds. We were able to exchange names but that was about it on 20M.

This antenna is amazing, I can’t wait to try it outside in our green space.

I was using the Elecraft KX2 but I have several QRP Rigs that I have brought to the office.  Such as the Norcal 40, Elecraft K1, both of which were kits I built.  I started QRP back in 1999 before there was POTA.  Back then, you had to build your radio.  Most did back then.

Learning about propagation has been interesting.  It is not ideal to operate indoors.  One simple way I test conditions is to see if I can hit the reverse beacon network.

Here’s a screenshot of the Reverse Beacon (below) while I was using the Chelegance MC-750 on 20 meters:

(Click to enlarge)

Simple Office Setup

I work for the railroad.  You will notice my mug says Taggart.  Some humor here, but that is from Ayn Rand’s Atlas Shrugged.  Story about a railroad and so much more.

Here is the Green Space on the 5th floor.  Could you use this space for portable operations?

Here is pictured where I operated off the 10th floor balcony.  The view is amazing!

For the balcony, I just throw a wire over the glass railing.  The balcony is huge with many tables and chairs for lunch.  I have used K4SWL’s Speaker Wire antenna build here.

My hours are very unusual.  I normally work from 2AM to 5PM and I leave to drive home at 11AM.  I love telecommuting for work these days.  So, when I operate, it is around 3AM or 4AM.  Not ideal times for POTA, but a great time of day to work DX!

I have so much more to try.  I have a Spiderbeam Pole and SOTABEAMS Pole that I am playing with as well.  I also have the Alex Loop Antenna that I will try from work.

Another operating position: here I am inside running RG-316 through the door to the 10th Floor Balcony.  I am using Thomas’s Speaker Wire antenna here.

One of the challenges that I face at 3AM is cold temperatures and wind.  There can be wind around these large buildings that can make operating difficult.  In cases of cold weather, I just opt for the little table and chair next to the door.  Besides, the coffee stays warmer longer inside!

New buildings make it very difficult if not impossible to get an RF signal out.  Getting an antenna outside is key.  And even then, that does not guarantee success.  The building’s corners have glass conference rooms.  You feel like you are outside, but I haven’t found a really good location for QRP.  That said, there are many more options to try.

Have you tried operating from your work location, perhaps at lunch?  Maybe as a POTA chaser?  What is your go-to method and set up?  Check out more of my shack on QRZ.

Bill KG4FXG

Gear:

Note: All Amazon, CW Morse, ABR, Chelegance, eBay, and Radioddity links are affiliate links that support QRPer.com at no cost to you.