Editor note – Please enjoy this guest post from Jeff Bourgeois VE7EFF.
Sometimes the elements just aren’t in my favor. I knew activating Echo Lake Provincial Park CA-3459 would be a propagation challenge. This POTA Park has never been fully activated before. Last year one operator attempted it and was only able to log four contacts. Today, I not only had mountains to contend with, but apparently significant solar storms in action as well.
What initially made this activation so challenging is that Echo Lake is located on a valley floor and that it is surrounded by mountains on almost all sides. I picked this particular spot to operate because it is the only location in the park that has a small window of opening to the South or South-South-East. I was hoping I could hit enough stations in the USA to make a successful activation of 10 contacts.
Echo Lakes is about a 2-hour drive NE from my home in Kelowna, BC, and about 45 minutes ESE of Lumby, BC. The last half-hour or so is on gravel roads. Now that we have arrived, my wife Alexis, VE7LXE, helps with unloading the gear,

This photo shows my narrow window of opportunity for southerly HF propagation. Mountains on the left, mountains on the right, and mountains behind me.

As you can see below, the eastern direction is mostly blocked by a mountain and SE is the direction where I typically have the best success of traversing the USA. I generally can’t rely on NVIS propagation; there just aren’t enough Canadian POTA chasers within NVIS range for me to make a successful activation.

Today, I’m using my recently acquired Chameleon CHA Porta-Mount to support the 34’ (really only ~ 32’) carbon fiber telescopic mast.
Once again, I’m also testing my homebrew coaxial sleeve dipole, now cut for the 17m band. I constructed it with RG-8X coax and terminated with a Fair Rite #31, 2.5” core as the RF block choke. My KX3 antenna tuner will take care of any SWR issues on all bands that I operate on.
Because I’m using a carbon fiber telescopic mast, I’ve previously noted that the mast has “significant” detuning effect on the antenna. Thus, I operate it as a slanted coaxial sleeve dipole. This moves the antenna away from much of the mast influence. The slant should also help with raising the propagation angle to hopefully clear the mountain tops (but not enough to make it NVIS).

The weather report was supposed to be mostly sunny. However, it turned out to be just the opposite and was cloudy, threatening to rain, and somewhat cold. It’s colder outside than I care for and the fact that it is threatening to rain, I decide to operate from inside my 2016 Subaru Forester. I only operate from inside my car when it isn’t viable to operate outside. Besides, I don’t want to risk getting wet today.
Now that my KX3 is fired-up and connected to the Bioenno 4.5 Ah battery and the antenna, I’m all set to see if anyone can hear me. I should mention that I’m operating at 10W today so I guess that disqualifies me as a QRP operator. 😊

Here is the play-by-play report:
I started calling CQ on 20m at 16:55 UTC (09:55 PDT). My first contact came 15 minutes later with KN7D in Utah. It took another 15 minutes to snag my next contact with WM2V in Arizona.
There’s not much happening for me on 20m, so I switch up to 17m. At 17:40 UTC I log N5RLH in NM. That’s it for 17m. Moving up to 15m, I snag a contact in NC with N4EX at 17:52. That was my only 15m contact of the day.
I went on to try 12m, 10m, and even 30m. Absolutely nothing over the next hour of calling CQ on those 3-bands. Back down to 20m. One contact with KE4KE in Minnesota. It took an hour and 15 minutes more to land just one more contact on 17m with KB6FPW/P in California at 21:00.
I’m definitely not breaking any speed records today. A tortoise could probably log more contacts than this.
Another hour passes until I land a contact with K0SX in Colorado on 20m. Suddenly, 20m picks-up steam and I land 4 more contacts on 20m – two in California and two in Colorado between 22:00 and 22:47. I’m almost at the end of the POTA UTC day for this park, but I’m determined to try to pick up more contacts before 00:00 UTC.
Last crack at 17m band. At 23:13 I land KJ7BS in Arizona. As my final contact of the UTC day, I snag KD7DUG in California at 23:15. I keep calling CQ for the next 45 minutes with no more results. It is now 00:00 UTC and the POTA day is over.
But something drives me on to keep calling CQ. I keep thinking propagation will get better.
At 00:05 I log my last contact of the day on 20m – a P2P QSO with AF0E in Colorado. I realize that this contact will have to go into the next day’s POTA log, but a contact is a contact. At the end of the day, I logged 13 valid POTA contacts, plus 1 into the next UTC day.

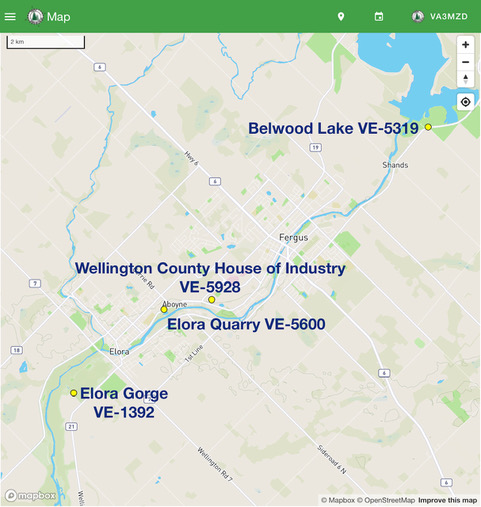
Tip: Click on the map for a larger image view.
The Contacts Map above does seem to confirm that my narrow corridor of propagation was primarily due-south or SSE – squeezing through the mountains opening. Some magic of propagation handed me North Carolina and Minnesota.
This is by far the hardest I’ve ever had to work to get sufficient contacts to activate a new park. I was determined to get this park activated, though. It took 7 hours of calling CQ to log 13 contacts. That’s a record 1.8 contacts/hour!
I don’t think the antenna is the real culprit for today’s weak results, especially considering that 6-days earlier I logged 68 contacts including 8 DX stations in Europe via Inonoaklin Provincial Park CA-3626 using this same antenna configuration. I wont get any awards for logging the most contacts per hour – but perhaps I qualify for an award for the least number of contacts per hour! They could call it the Snail Award. 😊
Between being surrounded by mountains and muffled by solar storms, it was a challenging day. Time to pack-up and make the 2-hour drive back home before it gets dark.
Equipment list:
Elecraft KX3 with internal antenna tuner
Elecraft KXPD2 paddle
Bioenno 4Ah battery
Gigaparts 32ft carbon fiber telescopic mast
Home brew ½ λ 17m experimental coaxial sleeve vertical dipole made with RG-8X and Fair Rite #31 2.5” core.
73 de Jeff, VE7EFF