Tag Archives: Scott (VO1DR)

Construction Notes: VO1DR Monopod Antenna Mount

Many thanks to Scott (VO1DR) who shares the following guest post:


Construction Notes – VO1DR Antenna Mount for Camera Monopod

by Scott Schillereff,  VO1DR

Further to my article about radio during trip to Portugal, a number of readers asked for details on how I mounted my whip antenna system to my camera monopod for /P use.  Here are some photos and notes on this.

General notes:

  • This is a “straight-through” design.  Just direct connections from the BNC center pin to whip (via brass nut), and BNC housing to radial connector.
  • This is not a cook-book construction article, rather just a show-and-tell of how I built mine.  You can use what you have on hand to build something similar.
  • I suggest you start with your telescoping whip, so you know the size and threads for mounting bolt.
  • You could use any type of connector for the radial (wingnut, knurled nut, spade lug, alligator clip, whatever you like).  I prefer banana jacks since a) I can push in the radial banana plug fast, b) the plug is a weak release point (pulls apart if someone walks into the radial), and c) I can easily attach additional radial wires, if desired.
  • Use a strong case (metal clamshell or cast aluminum work well).  With the whip extended, there can be substantial forces (bending moment) from wind or handling. A tiny plastic case would be fractionally lighter but might fail.
  • For size, the one I used (25 x 25 x 50 mm; 1” x 1” x 2”) is about as small as I would go.  It needs to have a big enough footprint to sit firmly on a camera mount fitting.
  • Use high heat (e.g., Weller 100-140 W solder gun) when soldering the center pin wire to the brass whip mounting nut.  Solder the wire to the brass nut before you epoxy the nut.
  • I custom made the white plastic insulating bushing (where whip screws in). This was from a nearly-right bit from my junk box.  You can be creative here.  You could also epoxy on short piece of close-fitting, thick-walled PVC pipe around the outside of the whip mounting hole as a supporting sleeve to give some lateral support to whip when it is screwed in.
  • Dry-fit everything (before epoxying) to make sure nothing touches that shouldn’t and you can screw in the camera nut and whip fine.  Test proper continuity of center pin and radial connections to BNC fitting.  Once glued, there’s no going back!
  • For surfaces to be epoxied (metal nut sides and bottom, insides of mounting case), slightly roughen with sandpaper or jewellers file, then clean with isopropyl alcohol and Q-tip.  This will increase adhesion and strength.
  • Use good-quality, high-strength, long-cure epoxy (e.g., JB Weld), not el-cheapo 5-minute epoxy from the Dollar Store.  LET THE EPOXY COMPLETELY CURE BEFORE MESSING WITH IT!  Just walk away from it for a day… (your patience will be rewarded).

Figure 1 – VO1DR Antenna Mount, clamped onto top of monopod.  Coax goes to BNC on left; whip screws into top; raised radial connects by banana plug on right

Figure 2 – Antenna mount unclamped from top of monopod.  The black plastic fitting (at right, with wedge-shape) fits into slot on platform at top of monopod (at left) and clamps in with cam arm.  Large steel screw attaches wedge fitting to antenna mount case. Ruler shows scale of things.

Figure 3 – Antenna mount case (right) unscrewed from camera mount fitting.  Steel screw is standard camera mount size (1/4-20 thread size).  Black silicone cap keeps dust out of BNC connector.  If your camera mount does not have a detachable wedge fitting (like the one on the left), you would simply screw the camera mount screw directly into the bottom of the antenna mount case.

Figure 4 – Top of monopod dissembled to show (clockwise from top): black monopod tube with telescoping whip stored inside (stainless steel with 10 mm brass mounting bolt), antenna mount case, detachable camera mount fitting, and round top plate of monopod.  For my monopod, I had to remove one tiny screw and apply gentle torque to break a weak glue joint of this round piece on top of the monopod leg.  It remains a snug hand fit (no screw needed).

Figure 5 – Fully assembled whip antenna mount with wiring.  Radial (blue wire) with tie-off cord (yellow) at left; RG174 coax (5 m) at right.  Whip is only ever screwed in hand-tight.  Deploying in the field, I first tie off the monopod to something (park bench, picnic table, fence, tree), then screw the collapsed whip into the antenna mount and clamp mount on top of monopod, then plug in radial and tie the yellow cord off to something (straight out at 2 m height or slope down to ground anchor), and finally connect the coax to the rig.  When all in place, I carefully raise the whip (slowly, with two hands to reduce bending forces).  Take-down is all in reverse.

Figure 6 – Detail of antenna mount case.  Case is 50 mm x 25 mm x 25 mm aluminum clam shell box with square metal end plates.  These end plates are screwed in to hold the two halves together.  White plastic bushing provides additional lateral support for the whip when it is screwed in.  The bushing is glued to outside of case with CA (Krazy) glue.

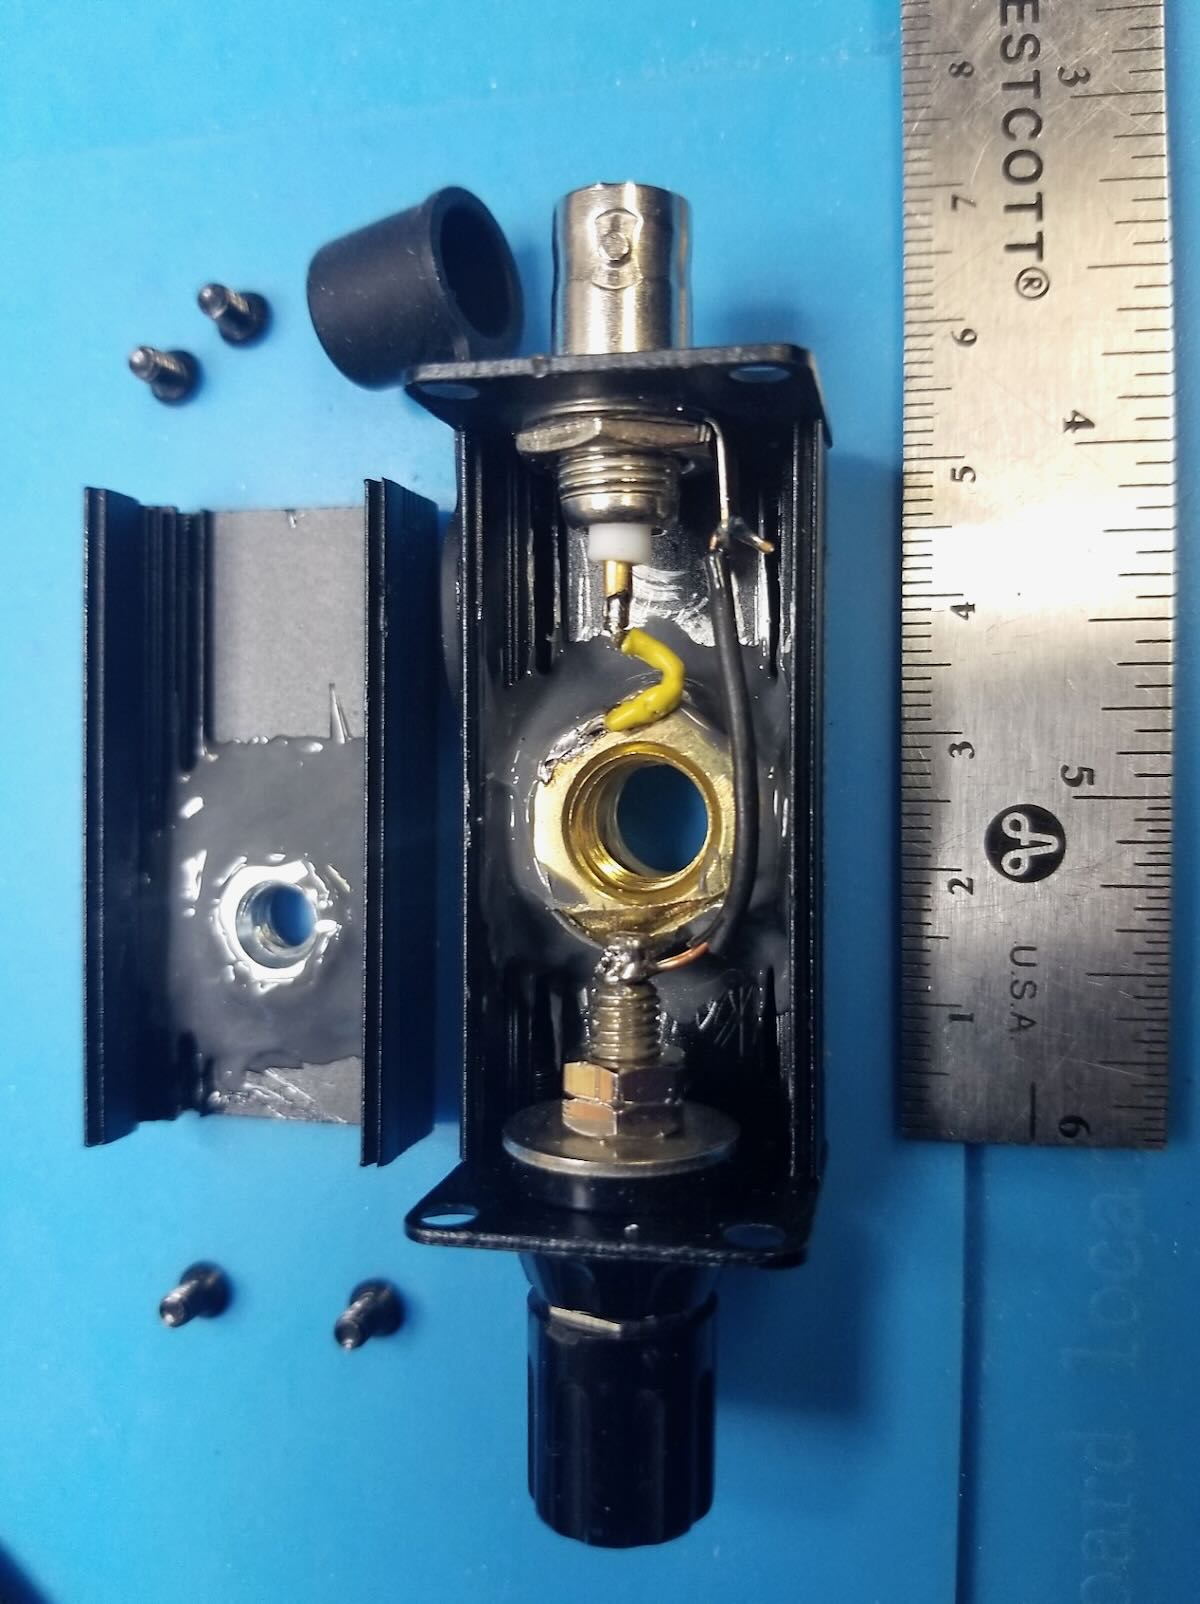
Figure 7 – Inside of antenna mount case.  On left, a ¼-20 steel nut is epoxied to inside of case with strong JB Weld epoxy.  In main case, a 10 mm brass nut is epoxied to inside of case with an insulating washer beneath.  This brass nut connects to the whip and is “hot”, so must be insulated from the black aluminum case.  Yellow wire connects center of BNC to brass nut (soldered).  Black wire connects ground side of BNC to radial banana jack.  Use plenty of epoxy; there is a lot of force exerted on the steel and brass nuts.

Figure 8 – Detail of inside of case.  Note separation of banana jack solder post and edge of 10 mm brass nut.  Solder yellow wire to nut before epoxying in nut.

Hope you find this useful.  Just use what you have on hand and some ingenuity to make yours!

Best 72, Scott  VO1DR

VO1DR Portable in Portugal: Coffee, Cobblestones and Contacts!

Many thanks to Scott (VO1DR) who shares the following guest post:


Coffee, Cobblestones and Contacts – Portable in Portugal

by Scott Schillereff, (VO1DR), St. John’s, NL, Canada

On a recent trip throughout Portugal (May 29 – June 12), I operated /P QRP CW at five locations, with varying success.  Here are some details and pictures that you might find interesting.

Portugal and /P sites

Figure 1 shows a map of Portugal and the five locations where I operated.  On this trip, we were on the move a lot, so radio was tucked in here and there when I found some free time.

Figure 1 – Portugal and operating locations. 1 Lisbon, 2 Faro (Algarve region), 3 Foz do Duoro (near Porto), 4 Funchal (Madeira island; off coast of Morocco), 5 Monte Estoril (coast west of Lisbon).

QRP gear

I was packing the following gear in a small compartmented zip bag:

  • ATS-V5 CW transceiver for 15, 12, and 10 m (small-run kit from Steve Weber, KD1JV; fits into lid-less Altoids tin).  My max P(out) was 1.7 W on 15 m rising to 2.3 W on 10 m.
  • Homebrew whip antenna system.  2.54 m telescoping whip on top of a 2 m camera monopod; raised radial (coiled up to preset lengths to resonate on each band); no ATU; directly wired via 5 m of RG174 coax to choke at rig.
  • Homebrew common mode choke – RG174 coax threaded through five FT37-43 toroids and coiled around a larger unknown ferrite core (scavenged from TV).
  • Homebrew resistive SWR bridge – common design to null out an LED at low SWR; max tuning SWR 2:1; switchable in and out of Tx circuit; direct BNC connector to rig
  • 30,000 mA-hr Lithium-ion battery– car jump-starter; lightweight (284 g); 15V and 5V no-load outputs; 15V output through voltage controller to rig.  One charge did entire trip.
  • Homebrew Voltage Controller – simple design based on LM317T regulator and small V-A display (see article in SPRAT #195, p.24).  Vin max 40V; Vout 1.2-37V; Iout up to 1.5A.
  • Homebrew single paddle key, made with popsicle stick inside a plastic screw-top vial.

I chose a whip- versus a wire-based antenna system because I anticipated setups on hotel balconies, beaches or in city parks, not “off in the woods”.  Wire antennas are certainly more portable and could be taken in carry-on without worry, but might be more noticeable during setups in city parks.  Wire antennas are also not much good on beaches or balconies (without distant anchor points).  I wanted to be less conspicuous, and didn’t need to worry about weight.

Air travel with radio gear

I put all my QRP gear and antenna in my checked bag and had no trouble anywhere.  I added a note in English and Portuguese stating that this was amateur radio gear for hobby use, and included a copy of my Canadian licence. I probably could have taken the works in carry-on, but I was a bit uncertain about the metal monopod and whip (might be perceived as a weapon) so I just checked it all.

1. Lisbon Old Town

Due to a *two-day* travel disruption on the way to Portugal (thanks to Air Canada at Toronto Pearson airport; another story), we only had one night in Lisbon. Our hotel was a four-storey concrete and steel building in a narrow street. Our 3rd storey room had two little balconies about 3 m apart, with metal rails. To test the waters, I mounted the monopod and whip on one balcony and tied off the radial to the other balcony. The antenna impedance match was fine but, either due to band conditions, night time, or metal in the buildings, all three bands (15-10 m) were dead. Not a single signal; not even the ghoulish drone of digital signals; a total bust. Not a great start, but things improved later – read on!

Figure 2- Tram on steep street in Lisbon Old Town, close to our hotel

2. Faro (Algarve Region)

We travelled by wonderful inter-city Portuguese train to Faro in the Algarve.  Faro is a hub city in this sun-drenched and slow-moving southern region of Portugal; a region where everyone seems to be in second gear, and quite content there. Being a coastal city, I had hopes of good propagation.  Our schedule meant I could only play radio at our hotel late one afternoon. I set up in a quiet corner of a concrete-walled, 2nd storey courtyard with an open roof.  The top of the whip extended ~1 m above the concrete wall, but the radial was deployed entirely within the courtyard.  An improvement on the air – I could hear a number of stations, mainly on 15 m, and worked LY2NK (Lithuania, 3,119 km).  I was amazed at what 1.7 W and a whip antenna with a single raised radial could do!

Figure 3 – Walking street in Faro, 5 min from our hotel.
Figure 4 – Boats at Ilha da Culatra, on day trip out of Faro

3. Porto and Foz do Duoro (“mouth of the Duoro”)

We travelled on a delightful high-speed train (complete with coffee and snacks trolley down the aisle!) up to Porto in the north of Portugal.  Porto has a much different vibe than the Algarve.  A more working-class, energetic, commercial feel, and steeped in the wine- and port-making industry along the picturesque Duoro River. The Duoro Valley is a huge viticulture region and, yes, they still stomp grapes with bare feet on harvest day (don’t worry – in the making of port, fortification with 60% alcohol (aguardente) abruptly stops sugar fermentation and kills every living microbe in the batch!).

One afternoon, we took a clattering electric tram from downtown Porto west to Foz do Duoro, a seaport town 6 km away where the Duoro R. empties into the Atlantic.  After an espresso in an outdoor café, I set up the radio in a city park adjacent to the ocean – monopod lashed to a park bench and a radial tied off to a palm tree.  Figure 5 shows my park bench set up with a sea wall and Atlantic in the distance.  In QRP radio, as in real estate, “localização, localização, localização”!  Conditions were great here and I worked these stations on 15 m:  TM56JO (France; 1,087 km); HA0DD (Hungary; 2,476 km); OU5U (Denmark; 2,146 km); LY2PX (Lithuania, 2,903 km); and 9A2N (Croatia, 2,119 km).  Very exciting! And, again, passers-by  took no notice.

Figure 5 – Radio set up on park bench, Foz do Duoro, Portugal. View west to Atlantic Ocean in distance.
Figure 6 – Detail of my radio set up. Clockwise from L to R: paddle key in clear plastic vial; blue floss container with volume control for ear buds; ATS-V5 rig (green cover) in bottom of Altoids tin; oltage controller in bright blue Altoids tin; Li-ion battery pack (black rectangle); common mode choke (red sleeve); resistive SWR bridge (silver top with LED). Zippered back for this gear is immediately to right. The whip collapses to about 14 in and fits inside the camera monopod for transport.

4. Madeira

Air travel is fairly cheap within Portugal, so we detoured to Madeira, an autonomous Portuguese island in the Atlantic ocean ~1,000 km southwest of Lisbon.  The main city (Funchal) is about even with Casablanca on the Moroccan coast.  Madeira is a very rugged volcanic island with its highest point (Pico Ruivo) 1,862 m (6,109 ft) above sea level.  We were based in Funchal and toured around to see the sweeping vistas, mountain-scapes, and steep coastal cliffs. Continue reading VO1DR Portable in Portugal: Coffee, Cobblestones and Contacts!

Guest Post: The Full Moon, Eels, and /P Operation on Mount Peyton, NL, Canada

VO1DR on top of Mount Peyton

Guest Post: The Full Moon, Eels, and /P Operation on Mount Peyton, NL, Canada

by Scott (VO1DR)

Introduction

I have been eyeing Mount Peyton in central Newfoundland for years as an attractive spot for /P HF operation.  Even before my radio adventure to Mount Sylvester (reported earlier in QRPer.com), I have been seeking a way to get up Mount Peyton.  Like Mount Sylvester, Mount Peyton is an inselberg of granite protruding above the glacial plain of central Newfoundland.  However, Mount Peyton is even larger and higher; an elongated ridge about 800 m long reaching up to 487 m (1,599 ft) above sea level.  For SOTA enthusiasts, it is designated VO1-CE-005, multiplier 4.

Figures 1 and 2 show the location local topography around Mount Peyton.

Figure 1 – Highway map of central Newfoundland showing Mount Peyton and landmarks
Figure 2 – 1:50,000 scale map I used during trip showing topography near Mount Peyton and our hiking route.  Each block is 1 km on a side.

Mount Peyton is a case of “so near and yet so far”.  Just west of Gander, this ridge is visible in the distance south of the Trans-Canada Highway (the main arterial highway traversing the island of Newfoundland).  However, in summer there is no trail directly to the top, and access to its base is only via rough ATV tracks and wet bogs.  One must get to the base of the mountain, then hike overland to the south side and climb a long inclined cleft in the hillside to the top.  This cleft is the surface trace of a fault in the underlying granite (see route on Figure 2).  By contrast in winter, Mount Peyton is a popular and readily accessible snowmobile destination with dozens of machines roaring up this same cleft on a thick blanket of snow.

The Full Moon and Eels

Looking at maps and Google Earth, an approach on foot would entail a three-day hiking trip.  While this sounds delightful, my current living situation would not permit this, and in addition I have no hiking buddies able and willing to make such a commitment.  So, it became clear I needed all-terrain vehicles (ATVs) to get quickly to the base, so we could do the entire trip in one long day.

I don’t own an ATV and after multiple attempts over this summer to find any ATVers interested in such an adventure, there were no takers.  Apparently ATVers like to ride, but don’t like to get off their machines ?. I finally found a local outfitter (Paul) who not only could supply ATVs, but had hiked multiple times to the top of Mount Peyton – a perfect fit.  For safety, I needed at least one extra person to go to the top.  All other potential radio or hiking companions fell by the wayside for various reasons, so it became just me and Paul.

As is common in rural Newfoundland, Paul is a Jack of all trades and is also a commercial eel fisherman.  American Eels (Anguilla rostrata) have a fascinating life history (https://en.wikipedia.org/wiki/American_eel) and inhabit freshwater rivers and streams in Newfoundland.  Paul harvests them in conical net traps anchored to the stream bottom (Figure 3).

Figure 3 – An eel trap in place in a local stream.  Eels move into the large mouth and get trapped in the bottom cage.

He told me that eels run during the new moon and stay put near the full moon.  Now doesn’t that ring deep bass notes of evolutionary biology!?  Since eel fishing is an important part of Paul’s income, we agreed to fit in my radio around his eel-catching.  He would be available around the full moon when the eels were sluggish; toward the end of September, the moon was full on the 29th.  Given the local weather, we settled on Tuesday, September 26 as our day.  Isn’t life fascinating – the moon controls eel movement, which controls human movement, which controls our /P radio expedition!

Getting There was Half the Fun

I drove from St. John’s to Paul’s cabin west of Glenwood, NL on the afternoon of Sep 25, on the beautiful shores of Indian Arm Pond (Figures 4 and 5).

Figure 4 – Paul’s cabin on Indian Arm Pond
Figure 5 – Shoreline of Indian Arm Pond

We planned an early departure on the ATVs.  Sun-up was around 7 am and sun-down was about 7 pm, so we had 12 hrs of daylight to work with.  September 26 dawned bright and clear (Figure 6) and we were soon packed and underway on two ATVs (Figure 7).  We drove for over 2 hrs on a wide range of roads, tracks, and rough trails to a point where we dropped the ATVs and started hiking (one way distance 26.7 km or 16.6 mi).

Figure 6 – Dawn over Indian Arm Pond on September 26.  Time to get moving!
Figure 7 – Scott on Polaris 450 ATV ready to go.  Black lumbar pack on right.  Blue survival bag on left.  Pole strapped on my left.  Radio and spare water in elbow compartments.
Figure 8 – Turtles are huge in Newfoundland
Figure 9 – Passing over beautiful Neyles Brook.  This is quintessential central Newfoundland scenery.
Figure 10 – Magnificent Mount Peyton looms in the distance.  This view is toward the nearly-vertical NW face.  We are about half-way there.  After dropping the ATVs, we will hike around the right end and climb up the far (SE) side.

This trip reinforced that I am not a motor sports guy.  The ATV ride was long, bone-jarring, and noisy.  Buying an ATV at great expense and doing this for “fun” is a mystery to me; and forget about seeing any wildlife.  But, hey, the ATVs got us there; we couldn’t have done this trip without them! Continue reading Guest Post: The Full Moon, Eels, and /P Operation on Mount Peyton, NL, Canada

Part 2 – Kite Operation: VO1DR Goes QRP Portable in Central Newfoundland via Float Plane

Many thanks to Scott (VO1DR) who shares the following guest post:


Portable/Kite QRP Operation in Central Newfoundland Wilderness by Float Plane: Part 2 – Radio Gear and Portable/Kite Operation

by Scott Schillereff, VO1DR

Introduction

This is Part 2 of a two-part story of a portable QRP adventure with a kite antenna at Mount Sylvester in the Bay du Nord Wilderness Area in central Newfoundland by float plane.

Part 1 described the setting, history, geology, access, and outdoor/survival gear.

Part 2 here describes radio stuff and some dramas with kite antenna operation.  I hope you enjoy reading this.

Radio Gear

Given that our hike up Mount Sylvester would be relatively easy (about half an hour up a gentle bedrock slope), I chose to bring a fair bit of radio gear with lots of backups.

Figure 1 – My gear in porch.  L to R: survival bag and day pack (described in Part 1), haversack with radio gear and kite (orange bag), and plastic ammo box (for IC705).  Our Havanese dog Chico was overseeing packing.
Figure 2 – Haversack (originally a free gift to mother-in-law; now pressed into radio service).
Figure 3 – Contents of Radio bag
Figure 4 – End-fed wire antennas (HB9EAJ designs; Standard (on winder), and Compact (coiled)).  The Standard has a 56:1 coupler (white barrel) and in-line latching band switch (black tape).  Zip bag is a GODSPC (good ol’ Dollar Store pencil case).  Wire is AWG24 speaker wire.
Figure 5 – 5.8 m (19 ft) telescoping fibreglass pole (repurposed from a discarded bird-scaring mast found by a nearby school); collapsed, it doubles as my 1.4 m (4. 5 ft) walking stick.  Yellow 1.5 m (5 ft) rope is for tying off to a support (e.g., picnic table) and forms a grip for walking.
Figure 6 – Detail at top of pole.  Top fitting is from a broken fishing rod.  I added a homemade pulley and split sheave (easy to insert and remove antenna wire).
Figure 7 – Detail of bottom of pole.  Black ABS plumbing fitting (plug) fits snugly over base of pole and is tack-glued with cyano-acrylate glue (can be be forced apart if needed).  Hiking/achor tip is a filed down 6 mm (1/4 in) steel bolt threaded and glued into plug from inside.
Figure 8 – DIY guy rope system for pole.  Stakes are 18 cm/7 in aluminum gutter nails (excellent tent pegs).  Red ring is made from the top of a pill bottle that snugly fits over top of pole.  Stakes are driven equi-distantly around the pole and tightened with 2.5 mm nylon cordage for rigid support.  Tip: I tied the guy cords with fixed knots (Constrictor Knot) at the stake heads and moved the tensioning knots up near the ring – less bending over and I can reach them all!
Figure 9 – Back-up base-loaded whip antenna (DIY, modified from QRP Guys DS-1). I call it the “MiracleWhip” it works so well.  Too windy to deploy on this trip.  It all fits in a GODSPC.
Figure 10 – Nylon ground tarp 2 m x 2 m (6.5 x 6.5 ft).  DIY tarp/poncho based on a Russian plash palatka (design dates back to the 1700s).  Keeps me dry when sitting on damp ground; many survival uses too.
Figure 11 – Rite In The Rain notebook  #363.  Waterproof, lays flat, pencil fits in spirals.
Figure 12 – Plastic ammo box for IC705 and my ATU.  For this trip, I just looped a nylon strap through handle for carrying.  I’ve since made a sling attached to both the hinge end and clasp end (more stable).
Figure 13 – Ammo box open. IC-705 (in WindCamp exo-skeleton) is in blue bag snug in bottom.  ICOM mic on right.  ZM-4 style ATU in red bag (a cut-down GODSPC).
Figure 14 – Detail of ATU.  I built this modified from QRP Project ZM-4 ATU design to fit in an Altoids tin.  I have submitted an article on this build to Sprat journal of G-QRP club.

The Kite

A common kite style used for antennas is a sled kite.  Rigid sled designs maintain their flying shape with struts, while soft sled designs use a rigid air-filled tube (tapering Venturi tube) to maintain flying shape. Continue reading Part 2 – Kite Operation: VO1DR Goes QRP Portable in Central Newfoundland via Float Plane

Part 1 – Getting There: VO1DR Goes QRP Portable in Central Newfoundland via Float Plane

Many thanks to Scott (VO1DR) who shares the following guest post:


Portable/Kite QRP Operation in Central Newfoundland Wilderness by Float Plane: Part 1 – Gearing Up and Getting There

by Scott Schillereff, VO1DR

Introduction

I love getting out in the woods and wilds in Newfoundland for portable QRP operation.  Lately, I have been trying kite-borne antennas.  This is a two-part story of a portable QRP adventure with a kite antenna at Mount Sylvester in the Bay du Nord Wilderness Area in central Newfoundland by float plane.  Part 1 describes the setting, history, geology, access, and outdoor/survival gear.  Part 2 describes radio stuff and some dramas with getting a kite antenna aloft.

It is useful to describe the island of Newfoundland setting, since it is unique in North America.  You can think of Newfoundland as a wild cousin of Nova Scotia – many similarities, but worlds apart.  If you want to play radio in a well-developed, refined setting (where giant manicured lawns are a thing), then Nova Scotia is for you; if you want a wilder adventure with some risk and less people, come to Newfoundland and Labrador.

Central Newfoundland Setting

I live in St. John’s, the capital of the eastern-most Canadian province of Newfoundland and Labrador (NL), situated about equidistant between Boston and Ireland (Figure 1).  This means QRP contacts to western Europe are as easy as those to eastern North America.

The island of Newfoundland is about the size of England but, with an island-portion population of only 479,105, we have less than 1/100th of the people in England.  There is a lot of empty space here!  Most of the people live in small towns and communities scattered along the coasts, originally to pursue various fisheries.

The principal highway (Trans-Canada Highway; Highway 1 on Figure 2) traverses an arc around the northern and western part of the island.  The central area of Newfoundland is a vast sparsely-populated area, historically used by indigenous groups for hunting, fishing and gathering, and, since European contact and later occupation, mostly for logging, mining, recreation, and hydro power projects.

Figure 1 – Location of Newfoundland and Labrador

The Bay du Nord Wilderness Reserve and Mount Sylvester

The Bay du Nord Wilderness Reserve in southern Central Newfoundland (large green patch in Figure 2) was established by the Province in 1986, primarily to protect the Middle Ridge woodland caribou herd – the largest herd in the island of NL.  This 2,895 km2 reserve includes ponds, rivers, bogs and fens, and forests, and is the last major unspoiled area on the island.  There are no facilities, amenities, trail markers, or public buildings – just wilderness.  This inland area has a cultural history of use by the Mi’kmaq indigenous peoples since the 18th century.  The area was first described by European explorer (William Cormack) after his trans-island trek of 1822.  Geologist James Howley was the first known person to travel the full length of the Bay du Nord River in 1887.  A cairn he built atop Mount Sylvester as a surveying marker still stands today (see below).

Figure 2 – Eastern and Central Newfoundland showing Mount Sylvester within the Bay du Nord Wilderness Reserve.  Also showing the capital St. John’s (east edge) and Gander (north-northeast), where we started our flight.

Mount Sylvester (Figures 3 and 4) is an inselberg (German: island mountain) created by weathering and glaciation with top elevation of 365 m (1,198 ft) above sea level, and rising 154 m (505 ft) above the adjacent flat glaciated terrain (for more stats search: peakvisor.com).  It was named after Sylvester Joe, a Mi’kmaq hunter and guide hired by Cormack for his travels.  The yellow arrows on Figure 4 point to Howley’s cairn (about 2.5 m high) at the top, and huge fluted glacial scours along the sides and flanks.

Figure 3 – View of Mount Sylvester looking south
Figure 4 – View of Mount Sylvester looking west, showing Howley’s cairn at the top and fluted glaciated scours along the flanks

Getting There

Mount Sylvester lies immediately adjacent to Diamond Lake, with a gentle glaciated bedrock slope to the summit.  A perfect spot to land a float plane and walk to the top for a QRP adventure!

My companion Kerry, a distant relation in Gander, NL, owns a float plane and for years has been interested to land on Diamond Lake and walk to the top – but never had a second person to go (for safety).  We were a match made in heaven!  My wife and I and our two Havanese doggies drove our motor home to Gander (about 4 hr drive) and Kerry and I geared up for the flight and hike on June 24, 2023.

As luck would have it, hundreds of forest fires were (and are) burning in eastern Canada.  Smoke from those fires has drifted over eastern Canada and most of NL producing a tan haze that can block out the full sun (Figure 5) and reduce visibility for flying.  Since Kerry is only certified for Visual Flight Rules (VFR) flying, it was touch-and-go whether we could fly at all.

Figure 5 – Forest fire smoke haze blocking sun, Gander, NL – June 23, 2023

On the morning of June 24, bright and early, we tried anyway.  The smoke had shifted to form a layer above 1,500 ft altitude, but we could safely fly under it at 500-750 ft altitude.  We were good to go!  Kerry’s plane (C-FAVG) was the venerable Cessna 172 Skyhawk (Figure 6), among the most common small aircraft on earth.  The C-FAVG airframe was produced in the 1970s and has been upgraded and certified ever since.

We drove to his float plane dock at Deadman’s Pond adjacent to Gander airport (this airport was the site of the massive commercial aircraft landings during 9/11/2001; the basis for the Come From Away musical).  Kerry assured me not to worry about the name of the pond…

Figure 6 – Cessna 172 Skyhawk C-FAVG
Figure 7 – Kerry fuelling wing tanks (takes 38 US gal of AVGAS; gives about 6 hrs of flying)

We took off just before 9 am and headed south for about an hour’s flight to Diamond Lake.  Kerry checked in with Gander Tower and within half an hour, we were out of direct VHF contact.  Our communications were by VHF with other planes, or our cell phones (they worked great all day, even on top of Mount Sylvester).

Figure 8 – Pilot Kerry in his happy place during take-off.  Regarding small planes, he said: “Everyone should have one”.
Figure 9 – Me in the plane (at 1.98 m or 6’6”, I barely fit in this dual-controls plane!)
Figure 10 – Typical view in central Newfoundland – a vast glaciated terrain of boreal forest, ponds, and wetlands.  The white patterns in the bogs are reflections of the sky on pools of water at surface.  One cannot (easily or dryly) walk across such bogs, you must skirt around them.
Figure 11- Woodland Caribou on heathery barrens (small ones are new-born calves)
Figure 12 – Larger herd of caribou (expand photo to see calves).
Figure 13 – Caribou on barrens with lurking black bear (circle at right). He will take advantage of a new-born calf in the natural order of things.

Geology

As a geologist, I am fascinated on why Mount Sylvester exists and its interesting geological features.  First of all, the ENTIRE mountain was covered with glacial ice during last ice age (Wisconsinan-Age glaciation ending about 11,000 years ago).  A small continental ice sheet covered the island of Newfoundland, and radiated out toward lower sea levels.  Figures 3 and 4 show the smooth, fluted flanks of the inselberg created by the grinding passage of ice laden with rock blocks and fragments (Nature’s ultimate sandpaper). Continue reading Part 1 – Getting There: VO1DR Goes QRP Portable in Central Newfoundland via Float Plane

VO1DR’s Cheap and Bomb-Proof Field Package for the Icom IC-705

Many thanks to Scott (VO1DR) who shares the following guest post:


Cheap and Bomb-Proof Field Package for the IC-705

By Scott Schillereff (VO1DR)

St. John’s, NL, Canada     

Since getting my novice ticket in 1970 (WB9CXN) under the watchful direction of Charles “Rock”  Rockey, W9SCH (SK), I have been a dyed-in-the-cloth homebrewer and QRPer.  My one and only commercial rig before this year was a Ten Tec PM-3 I bought with paper-route money in 1971 (still have it).  Fast-forward to today.  I now live in Newfoundland, and Europe is as close as Georgia.  I continue to build my station components and antennas.  A recent sea-change though – I inherited some money and decided to splash out on a for-life rig that would serve well in the shack and on the road (RV or hiking).  After researching options, I settled on the ICOM IC-705.  A fantastic performer; a receiver like I’ve never heard before; more bells and whistles than I could dream of, and a form-factor like a….. delicate, expensive brick!

The 705 is not a sleek, trail-friendly radio.  It’s on the heavy side and, well…awkward to pick up!  But, man, what a radio!  So, my first step was to buy a Windcamp ARK-705 exoskeleton.  This protects the rig on all sides and gives you something to grab onto.  I don’t mind the weight and size; I want this rig to be working in 25 years.

My operating interests are home use, mobile in my 25 ft motor home, and portable on day hikes.  I’m new to POTA and SOTA but maybe that’s next, thanks to you, Thomas!

I’m genetically wired not to buy the luxury ICOM backpack; I prefer to build my own and integrate with my hiking gear.  With that in mind, I would like to share my field package system to move the 705 around safely with little risk of damage.  Also some other homebrew portable gear. Continue reading VO1DR’s Cheap and Bomb-Proof Field Package for the Icom IC-705