Category Archives: Videos

Carolina Beach State Park: A QRP Oasis Amidst the Summer Heat and Activities

Tuesday, July 9, 2024, was a very radio-active day!

I was in Wilmington, North Carolina, and that morning, I had the privilege of activating the Battleship North Carolina from inside the battleship. Click here to read the field report and watch the video.

In short? It was amazing and certainly a fabulous way to start the day.

We were in Wilmington because one of my daughters was attending a week-long program at NC State University, and the other was attending a similar program at UNC Wilmington.

That Tuesday afternoon, after dropping my daughter off on the campus of UNC Wilmington, my wife suggested we hit Carolina Beach State Park for a POTA activation. It didn’t take me a microsecond to agree to that plan!

Carolina Beach State Park (US-2722)

Carolina Beach State Park, located just south of Wilmington, is a unique spot full of natural wonders. The park covers over 760 acres of Pleasure Island, with diverse habitats ranging from the impressive 50-foot Sugarloaf Dune (which used to be used as a navigational aid) to the fascinating limesink ponds, each with its own special plant community.

The park is also home to the Venus flytrap, a rare carnivorous plant found only in a small part of the Carolinas. You can explore the park’s trails, winding through maritime forests and maybe even catching a glimpse of these fascinating plants in action. The park also has a marina for easy access to the Cape Fear River and the Intracoastal Waterway, making it a great spot for boating and fishing.

We arrived at the park a little before 4:00 PM local time. Had it not been so hot and humid, we would have hit one of the park’s trails before finding a spot to do POTA, but the weather being what it was, both of us were happy to spend time in the shade.

We pulled into the main picnic area and quickly found a spot to set up. As I pulled out my radio and camera gear, my wife, Heather, pulled out her travel watercolor kit, all packed in a Tom Bihn HLT1 (we’re a pack geek family!).

When Heather joins me on POTA activations, she almost always sets up somewhere and paints while I activate. I love the fact that we both enjoy the experience in different ways.

In fact, my buddy Steve (KC5F), who is also an avid POTA activator, performs almost all of his activations with his wife, who also paints while he activates. He told me that she likes a good couple of hours of painting, so he typically racks up a lot of contacts in that amount of time.

Setting Up

The first thing I did was set up my Thermacell mosquito repeller–it needs a few minutes to do its thing and clear out the mozzies. The model I carry, the “backpacker,” fits a standard backpacking stove canister. I’ve recommended this one to many other POTA ops who operate in areas with mosquitoes–so far, it’s never let me down!

Also, I want to send a big shout-out to Alanna (K4AAC) and Bob (K4RLC) for making this activation even more civilized.

After watching an activation earlier this year at Tuttle Educational State Forest, where I placed my KX2 and logbook on a wet and dirty picnic table–covered in pollen and other tree bits–Alanna ordered a blue Gingham picnic tablecloth and whisk and had it sent to me.

I’ve had this tablecloth packed in the go-box I keep in the Subaru, and this activation was the perfect time to put it to use because the table I chose needed cleaning!

Thanks, Bob and Alanna!

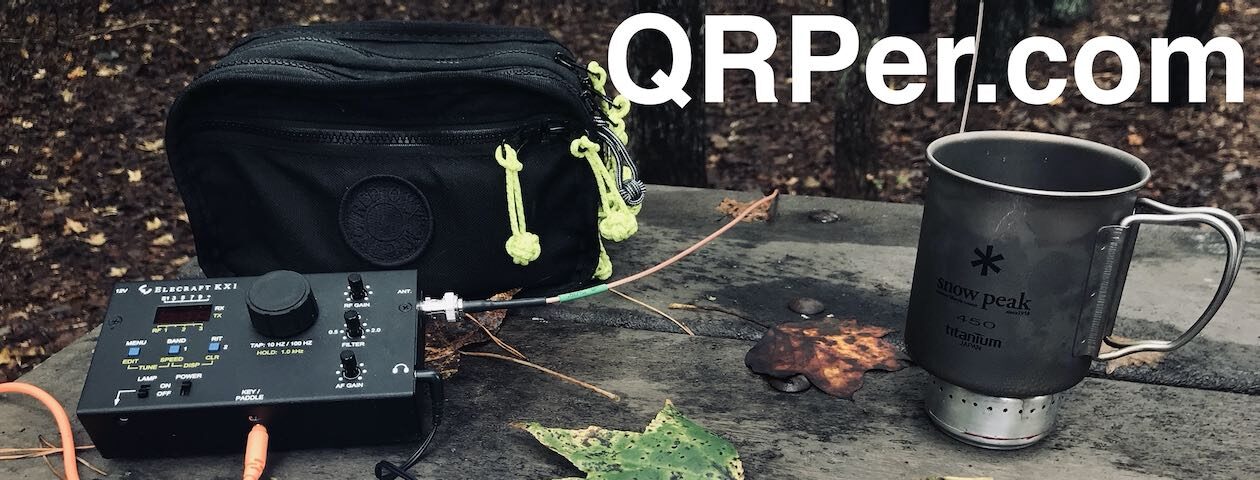
Next, I deployed my PackTenna 9:1 End-Fed Random Wire antenna and paired it with my Elecraft KX2.

New paddle mount!

I did (finally) get to try out a new piece of kit in the field: a newly-designed paddle mount from Steve (KB3SII) at QRPworks.

Steve handed this prototype mount to me at Hamvention this year. It’s an updated design of one we tested last year.

You basically attach the mount to the front of the KX2 (or KX3) and place a paddle like the Bamakey TP-III that has strong rare earth magnets. The paddle locks onto the metal pad and makes for a rock-solid, ergonomic keying experience.

Steve also sent me two short 3.5mm angled cords to connect the key to the radio, but I forgot to pack them for the trip. My standard paddle cable worked fine, although I had to angle the TP-III slightly.

Note that Steve plans to have these paddle mounts in production and available on the QRPworks website in the coming weeks. When they’re available, I’ll post a direct link.

With the KX2 set up and ready to go, it was time to hit the air!

Gear

Note: All Amazon, CW Morse, ABR, Chelegance, eBay, and Radioddity links are affiliate links that support QRPer.com at no cost to you.

On The Air

I started calling CQ POTA on 17M and discovered that it was a fairly quiet band. Nonetheless, I worked two stations in about six minutes. Secretly, I was hoping there might be a 17M path into Europe, but then again, it was a bit late in the day for that (and it seemed 17M wasn’t terribly energized). Continue reading Carolina Beach State Park: A QRP Oasis Amidst the Summer Heat and Activities

One CW Question series draws to a close after 6 months

by Vince (VE6LK)

Firstly, a huge shout-out and thank you to Thomas K4SWL for letting me hang out here on QRPer.com and exercise my creative writing chops, and to the community at QRPer.com for giving me such excellent feedback in my original article – both of which propelled me into this fun project.

Sometimes I begin my creative writing on a notepad with pencil, and sometimes I just type it out.

On January 20th 2024, I posted a simple question to readers of QRPer.com, If you could tell new CW learners your single best tip to learn CW, what would it be?

I was overwhelmed with the response in the comments and realized I had struck a nerve. At least one person told me that I should have bought a lotto ticket with that sort of luck, but I’ll tell you all that I am richer with the knowledge I’ve gained and shared with others as a result of the interviews I conducted with the who’s who of the English-speaking CW world.

My first key, on the right. Yes, a converted joystick. Yes, I did my exam with it.

It’s with a mixed heart that I’m here to announce that project has drawn to a close. It’s been tremendously helpful to so many people. Here’s the final episode and my personal tip to all of you aspiring CW learners.

I’m blessed to have met so many interesting people along the way and forged new friendships as a result.

Additionally, extra special thanks to Tim N7KOM, Alan W2AEW and Adam K6ARK who, along with Thomas, were my first victims interviewees where I was able to refine my interviewing and video editing process. And, Adam gave me a great idea – refine the videos into YouTube Shorts format. These refined Shorts are called 1CWQ and are the essence of each tip I recorded. The credit for the Shorts really belongs with Adam.

My entire family of keys (minus one in my truck and the others pictured above). W8BH Morse Tutor kit seen in the back of the photo. Visit my website to get your kit.

I interviewed 53 people for the series and produced well over 100 videos as a result as some gave us (you and I) more than one tip. If you missed the series, it’s not a ton of hours to binge watch. The original recordings are 2-3 minutes each and the shorts are all under one minute, or else YouTube won’t let me call them a short. You can find the Original playlist here and the Shorts playlist here.

I hope you enjoy these CW tips at least half as much as I did in recording and editing them.

One final tip, direct from my friend W5WTH who offers the following excellent advice in words better than I could ever say:

“Don’t let perfect be the enemy of good. Most CW ops are patient and can recognize a new op right away. They will most likely be happy to work you at a slow speed because they recall their personal CW journey. SKCC and POTA are the two easiest, stress free ways to make a CW QSO. Once you get the numbers and letters learned then start trying to get on the air. Don’t worry if you screw up because we all screw up and try to get better…”

I’ll add here that CW means never having to say SRI (CW shorthand for sorry) <GRIN>. Also Pat W5WTH has an excellent website too!

Handmade key left to me by VE6AB

Lastly, this is the story behind the straight key featured in all of the videos and in the main photo for this article. The key was hand crafted by my friend VE6AB, Jerry Clement, now a silent key. Jerry was a creator, maker, master machinist, backcountry hiker and camper, and photographer – a real true Renaissance Man in every sense of the word. His photography graced the covers of QST Magazine often in recent years.

At a time when CW was required for HF privileges in Canada, Jerry did his CW exam with this key and he told me once it was a real attention-getter at that testing session! Upon his passing it was bequeathed to me with instructions for me to use it and to keep my [at-that-time struggling] CW skills up. The only parts he did not manufacture were the ball bearings and the rubber feet – all of the other parts were crafted in his hands. I shall always treasure this beautiful key.

Thank you, Jerry, for encouraging me from the great beyond. DididiDahDiDah

73 and dit dit,
…Vince

First introduced to the magic of radio by a family member in 1969, Vince has been active in the hobby since 2002. He is an Accredited examiner in Canada and the USA, operates on almost all of the modes, and is continually working on making his CW proficiency suck less. He participates in public service events around Western Canada and is active on the air while glamping, mobile, at home or doing a POTA activation. You can hear him on the Ham Radio Workbench podcast, follow him on Twitter/X @VE6LK and Mastodon @[email protected], check out his YouTube channel, and view the projects and articles on his website.

Do I make videos of all of my field activations?

This past weekend, I attended the WCARS hamfest in Waynesville, North Carolina. My buddy Vlado (N3CZ) and I purchased a few indoor tables to sell some gear we no longer needed.

I also gave a short presentation about the ins and outs of going QRP. It was a lot of fun!

When I go to a hamfest, I spend a great deal of time salivating over the vintage stuff. This R-388 would look brilliant in my radio room! Wish I had the space.

I was surprised at how many people introduced themselves as readers, subscribers, and supporters. It blew my mind since this is a smaller regional hamfest—not Hamvention or Huntsville!

One reader asked a question I get a lot: Do you film all of your activations?

The answer is no, but I probably film 80% or more. I enjoy making activation videos. When I do a real-time video, I feel like you’re there with me, and I really enjoy that.

Even though I’ve simplified my camera gear, filming still adds time to my activations. I have to plan the setup so you can easily follow along as I log, and I need to ensure the audio is acceptable. When I’m really pressed for time, I skip making a video.

In addition, each activation video and field report takes me at least four hours to prepare. Unlike most YouTubers, the video editing time is minimal, but the field report takes time: preparing the text, photos, layout, links, etc. It’s a labor of love, though, and I enjoy the process.

Speaking of offline activations…

Lunch with Vlado isn’t complete without Baklava.

After the hamfest, Vlado and I enjoyed lunch (at this brilliant Italian restaurant), then I drove to Sylva to pick up Hazel (who had been staying with my brother-in-law).

On the way home, I passed the Blue Ridge Parkway, so I did an impromptu POTA activation at the Balsam Gap Overlook (which is overgrown and not much of an overlook anymore, but still a great spot for POTA).

I decided to make a short video for YouTube answering the reader’s question.

There’s some irony in making a video stating that I don’t always make videos of activations!

Click here to watch on YouTube.

It was a fun and quick activation: ten contacts in thirteen minutes. I used my Elecraft KX2 and PackTenna 20M EFHW—always an effective combo.

Hazel enjoyed laying on the grass next to me.

All in all, a fun little activation! I was in and out of there in 22 minutes. Had I filmed this, it would have taken more than 30 minutes.

Here’s my log sheet:

Here’s the QSO Map:

Screenshot

I’ve got some great activations in the pipeline and look forward to publishing them this month!

Thank you for coming along on the journey!

Cheers & 72,
Thomas (K4SWL)

Lee’s QRP CW POTA Adventure on Black-a-Tor

Black-A-Tor Copse National Nature ReserveMany thanks to Lee (M0VKR) who shares the following field report and video:


A QRP CW POTA Adventure on Black-a-Tor

by Lee (M0VKR)

It was another sunny morning when my wife Joanne and I set off for a new mini adventure. Our destination was Black-a-Tor on Dartmoor, Devon, a scenic location ideal for a Parks on the Air (POTA) activation. We had not activated this park before so didn’t know what to expect. With excitement abound and a bit of nervous anticipation after looking at the propagation figures, we parked their car at Meldon Dam Reservoir car park, the starting point of our trek.

The weather was pleasantly warm as we began the journey, following a meandering river that gently led us towards our destination. The path was relatively easy, allowing us to enjoy the natural beauty surrounding us. At one point a horse fly latched onto my arm, and although I indicated my displeasure it continued to harass me for a good 10 minutes or so, before eventually giving up.

As we hiked, the silhouette of Black-a-Tor gradually appeared on the horizon, beckoning us closer. A short climb later, we found ourselves at the summit, ready to set up for our POTA activation.

After a delicious boil in the bag meal of Chicken curry and a pot noodle heated on the jet boil stove (and of course a mug of tea!), we started proceedings with the trusty Elecraft KH1 hooked up to the MPAS, calling out into the ether for about 45 minutes.

Despite best efforts, the airwaves remained silent, and no contacts were made. Relatively unfazed but a little dejected, I decided to bring out the backup—the Elecraft KX3. This radio, with its extra power, held the promise of better luck. I think in hindsight if I had just stuck with the KH1 a little longer the RF gods would swing things in our favour, or perhaps the extra little bit of power helped? Now I know you need to quadruple your power to make a single S unit of difference at the receiving station, but maybe, just maybe the extra 5 watts or so might have helped us just break over the noise threshold?

After setting up the KX3, we managed to make a very scratchy CW contact with my son, Daniel, who was back at home on 40 meters, around 70 miles away. I must admit at this point enthusiasm was depleted a little and the poor propagation conditions continued to be a challenge on this activation, and I was struggling sending with the Bamatech key for some reason. I think I had been a bit over enthusiastic when setting it up and it felt a tight in operation. A couple of European stations faded out just as quickly as they had appeared, leaving me feeling a bit frustrated to be honest. Things are not normally this difficult! I think this is the point of these longer videos (se below) it’s important to show the struggles and the highlights.

With all this being said, as if by magic after calling again on 20m, the station K2UPD suddenly erupted out of the KX3’s speaker loud and clear, as if he was on the next hill. The sudden clarity of the signal was surprising and caught me off guard. I simply couldn’t believe I was hearing a letter K, and I struggled to comprehend the characters, once my brain had recalibrated itself. I couldn’t help but smile.

It was a gentle reminder of the CW innovations Comprehensive Instant Character recognition course that coach Jon KC1FUU has mentioned so many times, Ignore the scope, and ignore the propagation predictors, persevere, and just call, as you never know who will answer! In ham radio, sometimes it’s all or nothing. The contacts started to come in more steadily after that and it really woke me up. Suddenly we were back in the game, and eventually, we reached the 10 contacts required for a successful POTA activation.

As the summit grew busier with curious passersby, Joanne found herself fielding numerous questions about our intriguing setup. The interest from the public added an unexpected but enjoyable social element to our adventure. With our mission accomplished, we decided it was time to pack up.

On our way back down, we took a detour through the ancient woodland at Black-a-Tor. The old oak trees, with their branches draped in lichen, and the river running quite fast down the slope as it meandered through created an enchanting atmosphere. It felt as if we had stepped back in time. We lingered there for about 20 minutes, absorbing the serene beauty of the place.

It was an 8km round trip. The walk back to the car was under the blazing sun, and we were both getting a little tired from it. By the time we reached the car, we realised we had gotten sunburned on the back of our necks. It was a small price to pay for such a fulfilling day, and we made a mental note to remember the sunscreen next time, perhaps I will add a small travel tube to the admin pouch.

Reflecting on our adventure, and despite the sunburn, Joanne and I felt a deep sense of satisfaction that had overridden the previous frustration. Despite the challenges, we had successfully activated Black-a-Tor and enjoyed a day immersed in nature. The memory of this outing, like the lichen on the ancient oaks, would stay with us for a long time.

Click here to view on Lee’s YouTube channel.

Morning POTA with KM4CFT: Back-to-Back activations with the venerable Yaesu FT-818!

As I write this report, I’m on the road with my family–we’ve been spending the week on the coast of North Carolina and are now (at time of publishing) in Raleigh. I’ll keep this field report short and sweet so I can publish it quickly and also fit in an activation before record temps heat up the region!

Blue Ridge Parkway (US-3378)

On the morning of July 4th, 2024, Jonathan (KM4CFT) and I arranged to meet and activate on the Blue Ridge Parkway (US-3378).

Jonathan was in town visiting family over the holiday weekend, and I had a brief window of time that morning to join him. My schedule had been packed since Field Day, making this my first chance for a POTA activation for a couple of weeks.

We knew it would be an interesting activation right from the start: we both arrived at the Folk Art Center at the same time and were greeted by a large black bear strolling down the road in front of the entrance! A bear walking away from your POTA spot is always a good thing.

After a quick catch-up, I grabbed my arborist throw line and deployed the 30/40 meter linked end-fed half-wave antenna I’d built using the KM4CFT antenna kit.

It would have been rude to use another antenna with KM4CFT standing right there! (Note to N5FY: Yes, I know I’ve been rude to you on many previous activations, haha!)

Gear:

Note: All Amazon, CW Morse, ABR, Chelegance, eBay, and Radioddity links are affiliate links that support QRPer.com at no cost to you.

On The Air: The Accidental Self-Spot

Jonathan took to the air first. Since neither of us had announced our activation, I opened POTA.app to spot him. Except, I didn’t. In a moment of confusion, I accidentally spotted myself!

It turns out there’s no easy way to delete your own spot once you’ve done that. (If there is, I’d love to know, though I hope to never make that mistake again!)

What followed was rather comical. Jonathan noticed people thought he was me, even though he used his own callsign in each exchange. I guess it’s easy to mishear a callsign when you think you already know it!

I kept spotting myself “QRT,” but many kind operators kept re-spotting me. I even moved to 14,000 kHz (an out-of-band frequency I’d never use) and spotted myself QRT. People were still re-spotting me on Jonathan’s frequency!

It was funny, and the early morning hour on a holiday probably contributed to the confusion.

After Jonathan logged his ten contacts, he handed the radio over to me. I swapped out paddles (his TP-III setup mounted to the FT-818 wasn’t comfortable for me).

I started calling CQ POTA de K4SWL, spotted myself (correctly this time!), and the real activation began.

In the end, I worked 25 stations in 26 minutes. Thanks to all the hunters!

Then it was time to call QRT and continue our day. It was great seeing Jonathan and fitting in a little POTA before the day really started!

QSO Map

Here’s what this five-watt activation looked like when plotted out on a QSO Map:

Activation Video

Here’s my real-time, real-life video of the entire activation.  As with all of my videos, I don’t edit out any parts of the on-air activation time. In addition, I have monetization turned off on YouTube, although that doesn’t stop them from inserting ads before and after my videos.

Note that Patreon supporters can watch and even download this video 100% ad-free through Vimeo on my Patreon page:

Click here to view on YouTube.

Thank you

Thank you for joining me during this activation! (And thank you, Jonathan, for joining me!)

I hope you enjoyed the field report and my activation video as much as I enjoyed creating them!

Of course, I’d also like to send a special thanks to those of you who have been supporting the site and channel through Patreon, and the Coffee Fund. While not a requirement, as my content will always be free, I really appreciate the support.

As I mentioned before, the Patreon platform connected to Vimeo makes it possible for me to share videos that are not only 100% ad-free but also downloadable for offline viewing. The Vimeo account also serves as a third backup for my video files.

Thanks for spending part of your day with me! Have a brilliant week ahead and be kind to one another out there!

Cheers & 72,
Thomas (K4SWL)

The Write Stuff: My pencil/paper weatherproof logging combo!

If you’ve followed my field reports in the past couple of years, you’ll know that I predominantly use Rite In The Rain notepads and mechanical pencils.

When I first started my POTA journey in 2019, I would print out log sheets for each activation just like I did during the National Parks On The Air program in 2016. It was a very inexpensive and organized way to manage all of my written logs.

Over time, though, I made a shift to small pocket-sized notepads (Moleskine, Moji, Mead…) basically any pad that took up less space and could remain in my QRP field kits.

Rite In The Rain

After a couple of moisture mishaps with Moleskine pads (which, by the way, I otherwise love) I decided to completely shift to using Rite In The Rain spiral-bound notepads.

I resisted doing this for a long time because Rite In The Rain pads aren’t cheap; they typically cost about $6-$7 US each, but they are made in the US and are very high quality. They don’t smudge or smear.

My father-in-law is a retired professor of Botany and the bulk of his research time was (literally) in the field–in the mountains of western North Carolina. He’s always been a huge fan of Rite In The Rain and we often purchased these for him as gifts.

I switched to Rite In The Rain and haven’t regretted it. Yes, they’re pricier than all of the previous options I’d used, but they are insanely durable, can survive getting wet, and they hold quite a lot of my 45-60 minute POTA and SOTA activations! One pad will typically last me several months.

There are two sizes of pads I use:

(Left) 3×5″ and (Right) 4×6″ Notepad

Please note that all of the Amazon.com links on this page are affiliate links that support QRPer.com.

The 3×5″ sixe easily fits in my Pelican 1060 case

I find that both sizes work well. I tend to use the larger 4×6 size most of the time, but I love the 3×5 size because it fits in some of my smallest field kits including the MTR-3B SOTA kit I highlighted last week.

When you use a Rite in the Rain pad, it will hold up in the rain if you are using any pencil, or one of their pens which has a special ink that bonds to the paper permanently.

I use mechanical pencils when I log, although I plan to start using pens more often only because it makes it easier for my YouTube video subscribers to read my logbook as I write (pencil can be more difficult to read from the camera angle, depending on reflection, etc.).

Mechanical Pencils

This is an area where (being fully transparent here) I can geek out a bit (understatement alert).

I’ve always had a place in my heart for mechanical pencils. It dates back to my high school years when I took drafting classes. These were the days when drafting desks, pencils, T-Squares, triangles, and templates were tools of the trade (CAD was just becoming accessible to students).

I found mechanical pencils to be an amazing piece of engineering and, while I couldn’t afford a lot of them, I would spend my hard-earned money to buy them. To me, visiting our local drafting store was like a trip to the toy store.

But I digress…

In the field, performing a POTA or SOTA activation, I don’t look for the same precision I needed in drafting class. Quite the opposite–I’m looking for durability and reliability.

Wooden pencils, to be clear, are both of those things and will serve you well in the field. What I love about mechanical pencils is that their leads are consistent when writing and there’s no need to pause and activation to sharpen them. Just click and keep going.

There are currently three mechanical pencil models I use.

My wife recently gave me a uni Core Keeps Sharp Mechanical Pencil as a gift. She did so after reading a comment from one of my readers (I had no idea she even read QRPer–I’ve got to be careful what I say around here!). 🙂

What makes this particular pencil unique is that it rotates the lead as you use it. This keeps the line looking sharp since the lead doesn’t wear to one side.

So far, I love it. This one has a .5mm lead, which is small–I tend to prefer .7 or .9mm because they’re more durable. Expect to see this in activation videos soon.

Next is the Zebra Mechanical Pencil, Del Guard, 0.7mm. This particular pencil lives in my MTR-3B SOTA field kit. The Del Guard has a double spring mechanism that acts as a shock absorber when you write.  If you apply a little too much vertical or angled pressure, it absorbs the energy thus saving your lead from breaking.

I find it works really well, in fact. I tend to have a heavy hand when I write in my log books and I find I have less lead breakage in the field.

Finally, the mechanical pencil I’ve adopted as my primary SOTA and POTA pencil is the amazing GraphGear 0.9mm 1000.

This pencil is the most durable mechanical pencil I’ve ever used.

Bruce (KO4ZRN) introduced this to me when he joined me on a SOTA activation of Craggy Dome a couple years ago. This pencil is incredibly strong. In fact, I’ve even used it in woodworking and carpentry projects to mark cuts on wood.

At this point, I think I probably own about six of these GraphGear pencils and I couldn’t be happier.

Video

I actually made a short (for me) video about my notepads and pencils:

Click here to view on YouTube.

Again, you don’t need anything fancy…

If you’re not into waterproof paper and mechanical pencils, just use what you have to log.

I remember once using the back side of an envelop and a pen I found in my car to log a NPOTA activation–it worked perfectly! I even remember another NPOTA activation using a pen to log and running out of ink, so I used the pen to log in the dirt on the ground. I only copied three or so more contacts then took a photo of the ground. (I can’t recommend this, but point is, practically anything can be used for logging!)

I just find that when I do something on a regular basis, I’m willing to invest in tools I love using. I feel they serve me well in the end.

How do you log?

I’m curious how you log. I know that a large percentage of POTA activations never write a thing on paper logs–they simple log directly to an app on their phone, tablet, or laptop.

I prefer making a paper copy of my logs, then taking a photo of them when the activation is complete. I worry less about my app crashing, phone running out of power, and, frankly, I just find the process of logging more fun on paper. Furthermore, rain can disrupt touch accuracy on capacitive touchscreen devices, making logging difficult in wet conditions.

I’m curious how you log in the field. Please comment!

Thank you

Thank you for reading this post!

Of course, I’d also like to send a special thanks to those of you who have been supporting the site and channel through Patreon, and the Coffee Fund. While not a requirement, as my content will always be free, I really appreciate the support.

Have a brilliant week and I hope you run out of paper due to the number of contacts you must log!

Cheers & 72,
Thomas (K4SWL)

QRP SOTA: Lee pairs the KH1 and MPAS 2.0 to activate High Willhayes (G/DC-001)

Many thanks to Lee (M0VKR) who shares the following field report and video:


SOTA CW Activation on High Willhayes Dartmoor

by Lee (M0VKR)

It was an overcast and breezy morning when wife Joanne and myself Lee, M0VKR set out on our latest SOTA (Summits on the Air) activation adventure. Our destination was High Willhays, the highest point in Devon UK – SOTA G/DC001, Dartmoor is well known for its rugged beauty and challenging terrain.

We parked the car a short distance up the road from the army camp, slung our packs over our backs and set off. The gravel tracks leading to the summit stretched out before us and took a winding path through the moorland.

A few sheep and cattle grazed in the rough grass as we made our way upwards on the gentle slope. It was a breezy morning and we had had rain a short while earlier. Despite the weather our spirits were high, and we were eager to reach the top and get on the air with the Elecraft KH1.

In my pack was my now trusty Elecraft KH1 and an MPAS 2.0 vertical antenna, with the KX3 as backup, a reliable setup for such expeditions. I’m pretty sure I could halve the weight in my pack, but as it’s not a huge walk to the summit I don’t mind ferrying the extra gear to the top. The weather, though overcast, was adding a touch of drama to the landscape, and the breeze kept us cool as we trekked upward.

Joanne, ever the supportive partner, helped carry some of the cooking equipment and victuals and she kept the mood light with her cheerful conversation.

After a brisk hike, we reached the summit of High Willhays. The view, even under the Grey sky, was breathtaking. Rolling green hills and expansive moorland stretched out as far as the eye could see.

I set about preparing the station, using the MPAS 2.0 vertical antenna, which is quick to deploy and ideal for the variable conditions we faced. Despite the less-than-ideal propagation conditions, I was determined to make the activation a success.

Although the MPAS in vertical form isn’t very efficient on 40, I prefer to take advantage of the quick setup that it offers, one of these days I will look at adding a top section to make 40 more efficient, perhaps as a sloping inverted L or something similar, more reading of the manual required!

With everything set up, I made the first call on the 40m band. My Friend Matt MW0KAX answered, he was essentially line of sight from Wales, so his signal was strong. That was the first and last contact on 40m. I changed to 20 meters, where the MPAS was more efficient for the little KH1 and it was able to breathe a bit easier. The tuner in the KH1 is nothing short of amazing, and quite happily tuned 40 meters in a few seconds.

The static crackled, and for a moment, there was silence. Then, a faint reply came through. The thrill of making that first contact was palpable. It still amazes me every time I make those first few contacts that QRP does work, even with a compromised antenna system. Despite the challenging conditions, My limited skill, Plenty of luck and the reliability of the equipment began to shine. All the equipment I was using was off the shelf, I hadn’t made a single thing myself, maybe one day.

One by one, contacts started to come in. Each short QSO contact was a small victory, a testament to perseverance and the joy of ham radio. It is necessary to persevere as a newer CW operator and use QRP power levels and poor propagation conditions. It’s non-negotiable after driving for 2 hours, and a 4km hike that we go home empty handed. I logged each contact meticulously, my excitement growing with every successful connection. Joanne watched on slightly bemused but very supportive of the hobby, sharing in the triumphs that each contact brings and providing much-needed encouragement.

By the end of the activation, We had made several QSOs. While the propagation conditions had been far from ideal, the activation was undeniably a success. We had achieved what we set out to do: connect with fellow hams across the airwaves from the summit of High Willhays for a SOTA activation.

As we packed up our gear, the breeze picked up, and the clouds began to clear slightly, offering a glimpse of blue sky. The trek back down was filled with reflections on the day’s achievements and plans for future activations. We both felt a deep sense of accomplishment. We had braved the elements, navigated the challenging RF conditions, and emerged victorious.

This activation, like many before it, was a reminder of the joys of ham radio, CW and QRP operation and the adventure it can bring. For me and my wife Joanne, High Willhays would always hold a special place in our memories, not just for its height, but for the heights that we reached together on the airwaves.

Activation Video:

Take care and Speak soon, 72,

Lee M0VKR

Tabletop QRP POTA: A Father’s Day Getaway to Mount Mitchell State Park

When our family needs a change of scenery without a long drive, Mount Mitchell State Park is our go-to destination. I’ve mentioned before that it’s my “happy place” here in North Carolina. Mount Mitchell is only about 6 miles from our home as the crow flies, but it takes about 50 minutes to drive there, and it’s not in the direction of any of our usual destinations. Heading up the Blue Ridge Parkway and watching the flora change with elevation makes it feel like a proper getaway.

On Sunday, June 16, 2024, we wanted just such a getaway, as my wife and daughters were treating me to some Father’s Day fun. After visiting my father-in-law in the hospital in the early afternoon, we drove to Mount Mitchell.

Mount Mitchell State Park (US-2747)

Sundays on Mount Mitchell tend to be busy, especially in the summer. However, on this particular Sunday, it was rainy, foggy, and there were storms in and around the area.

Weather like this never bothers us on Mount Mitchell, as it can shift in an instant, as long as thunderstorms don’t intrude.

As soon as we arrived, I grabbed my radio bag from the car and found an empty picnic shelter. I’d been hoping for a free shelter since it was raining, and fortunately, we got our pick!

One of the first things I did after dropping off my pack was to tie Hazel to a picnic table because she was laser-focused on a chipmunk she saw run up a tree next to the shelter. That dog drives chipmunks and squirrels crazy, I’m sure.

My wife and daughters dropped off some art supplies at one of the shelter tables, then went on a short hike while I performed my POTA activation.

Note that Mount Mitchell is also a SOTA summit, but the picnic area is not within the activation zone. I could have easily gone to one of my go-to SOTA spots on the summit and knocked out a SOTA activation quickly (only four contacts are needed), but I wanted to save that for another day. Plus, being in the shelter meant that I could have a nice leisurely, dry activation!

I brought along my Penntek TR-45L and planned to pair it with a random wire antenna for the activation. However, since the weather was iffy—again, my primary concern was any thunderstorms that might sneak up on us—I decided to skip the wire antenna and go tabletop instead.

Fortunately, my Elecraft KH1 lives in my EDC bag at all times, so I set it up for tabletop mode.

New Tufteln KH1 Right Angle Adapter

KH1 “tabletop mode” gave me the perfect excuse to try out an accessory my friend Joshua (N5FY) sent me: his version of a KH1 right-angle antenna adapter.

You might recall that I have used the Elecraft KH1 adapter in previous activations and I think it works brilliantly. The first version of Elecraft’s adapter had one issue: the parts would fall apart if you weren’t careful with how you attached it to the KH1.

Joshua designed his right-angle adapter with captive components so that it’s all in one piece and can’t come apart.

I should note here that Elecraft actually updated their right-angle adapter design so that it also has captive components as well—so you have two choices! I’ll use the new Elecraft adapter in a future video and field report.

Joshua’s Tufteln design works really well (it’s also less expensive than the OEM adapter), and I like that it’s bright red, which means I’m less likely to leave it in the field!

Gear:

Note: All Amazon, CW Morse, ABR, Chelegance, eBay, and Radioddity links are affiliate links that support QRPer.com at no cost to you.

On The Air

I assumed that 20 meters might be the most productive band that afternoon, so that’s where I started calling CQ POTA after snagging a Park-to-Park with K9NUD. Continue reading Tabletop QRP POTA: A Father’s Day Getaway to Mount Mitchell State Park

On a POTA Mission with the RGO One!

On Thursday, June 6, 2024, I had two missions:

  1. To help fellow volunteers at the Asheville Radio Museum assemble shelving.
  2. To fit in a POTA activation over lunch.

I started out the day pretty early at the QTH sorting out a few chores, then I made my way to the museum around 9:30.

The Asheville Radio Museum

I’m a member and volunteer of the Asheville Radio Museum, a small – but brilliantly curated – museum on the campus of Asheville-Buncombe Technical Community College.

That Thursday morning, we organized a shelf-building party to assemble a shipment of new shelves we’re going to use to house our collection in a new space A-B Tech has given us on the third floor of the Elm building.

We’re super excited about the new space not only because it’s much larger, but there’s even a dedicated workbench where we can invite students and guests to learn some soldering and repair skills.

If you’re ever in the Asheville, North Carolina area, I’d strongly encourage you to check out the Asheville Radio Museum. Check our website for directions and hours.

We ended up working on the shelves for a couple of hours, and once assembled, I decided to grab lunch at Bridge & Tunnel Coffee in the Coman Student Activity Center next door. The food and coffee were absolutely amazing. A-B Tech students are so lucky to have a café of this caliber on campus!

I spent more time hanging with my friends at lunch than I had planned. No regrets there.

I knew there was still plenty of time to make my way to the Vance Historic Birthplace and fit in a POTA activation! Twenty minutes of driving later, and I was pulling into the Vance parking lot.

Zebulon B. Vance Birthplace (US-6856)

As I made my way around the visitor’s center, I was very pleased to see that the picnic shelter was unoccupied. School was still in session for many districts in the area and field trips tend to take place near the end of the term. Had there been a school group at this small historic site, I would have gone elsewhere to activate so as not to disturb them.

The weather was pretty amazing – the perfect day to be outdoors playing radio.

Speaking of radio, I brought a special one with me that day.

The Mission RGO One

As I mention in my activation video below, I receive more questions about this radio than any others I take to the field. Some have seen it in previous activation videos, and many see it in my QRPer.com banner rotation.

Typically, I’ll get a message with the following question, “Thomas, what is that cool radio with the white faceplate I see in the banner on QRPer?”

It’s no wonder I get a lot of questions about it. The Mission RGO One is a very low-production run modular transceiver – the creation of Boris Sapundzhiev (LZ2JR).

Boris produces the Mission RGO One in small batches at his facility in Bulgaria. This is very much a cottage industry radio – one you won’t find in many shacks or on Field Day because there just aren’t a lot out there (compared with Yaesu, Elecraft, Icom, etc.).

I’m a massive fan of the RGO One. So much so, that if I had to pare down my radio collection to only two HF transceivers, the RGO One would be one of those two.

I love the RGO One’s legacy design and the fact it’s a down-conversion superhet receiver with 9MHz IF. The receiver is absolutely amazing.

You don’t see the RGO One in many of my POTA videos mainly because I tend to use my smaller, portable radios in the field. That said, the RGO One was designed with field operating in mind – it’s a very capable radio and lightweight compared to other tabletop radios.

The RGO One is my main HF radio in the shack, so it actually gets heavy use. If I’ve ever hunted you at the QTH while you were activating a park or summit, it was likely with the Mission RGO One.

As I mention in the video, I will plan to make a “Getting To Know You” video with the RGO One in the near future, so I’ll speak a bit more about it then.

In the meantime, you can read my full review of the Mission RGO on The SWLing Post and check out more about any upcoming production runs on Boris’ website.

Setting Up

I decided to deploy my KM4CFT EFHW kit that I trimmed for 30 meters with a 40-meter extension. This antenna is brilliant because it resonates on 30 and 17 meters as a 30-meter EFHW, then if you link the 40-meter extension, it’ll give you 40, 20, 15, and 10 meters. That’s six bands on one antenna without the need for an ATU.

Next, I paired my Begali Traveler paddles with the RGO One.

Although the RGO One has a maximum output power of 50 or 55 watts, I had it set to my standard 5 watts QRP.

Gear

Note: All Amazon, CW Morse, ABR, Chelegance, eBay, and Radioddity links are affiliate links that support QRPer.com at no cost to you.

On The Air

Being in the early afternoon, I decided to hop on 20 meters first, as I assumed it might be one of the more productive bands. Conditions – as we all know – have been quite rough as of late, so I tend to start my activation on the band where I think I’ll accumulate the most contacts. Continue reading On a POTA Mission with the RGO One!

M0VKR’s Lewesdon Hill SOTA activation with the Elecraft KH1

Many thanks to Lee (M0VKR) who shares the following field report and video:


Activating Lewesdon Hill with the Elecraft KH1

by Lee (M0VKR)

After taking a day off from work my wife Joanne and I pondered about what we could do. “Shall we go over to Dorset to that hill you have spoken about and take your new radio?” There is no need to ask me twice to get outside and activate so we were quickly packed.

The KH1 came as the Edgewood package, so everything is contained in its own pack, ready for moments just like this. I grabbed it off the shelf in the shack, along with a KX3 as backup.

Within 10 minutes we had our labradors Toby and Konnie in the car and set off on a new CW ham radio adventure to activate Lewesdon Hill in Dorset for a SOTA activation. It was mid-morning by this point and things looked promising for a perfect day of outdoor radio operation.

With my Elecraft KH1 and KX3 as a backup snugly packed, along with my trusty home brew antennas, we embarked on the journey. The drive was scenic, with the rolling hills of the Dorset countryside providing a beautiful backdrop, Traffic was light too – Perfect.

After 45 minutes or so we arrived at the base of Lewesdon Hill. I took a moment to appreciate the tranquility of the area, breathing in the fresh air. The only downside was no nearby carpark, so we parked the car in a layby making sure it wasn’t going to be in the way of any farm traffic.

Finding the right spot to set up was the first small challenge.

Lewesdon Hill is only 279 meters (915 feet) to the summit, not exactly a mountain but it is the highest point in Dorset. We set off up the concrete driveway to a local farm, then turned right through a gateway and began ascending. The ascent is marked as a footpath and is pretty much through woodland until you get to the summit. It is a relatively steep climb, and we stopped every so often to take in the expanding view of the countryside through the trees.

Joanne had completed a 10K run a few days before so was happy to stretch her legs.

We arrived at the summit in good time. I needed a location with good elevation and a clear view to maximize my reach.

After a brief walk 1KM’ish, Joanne found the perfect spot—a clearing with a panoramic view of the surrounding area and a fallen tree which made the perfect workstation. I could already feel the anticipation building as I began unpacking my gear.

Setting up the antenna is always a mix of art and science, but mostly just plain luck. Today, I was using my favourite home brew random wire, which had served me well in previous activations. I found a stone to act as a weight and tossed the wire into a tree on the first shot and with a few quick adjustments, it was up and ready. Next came the radios.

The Elecraft KH1 and KX3 are compact yet powerful, ideal for portable operations like this. Because the KH1 had been configured already at home and previous activations, I hit the tune button. It tuned the random wire within a second or so and I double checked the keyer speed and set it to 16 WPM. Luckily, there was good phone service, so I sent out a spot on the SOTA website and I was ready to start.

The band conditions were not exactly favourable, however the clear blue skies hinted at a good run. I powered up the KH1 and began calling CQ. A station in Northern Ireland came back instantly and exploded out of the speaker, at a lovely cadence. One by one, contacts started rolling in. Each successful connection was a small victory, a testament to the power of CW communication and the effectiveness of my setup and of course the superb performance of the Elecraft KH1.

The weather was kind, with a gentle breeze keeping things cool. Throughout the activation, I logged 4 contacts, each one a story in itself. Notable among them was a contact from my good friend Steve MW0SAW from across the Bristol Channel in Wales, a testament to the reach of my modest setup. Steve and I had been in the same CWOPS class last year, so it’s always great to get him on air, even though we speak most days on the phone.

By the end of the session, I had made 4 contacts. I was really satisfied and could have sat for longer working the bands but, content, we decided to pack up and go grab some lunch from the nearby bakery in the village of Beaminster. The KH1 had performed flawlessly, and the homebrew wire antenna had once again proven its worth and overall, it had been a successful activation.

Reflecting on the day’s achievements as we hiked back down, the sun now a little higher in the sky, I couldn’t help but feel a sense of accomplishment. Having just completed a 10 week comprehensive ICR course with CW innovations and being a relatively new CW operator, I was pleased that the contacts had come back at a predictable pace. This made copying the callsigns easy. As I complete more activations, I am finding each activation is a unique experience, and today with the Elecraft KH1 was no exception. We are looking forward to the next adventure, with new challenges and new stories to tell.

Back at home, I reviewed the logs and relived the day through the video footage I had been encouraged to make by my family and friends. For those who want to see the activation in action, you can check out this video on my YouTube channel:

73 and see you on the airwaves!

Lee (M0VKR)


Readers: Would you do me a favor and subscribe to Lee’s new YouTube channel? Lee kindly shared his field report at my request and this activation video was a first for his new channel. Let’s support him by giving his video a thumbs up and subscribing! Thanks for sharing your report, Lee! -Thomas (K4SWL)