An easily accessible, multi-function button on the IC-705’s “back rim” gives a great improvement over the stock noise reduction. (ICOM, with all your resources, why can’t you design a DSP NR circuit that works as well as BHI’s? )
I admit it! I’m in love with BHI Ltd.’s DSP noise reduction accessories. I’ve owned most of their popular models like the DSP Desktop Speaker, and have installed BHI low-level audio modules in six different receivers and transceivers.
How is it that an audio-based DSP noise reduction accessory can be so effective? Only BHI knows, but they clearly have top-notch algorithms that rival the best of noise reduction circuits in contemporary Yaesu transceivers. (Personal bias alert: I find Yaesu’s approach to noise reduction (“DNR” in Yaesu-speak) to be quite superior to ICOM’s, and this is what got me thinking about improving the transceiver with an internal BHI NEDSP1901-KBD module in the first place.)
The noise reduction feature in the IC-705 and its IC-7300 base station counterpart is merely “OK” in my opinion, but the addition of BHI’s NR makes a significant difference in S/N and intelligibility of signals. It’s simple enough to use an external BHI product and connect it to your rig’s speaker or headphone’s audio path, but it adds wiring and complexity. The ICOM IC-705 modification described in this article is a neat, clean, internal solution needing no external wiring or power supply.
In 2020, I easily spent a total of 100 hours outdoors with my radios activating a total of 82 sites for the Parks On The Air (POTA) program alone. This doesn’t include hours and hours of SWLing (shortwave radio listening). It’s been great.
Taking radios into the field is so much easier to do today than it was in, say, 1985 or earlier, because we have so many more options for powering our gear in the field. Not only have radios become more efficient in operating off of battery power, but we now have so many affordable and lightweight rechargeable battery choices on the market.
In the following article, let’s take a look at some portable battery power options for your radio gear. By “portable,” I’m talking power options for those of us who load a backpack or carry case and head to the field.
To keep the scope of this article in check, I’m also going to focus only on rechargeable battery options. And rather than get bogged down in the nuances of battery chemistries, we’ll focus on the end result––the pros and cons of each battery type, and how practical they might be for your field application.
In addition, I’ll also limit discussion to batteries that can be purchased of-the-shelf rather than addressing homebrew options. While I love building things, I’m very cautious when dealing with battery charging because if not done correctly, the results can be dangerous. I prefer obtaining products from trusted suppliers who thoroughly engineer and test their equipment.
Let’s take a look at several types of batteries, and speak to their advantages…as well as disadvantages. Then––as we summarize our findings––let’s discuss how to choose the right option for your needs.
Consumer-grade rechargeable batteries
Let’s begin by talking about the lowest-hanging fruit in terms of portable power: everyday rechargeables in the form of 9V, AA, AAA, C, and D cells.
While, admittedly, these batteries are not typically an option because of their limited capacity and energy density, they can still be a very practical power source for portable receivers and even a few QRP transceivers.
Rechargeable battery chemistries have improved with time, thus I no longer purchase nickel-cadmium (Ni-Cd or NiCad) or legacy nickel metal hydride (NiMH or Ni–MH) batteries.
These days I almost exclusively purchase low-self-discharge nickel metal hydride (LSD NiMH) batteries, specifically, Panasonic Eneloop batteries (Amazon affiliate link). Although they’re a pricey option compared with generic NiMH batteries, and might even be overkill for certain applications, I do love the shelf life of Eneloops.
Of course, the benefit here is Eneloops have that low self-discharge. They will maintain charge better at rest (i.e., when not in use) than legacy NiMH or NiCad batteries. From my real-word usage, I’m convinced that Eneloops also demonstrate better longevity over numerous charge/discharge cycles than many others.
All of my portable shortwave receivers that accept AA or AAA batteries are powered by Eneloops exclusively.
And although I’ve never done this myself, it is also possible to power highly-efficient QRP transceivers with Eneloop batteries, so long as you use a multiple battery holder to increase voltage and capacity to match both your rig and your desired amount of operating time.
WD8RIF’s AA battery holder
Keep in mind, though, that most transceivers will require a block of at least ten AA batteries to reach a voltage around 12 VDC. As you might imagine, it can be cumbersome after using your radio in the field to remove all ten of these batteries and charge them in a charger that can only hold, say, four batteries at a time. I personally prefer other options, but this one is certainly a fairly affordable, safe, and accessible option.
Note that in recent years, Panasonic started offering Eneloop Pros: while pricier than standard Eneloop batteries, they offer slightly higher capacity at the expense of overall longevity (roughly 500 versus 2100 total charge/discharge cycles). Since the voltage is the same, I’ve never felt the need to use higher-capacity Eneloop Pros.
Rechargeable Panasonic Eneloop AA batteries (non-Pro version):
Price: $2.25 – $4 US per battery, depending on the number in the package
Weight: 4 grams/.4 ounces per cell
Voltage: 1.2 V each
Longevity: Excellent, up to 2100 charge/discharge cycles
Ease of recharging: Simple via Eneloop OEM chargers
Solar- charging option: Eneloop originally marketed solar chargers, but doesn’t seem to do so presently
Sealed Lead Acid (SLA) Batteries
When I first became a licensed ham radio operator in the late 1990s, sealed lead acid batteries were the primary battery power source used for field radio operation.
At the time, these batteries were one of the best options for portable radio use because they could be purchased in a variety of sizes (based on amp hour capacity), and unlike flooded lead acid batteries, they required no maintenance––and being sealed, did not outgas.
While I’ve owned everything from 3 Ah to 15 Ah SLA batteries, I found the once-ubiquitous 7-8 Ah size to be the “sweet spot” in terms of portability and capacity.
SLA batteries are still among the most accessible high-capacity batteries on the planet. No matter where you travel, it’s likely you’ll be able to hunt them down in any hardware or electronics store. Our small local hardware store has a wide selection of these at their battery kiosk.
What are some of the pros of these batteries? In terms of “bang for buck,” the SLA is still hard to beat. You can purchase a quality 7.2 Ah 12-volt SLA battery for about $18-20 US (affiliate link). This would be more than enough battery to power a typical QRP transceiver for many hours on end. Chargers are also inexpensive––you can purchase a dedicated charger for about $10-15 US. Not bad.
In addition, 12-volt batteries are nearly ideal for amateur radio use since most transceivers are designed to operate with 12-13.8 volts DC +/- a modest margin.
There are some negatives compared with more modern battery chemistries, however. For one, SLA batteries are much heavier than the batteries we’ll discuss in the following sections. After all, they’re (still) made of lead! In addition, the battery’s longevity will be negatively impacted if you discharge it too deeply.
With that said, if you take care of an SLA battery, it can give you five or more years of service life in the field, yielding an excellent value for the modest investment. If you have an application that requires relatively little capacity from the battery, you might get a very long service life, indeed. In 2011, I built a remote antenna tuner box around an LDG Z11 Pro ATU and a discarded 7Ah 12V SLA battery. At the time, this battery could no longer hold voltage long enough to be reliable in the field, but I knew the Z11 Pro requires very little in the way of power, so I thought I’d try it as a power source anyway. Since the remote ATU box isn’t near an outlet, I charge the SLA battery with a 5-watt solar panel I purchased used at a hamfest with a Micro M+ charge controller. A decade has now passed, and that SLA battery continues to power the Z11 Pro even through seasonal temperature variances of -10F/-23C to 90F/32C. Not bad! Again, keep in mind this application works because the Z11 Pro is so flexible in terms of power requirements––it’ll operate on 6-16 volts DC at 300 mA with a 20 uA standby current.
Clearly, SLA batteries are affordable candidates for back-up power in the shack during occasional power outages.
Price: Most affordable option per Ah of the batteries listed here
Weight: By far, the heaviest of all the battery options in this article
Voltage: Various, but 12VDC is very common
Longevity: Very good if properly maintained
Ease of recharging: Easy, via simple charge controllers
Solar charging option: Multiple types of charge controllers can be used with SLA batteries; among the listed batteries, the easiest and least expensive to charge via solar
Lithium-Ion (Li-ion)
Without a doubt, lithium-ion batteries have revolutionized the consumer electronics world.
Why are they so popular?
First of all, their construction allows for a variety of form factors ranging from cylindrical cells to slim packs and pouches so thin they can fit in an ultra-thin mobile phone, eReader, or tablet. They’re the easiest type of battery to accommodate in compact consumer electronics, and indeed, they power most of the consumer electronics we’ve put to use in the last decade.
Secondly, they have a very high energy density, thus pack a lot of capacity for the size and weight. Indeed, if size and weight are your primary requirements, li-ion batteries should be high on your list.
In addition, Li-ion batteries are ubiquitous and affordable because they’re used in so very many applications.
There are negatives, though, with these power sources. First and foremost, they’re very sensitive to over-voltage and over-current events that initiate a thermal runaway. To prove this point, I’ll share some first-hand experience from the early days of large lithium-ion packs…
Li-ion Horror Story
In 2011, I evaluated a lithium-ion battery pack with integrated 5V USB chargers and even a simple one-outlet inverter from one of the big names in portable power systems. At the time, this was a new battery pack and a relatively new technology, at least in terms of the energy density and compact size. After receiving the battery, I charged and discharged it perhaps twice during testing. I had a flight scheduled from North Carolina to California, and decided I’d take it in my carry-on bag to power my laptop in flight. It worked fine on the flight to KSFO. Once there, I recharged it. On my return flight, it simply didn’t work. I thought perhaps I hadn’t plugged it in properly, or that the hotel outlet I used didn’t work. Upon arrival I emptied my travel pack onto the bed and plugged in the battery pack; it indicated it was taking a charge.
After doing a few projects around the house, I went back up to the bedroom and was greeted with an overpowering smell––almost like the pungent chemical odor of nail polish remover. I looked everywhere for the source of the odd smell. Finally, I located it: it seemed to be coming from the battery pack. Upon examination, I could tell the battery had begun to swell. As I lifted it up, I noticed that the bottom portion was essentially in a state of melting. As quickly as I could, I unplugged it and removed it from the room. I then discovered that in the thermal runaway process, it had begun burning through the sheets and mattress of the bed. Shocked, I suddenly realized it could have burned down my home.
Keep in mind, I was completely new to this battery technology, and this was years before thermal runaways made the news and airlines began restricting their transport. To my relief, the company from which I purchased the pack ended up pulling that model off the market, and even reimbursed me for the mattress and bedding. But it was a hard lesson learned.
If I’m being perfectly honest, this lesson had a major impact on my willingness to experiment with Li-ion battery packs.
The problem with the model of pack I had purchased was not the battery chemistry or construction, per se, but the charge controller). The fact is, Li-ion batteries require millivolt accuracy and a number of protections to detect and stop thermal runaway. Battery packs with multiple cells need a battery management system (BMS) that also balances the cells and monitors them closely. Fortunately, most manufacturers of the technology now understand this.
Modern Li-ion cells and chargers are much safer and more stable
Since then, Li-ion battery chargers have become both orders of magnitude safer and more effective. Still, I only charge these batteries on a surface which, should the battery be tempted to melt down, would be less likely to be damaged or serve as a fire hazard. I also never leave them unattended during charging.
With that said, I don’t think Li-ion batteries are to be feared. Obviously, many of us walk around with one tucked in our pocket all day––in our smartphones! They’re generally considered very safe now. Of course, I’d only buy the best and would steer away from the lowest-costs units you might find on eBay and Aliexpress, as many of these products are made in places with little oversight or regulation.
Another interesting fact about Li-ion battery packs is that since their voltages are usually available in multiples of approximately 3.6 volts (e.g., 3.6, 7.2, 10.8, 14.4 and 18 volts), they are not always ideally suited for radios that require 13.8V input power. Some packs, however, have circuitry that provides an output voltage closer to your desired amount.
One Lithium-ion battery pack I’ve been using with my Mountain Topper MTR-3B, Elecraft KX2 and KX3 transceivers is a (very affordable) TalentCell rechargeable 3000 mAh Li-ion battery pack that provides both 12V and 5V USB power. It has built-in charging circuitry and is very compact. I purchased mine for about $25 on Amazon.com, and have been very pleased with it so far.
Summits On The Air operators often place priority on smaller-sized and lighter-weight power sources, and thus turn to Li-ion battery packs. Many SOTA friends have invested in high-quality balance charger/dischargers to maximize the life of their batteries, and have been happy with the performance they receive. A quality charger may costs upwards of $60, but is worth the investment if you choose Li-ion batteries as your portable power of choice.
Price: From affordable to pricey, depending on capacity and charger investment
Weight: The lightest weight portable battery options in this list
Voltage: Often in multiples of approximately 3.6 volts: (3.6, 7.2, 10.8, 14.4 and 18VDC)
Longevity: Good. Typically around 400-500 charge cycles if properly maintained
Ease of recharging: Simple, if a self-contained pack; more complex, if using multiple cells that need balancing
Solar charging option: Not advised (yet). There are a number of homebrew Li-ion solar charging projects on the web, but I believe this battery chemistry fares better with a balance charger connected to a stable AC power supply.
Lithium Iron Phosphate (LiFePo4/LFP)
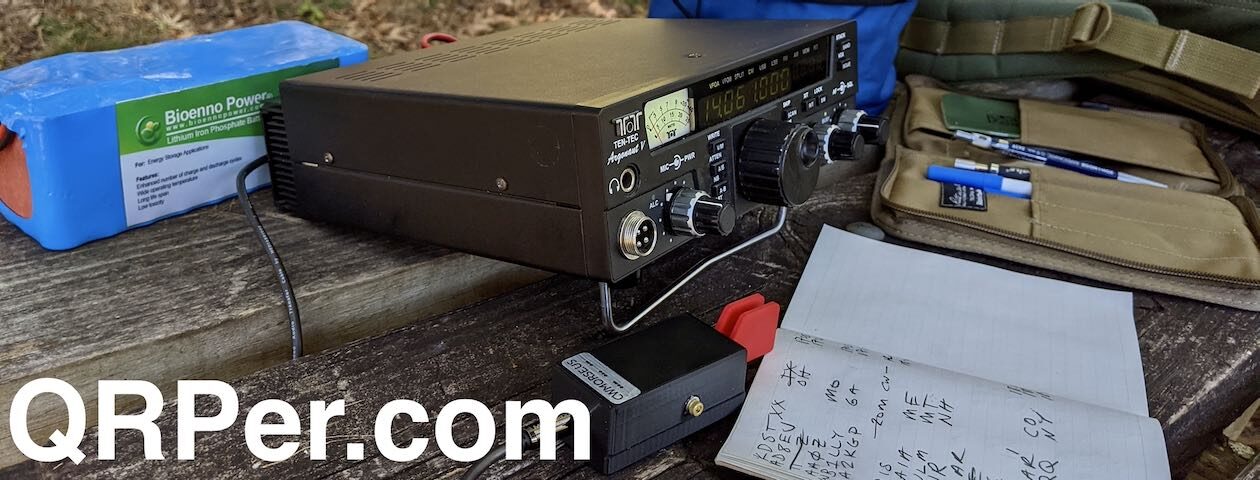
I typically use my 15 Ah LiFePo4 battery pack when powering transceivers like the Mission RGO One that can push 55 watts of output power. I also use this battery to power my Elecraft KXPA100 amplifier on Field Day.
The final type of battery chemistry we’ll cover here is my favorite of the bunch.
There are good reasons why Lithium Iron Phosphate batteries have become one of the choice rechargeable batteries for field radio use.
LiFePo batteries are inherently stable and safe
They offer a longer cycle life than that of other Li-ion, NiMH, NiCad, or Lead Acid batteries–thousands of charge cycles as opposed to hundreds
LiFePO batteries have an excellent constant discharge voltage
LiFePo batteries use phosphates––as opposed to cobalt or nickel, which are supply-constrained and carry heavier environmental concerns
LiFePo batteries have a lower self-discharge
LiFePo batteries are very lightweight compared to SLA batteries
3.2 V nominal output voltage means that four cells can be placed in series for a nominal voltage of 12.8 V, near ideal for most field radio gear
Any cons? Yes…while they’re lightweight, LiFePo4 batteries aren’t as compact as Li-ion battery packs. But the primary negative here is the price. At time of print, LiFePo4 batteries have the highest cost per Amp hour of the batteries discussed in this article. With that said, due to the excellent longevity of these batteries, the LiFePo may be the most cost effective option in the long term.
LiFePo4 battery systems sport built-in battery protection modules to address concerns like over-voltage and balancing.
How do LiFePo batteries stack up?
Price: One of the pricier options, when you include the battery and charger
Weight: Very light weight, but size tends to be larger than comparable Li-ion packs
Voltage: Excellent match for gear requiring 12V – 13.8 VDC
Longevity: Excellent. Thousands of charge/discharge cycles
Ease of recharging: Simple, using the provided charger (battery packs have a built-in charge controller)
Solar charging option: Bioenno sells charge controllers designed to work with LiFePo batteries, handy for the field
Without a doubt, the best-known LiFePo battery manufacturer in the world of ham radio is Bioenno Power. I’ve purchased their batteries exclusively and have been incredibly pleased with the quality, longevity, and performance of their products.
Choosing the right battery for you
Each one of these battery types have their pros and cons, and you can find lengthy, in-depth discussions online about the nuances of each battery chemistry. At the end of the day, however, what matters is which one best suits your particular application and provides your gear with the appropriate amount of voltage.
Here’s when I would reach for each of our types of batteries…
NiMH LSD AA batteries
WD8RIF uses Eneloop rechargeable AA batteries with his Elecraft KX3 field kit (Photo: WD8RIF)
If you’re willing to use a battery pack to run 8-12 cells in series to achieve your required nominal output voltage, Eneloop batteries are relatively affordable, lightweight, and of course, power an array of electronic devices in our world.
Of course, AA Eneloop batteries are also invaluable for those of us who have an arsenal of portable shortwave radios that accept AA cells!
Sealed Lead Acid Batteries
If you’re on a very tight budget and weight is less of a concern, SLA batteries are a great choice. They’re an especially affordable option if you plan to make a solar-powered battery pack since charge controllers are quite simple and affordable.
If you’re looking for a stationary back-up battery for home, these are an excellent choice, as long as you keep the charge topped up.
Li-ion Batteries
Backpacking or flying overseas, and size and weight really do matter? Purchase a Li-ion battery system. Li-ion cells and packs offer the highest energy density of any of the battery chemistries in this list. They’re incredibly compact––and as long as you use a quality charge controller with built-in protections, and you don’t damage or puncture an actual Li-ion pack––they should be quite safe, and you’ll be pleased with performance. Note: Keep in mind some airlines have regulations about the size of Li-ion battery pack you’ll be allowed to carry on board, so do check before departure.
LiFePo Batteries
The 9V 3Ah Bioenno LiFEPo4 pack is very compact and pairs beautifully with the Mountain Topper MTR-3B as this particular transceiver prefers voltages at 12 volts and below.
If you’re looking for a simple, effective portable battery solution that is almost custom-designed to power radio gear, invest in a LiFePo4 battery and charger. I have everything from a 15 Ah 12V LiFePo4 battery that can power my 50 watt Mission RGO One transceiver, to a 3 Ah 12V pack I now use for 2-3 hours in the field at a time with my QRP transceivers. Bioenno has recently sent me a 9 V 3 Ah battery pack to test with my Mountain Topper MTR-3B––it’s incredibly compact, since it only needs three 3.2V cells in series. LiFePo batteries are also the ones I suggest for those who are new to the world of battery packs and want something that is hassle-free and simply performs.
I admit, I’m being transparent here about why I own a total of three LiFePo4 batteries from Bioenno Energy––they’re amazing and I know I can rely on them.
In summary…
…I would offer this final piece of battery-usage advice: whatever you do, don’t “cheap out” on your battery and charging system. No matter what chemistry you decide to purchase, buy the best quality you can afford. If using any variant of a Li-ion battery, heed my tale, and be sure any separate charge controllers you employ will protect your battery (and your home)!
And now…Go out there and have fun. I assure you: when you take your radios––whether portable shortwave radios or ham radio transceivers––to the field, you’ll find you can escape all of the noises that so often plague us indoors. And out there, you, too, may find your radio bliss.
Since last year, I’ve become a bit of an arborist throw line evangelist. Arborist throw lines have made my wire antenna deployments so quick and easy compared with using monofilament fishing line or more complicated systems.
Since purchasing this arborist throw line last year, I’ve never looked back. The throw line never gets caught in tree branches, it’s reusable hundreds of times, and with it I can easily snag branches 50’+ above the ground to hang my wire antennas.
If I’m being honest, I was very skeptical about how easily this bag would work in the field. One of the reasons my throw line storage cube works so well is the opening is large allowing the line to deploy without tangling. Packing up is so fast because the line can be flaked back into the cube in a matter of seconds.
Before purchasing, I was afraid the compact throw line bag might get tangled when being stored in such a small stuff sack. I was really concerned packing the line in the storage bag might take too much time.
I purchased the the throw line bag and a new throw line from Weaver.
At home, I did a full break-in of the new throw line (attaching it to a tree, stretching it to full length, then pulling it for enough tension that some of the bend “memory” is removed). Then I attempted to simply stuff the line in my throw bag–it took ages, because the whole idea of a throw line is that it doesn’t easily tangle. The line wanted to “spring” from the bag as I tried stuffing it in.
A much better way: The “Figure 8” stuffing method
After a field activation this spring, I received a game-changing tip from one of my subscribers and I hope they step up to take credit! (Update: it was NW3S!–thank you!).
When stuffing the line back in the bag, wind it on your hand using the figure 8 method. I wind almost all of my lighter-weight cables and antenna wires in a figure 8 so that they deploy without getting tangled. I’ve been doing this for years and it works brilliantly.
I’d never thought about using this method on the arborist throw line. I was amazed with how effectively it worked.
Video demo
I made a short video (thank you for requesting this, Scott!) to better demonstrate how I pack my throw line storage bag now:
This method works amazingly well and I can usually pack the entire line within one or two minutes.
Again, I’m incredibly grateful to the subscriber who first suggested this method!
Until 2016, I had never purchased a commercial field antenna; I built all the ones I had ever used.
These days, I take a number of commercial antennas to the field and use them in my real-time videos and I really enjoy deploying and using them. My buddy Eric (WD8RIF) reminded me, though, that I hadn’t actually used a homebrew antenna in ages. He was right!
You see, while I believe commercial field antennas can be incredibly durable and compact, it’s important to note that antennas are one of the easiest components of an amateur radio system to build yourself. They require only the most simple of tools and are very affordable. And the best part? They can perform as well as those that are available commercially.
I also get a great deal of pleasure out of building things.
A simple goal
I’ve mentioned in previous posts that I often set a little goal that runs in the back of my mind for each park or summit activation I make.
On Monday, June 14, 2021, I made a simple goal: buy my antenna wire en route to Lake James State Park, build the antenna on site, and complete a valid Parks On The Air (POTA) activation.
A very simple antenna
I also decided to employ my Xiegu X5105 since 1.) it’s one of the most affordable general coverage QRP transceivers I own and 2.) it has a built-in antenna tuner (ATU).
One of the cool things about having an ATU is that, if it has the matching range, you can allow it to do the “heavy lifting” in terms of matching impedance.
Although I’d never put the X5105 to the test, I suspected its internal ATU would have the matching range to forgo building a 4:1 or 9:1 transformer and simply pair it directly with a random wire.
All I would need was a 28.5 foot length of wire for a radiator, at least a 17 foot length for a counterpoise, and a BNC to binding post adapter.
The antenna would benefit from multiple 17′ counterpoises, but I really wanted to keep this setup dead simple to prove that anyone can build an effective field antenna with a very minimum amount of components.
Even though I have plenty of wire lying around the house to build this simple antenna, I wanted to pretend I had none to prove that any wire would work.
And to add just a wee bit more challenge, I also limited myself to shopping for antenna wire between my home and the park without making a serious detour from my route. That really limited my options because there isn’t much in terms of commercial areas between me and Lake James State Park.
The wire
As I left the QTH, I decided that the best spot to shop was a Walmart in Marion, NC. It would only be a four minute round-trip detour at most. I had a hunch that Walmart would even have speaker wire which would be ideal for this application.
In my head, I imagined I would have at least three or four choices in speaker wire (various gauges and lengths), but turns out I had a difficult time finding some at Walmart. We live in such a Bluetooth world, I suppose there isn’t much demand for it these days. A store associate helped me find the only speaker wire they had which was basically a 100 foot roll of the “premium” stuff for $17 US.
While I would like to have paid a fraction of that, in the end it’s not a bad price because once you separate the two conductors, you have double the amount of wire: 200 feet.
Although the frugal guy in me cringed, I bit the bullet and purchased their speaker wire. To be clear, though, I could have found another source of wire in that Walmart, but I preferred speaker wire for this application. And $17 to (hopefully!) prove a point? That’s a deal!
Lake James State Park (K-2739)
Once I arrived on site, I found a picnic site I’d used before with some tall trees around it.
Here’s how I prepared the antenna:
First, I cut 28.5 feet of the speaker wire from the roll and split the paired wires so that I’d have two full 28.5 foot lengths.
Next, I stripped the ends of the wire and attached banana jacks I found in my junk drawer. Although these aren’t necessary as the binding post adapter can pair directly with the wire, I though it might make for a cleaner install. In the end, though, I wasn’t pleased with the connection to the radiator, so dispensed with one of the banana jacks on site, and later dispensed with the other one as well. The connection is actually stronger without the banana jacks.
I then deployed the 28.5 radiator with my arborist throw line, and laid the other 28.5 half on the ground (the ground of this antenna would pair with the black binding post, the radiator with the red post). I only needed 17 feet of counterpoise, but once it couples with the ground, I don’t think any extra length makes a difference (although less than 17 feet likely would).
The antenna was essentially set up as a vertical random wire with one counterpoise.
I then plugged the BNC binding post adapter into the rig, hit the ATU button, and was on the air.
I’ll admit: I was a bit nervous putting this antenna on the air. Although I felt the X5105 ATU *should* match this antenna, I had no idea if it actually would.
Fortunately? It did.
At this point, if you don’t want any spoilers, I suggest you watch my real-time, real-life, no-edit, no-ad, video of the entire activation (including buying and building the antenna!).
I was very pleased that the X5105 found a match on the 40 meter band.
I started calling CQ in CW and validated my activation by logging 10 stations in 13 minutes.
Honestly: it doesn’t get much better than this.
I logged three more stations on 40 meters CW, then moved up to the 30 meter band where the X5105 easily found a match.
I worked one station on 30 meters before heading back down to the 40 meter band to do a little SSB. I logged three SSB stations in five minutes.
Mission accomplished!
In the end, I logged a total of 17 stations including a P2P with K4NYM.
Not bad at all for speaker wire!
After the activation, I tested the X5105 ATU by trying to find matches on other bands–I was able to find great matches from 60 meters to 6 meters. Most impressive!
All I can say is that I’m incredibly impressed with the X5105 internal battery. This was my fourth activation from one initial charge on May 16. The battery lasted for 20 minutes, taking me well beyond the 10 contacts needed to validate this park. I’ll now consider taking the X5105 on a multiple SOTA summit run!
Short Hike
Even thought the heat was intense and the humidity even more intense, I decided to take in a 2 mile hike post-activation. I snapped a few shots along the way.
This is the Christmas Fern which derives its name from a few characteristics: its resilience to early season snows maintaining a dark green color beyond Christmas, and because folks believe its leaves are shaped like Santa’s boots or even Santa on his sleigh.
Improvements
I’ll plan to add more counterpoises to the speaker wire antenna as I know this will only help efficiency.
In addition, I’ll plan to build even more antennas with this roll of speaker wire. If you have some suggestions, feel free to comment!
Like many I’ve taken the plunge on an Icom IC-705. Even though I sold off an old Yaesu 817 to finance part of it, it still cost a very pretty penny and I didn’t want to shell out more for a tilt stand or bail.
Especially at the rather extravagant prices they’re going for now. $30, $40? No thank you. (Really, the radio, at $1300, should have come with one in the box, but why beat that dead horse – it is what it is.)
In any case, I looked around the house for something to DIY one with. I found a couple of metal angle brackets, screws that fit the mounting holes, and some tiny rubber bumpers to shield from nicking up the radio’s plastic case. Voila! Instant tilt stand. See pics:
And just the right angle too. My plan is to plastic-dip the brackets so I can get rid of the bumpers as well as not nick up any softer surface the radio sits on.
IC-705 Bluetooth Question
Meanwhile, a question for you and other owners of this radio.
What’s up with the Bluetooth function? I have three bluetooth speakers and a small audio amp with built in BT, and I can’t get audio to play through them. The unit sees the accessories and connects. But no sound. I’d updated the firmware to 1.24, just in case they might have addressed any issue. Still no joy.
That being said, I can control the radio via BT with android apps, etc, but no audio. A very disappointing development for such an expensive radio.
Oh well. The good with the bad and all that…
Joe Patti (KD2QBK)
Thank you for sharing this, Joe! That’s a very clever and simple solution for the IC-705 stand.
As for the Bluetooth functionality, I’ve yet to use it. Hopefully, someone here can chime in and comment with advice!
As a follow-up to my query yesterday, and so that others can find this on the web, I’ve posted the procedure below for using Xiegu X5105 CW memory keying.
Many thanks to Gary (KE2YK) and many others for sharing the following method:
To configure the 10 CW memory messages:
Go to Menu 3 by pressing the MENU button until 3 appears beneath the power meter on the display.
Hit MSG
Select MSG number with VFO (Tuning Knob)
Press the EDIT button
Scroll through letters / numbers with the VFO and hit INS for each selection
When letter/number selections are complete, press SAVE
Repeat for each custom message and when done, hit QUIT
To play the 10 CW preset messages:
Go to Menu 5 by pressing the MENU button until 5 appears beneath the power meter on the display.
Select DIGI
Select CWDEM from mode choices (leftmost button in menu 5) by pressing the button until CWDEM appears
Repeatedly hit MSG to select specific message number
Press PTT on body of rig or perhaps press PTT on mic. This will send the selected message one time.
To exit, hit MENU for other menu selections
No doubt, for CW memory playback, this is cumbersome. In fact, if Xiegu doesn’t update the firmware with an easier way to initiate playback (as they had in the original firmware version), I see that I’ll only use memory position 1 for calling CQ. I wouldn’t want to go through the trouble of selecting a different message for playback in the field and in the middle of an exchange. That’s just a little too clunky to be practical.
I’ve sent a note to Xiegu about this. With any luck, perhaps they’ll improve the firmware for easier operation.
Thank you again, readers for sorting out the mystery!
Thomas, my MFJ 1984MP arrived today so looking forward to using a resonant antenna with my 705 but also have the LDG Z-100Plus tuner as a back up.
I’ve seen many antennas that have a winder built in allowing the user to wind in a figure eight fashion. It might help keep the kinks down.
I have fashioned a cord winder for the MFJ 1984 EFHW Antenna. It is a winder made for electrical drop cords and comes in a 3 pack at Lowe’s. Very inexpensive solution for adding it to the MFJ antenna with a couple of zip ties. I’m set to go works some POTA with an efficient antenna. Thanks for your videos deploying the MFJ antenna in the field.
Thank you for sharing this tip, Max! I like how you can so easily secure the antenna to the extension cord winder with cable ties.
Many thanks to Mark Hirst, who shares the following guest post:
Pick and Pluck Foam
The old adage of ‘measure twice and cut once’ is very apt when using pick and pluck foam. The inserts are not cheap and mistakes are hard to rectify.
Whether you are preparing a large case with several items in a shared insert, or focussing around a single item, planning the layout is key.
Item weight is also a factor to consider, as this will affect decisions on wall thickness between items and the case.
Finally, how hostile is the environment likely to be? Is the case going in your backpack or car where you’re in careful control, or is going to be subject to careless handling by others?
Planning the layout
Once you’ve settled on a case size and how much padding you need, a non-destructive way of planning the layout is to use cocktail sticks.
These can be inserted into the corners of the foam segments to trace the outline of the radio and any items such as controls and ports that may extend from the body.
Since the size of the segments is in fixed increments, matching the exact dimensions of the radio is down to pure luck. I would go for a slight squeeze on the radio body if feasible to make sure it’s always in contact with the foam, but give some breathing room around the controls and ports.
The example below is a case I use for backpack transport. It has rather thin but adequate side walls for that purpose. I prioritised wall thickness facing the front and back of the radio, and also on the side opposite the carry handle. Note how the foam comes right up against the body of the radio, but leaves the front controls with some clearance.
Outlining using cocktail sticks
This has the benefit of keeping any sudden shocks away from the controls, and also reduces the number of places where foam is subject to tearing and compression when the radio is inserted and removed.
The completed insert
Separating the foam
The best place to start is along the planned route of a long side wall. Use your thumbs to separate the surface of two segments on one side from two segments on the other.
Once the surface tear has got going, you should be able push a finger down between the four segments, extending the tear till it reaches the bottom of the foam. At this point, you have a cut all the way through.
Separating the foam
Now you can peel the foam apart at the upper surface in each direction, using your forefinger to again push down between the segments to complete the separation down to the lower surface.
Work carefully around the cutouts and protrusions accommodating the controls. The protrusions are potential weak points at this stage, so be sure to proceed slowly.
If you need to practice, you can always start by separating segments deep within the section that will be removed till you get the hang of it.
Reinforcement
While pick and pluck means you don’t need special tools or templates to cut the foam, the remaining material in your insert is inherently weaker than a solid structure.
The solution I’ve used is to fill the residual cuts with a solvent free adhesive. Solvent free adhesives are often aimed at children for safety reasons, and while there are solvent based adhesives for foam, the one I used dries clear with a resilient flexible bond that is stronger than the foam itself.
I run a finger gently along the exposed walls, edges, and around the protrusions. This makes the potential weak points and stress areas immediately apparent as segments naturally separate along the pick and pluck cuts.
Armed with a tube of adhesive and a finger (usually a thumb), you can gently open the weak point and then run the nozzle of the tube down the cut, dispensing generous amounts of adhesive as you go. The two sections of foam close up as the nozzle passes by, with the adhesive soaking into both sides. As long as you don’t go overboard, the adhesive will stay within the join and you won’t have to wipe away any excess.
Reinforcing corners
Side walls are not subject to the same stress as protrusions, but you will probably still spot sections with deeper cuts that need attention, and you will definitely want to reinforce the corners.
Reinforcing sidewalls
I’ve allowed at least a day to be sure the adhesive has set. It’s worth going over the insert again to see if you missed anything the first time round.
The Adhesive
The Bostik solvent free adhesive resembles runny white toothpaste when dispensed from the tube, but dries clear when set.
Inevitably, when I tried to find more of it recently, I discovered that the easily recognisable colour and branding had made way to a confusingly generic scheme shared across a variety of different adhesive types from the manufacturer.
I found this old listing for Bostik 80518 on Amazon UK, and another here on Amazon US. Based on the product number, a modern equivalent seems to be here.
I’m sure there’s nothing unique about this particular product, other than I’ve found it to be foam friendly over the years. Aside from being solvent free, its ability to seep into the foam is a key asset.
Since the first step of creating an insert leaves you with a potentially discardable piece of foam anyway, you have plenty of raw material to experiment with if in doubt.
Additional Reinforcement
Even if you have been generous with the side walls of your foam insert, a heavy radio might demand some additional work to ensure the longevity of the foam.
While the example case shown above worked OK to start with, I noticed that the floor of the case and the side wall facing the back of the radio were taking a beating.
The problem was caused by the feet of the radio, cooling fins, power and antenna connectors. During transport, these were pushing into the foam with the full weight of the radio behind them. Subject to such concentrated point forces, I could see that the foam wasn’t going to last.
Using very thin and very cheap flexible plastic cutting boards from my local food market, I cut out panels which spread the point compression across a much wider area.
Additional Reinforcement
Now when I put the case into a backpack, I ensure that the radio is sitting on its tail with the cooling fins against the rear panel.
Conclusion
While it’s possible to create ad-hoc transport solutions for radios, there’s nothing quite as satisfying as a sturdy padded case that is made to measure. The cases are forever, but the foam needs care and attention, so I hope these tips help you build a lasting solution for safely transporting your pride and joy.
I am new – just about to start – portable, QRP operating. I’m just waiting for the weather to cooperate a bit.
Via phone, I have been looking around for the “proper” way to call CQ indicating either QRP or portable – or both! but I haven’t found that. I do see CW “calling CQ” samples. Can you give me that information or direct me to a site that might give some guidance? Not a big deal but I would like to start out on the right foot and sound like I know what I’m doing.
Thanks.
Susan
Thanks for your question, Susan! I’ll share, below, how I call CQ when QRP and portable:
Calling CQ Basics
There is no truly standard way to call CQ, but most CQs follow a certain pattern. Some are short, and some are long.
In general, if you’re calling CQ and simply want to work anyone anywhere and you’re open to a rag-chew (extended conversation), you might start by giving a longer CQ. Some operators will do CQ calls that last nearly 30 seconds, but I don’t personally do that. I use a call and repeat it leaving an interval of maybe 5-8 seconds between repeats. I’ll say something like:
“CQ CQ CQ, CQ CQ CQ, this is Kilo Four Sierra Whisky Lima, Kilo Four Sierra Whisky Lima calling CQ and listening.”
I repeat until I receive a reply.
I’ll sometimes change the length of the CQ call and add/remove words when I repeat. I might use a variation like:
“CQ CQ CQ this is Kilo Four Sierra Whisky Lima, Kilo Four Sierra Whisky Lima calling CQ and listening.”
then
“CQ CQ CQ this is Kilo Four Sierra Whisky Lima calling CQ to anyone, anywhere and listening.”
Side note: If you’re doing a Park or SOTA activation and you’ve been spotted on one of the networks, then keep your CQ short. Something like:
“CQ POTA CQ POTA CQ POTA this is Kilo Four Sierra Whisky Lima calling CQ for Parks On The Air”
Calling CQ QRP or Portable
Again, there’s no truly standard way of doing this, but when I call CQ QRP–which actually isn’t often–I’ll say:
“CQ CQ CQ, this is Kilo Four Sierra Whisky Lima calling CQ QRP and listening.”
or
“CQ CQ CQ, this is Kilo Four Sierra Whisky Lima calling CQ Portable and listening.”
I’ve even been known to say the number of watts I’m running in the CQ call.
But it’s truly rare that I note I’m running QRP in my CQ call. Why? I enjoy receiving and sending a good signal report then revealing “I’m running 5 watts into a dipole antenna.” I usually get very positive reactions and I believe I get more replies to my CQ when I’m not revealing I’m QRP until we’re in the exchange. But honestly? It’s all just a matter of personal preference.
Working stations: My favorite approaches as a QRP station
K4SWL portable VY2!
I’ve been known to spend the bulk of the summer in an off-grid cabin with my family in the Canadian Maritimes. I’m always QRP during these vacations and I love making contacts.
Here are a few approaches I use that I feel get the most contacts:
1.) Call CQ on a QRP calling frequency
When I’m operating QRP, I try to operate on or near generally accepted QRP calling frequencies–here’s a handy reference sheet. QRPers hang out there, so there’s a decent chance I might make a QRP to QRP contact on one of those frequencies. Again, I typically use a standard CQ call instead of identifying I’m QRP, but it’s also perfectly fine to say you’re QRP.
Also, when I’m at home and have a radio turned on in the background, I’ll often keep it set on a QRP calling frequency so I can answer a QRP call.
Sometimes, the best approach is to reply to other stations’ CQ calls.
This is so effective because the station is listening carefully for someone to reply to their CQ. If your signal is a little on the weak side, they’ll likely still reply.
As a QRPer, I’ll often start my search by tuning to one of the QRP calling frequencies mentioned above, but if no one is there, I look for any stations calling CQ with no replies.
3.) Move to a band with less activity
I’m sure some will disagree with me here, but I enjoy moving to bands like 17 meters when I’m QRP.
I’ve had very good success in the past if propagation is reasonably stable (an important factor in making this work).
I love 17 meters because the band is typically quiet and the density of stations isn’t that of, say, the phone portion of the 20 meter band. When I’m calling CQ on 17 meters, I’m often one of only a handful of operators I hear on that band, so I stand out a bit more. In fact, I’ve worked some of my best QRP DX on 17 meters. The trade-off is you might call CQ a while since there are less people on the band. This is where a voice memory keyer comes in handy!
Have fun!
Once you’ve made a few contacts on the bands, you’ll sort out your favorite CQ calls and what you include in them. Of course, learn from others you hear on the bands. Listening is always key.
My only advice would be not to do 30-45 second long CQ calls without leaving a break for a station to call back. Many would-be contacts will move on if they feel like they have to wait too long to answer your call. It is important, though, to send a few CQs and repeat your call at least twice anytime you’re giving a general CQ call on the HF bands.
Readers: What’s your favorite way of calling CQ QRP or Portable? What strategies work best for you? Please comment!
Many thanks to Frank Lagaet (ON6UU) for sharing the following guest post:
The EGV+ Three Band Transceiver Kit
by Frank Lagaet (ON6UU)
Another EA3GCY kit has seen daylight. The EGV+ is ready for you all.
It was beginning 2021 I got word a new kit from EA3GCY was ready and distribution could start. After a successful build of the DB4020 I did not need much time to decide to buy this kit, a week later the kit arrived at my QTH. As weather was good I did not start immediately building but then winter kicked in, with snowfall and frost, perfect time for some quality time and building the kit.
What do you get ?
The kit has a general coverage receiver from 6 to 16MHz, it has a keyer built in, has RIT without limit, requires only 0.25A on RX and smaller than 2A on TX. Dimensions are 18x14cm and weight is 0.3Kg. It is CW only, able to produce 8W on 40 and some 5-6 on 30 and 20. The kit has an AB class amplifier. Spurious is below -50DBc. The receiver is a heterodyne type balanced mixer, sensitivity is 0.2µV minimum and the CW filter is some 700Hz wide, the AGC is on audio. Furthermore the transceiver is equipped with both output for loudspeaker as for a headset or earbuds.
The kit arrived in a brown envelope and in that envelope I found a well-packed packet of plastic bags and the printed board well packed in bubble wrap. Around that another layer of bubblewrap. Safe!!
All plastic bags were checked, all needed stuff was there, super, well done Javier.
All components were installed in about 10 hours “relax max style”, if you have built some kits already you can easily do this one, all elements are far enough out of each other, the board is not overcrowded at all. Some attention is needed when soldering the IC’s and display but even that is a piece of cake. Be careful when installing the SI5351 module.
Winding the toroids, just follow what is in the manual, it is not that hard to do, I don’t understand what many find so difficult. Just take your time and don’t rush into it.
I got the transceiver up and running quite quick. I didn’t install a speaker in the cabinet but decided to go for a transceiver where no speaker is in. If I want to use it on SOTA or GMA I don’t need the extra weight and can take earbuds with me. So I installed the speaker connector on the board.
I made connections towards the CW key and CMD push button with jumper cables which fit exactly on the headers Javier supplies, a little glue to keep them in place is also added afterward. For easy operation I mounted the CW key connector and CMD pushbutton on the front of the transceiver.
Do to be able to withstand high power nearby stations, I mounted the EGV+ in a homemade box which is made of printboard. The box should be a Faraday cage to keep all QRM out. If you buy a box, buy one in metal. I added a laminated front and back which make the transceiver look kinda cool. Now you can also buy a box from qrphamradiokits.
Alignment
The alignment is done on 40 meters: crank up the volume and start turning the 2 coils (L1 and L2)to maximum volume. Be careful to handle these with caution and don’t use metallic screwdrivers. Connect an antenna after you’ve done that and do the alignment of the coils again for maximum volume. Find a station on 40 and redo the alignment once more. You should already have good results now.
P1 Set sidetone level to your liking.
P2 Set the hangtime of the relay after you’ve been on air–fast fingers will need a quick release. Set this to your liking.
P3 Connect a power meter between a dummy load and the transceiver, set power on 40 to some 8 Watts. Measure on 30 and 20 meters, you should find some 6-7W there. Don’t set the power to full if you want a long life for the final in the transceiver. Mine is set for 6W on 20, resulting in some 7.5W on 30 and some 8.4W on 40. I think I will reduce even more.
P4 Set to max, it is the RX-attenuator.
P5 Don’t pay too much attention to the signal meter, mine is set at 6/8 of the potmeter’s range. It is only an indication. If you don’t want the S-meter then you can do a start-up sequence with the tuning knob.
These are in fact the alignments you need to do inside the transceiver. You should also check Xtal calibration and BFO, these are settings which you need to do in the set-up. Don’t forget to write all down when you have maximised these settings. If you do a reset, all these values are erased too so be carefull.
The complete CW 3 bander
Well, you get a 3 band transceiver which you build yourself, it has RIT and XIT, has 4 memories on the KB-2 keyer, speed of CW can be set between 0 and 50WPM and you can set the KB-2 as a beacon which can be handy too. The EGV+ provides you with 3 bands which are almost for certain insurance for QSOs when going on SOTA, GMA or POTA.
You may have noticed some resemblance with the DB4020. You are right as some parts are the same on the board. The designer worked on the same platform to make two completely different transceivers. The result is twice the fun for kit builders.
I made a box myself since, at the time of ordering, there were no boxes available, here’s the result.
The naked printboard transceiver.
After adding a laminated front to the trx, it looks now like this. You can see it is not made professionally but I like it.
The paper which is between the plastic was first cut out for the display before placing it in the plastics so giving an extra protection to the display.
I have also made a retractable stand for it, when folded back it is next to the bottom of the transceiver, when folded out the stand is under the front of the transceiver, the retractable stand is also made out of printboard.
It’s an easy-to-make stand–take some old printboard and solder it together. The pictures explain it all, I think.
Meanwhile, I already made a lot of QSOs with this small (16 X 20 X 6 cm) QRP transceiver. The power out is better than expected and even reduced so all bands are within QRP regulations.
Finally, I’d like to say that I’m not sponsored to make this kit, I don’t have any ties with the kit producer, nor do I gain money with building it. If people would like to have this QRP kit built for them I’m willing to help out in populating the board and aligning it. A ready made box is available with qrphamradiokits. This also stands for the DB4020 which I made earlier.
The kit comes for 125€ without shipping costs. Many European countries will have no shipping costs at all. The enclosure comes for 50€ all included. This means you have a complete 3 band radio for about 200€. In my eyes, this is a pretty good deal.
Connecting an international community through low-power field radio adventures.
Please support QRPer by adding us to your whitelist in your ad blocker. Ads are what helps us stay online. All of our ads are ham radio related--no junk, we promise! Thank you!