This month, we’ll take a deeper dive into the types of radio kit you might choose to assemble based upon your activity goals. And finally, we’ll look at my “golden rules” of field kits, which I hope you’ll find useful.
Types of field radio kits
I configure and outfit my radio kits based on the environment in which I plan to deploy and operate, and which determines in no small way just what I need to pack besides the basics.
I roughly divide my field kit types as follows…
The Field Day or “Picnic Table” Kit
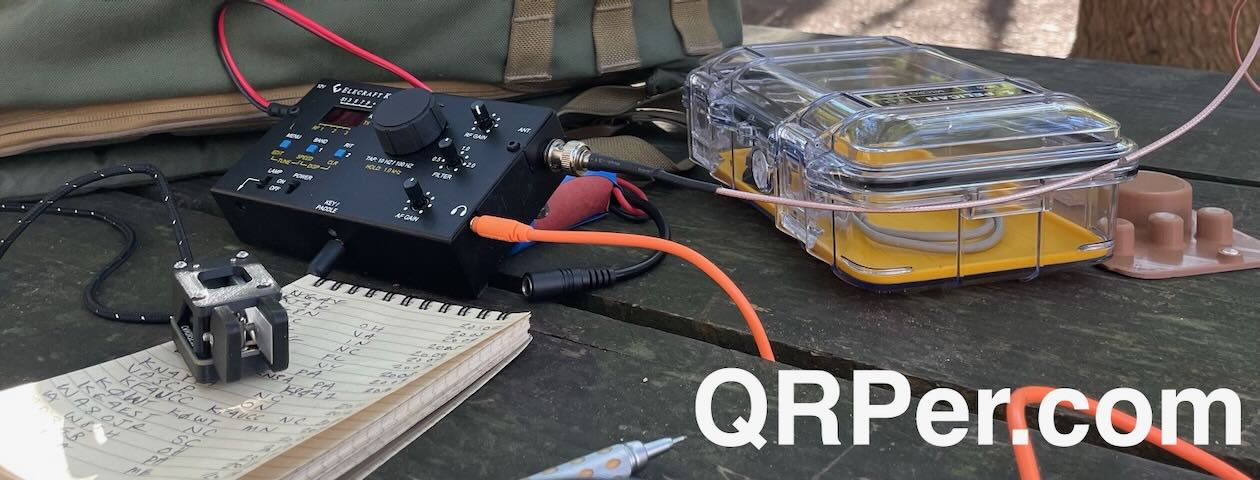
This is probably the most popular type of field kit in the world of amateur radio. Picnic table kits are designed with portability in mind, but not designed with distance hiking in mind. This is a very popular type of kit for Field Day or park activations through POTA or WWFF.
These kits are typically packed in a backpack, a Pelican-type utility case, or a self-contained and field-ready box.
My picnic table kit is packed in a large Red Oxx C-Ruck rucksack. If I haven’t already made it clear, I’m a self-professed pack geek and I love this Red Oxx Pack because it has large zippered pockets on the outside, a rain flap with storage on top, and one large compartment on the inside.
Most of my on-air time is in the field. While I enjoy operating from the shack, I’ve discovered I especially enjoy operating in the great outdoors.
Besides being a fan of hiking, camping, and the great outdoors generally, I also am particularly fond of radio field gear. I like portable transceivers, portable antennas, battery packs, and all of the accessories that make field operation efficient and enjoyable.
I appreciate the emergency communications skills I’ve developed in the field, too. Should the need (or opportunity) arise, I now keep a complete field kit packed and ready to go at all times, and can even deploy all of it within just ten minutes. In my early days of ham radio operation, I might have easily spent thirty minutes setting the antenna, alone…especially on Field Day, with folks watching me struggle to untangle wires and cables, followed by the undoubtedly entertaining attempts I made to put a line into a tree to deploy the antenna. But after deploying a variety of antennas hundreds of times now, I find that––while I’m still not perfect––I finally have a bit of skill and the process of tossing up a line is becoming much swifter and smoother.
Confessions of a pack geek
The Red Oxx C-Ruck loaded and ready for the field!
If I’m being honest with myself, I admit: I also simply get a thrill out of kitting out my field packs, as well as organizing and tweaking them over time. Yes, (don’t judge me!) I actually like packing up my field gear.
I think my passion for organizing and packing gear goes back to a former career when I lived in the UK, Germany, and France, and was required to travel throughout Europe frequently. Originally inspired by travel guru Rick Steves, I’ve always appreciated the footloose feeling of having all of my travel gear in one lightweight pack. I don’t like checking in luggage, but love the freedom of grabbing my backpack and skipping the baggage claim carousels. And I also like knowing that, even though my gear is compact, it contains everything I need.
I’ve become something of a “less-is-more” traveller. Two years ago, for example, I traveled for one week using what Frontier Airlines classifies as a “personal carry-on.” My Tom Bihn Stowaway pack, which only measures 14.0″ (w) x 9.4″ (h) x 8.1″ (d), carried everything I needed for a conference, including my own presentation gear.
My Tom Bihn Stowaway personal carry on convertible pack with everything I needed for a one week trip including a conference.
Packing for that trip was great fun as it really challenged me to decide what was essential and what was not. My iPad doubled a computing and presentation device, for example, but I also packed a small flashlight and a mini first aid kit, which I felt were important. Of course, I also carried a small portable Shortwave/AM/FM radio and my Yaesu VX-3R handheld…also vital, as I can’t leave home without radios!
Getting started with a field kit
Putting together a field radio kit is so similar to packing for travel: you must first do an assessment of what you need, starting with the basics––then organize it, pack it, and test it.
In my world, this is a very deep topic. We’re going to break down this topic into two parts.
This article, Part 1, we’ll dive in:
first, going over the obvious components of a basic field radio kit;
second, discussing the benefits of going low-power (QRP) if that appeals
In Part 2, we will:
look at variations of kits based on activity, and finally
review what I consider the “golden rules” of a good field radio kit
The basics of a field radio kit
First, let’s go over the basics of your field kit, considering that that these primary components will dictate your bag, pack, or case size.
A transceiver
The lab599 Discovery TX-500
Since I’m a bit radio obsessed, I have a number of QRP transceivers I like to take to the field. But if you have selected one transceiver you plan to dedicate to field work, or simply have only one transceiver, period, you can build a kit around it (and see my note below about “modular” kits). If budget allows, you might consider buying a radio specifically for field use, so it can always be packed and ready to go.
There are a number of transceivers on the market that are designed with field use in mind. Some are compact, power-stingy CW-only QRP transceivers that might only operate on three ham radio bands, while others are 100-watt general coverage transceivers that even have built-in antenna tuners––there’s a wide range of options.
Look for field-friendly, built-in options like:
CW and voice-memory keying;
SWR and power meter readings;
a battery voltage indicator;
low current consumption;
the ability to lower power to at least one watt;
an internal battery option; and
an internal antenna tuner option
And the more such options are already built into your field rig, obviously, the less separate accessories you’ll need to pack and keep track of in the field, which is a good thing.
The Elecraft KX2 has a built-in ATU, battery pack, and even attachable CW paddles!
Some of my favorite field-ready general-coverage transceivers currently in production are:
The Elecraft KX2 A full-featured, inclusive, and compact 80-10 meter transceiver that’s truly a “Swiss-army knife” of field operation (see November 2016 TSM review)
The Elecraft KX3 Benchmark performance, wide array of features, and compact design
The lab599 Discovery TX-500 Military-grade engineering, weatherproof, spectrum display, and benchmark current consumption for a general-coverage radio (see October 2020 TSM review)
Mission RGO One Top-notch performance, 50-watts out, and excellent audio (see November 2020 TSM review)
The Yaesu FT-817/818 Rugged chassis, 160-6 meters, VHF and UHF multi-mode, both BNC and PL-259 antenna inputs
The Xiegu X5105 Affordable, 160-6 meters, 5 watts output, built-in ATU, and built in rechargeable batttey
The Xiegu G90 Affordable, relatively compact rig with built-in ATU, color screen with spectrum/watefall, good audio, and 20 watts of output power (see August 2020 TSM review)
The Icom IC-705 Benchmark performance, a multitude of features, exchangeable battery packs, 160-6 meters, VHF and UHF multi-mode, D-Star, GPS, WiFi, Bluetooth (see February 2021 TSM review)
The Yaesu FT-891: Affordable relatively compact radio with detachable faceplate, 100 watts output, and excellent audio (see November 2017 TSM review)
An important side note for field contests: if you plan to use a field transceiver in an event like the ARRL Field Day and/or another popular radio contest, make sure you choose a transceiver that can handle tightly spaced signals in an RF-dense environment. This is not the time to pull out a lower-end radio with poor receiver specifications. Use Rob Sherwood’s receiver test data table as a guide.
An antenna––and a means to deploy/support it
The CHA LEFS sloper
This particular topic, alone, might warrant a three-part series of articles. So, to keep the scope of this article realistic, let’s just say that you should build or buy an antenna that can comfortably handle the wattage you’re pushing into itin all the modes that you operate, considering that some 100-watt SSB-rated antennas might melt or arc if you run 100 watts CW or FT8.
I would suggest you consider having at least one resonant antenna, like an end-fed half-wave (EFHW) that might cover 40 and 20 meters without the need of an antenna tuner to match the antenna impedance to your rig.
Some of my favorite portable antenna systems?
I’m a big fan of Chameleon Antennafor their ease of deployment and benchmark build quality. Their prices range from $145 for the Emcomm III random wire, to $550 for their MPAS 2.0 vertical antenna system. These prices are near the top of the market, but Chameleon antennas are all machined and produced in the US and the quality is second to none. These are antennas you might well pass along to the next generation, meaning, really heirloom-worthy kit!
The PackTenna 9:1 UNUN
PackTennas, likewise, are pricey for such a compact product, but they are also beautifully engineered, lightweight, and designed for heavy field use. PackTenna produces an EFHW, 9:1 UNUN random wire, and linked dipole models. They’re some of the most compact field antennas on the market that can still handle as much as 100 watts of power output.
My Wolf River Coils “TIA” vertical antenna
Wolf River Coils verticals are affordable, compact, and resonant––thus an ATU isn’t needed. It will take some time to learn how to adjust the coil during frequency changes, but they work amazingly well. I have the WRC Take It Along (TIA). Their antennas are designed to handle 100 watts SSB, 50 watts CW, or 20 watts digital.
The EFT Trail-Friendly
Vibroplexsells a number of compact field portable antennas and is the manufacturer of Par End Fedz offerings. I’m very fond of the EFT Trail-Friendly and the EFT-MTR.
The MFJ-1984LP EFHW packs a lot of performance for the price
MFJ Enterprisesalso has a few portable antennas in their catalog, and it’s very difficult to beat the price and performance of their antenna gear. I have their $50 EFHW antenna (the MFJ-1982LP) and love it.
The Elecraft AX1 attaches directly to the BNC port on the KX3 and KX2.
I’ve also had tremendous fun with the uber-compact Elecraft AX1 antenna. Unquestionably, it’s the most compact and quickest-to-deploy antenna I own. It’s designed to pair with the Elecraft KX2 and KX3 using the optional internal antenna tuner.
There are a number of other antenna manufacturers who cater to portable operators. For example––although I’ve not yet had the opportunity of testing their antennas––SOTAbeams is highly regarded among SOTA enthusiasts.
Short on cash? No worries; you can build your own! In fact, until 2016, I had never purchased a field antenna; I built all my own. EFHW antennas and random-wire antennas are no more than a carefully-wound coil, a female antenna connector, an enclosure or mounting plate, and some wire. Some of the most active field operators I know homebrew all of their antennas. It’s easy, affordable, and fun!
Make sure you choose a battery that is sized appropriately for your transceiver power output. I will say that I’m a huge fan of LiFePo4 rechargeable batteries for their voltage range, lightweight design, and longevity. Being primarily a QRPer, I typically use 3 to 4.5 amp hour batteries as they’ll carry me through as many as three or four activations without needing to be recharged. For longer field deployments, or when I’m powering my 100W KXPA100 amplifier, I’ll use my 15 aH Bioenno LiFePo4 pack.
I use my 15Ah Bioenno LiFePo4 pack for QRO transceivers
It should go without saying that you need to pack these, but I have gone to the field with operators who forgot their key or mic and asked if I had a spare.
Keys are fairly universal, but keep in mind legacy transceivers often want a ¼” plug while newer rigs typically accept an ⅛” plug. Microphones, however, vary in port type and pin configuration based on the manufacturer and model. You could damage your mic or rig if you plug in a multi-pin mic that was designed for a different transceiver. Most mics that use a ⅛” plug are universal. Still, check before you plug it in if using an after-market or non-OEM mic.
Of course, choose a key, microphone, or boom headset that’s compact and rugged so that’ll be easy to pack and will stand the test of time.
I also always pack a set of inexpensive in-ear earphones. These can dramatically help with weak-signal interpretation.
Also, if you plan to operate a digital mode, you’ll likely need some sort of computing device. Even though I rarely operate digital modes in the field, I often pack my Microsoft Surface Go tablet in case I change my mind.
My Microsoft Surface Go tablet
In addition, I like logging directly to N3FJP’s Amateur Contact Log application directly in the field to save time submitting my logs later. Soon, I’ll be using the new HAMRS field log on my iPhone.
Speaking of logging…
A means of logging
I like compact notepads like Muji and Rite In The Rain for field use.
As simple as it is, it’s very important to take at least some paper and a pencil for logging your contacts. I like using small, pocket-sized Muji notebooks (affiliate link) for logging, and if the weather is even a little questionable, I’m a huge fan of getting my contacts down in Rite In The Rain mini notebooks (affiliate link) or notepads using a good old-fashioned pencil.
I like logging to paper and sometimes simultaneously logging to my Microsoft Surface Go. I have completed phone-only field activations where I only logged to my Surface Go tablet: in those cases, I snap a photo of my N3FJP call log, just in case something happens to my tablet between the field and the shack! Having endured enough technology failures, it gives me peace of mind to have at least one other backup.
Keep in mind that when you’re activating a park or summit, the folks calling you are relying on you to submit your logs to the appropriate programs so that they can get credit for working you. Many times, this might also help their awards for a state, county, or grid square. Always submit your logs after an activation even if you didn’t make enough contacts to validate the activation (POTA requires 10 contacts, SOTA requires 4 logged). It helps other folks out.
A pack or case
If you have a field radio kit, you’re going to need a means to organize and contain it for transport. There are at least three types of systems used for field kits.
A backpack or soft-sided case
My GoRuck BulletRuck is a brilliant SOTA pack
Since I enjoy the option of hiking with my radio gear, I love using backpacks. Although I’ll speak to this more next month in “Part 2,”, I choose quality packs that have at least one waterproof compartment and are comfortable to carry on long hikes. I also try to look for packs with Molle or some sort of external strapping so that I can attach portable antenna masts or even my hiking poles to the exterior of the pack.
A waterproof case or flight case
Ruggedized, weatherproof cases come in all sizes. This Pelican 1060 can house my entire KX1 radio kit.
Many field operators who want extra protection for their gear––especially when they don’t plan to hike or carry their gear long distances to the operating site––like hard-sided cases. I have built field radio kits in waterproof Pelican cases and appreciate knowing that I could drop my kit in a whitewater river, and it would likely survive the adventure unscathed. If you are one of these operators, look for quality watertight cases from brands like Pelican and Nanuk with interiors lined in pick foam padding that allows you to perfectly accommodate and safely protect your radio and accessories.
Portable ready-to-deploy cases
Although this option is almost outside the scope of this article, many emergency communications enthusiasts love having their gear loaded in rugged, portable––often rack-mounted and hard-sided––cases that they can simply open, hook to an antenna, and get right on the air. These systems are often the heaviest, least “portable,” and less suited for long distance hikes, but they’re often completely self-contained, with all of the components, including the power, hooked up and ready to go on a moment’s notice. While a system like this would be impractical for many Summits On The Air sites, it could be ideal for a park or island activation where you’re never that far from your vehicle.
Optional: Antenna cable
An ABR Industries RG-316 cable assembly
This doesn’t sound like an option, but it’s true. I’ve often operated my Elecraft KX3, KX2, and KX1 without a feedline at all: I simply attached two wires to a BNC binding post, and connected that to the radio. It makes for a super-compact setup.
Even an 8-12 foot feedline can make it easier to configure your operating position in the field. If you want to keep the feedline as low-profile as possible, especially if you’re operating QRP, consider investing in a quality RG-316 feedline terminated with the connector that fits your radio and antenna.
Optional: Antenna Tuner/Transmatch
A portable ATU with RF-sensing like the Elecraft T1 will give you an amazing amount of frequency agility. I’ve been known to use the T1 to tune my CHA Emcomm III random wire antenna on 160 meters..
Again, this topic could easily warrant a multi-part series of articles, but I’ll sum this one up in a nutshell: while I love (and even prefer) using resonant antennas that require no antenna tuner, I almost always carry a radio with a built-in ATU or an external portable ATU like the Elecraft T1 or ZM-2.
Why? Because an ATU will give you a certain amount of frequency agility or freedom. If I’m using an antenna that’s resonant on 40, 20, and 10 meters, but there’s a contest that day and the bands are incredibly crowded, I might use the ATU to find a match on 30 meters or 17 meters, thus finding a little refuge and space to operate. Also, sometimes antenna deployments aren’t ideal––due, for example, to site limitations such as dense vegetation that may alter the antenna deployment and thus its resonance. An ATU can at least keep your transceiver happy with the SWR when your resonant antenna might not be perfectly resonant.
But the main reason I carry it? A portable ATU gives you operational flexibility.
QRP or QRO?
I have operated QRO in the field with my KXPA100 amplifier on Field Day.
Its good to keep in mind that many of the station accessories listed above need to be matched to the output power of your transceiver and modes you use.
Many ham radio friendships have been placed in jeopardy over the question of either using QRP (low power) or QRO (high power) for field operations. This is a shame. Some operators have very strong opinions, but the truth is, there is no right or wrong answer.
In the spirit of full disclosure, I operate 97% of the time at QRP power levels––in my world, this means five watts or less. Personally, I enjoy the challenge of low-power operating. But I also appreciate the portability QRP gear offers.
The wee Mountain Topper MTR-3B
Speaking pragmatically––and this fact really isn’t open to debate––QRP and lower-power transceivers and accessories tend to be more efficient, more compact, and lighter than their higher-power siblings.
Most of my QRP transceivers weigh anywhere from two to five times less than their 100-watt equivalents. If you’re operating mobile (from a vehicle or camper/caravan, for example), an eight to twelve pound difference might not be a big deal. But the moment you’re hiking several miles to a mountain summit, weight becomes an important factor.
QRP transceivers have modest power requirements: everything from battery, to antenna, and even to tuners, are smaller, lighter, and more compact.
When operating QRP, you don’t have to worry as much about RF coming back to the radio from, say, an end-fed antenna. If I’m pushing over 20 watts into an end-fed half wave or end-fed random wire, I’ll likely want an in-line RF choke to keep some of that energy from affecting my transceiver or giving me an RF “tingle” when I touch the radio chassis or my key. Too much RF coming back to the transceiver can also affect things like electronic CW keying. But at five watts? I don’t worry. This is almost a non-issue, unless your transceiver happens to be very RF-sensitive indeed.
And even though I’m predominantly a QRPer, I definitely do pack radios like the 50-watt Mission RGO One and occasionally my Elecraft KX3 and KXPA100 100-watt amplifier, especially for an event like Field Day where my club is operating at higher power. I simply size up my gear appropriately. Again, this is especially important with your antenna, feed line, ATU, and battery selections.
If you primarily activate parks and are never far from your vehicle, it’s quite easy to accommodate a 100 watt transceiver like an FT-891, for example. Of course, if you wish to operate low-power and save your battery, simply turn down the output power. If you plan to hike a lot with your gear, then get your mind around QRP!
Stay tuned for Part 2!
In Part 2 we’ll dig into some of the details, looking at different approaches to field radio kits and some guidance and suggestions based on my real-life experience (read: operating mistakes).
In 2020, I easily spent a total of 100 hours outdoors with my radios activating a total of 82 sites for the Parks On The Air (POTA) program alone. This doesn’t include hours and hours of SWLing (shortwave radio listening). It’s been great.
Taking radios into the field is so much easier to do today than it was in, say, 1985 or earlier, because we have so many more options for powering our gear in the field. Not only have radios become more efficient in operating off of battery power, but we now have so many affordable and lightweight rechargeable battery choices on the market.
In the following article, let’s take a look at some portable battery power options for your radio gear. By “portable,” I’m talking power options for those of us who load a backpack or carry case and head to the field.
To keep the scope of this article in check, I’m also going to focus only on rechargeable battery options. And rather than get bogged down in the nuances of battery chemistries, we’ll focus on the end result––the pros and cons of each battery type, and how practical they might be for your field application.
In addition, I’ll also limit discussion to batteries that can be purchased of-the-shelf rather than addressing homebrew options. While I love building things, I’m very cautious when dealing with battery charging because if not done correctly, the results can be dangerous. I prefer obtaining products from trusted suppliers who thoroughly engineer and test their equipment.
Let’s take a look at several types of batteries, and speak to their advantages…as well as disadvantages. Then––as we summarize our findings––let’s discuss how to choose the right option for your needs.
Consumer-grade rechargeable batteries
Let’s begin by talking about the lowest-hanging fruit in terms of portable power: everyday rechargeables in the form of 9V, AA, AAA, C, and D cells.
While, admittedly, these batteries are not typically an option because of their limited capacity and energy density, they can still be a very practical power source for portable receivers and even a few QRP transceivers.
Rechargeable battery chemistries have improved with time, thus I no longer purchase nickel-cadmium (Ni-Cd or NiCad) or legacy nickel metal hydride (NiMH or Ni–MH) batteries.
These days I almost exclusively purchase low-self-discharge nickel metal hydride (LSD NiMH) batteries, specifically, Panasonic Eneloop batteries (Amazon affiliate link). Although they’re a pricey option compared with generic NiMH batteries, and might even be overkill for certain applications, I do love the shelf life of Eneloops.
Of course, the benefit here is Eneloops have that low self-discharge. They will maintain charge better at rest (i.e., when not in use) than legacy NiMH or NiCad batteries. From my real-word usage, I’m convinced that Eneloops also demonstrate better longevity over numerous charge/discharge cycles than many others.
All of my portable shortwave receivers that accept AA or AAA batteries are powered by Eneloops exclusively.
And although I’ve never done this myself, it is also possible to power highly-efficient QRP transceivers with Eneloop batteries, so long as you use a multiple battery holder to increase voltage and capacity to match both your rig and your desired amount of operating time.
WD8RIF’s AA battery holder
Keep in mind, though, that most transceivers will require a block of at least ten AA batteries to reach a voltage around 12 VDC. As you might imagine, it can be cumbersome after using your radio in the field to remove all ten of these batteries and charge them in a charger that can only hold, say, four batteries at a time. I personally prefer other options, but this one is certainly a fairly affordable, safe, and accessible option.
Note that in recent years, Panasonic started offering Eneloop Pros: while pricier than standard Eneloop batteries, they offer slightly higher capacity at the expense of overall longevity (roughly 500 versus 2100 total charge/discharge cycles). Since the voltage is the same, I’ve never felt the need to use higher-capacity Eneloop Pros.
Rechargeable Panasonic Eneloop AA batteries (non-Pro version):
Price: $2.25 – $4 US per battery, depending on the number in the package
Weight: 4 grams/.4 ounces per cell
Voltage: 1.2 V each
Longevity: Excellent, up to 2100 charge/discharge cycles
Ease of recharging: Simple via Eneloop OEM chargers
Solar- charging option: Eneloop originally marketed solar chargers, but doesn’t seem to do so presently
Sealed Lead Acid (SLA) Batteries
When I first became a licensed ham radio operator in the late 1990s, sealed lead acid batteries were the primary battery power source used for field radio operation.
At the time, these batteries were one of the best options for portable radio use because they could be purchased in a variety of sizes (based on amp hour capacity), and unlike flooded lead acid batteries, they required no maintenance––and being sealed, did not outgas.
While I’ve owned everything from 3 Ah to 15 Ah SLA batteries, I found the once-ubiquitous 7-8 Ah size to be the “sweet spot” in terms of portability and capacity.
SLA batteries are still among the most accessible high-capacity batteries on the planet. No matter where you travel, it’s likely you’ll be able to hunt them down in any hardware or electronics store. Our small local hardware store has a wide selection of these at their battery kiosk.
What are some of the pros of these batteries? In terms of “bang for buck,” the SLA is still hard to beat. You can purchase a quality 7.2 Ah 12-volt SLA battery for about $18-20 US (affiliate link). This would be more than enough battery to power a typical QRP transceiver for many hours on end. Chargers are also inexpensive––you can purchase a dedicated charger for about $10-15 US. Not bad.
In addition, 12-volt batteries are nearly ideal for amateur radio use since most transceivers are designed to operate with 12-13.8 volts DC +/- a modest margin.
There are some negatives compared with more modern battery chemistries, however. For one, SLA batteries are much heavier than the batteries we’ll discuss in the following sections. After all, they’re (still) made of lead! In addition, the battery’s longevity will be negatively impacted if you discharge it too deeply.
With that said, if you take care of an SLA battery, it can give you five or more years of service life in the field, yielding an excellent value for the modest investment. If you have an application that requires relatively little capacity from the battery, you might get a very long service life, indeed. In 2011, I built a remote antenna tuner box around an LDG Z11 Pro ATU and a discarded 7Ah 12V SLA battery. At the time, this battery could no longer hold voltage long enough to be reliable in the field, but I knew the Z11 Pro requires very little in the way of power, so I thought I’d try it as a power source anyway. Since the remote ATU box isn’t near an outlet, I charge the SLA battery with a 5-watt solar panel I purchased used at a hamfest with a Micro M+ charge controller. A decade has now passed, and that SLA battery continues to power the Z11 Pro even through seasonal temperature variances of -10F/-23C to 90F/32C. Not bad! Again, keep in mind this application works because the Z11 Pro is so flexible in terms of power requirements––it’ll operate on 6-16 volts DC at 300 mA with a 20 uA standby current.
Clearly, SLA batteries are affordable candidates for back-up power in the shack during occasional power outages.
Price: Most affordable option per Ah of the batteries listed here
Weight: By far, the heaviest of all the battery options in this article
Voltage: Various, but 12VDC is very common
Longevity: Very good if properly maintained
Ease of recharging: Easy, via simple charge controllers
Solar charging option: Multiple types of charge controllers can be used with SLA batteries; among the listed batteries, the easiest and least expensive to charge via solar
Lithium-Ion (Li-ion)
Without a doubt, lithium-ion batteries have revolutionized the consumer electronics world.
Why are they so popular?
First of all, their construction allows for a variety of form factors ranging from cylindrical cells to slim packs and pouches so thin they can fit in an ultra-thin mobile phone, eReader, or tablet. They’re the easiest type of battery to accommodate in compact consumer electronics, and indeed, they power most of the consumer electronics we’ve put to use in the last decade.
Secondly, they have a very high energy density, thus pack a lot of capacity for the size and weight. Indeed, if size and weight are your primary requirements, li-ion batteries should be high on your list.
In addition, Li-ion batteries are ubiquitous and affordable because they’re used in so very many applications.
There are negatives, though, with these power sources. First and foremost, they’re very sensitive to over-voltage and over-current events that initiate a thermal runaway. To prove this point, I’ll share some first-hand experience from the early days of large lithium-ion packs…
Li-ion Horror Story
In 2011, I evaluated a lithium-ion battery pack with integrated 5V USB chargers and even a simple one-outlet inverter from one of the big names in portable power systems. At the time, this was a new battery pack and a relatively new technology, at least in terms of the energy density and compact size. After receiving the battery, I charged and discharged it perhaps twice during testing. I had a flight scheduled from North Carolina to California, and decided I’d take it in my carry-on bag to power my laptop in flight. It worked fine on the flight to KSFO. Once there, I recharged it. On my return flight, it simply didn’t work. I thought perhaps I hadn’t plugged it in properly, or that the hotel outlet I used didn’t work. Upon arrival I emptied my travel pack onto the bed and plugged in the battery pack; it indicated it was taking a charge.
After doing a few projects around the house, I went back up to the bedroom and was greeted with an overpowering smell––almost like the pungent chemical odor of nail polish remover. I looked everywhere for the source of the odd smell. Finally, I located it: it seemed to be coming from the battery pack. Upon examination, I could tell the battery had begun to swell. As I lifted it up, I noticed that the bottom portion was essentially in a state of melting. As quickly as I could, I unplugged it and removed it from the room. I then discovered that in the thermal runaway process, it had begun burning through the sheets and mattress of the bed. Shocked, I suddenly realized it could have burned down my home.
Keep in mind, I was completely new to this battery technology, and this was years before thermal runaways made the news and airlines began restricting their transport. To my relief, the company from which I purchased the pack ended up pulling that model off the market, and even reimbursed me for the mattress and bedding. But it was a hard lesson learned.
If I’m being perfectly honest, this lesson had a major impact on my willingness to experiment with Li-ion battery packs.
The problem with the model of pack I had purchased was not the battery chemistry or construction, per se, but the charge controller). The fact is, Li-ion batteries require millivolt accuracy and a number of protections to detect and stop thermal runaway. Battery packs with multiple cells need a battery management system (BMS) that also balances the cells and monitors them closely. Fortunately, most manufacturers of the technology now understand this.
Modern Li-ion cells and chargers are much safer and more stable
Since then, Li-ion battery chargers have become both orders of magnitude safer and more effective. Still, I only charge these batteries on a surface which, should the battery be tempted to melt down, would be less likely to be damaged or serve as a fire hazard. I also never leave them unattended during charging.
With that said, I don’t think Li-ion batteries are to be feared. Obviously, many of us walk around with one tucked in our pocket all day––in our smartphones! They’re generally considered very safe now. Of course, I’d only buy the best and would steer away from the lowest-costs units you might find on eBay and Aliexpress, as many of these products are made in places with little oversight or regulation.
Another interesting fact about Li-ion battery packs is that since their voltages are usually available in multiples of approximately 3.6 volts (e.g., 3.6, 7.2, 10.8, 14.4 and 18 volts), they are not always ideally suited for radios that require 13.8V input power. Some packs, however, have circuitry that provides an output voltage closer to your desired amount.
One Lithium-ion battery pack I’ve been using with my Mountain Topper MTR-3B, Elecraft KX2 and KX3 transceivers is a (very affordable) TalentCell rechargeable 3000 mAh Li-ion battery pack that provides both 12V and 5V USB power. It has built-in charging circuitry and is very compact. I purchased mine for about $25 on Amazon.com, and have been very pleased with it so far.
Summits On The Air operators often place priority on smaller-sized and lighter-weight power sources, and thus turn to Li-ion battery packs. Many SOTA friends have invested in high-quality balance charger/dischargers to maximize the life of their batteries, and have been happy with the performance they receive. A quality charger may costs upwards of $60, but is worth the investment if you choose Li-ion batteries as your portable power of choice.
Price: From affordable to pricey, depending on capacity and charger investment
Weight: The lightest weight portable battery options in this list
Voltage: Often in multiples of approximately 3.6 volts: (3.6, 7.2, 10.8, 14.4 and 18VDC)
Longevity: Good. Typically around 400-500 charge cycles if properly maintained
Ease of recharging: Simple, if a self-contained pack; more complex, if using multiple cells that need balancing
Solar charging option: Not advised (yet). There are a number of homebrew Li-ion solar charging projects on the web, but I believe this battery chemistry fares better with a balance charger connected to a stable AC power supply.
Lithium Iron Phosphate (LiFePo4/LFP)
I typically use my 15 Ah LiFePo4 battery pack when powering transceivers like the Mission RGO One that can push 55 watts of output power. I also use this battery to power my Elecraft KXPA100 amplifier on Field Day.
The final type of battery chemistry we’ll cover here is my favorite of the bunch.
There are good reasons why Lithium Iron Phosphate batteries have become one of the choice rechargeable batteries for field radio use.
LiFePo batteries are inherently stable and safe
They offer a longer cycle life than that of other Li-ion, NiMH, NiCad, or Lead Acid batteries–thousands of charge cycles as opposed to hundreds
LiFePO batteries have an excellent constant discharge voltage
LiFePo batteries use phosphates––as opposed to cobalt or nickel, which are supply-constrained and carry heavier environmental concerns
LiFePo batteries have a lower self-discharge
LiFePo batteries are very lightweight compared to SLA batteries
3.2 V nominal output voltage means that four cells can be placed in series for a nominal voltage of 12.8 V, near ideal for most field radio gear
Any cons? Yes…while they’re lightweight, LiFePo4 batteries aren’t as compact as Li-ion battery packs. But the primary negative here is the price. At time of print, LiFePo4 batteries have the highest cost per Amp hour of the batteries discussed in this article. With that said, due to the excellent longevity of these batteries, the LiFePo may be the most cost effective option in the long term.
LiFePo4 battery systems sport built-in battery protection modules to address concerns like over-voltage and balancing.
How do LiFePo batteries stack up?
Price: One of the pricier options, when you include the battery and charger
Weight: Very light weight, but size tends to be larger than comparable Li-ion packs
Voltage: Excellent match for gear requiring 12V – 13.8 VDC
Longevity: Excellent. Thousands of charge/discharge cycles
Ease of recharging: Simple, using the provided charger (battery packs have a built-in charge controller)
Solar charging option: Bioenno sells charge controllers designed to work with LiFePo batteries, handy for the field
Without a doubt, the best-known LiFePo battery manufacturer in the world of ham radio is Bioenno Power. I’ve purchased their batteries exclusively and have been incredibly pleased with the quality, longevity, and performance of their products.
Choosing the right battery for you
Each one of these battery types have their pros and cons, and you can find lengthy, in-depth discussions online about the nuances of each battery chemistry. At the end of the day, however, what matters is which one best suits your particular application and provides your gear with the appropriate amount of voltage.
Here’s when I would reach for each of our types of batteries…
NiMH LSD AA batteries
WD8RIF uses Eneloop rechargeable AA batteries with his Elecraft KX3 field kit (Photo: WD8RIF)
If you’re willing to use a battery pack to run 8-12 cells in series to achieve your required nominal output voltage, Eneloop batteries are relatively affordable, lightweight, and of course, power an array of electronic devices in our world.
Of course, AA Eneloop batteries are also invaluable for those of us who have an arsenal of portable shortwave radios that accept AA cells!
Sealed Lead Acid Batteries
If you’re on a very tight budget and weight is less of a concern, SLA batteries are a great choice. They’re an especially affordable option if you plan to make a solar-powered battery pack since charge controllers are quite simple and affordable.
If you’re looking for a stationary back-up battery for home, these are an excellent choice, as long as you keep the charge topped up.
Li-ion Batteries
Backpacking or flying overseas, and size and weight really do matter? Purchase a Li-ion battery system. Li-ion cells and packs offer the highest energy density of any of the battery chemistries in this list. They’re incredibly compact––and as long as you use a quality charge controller with built-in protections, and you don’t damage or puncture an actual Li-ion pack––they should be quite safe, and you’ll be pleased with performance. Note: Keep in mind some airlines have regulations about the size of Li-ion battery pack you’ll be allowed to carry on board, so do check before departure.
LiFePo Batteries
The 9V 3Ah Bioenno LiFEPo4 pack is very compact and pairs beautifully with the Mountain Topper MTR-3B as this particular transceiver prefers voltages at 12 volts and below.
If you’re looking for a simple, effective portable battery solution that is almost custom-designed to power radio gear, invest in a LiFePo4 battery and charger. I have everything from a 15 Ah 12V LiFePo4 battery that can power my 50 watt Mission RGO One transceiver, to a 3 Ah 12V pack I now use for 2-3 hours in the field at a time with my QRP transceivers. Bioenno has recently sent me a 9 V 3 Ah battery pack to test with my Mountain Topper MTR-3B––it’s incredibly compact, since it only needs three 3.2V cells in series. LiFePo batteries are also the ones I suggest for those who are new to the world of battery packs and want something that is hassle-free and simply performs.
I admit, I’m being transparent here about why I own a total of three LiFePo4 batteries from Bioenno Energy––they’re amazing and I know I can rely on them.
In summary…
…I would offer this final piece of battery-usage advice: whatever you do, don’t “cheap out” on your battery and charging system. No matter what chemistry you decide to purchase, buy the best quality you can afford. If using any variant of a Li-ion battery, heed my tale, and be sure any separate charge controllers you employ will protect your battery (and your home)!
And now…Go out there and have fun. I assure you: when you take your radios––whether portable shortwave radios or ham radio transceivers––to the field, you’ll find you can escape all of the noises that so often plague us indoors. And out there, you, too, may find your radio bliss.
Each time I head to a park or summit, I have a goal in mind.
With summits, it’s getting to the summit and activating it because, sometimes, that can be a challenge in and of itself. I’m not exactly Sir Edmund Hillary, so I’m happy when I make it to the top of any summit!
Parks, however, offer me the chance to experiment with transceiver/antenna combos, test gear, and explore hikes. Parks tend to be more accessible and spacious than summits and even have shelter options if weather is questionable.
I don’t even attempt afternoon summit activations if they require a decent hike and there’s a good chance of pop-up thunder storms.
On Monday, June 7, 2021, it was hot and incredibly humid in the Piedmont of North Carolina. That early afternoon, little patches of showers were passing through the region delivering brief, isolated downpours.
The weather forecast also predicted a high likelihood of thunderstorms that afternoon. (Turns out, they were correct.)
Those were not conditions for a SOTA activation, rather, I decided to pick out a park I knew could offer up some shelter options. Lake Norman was an obvious choice–there’s a very nice covered area at their visitor’s center and also two large picnic shelters at the other side of the park. Lake Norman it was!
Goal
I drove to Lake Norman State Park with one goal in mind: deplete the Xiegu X5105 internal battery. I had assumed the battery would only power the X5105 for perhaps two activations on one charge.
Now three full weeks later, I decided I would deplete the battery at Lake Norman because that afternoon I had a decent amount of time to play radio in the field. In my head, I was prepared to squeeze perhaps 30-45 minutes more air time out of that one May 16 battery charge.
Lake Norman (K-2740)
I arrived at Lake Norman State Park and scouted out a site. Fortunately–it being a Monday in the early afternoon–it wasn’t busy and all three shelters were available.
I chose to set up at a shelter at the far end of the main picnic area.
The humidity was so thick that day, I was sweating just walking around the site. I noticed in my activation video (see below), I was breathing as hard as I would hiking to a summit even though I was just tooling around the picnic shelter.
I had no doubt in my mind that if a thunderstorm developed, it would be a doozie! (I was right about that, too–keep reading.)
On The Air
I paired the Xiegu X5105 with my Chameleon MPAS 2.0 mainly because I wanted to see how easily the X5105 ATU could match this multi-band vertical. Turns out? Quite easily.
I expected the X5105’s battery to deplete to the point that I would need to use an external power source to complete the activation, so I connected my QRP Ranger battery pack, but didn’t turn it on. I knew that when the radio died, I could flip the QRP Ranger’s power switch and perhaps only lose a few seconds of air time.
I hopped on the air and started calling CQ. I planned to operate the X5105 until the internal battery died, then (if needed) continue operating with the QRP Ranger until I logged my 10 contacts for a valid activation. Post activation, I planned to hike one of the Lake Norman loop trails.
Normally, I would mention the number of contacts I made perhaps noting the bands that were most productive. Instead, if you’d like to experience this activation with me, you might consider watching the activation video.
Please note that this is the longest video I’ve ever published, so don’t feel any pressure to watch it in its entiretity:
Impressed
Let’s just say that the X5105 sold me.
The activation was incredibly fun and I logged 20 stations (18 CW and 2 phone) from Alaska to Spain with my 5 watts and the MPAS 2.0 vertical. Propagation conditions were only “meh” but since I had the time to play radio longer, I was able to take advantages of little openings as they happened.
X5105 Battery
The X5105 won.
I simply gave up on trying to deplete the internal battery because I was running out of time to fit the activation and a much needed hike that afternoon before thunderstorms moved in.
I operated over 90 minutes with constant CQ calls and the battery never made it below 10.2 volts.
A most welcome surprise.
No mic, no problem!
During the activation, I remembered that I had been asked by readers and viewers to include more SSB work.
Problem was, I left my X5105 mic at the QTH (nearly 2 hours away by car).
I remembered though that, like the Elecraft KX2, the X5105 has a built-in microphone.
I decided to give that mic a trial by fire and, by golly, it worked!
Not only did it work, but it worked well.
The X5105? A keeper.
It was at Lake Norman that day, I decided the X5105 was a keeper.
That evening, I reached out to Radioddity–who lent this X5105 to me–and offered to pay full retail price for it either in cash or via ad credit
Since Radioddity is a sponsor on my other radio site–the SWLing Post–we decided that, since their ad was coming up for renewal soon, I would simply extend their ad time an equivalent amount of months as the full value of the X5105 ($550 US). This saved them from having to cut a check in two months. Worked for both of us.
I have much, much more to say about the X5105 and will do so in an upcoming review.
In short, though? It’s not a perfect radio by any means, but I feel like it really hits a sweet spot for the QRP field operator.
I enjoy putting it on the air and it’s an incredibly capable little transceiver.
I’m very pleased to now put it in rotation with my other field radios. Look for it in future reports!
QSO Map
Here’s the QSO Map for this activation (click to enlarge):
Hike and dodgy weather
After packing up my gear, I walked over to a nearby trailhead and checked out the trail map. I was prepared to take a very long hike that afternoon despite the heat and humidity, but I also knew conditions were ripe for a thunderstorm.
I decided to take what appeared to be a fairly short loop trail along the lake. Looking at the map, I assumed the trail might be 1 mile or so long.
The hike is well-worn and well-marked, so there’s no getting lost here. That’s one of the reasons I didn’t bother looking at my GPS map or even consulting the trailhead map in detail.
Instead, I simply started hiking the Lake Shore Trail loop. It was gorgeous. Here are a few photos (click to enlarge):
The skies started getting dark, though, and I heard a little distant thunder.
I decided it might make sense to consult my phone for the weather map.
A line of thunderstorms had developed and they were sweeping toward me. Time to pick up the pace of hiking!
It was at this point I realized I had underestimated the length of this loop trail. Part of me was quite pleased that it was longer than I anticipated, but the part of me that didn’t want to be caught out in a t-storm wanted to get back to the car ASAP.
I checked another weather map a few minutes later.
I decided that jogging the rest of the trail made sense!
Turns out the 1 mile loop was something closer to 3 miles when I included the walk back to the car.
I did make it back to the car in time, though, right before the heavens opened.
It’s no exaggeration to say that I was sincerely concerned about the possibility of tornadoes in that storm front.
The skies were dark enough that streetlights turned on and the rain was incredibly heavy with strong wind gusts. I saw flash flooding and driving conditions were nearly impossible. I parked next to a brick building in the town of Catawba and waited for the strongest part of the storm to pass. I was also very grateful I wasn’t still on the trail by the lake!
Of course, the storm passed and I expected conditions to be a little drier behind that front, but I was wrong. I think the humidity level increased to 150%. Ha ha! No worries, though, as I was on my way to air conditioned space!
Thanks so much for reading this field report and stay safe out there!
I received my Mountain Topper MTR-3B last week, and I’ve already taken it on a POTA activation.
Last weekend, I decided to break it in on a POTA “two-fer” site: Hampton Creek Cove State Natural Area (K-6246) and The Overmountain Victory Trail (K-4577) in Tennessee. Hampton Creek Cove was actually an ATNO (all time new one) so it was a trial by fire!
In short, the MTR-3B was marvelous. I’m so impressed.
As I mentioned in a previous post, I’m building a full SOTA/POTA activation kit for the MTR-3B. I already have a kit built around my KX2 and I don’t want to “borrow” any items from it (so I’m not surprised later in the field when an item is missing).
The TalentCell Rechargeable 12V 3000mAh Lithium Ion Battery Pack is the little black box.
I also used my Whiterook paddle (which needs new paddle arms at this point) but that will soon be replaced with a set of N0SA portable paddles I recently ordered.
Since the MTR-3B has no volume control, I used a pair of 20 year old Sennheiser earphones I bought when I lived in Munich. These have been in a drawer for ages because I now prefer using in-ear earphones with silicon earpieces for better comfort and sound isolation. But the Sennheisers have one thing none of my other earphones sport: in-line volume control.
While the earphones worked well for this activation, I’d still prefer a set of in-ear earphones with in-line volume control. Any suggestions from MTR-3B owners? Also, I’d like a compact amplified speaker with volume control to carry as an option when needed. If you can recommend one, please comment!
I’m writing an article for The Spectrum Monitor magazine about portable power later this year. I noticed that a number of MTR-3B owners swear by 11V rechargeable cells that are used in the RC and drone markets. Many have a similar compact form-factor as the common 9V battery. I understand, however, some of these cells need special chargers and equipment to balance them.
I would appreciate any and all information about these batteries.
In the meantime, Rich (N8TGQ), recently shared a pic of his Mountain Topper portable pack. Check it out:
I think it’s brilliant how he’s mounted everything on a compact plastic cutting board inside the case. Rich says that what he loves about this set-up is that everything is there, ready to go–simply plug in the antenna!
I love seeing how others build out their field kits! Please comment or contact me if you’d like to share yours here on QRPer.com!
This year, during our family’s summer holiday, I’m enjoying the hospitality of Prince Edward Island, Canada (hence, the lack of recent posts on QRPer). This is our family’s second visit to the maritime island, and each time we’ve been fortunate to stay at the same off-the-grid cabin on the eastern coast, less than twenty meters from the water.
Of course, staying in an off-grid cabin comes with its radio challenges—namely, supplying power—but also comes with one supreme advantage: no noise from the typical electrical devices that plague most of our homes. What’s more, this cabin sits on 60 acres, so not even a neighbor’s home appliances disturb my RX ears.
On our previous visit, I brought my (then) Yaesu FT-817, a 9aH gel cell, Micro M+ charge controller, 10W Solarex PV panel, some 300 ohm window line, loads of 22 AWG wire and an LDG ATU. Unfortunately, I found I had very little time for radio, and propagation was dismal. Indeed, it was during that trip that I discovered my FT-817’s finals had blown, so part of the time I was transmitting less than QRPpppp levels.
This year, since I knew the site well, I came better prepared.
My full 2012 setup consists of the following:
An Elecraft K2/10
An Elecraft KX1 (4 band w/built-in ATU)
Elecraft T1 ATU
LDG 4:1 Balun
One 35 aH gel cell
Two 9.5 aH gel cells
Two PowerFilm Solar foldable 5 W PV panels
My radio toolbox with various connectors, crimpers, cutters, wires, caps, multi-tester, etc.
Enough wire and 300 ohm antenna line to make a couple of wire antennas
So…how’s it all working out? Brilliantly!
In the past few years I’ve done a lot of QRP CW—mainly rag-chews with some buddies on the lower bands. I’ve done less QRP SSB phone. When I first arrived at the cabin and began the process of unpacking, I couldn’t find the jumper cable to attach to my Vibroplex single-lever paddle (the paddle being a Dayton 2012 find, by the way). So, I plugged in a microphone and tuned to the phone portion of the 17 meter band.
Talk about radio fun!
I’ve once again re-discovered the joy of operating QRP SSB. It’s challenging to make those DX contacts and to transmit a long call sign (“VY2 portable K4SWL”) across the ether, but occasionally the propagation gods smile upon you, and you’re able to participate in a good rag-chew or quick DX with a 57 to 59 signal report.
Being 20 meters from the salt water is a bonus I don’t usually enjoy in my US hermitage. Due to its excellent propagation characteristics, despite my lower power set-up, I have easily worked stations from Russia to North Africa, from the Caribbean to Japan. I am thoroughly reveling in it, and the process has re-connected me with my ham radio roots.
As Gunter, VA3GA, told me in a recent Canadian rag-chew, “ham radio holidays give you a chance to explore areas of the hobby you don’t normally think to enjoy.”
So true, Gunter. That’s what I love about ham radio in general– the hobby is so broad, you constantly discover and re-discover favorite elements about it.
Connecting an international community through low-power field radio adventures.
Please support QRPer by adding us to your whitelist in your ad blocker. Ads are what helps us stay online. All of our ads are ham radio related--no junk, we promise! Thank you!
 The following review was first published in the July 2021 issue of The Spectrum Monitor magazine. Read Anatomy of a Field Radio Kit Part 1 here.
 This is probably the most popular type of field kit in the world of amateur radio. Picnic table kits are designed with portability in mind, but not designed with distance hiking in mind. This is a very popular type of kit for Field Day or park activations through POTA or WWFF.


