There were some noises in the campground that woke me up during the night (probably other campers scaring off raccoons), but aside from that, I slept peacefully in my rooftop tent.
As I lay there Saturday morning, I couldn’t decide whether to make breakfast and hit the air for an early morning POTA activation, or to take a nice hike before everyone else in the campground woke up.
I chose the latter option!
At 7:00 AM, I headed to the nearby trailhead for the Lake Shore trail. It was a very pleasant and quiet hike—roughly 5 miles in total.
Afterwards, I made some blueberry oatmeal and a cup of French-pressed coffee. It really hit the spot!
Next, I grabbed my Elecraft K2 and connected it to the MM0OPX 40M EFHW that I had set up the previous evening.
I realized it had been a while since I’d taken the K2 out into the field, which was why I packed it for this trip. I use the K2 quite often in the shack, but it needed some outdoor time. All radios (and their operators!) need outdoor therapy!
New Tufteln TP-III Protective Cover
My friend Joshua (N5FY) at Tufteln sent me this protective cover, at no cost to me, for the BamaKey TP-III. Joshua has almost become a specialist in making bespoke protective covers for radios and accessories.
This cover is great. You insert four rare earth magnets (included) into four holes in the bottom of the cover. These work with the rare earth magnets on the TP-III to mag-lock the cover in place.
If you buy one of these for your TP-III, I would advice that you check the polarity of the magnets on the TP-III before inserting the magnets in the cover’s holes. I didn’t do this and found that I’d aligned a couple of the magnets in opposition, thus they repelled the magnets in the case. I had to dig the magnets out and reverse them–not a complicated procedure, but one I could have avoided had I simply thought about this in advance!
Anyway, I do like this cover! Thanks, Joshua!
Gear
Note: All Amazon, CW Morse, ABR, Chelegance, eBay, and Radioddity links are affiliate links that support QRPer.com at no cost to you.
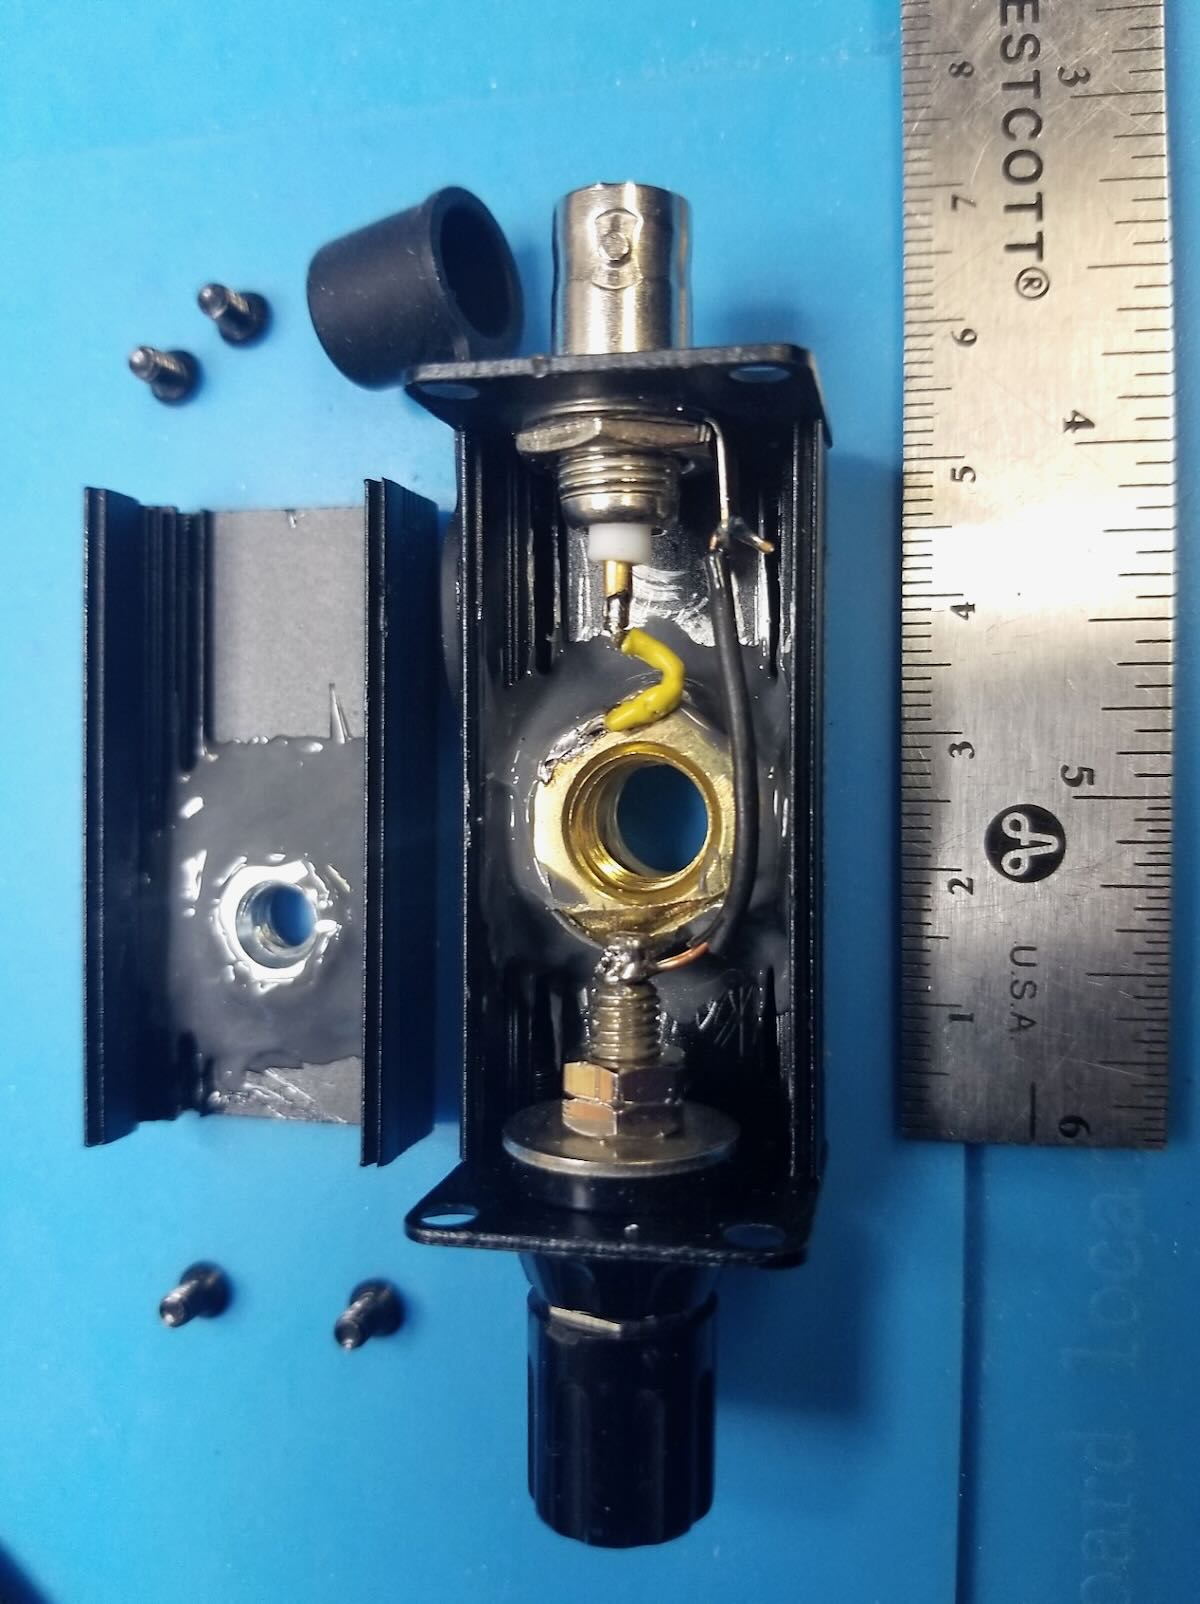
I have been working CW a bit in my upstairs QRP station. Last night, 40 meters was alive. Lots of POTA and general QSOs and a few SKCC. I used my new straight key. I thought you’d enjoy a critique.
I used the new key for two SKCC QSOs and three POTA hunter contacts. Here it is between my mini straight key and mini Iambic. Those are small keys, as the ruler shows;
It absolutely works, and I suspect by the way it is designed and manufactured, it will work well beyond my years. It would be excellent for travel as there is little you could do to damage it or throw it out of adjustment, short of using it to play catch.
It does not provide you with any sort of positive CLICK feedback when keying. A vintage Kent Morse Op like myself finds this a negative when keying. I like that positive click (or TAP if you prefer that description) on contact while using a straight key. This key is more of a touch-key because of the design.
If you look at the “Spring”, it’s a manufactured pseudo torsion disc spring that functions both as a spring and a stanchion for the key knob. It’s made to be both supportive and slightly flexible.
There is not enough flexibility in that spring nor space between contacts to give you enough smooth travel to get a positive click. You can get a click if you back the bottom contact screw all the way out, but it’s minimal and you have to hit the key harder than normal to get that minimal click. The spring is strong by design. This key is designed to give you more of a “Touch-Contact” that you hear via sidetone rather than feel via tactile feedback.
Some ops said that you best leave it at the factory setting, but I played with the contact set-screw in the bottom and I think I adjusted it a bit better for my fist. It comes factory adjusted with a very light touch, almost feathery. I now have it on a medium-to-light touch. There is just no “Click” or “Tap”.
Is it the best key (as one op stated in the reviews) I ever used? No.
Is it a cool and unique key that works well? Yes, as long as you don’t expect that mechanical click-on-contact that I like in a straight key for “Pounding Brass”.
There will be no brass pounding with this particular key. But I’m glad I added it to my collection. The fit, finish and manufacture is very well done, IMO. Especially for the price. And it’s unique. I may add it to my POTA kit instead of any other straight key.
I thought I would pass along this idea for your readers.
I was using my KX2 on PSK31(and cw!) this weekend at the lake QTH. I felt the rig getting warm. I remembered that my wife bought several of these battery powered personal fans (Cold Sky) in the attached pics. She bought them from Amazon for less than $15 each including a charging stand[QRPer.com affiliate link].
It took me a few minutes to realize that the fan “head” will pivot which makes it a perfect cooling device for the rig.
I often though about purchasing after-market heat sinks but none are needed with this little device. It has 4 or 5 fan speeds and it really moves air and cools my KX2. With headphones, I could barely hear the fan.
I really enjoy your videos and website. I hope this helps you and others looking for a cheap way to cool the rig.
Many thanks to Alan (W2AEW) for the following guest post:
Trapped EFHW antenna story (it’s all Vince’s fault)
by Alan (W2AEW)
One of my favorite antennas to use for POTA activations is a 40m EFHW wire. When properly tuned and deployed, it can be used on 40, 20, 15 and 10m without the use of a tuner (although, I really don’t mind using a tuner when I need to). Most of my activations are on 40 and 20m, so those bands are covered easily. It can be used successfully as a sloper, an inverted vee, or a combination of these (whatever the trees or support structures allow). It is efficient, inexpensive to build, lightweight and effective.
There are a few downsides to this antenna. The first is that it is approximately 68 feet (almost 21 meters) long. That’s a lot of wire to get in the air. Some POTA sites just don’t have that much room or support structures to effectively use this antenna. Another downside is that it doesn’t naturally support operation on the 30m band, another favorite of mine.
A few weeks ago, I watched a video from my friend Vince VE6LK entitled: “Discover the secret ingredients to build a trapped EFHW antenna”. This piqued my interest…
The video introduces a design for a 40/30/20m trapped EFHW. The fact that it covers the three bands I use the most, and would be shorter than my trusty full-sized 40m, and give me 30m to boot, got me excited to learn more.
Vince used a pair of traps (30m and 20m) that are offered in kit form by Tim Sherry, N7KOM. Here is a link to kit on Etsy.
Image Source: Tim Sherry, N7KOM
These are exclusively for use at QRP power levels – perfect for my application. I placed my order immediately after watching the video. The build instructions are very detailed, including how to tune the traps, which is critical in getting the antenna to work.
Image source: SparkPlugGear
He also used a 49:1 UNUN from SparkPlugGear. I’ve had one of these in my POTA kit for a while, but only used it occasionally. This was another good reason to proceed with this antenna build.
Of course, you could also use the QRP UNUN kit from KM4CFT that I made a video about earlier this year.
I created a video that showed how to assemble and tune the traps. Tuning can be a little tricky, and then stabilizing the turns/spacing to preserve the tuning is critical – not hard, just takes a bit of patience.
With the traps built and tuned, the next step would be to build and tune the antenna itself.
I was able to find the time this weekend to do just that, and make a video of the process.
Details of the resulting wire segment lengths are in the video. It is important to note that if you decide to build this antenna, your wire lengths will likely vary from mine. Several factors will effect the resulting lengths (details of the UNUN used, the trap construction, etc.). My video goes through the process I used to build, tune and test the antenna.
“The proof is in the pudding” as they say. It was time to actually run a POTA activation with this antenna. The overall length of the antenna was about 43 feet (about 13.1 meters), which is about 2/3rds the length of the 40m EFHW. This opens the possibility of using my 12 meter Spiderbeam mast (video review) as a support rather than just relying on a tree branch.
The weather here in NJ has been oppressively hot and humid with heat indexes over 100F, so I opted for a morning activation, before the heat really built up. The intent was to get some contacts on all three bands, even though 20m probably wouldn’t be very active.
I setup at my “home” park – Washington Rock State Park, US-1635. I decided to setup the Spiderbeam mast as the support for the new antenna:
The rig was my trusty KX2 with the BamaTech TP-III paddles:
I only had about an hour to dedicate to operating before the family activities for the day, so I figured I’d start on 40m and get most of the “ten” there first, then move on to pick up a few on 30m and 20m.
I was able to put 14 contacts in the log, under “so-so” band conditions, which at least a few on each band, several of which were park-to-park contacts.
Here’s the map of the “reach” that the new antenna had during this short activation:
Overall I am quite pleased with the antenna’s performance. The near ideal band coverage for my typical activations, and the ease of deployment compared to the full-sized 40m EFHW make this antenna a great addition to my POTA kit. I suspect it will get a lot of use!
If you’ve followed my field reports in the past couple of years, you’ll know that I predominantly use Rite In The Rain notepads and mechanical pencils.
When I first started my POTA journey in 2019, I would print out log sheets for each activation just like I did during the National Parks On The Air program in 2016. It was a very inexpensive and organized way to manage all of my written logs.
Over time, though, I made a shift to small pocket-sized notepads (Moleskine, Moji, Mead…) basically any pad that took up less space and could remain in my QRP field kits.
Rite In The Rain
After a couple of moisture mishaps with Moleskine pads (which, by the way, I otherwise love) I decided to completely shift to using Rite In The Rain spiral-bound notepads.
I resisted doing this for a long time because Rite In The Rain pads aren’t cheap; they typically cost about $6-$7 US each, but they are made in the US and are very high quality. They don’t smudge or smear.
My father-in-law is a retired professor of Botany and the bulk of his research time was (literally) in the field–in the mountains of western North Carolina. He’s always been a huge fan of Rite In The Rain and we often purchased these for him as gifts.
I switched to Rite In The Rain and haven’t regretted it. Yes, they’re pricier than all of the previous options I’d used, but they are insanely durable, can survive getting wet, and they hold quite a lot of my 45-60 minute POTA and SOTA activations! One pad will typically last me several months.
Please note that all of the Amazon.com links on this page are affiliate links that support QRPer.com.
The 3×5″ sixe easily fits in my Pelican 1060 case
I find that both sizes work well. I tend to use the larger 4×6 size most of the time, but I love the 3×5 size because it fits in some of my smallest field kits including the MTR-3B SOTA kit I highlighted last week.
When you use a Rite in the Rain pad, it will hold up in the rain if you are using any pencil, or one of their pens which has a special ink that bonds to the paper permanently.
I use mechanical pencils when I log, although I plan to start using pens more often only because it makes it easier for my YouTube video subscribers to read my logbook as I write (pencil can be more difficult to read from the camera angle, depending on reflection, etc.).
Mechanical Pencils
This is an area where (being fully transparent here) I can geek out a bit (understatement alert).
I’ve always had a place in my heart for mechanical pencils. It dates back to my high school years when I took drafting classes. These were the days when drafting desks, pencils, T-Squares, triangles, and templates were tools of the trade (CAD was just becoming accessible to students).
I found mechanical pencils to be an amazing piece of engineering and, while I couldn’t afford a lot of them, I would spend my hard-earned money to buy them. To me, visiting our local drafting store was like a trip to the toy store.
But I digress…
In the field, performing a POTA or SOTA activation, I don’t look for the same precision I needed in drafting class. Quite the opposite–I’m looking for durability and reliability.
Wooden pencils, to be clear, are both of those things and will serve you well in the field. What I love about mechanical pencils is that their leads are consistent when writing and there’s no need to pause and activation to sharpen them. Just click and keep going.
There are currently three mechanical pencil models I use.
My wife recently gave me a uni Core Keeps Sharp Mechanical Pencilas a gift. She did so after reading a comment from one of my readers (I had no idea she even read QRPer–I’ve got to be careful what I say around here!). 🙂
What makes this particular pencil unique is that it rotates the lead as you use it. This keeps the line looking sharp since the lead doesn’t wear to one side.
So far, I love it. This one has a .5mm lead, which is small–I tend to prefer .7 or .9mm because they’re more durable. Expect to see this in activation videos soon.
Next is the Zebra Mechanical Pencil, Del Guard, 0.7mm. This particular pencil lives in my MTR-3B SOTA field kit. The Del Guard has a double spring mechanism that acts as a shock absorber when you write. If you apply a little too much vertical or angled pressure, it absorbs the energy thus saving your lead from breaking.
I find it works really well, in fact. I tend to have a heavy hand when I write in my log books and I find I have less lead breakage in the field.
Finally, the mechanical pencil I’ve adopted as my primary SOTA and POTA pencil is the amazing GraphGear 0.9mm 1000.
This pencil is the most durable mechanical pencil I’ve ever used.
Bruce (KO4ZRN) introduced this to me when he joined me on a SOTA activation of Craggy Dome a couple years ago. This pencil is incredibly strong. In fact, I’ve even used it in woodworking and carpentry projects to mark cuts on wood.
At this point, I think I probably own about six of these GraphGear pencils and I couldn’t be happier.
Video
I actually made a short (for me) video about my notepads and pencils:
If you’re not into waterproof paper and mechanical pencils, just use what you have to log.
I remember once using the back side of an envelop and a pen I found in my car to log a NPOTA activation–it worked perfectly! I even remember another NPOTA activation using a pen to log and running out of ink, so I used the pen to log in the dirt on the ground. I only copied three or so more contacts then took a photo of the ground. (I can’t recommend this, but point is, practically anything can be used for logging!)
I just find that when I do something on a regular basis, I’m willing to invest in tools I love using. I feel they serve me well in the end.
How do you log?
I’m curious how you log. I know that a large percentage of POTA activations never write a thing on paper logs–they simple log directly to an app on their phone, tablet, or laptop.
I prefer making a paper copy of my logs, then taking a photo of them when the activation is complete. I worry less about my app crashing, phone running out of power, and, frankly, I just find the process of logging more fun on paper. Furthermore, rain can disrupt touch accuracy on capacitive touchscreen devices, making logging difficult in wet conditions.
I’m curious how you log in the field. Please comment!
Thank you
Thank you for reading this post!
Of course, I’d also like to send a special thanks to those of you who have been supporting the site and channel through Patreon, and the Coffee Fund. While not a requirement, as my content will always be free, I really appreciate the support.
Have a brilliant week and I hope you run out of paper due to the number of contacts you must log!
Many thanks to Scott (VO1DR) who shares the following guest post:
Construction Notes – VO1DR Antenna Mount for Camera Monopod
by Scott Schillereff, VO1DR
Further to my article about radio during trip to Portugal, a number of readers asked for details on how I mounted my whip antenna system to my camera monopod for /P use. Here are some photos and notes on this.
General notes:
This is a “straight-through” design. Just direct connections from the BNC center pin to whip (via brass nut), and BNC housing to radial connector.
This is not a cook-book construction article, rather just a show-and-tell of how I built mine. You can use what you have on hand to build something similar.
I suggest you start with your telescoping whip, so you know the size and threads for mounting bolt.
You could use any type of connector for the radial (wingnut, knurled nut, spade lug, alligator clip, whatever you like). I prefer banana jacks since a) I can push in the radial banana plug fast, b) the plug is a weak release point (pulls apart if someone walks into the radial), and c) I can easily attach additional radial wires, if desired.
Use a strong case (metal clamshell or cast aluminum work well). With the whip extended, there can be substantial forces (bending moment) from wind or handling. A tiny plastic case would be fractionally lighter but might fail.
For size, the one I used (25 x 25 x 50 mm; 1” x 1” x 2”) is about as small as I would go. It needs to have a big enough footprint to sit firmly on a camera mount fitting.
Use high heat (e.g., Weller 100-140 W solder gun) when soldering the center pin wire to the brass whip mounting nut. Solder the wire to the brass nut before you epoxy the nut.
I custom made the white plastic insulating bushing (where whip screws in). This was from a nearly-right bit from my junk box. You can be creative here. You could also epoxy on short piece of close-fitting, thick-walled PVC pipe around the outside of the whip mounting hole as a supporting sleeve to give some lateral support to whip when it is screwed in.
Dry-fit everything (before epoxying) to make sure nothing touches that shouldn’t and you can screw in the camera nut and whip fine. Test proper continuity of center pin and radial connections to BNC fitting. Once glued, there’s no going back!
For surfaces to be epoxied (metal nut sides and bottom, insides of mounting case), slightly roughen with sandpaper or jewellers file, then clean with isopropyl alcohol and Q-tip. This will increase adhesion and strength.
Use good-quality, high-strength, long-cure epoxy (e.g., JB Weld), not el-cheapo 5-minute epoxy from the Dollar Store. LET THE EPOXY COMPLETELY CURE BEFORE MESSING WITH IT! Just walk away from it for a day… (your patience will be rewarded).
Figure 1 – VO1DR Antenna Mount, clamped onto top of monopod. Coax goes to BNC on left; whip screws into top; raised radial connects by banana plug on right
Figure 2 – Antenna mount unclamped from top of monopod. The black plastic fitting (at right, with wedge-shape) fits into slot on platform at top of monopod (at left) and clamps in with cam arm. Large steel screw attaches wedge fitting to antenna mount case. Ruler shows scale of things.
Figure 3 – Antenna mount case (right) unscrewed from camera mount fitting. Steel screw is standard camera mount size (1/4-20 thread size). Black silicone cap keeps dust out of BNC connector. If your camera mount does not have a detachable wedge fitting (like the one on the left), you would simply screw the camera mount screw directly into the bottom of the antenna mount case.
Figure 4 – Top of monopod dissembled to show (clockwise from top): black monopod tube with telescoping whip stored inside (stainless steel with 10 mm brass mounting bolt), antenna mount case, detachable camera mount fitting, and round top plate of monopod. For my monopod, I had to remove one tiny screw and apply gentle torque to break a weak glue joint of this round piece on top of the monopod leg. It remains a snug hand fit (no screw needed).
Figure 5 – Fully assembled whip antenna mount with wiring. Radial (blue wire) with tie-off cord (yellow) at left; RG174 coax (5 m) at right. Whip is only ever screwed in hand-tight. Deploying in the field, I first tie off the monopod to something (park bench, picnic table, fence, tree), then screw the collapsed whip into the antenna mount and clamp mount on top of monopod, then plug in radial and tie the yellow cord off to something (straight out at 2 m height or slope down to ground anchor), and finally connect the coax to the rig. When all in place, I carefully raise the whip (slowly, with two hands to reduce bending forces). Take-down is all in reverse.
Figure 6 – Detail of antenna mount case. Case is 50 mm x 25 mm x 25 mm aluminum clam shell box with square metal end plates. These end plates are screwed in to hold the two halves together. White plastic bushing provides additional lateral support for the whip when it is screwed in. The bushing is glued to outside of case with CA (Krazy) glue.
Figure 7 – Inside of antenna mount case. On left, a ¼-20 steel nut is epoxied to inside of case with strong JB Weld epoxy. In main case, a 10 mm brass nut is epoxied to inside of case with an insulating washer beneath. This brass nut connects to the whip and is “hot”, so must be insulated from the black aluminum case. Yellow wire connects center of BNC to brass nut (soldered). Black wire connects ground side of BNC to radial banana jack. Use plenty of epoxy; there is a lot of force exerted on the steel and brass nuts.
Figure 8 – Detail of inside of case. Note separation of banana jack solder post and edge of 10 mm brass nut. Solder yellow wire to nut before epoxying in nut.
Hope you find this useful. Just use what you have on hand and some ingenuity to make yours!
When our family needs a change of scenery without a long drive, Mount Mitchell State Park is our go-to destination. I’ve mentioned before that it’s my “happy place” here in North Carolina. Mount Mitchell is only about 6 miles from our home as the crow flies, but it takes about 50 minutes to drive there, and it’s not in the direction of any of our usual destinations. Heading up the Blue Ridge Parkway and watching the flora change with elevation makes it feel like a proper getaway.
On Sunday, June 16, 2024, we wanted just such a getaway, as my wife and daughters were treating me to some Father’s Day fun. After visiting my father-in-law in the hospital in the early afternoon, we drove to Mount Mitchell.
Mount Mitchell State Park (US-2747)
Sundays on Mount Mitchell tend to be busy, especially in the summer. However, on this particular Sunday, it was rainy, foggy, and there were storms in and around the area.
Weather like this never bothers us on Mount Mitchell, as it can shift in an instant, as long as thunderstorms don’t intrude.
As soon as we arrived, I grabbed my radio bag from the car and found an empty picnic shelter. I’d been hoping for a free shelter since it was raining, and fortunately, we got our pick!
One of the first things I did after dropping off my pack was to tie Hazel to a picnic table because she was laser-focused on a chipmunk she saw run up a tree next to the shelter. That dog drives chipmunks and squirrels crazy, I’m sure.
My wife and daughters dropped off some art supplies at one of the shelter tables, then went on a short hike while I performed my POTA activation.
Note that Mount Mitchell is also a SOTA summit, but the picnic area is not within the activation zone. I could have easily gone to one of my go-to SOTA spots on the summit and knocked out a SOTA activation quickly (only four contacts are needed), but I wanted to save that for another day. Plus, being in the shelter meant that I could have a nice leisurely, dry activation!
I brought along my Penntek TR-45L and planned to pair it with a random wire antenna for the activation. However, since the weather was iffy—again, my primary concern was any thunderstorms that might sneak up on us—I decided to skip the wire antenna and go tabletop instead.
Fortunately, my Elecraft KH1 lives in my EDC bag at all times, so I set it up for tabletop mode.
You might recall that I have used the Elecraft KH1 adapter in previous activations and I think it works brilliantly. The first version of Elecraft’s adapter had one issue: the parts would fall apart if you weren’t careful with how you attached it to the KH1.
Joshua designed his right-angle adapter with captive components so that it’s all in one piece and can’t come apart.
I should note here that Elecraft actually updated their right-angle adapter design so that it also has captive components as well—so you have two choices! I’ll use the new Elecraft adapter in a future video and field report.
Joshua’s Tufteln design works really well (it’s also less expensive than the OEM adapter), and I like that it’s bright red, which means I’m less likely to leave it in the field!
Gear:
Note: All Amazon, CW Morse, ABR, Chelegance, eBay, and Radioddity links are affiliate links that support QRPer.com at no cost to you.
Many thanks to Shane who writes with the following question:
I really need some advice.
I know you have produced many videos on the Icom IC-705, and I am wondering if there is a way to directly enter frequencies on this rig, without using the touchscreen.
Being totally blind, I really need to know this before I fork out around $1400 or so, and I figured you (or someone you know) might have the answer?
Is there a small external keypad, like the one that I use with my Yaesu FT-891. Any help you could give me would be so much appreciated, here. Best and 73
At the end of the day, the IC-705 is a very visually-oriented radio since so many of the important features and functions rely on a dynamic, flat, color, touch-screen display. There are physical buttons, but they are typically used to open up more options on the touch-screen display.
I don’t know of an external keypad for the IC-705 that allows for direct frequency entry. I have seen external pads for controlling CW and Voice memory messages, but not for direct frequency entry.
I was hoping to find that there were voice announcements above and beyond those found in the Function menu (which are somewhat limited). Unfortunately, I don’t see a way that it can announce each digit entered in the frequency input, nor a way to audibly confirm the frequency, either in voice or CW.
As for other ways of entering frequencies outside of the radio—say, via a PC—I know this can be done. I use a program with my Macbook called SDR-Control. It will wirelessly connect to the IC-705 and allows you to directly enter the frequency via your computer keyboard. Using a computer adds an extra level of complexity, though, and I’m not sure if a screen reader would work well with it. You might reach out to the developer in case others have asked.
At the end of the day, I’m not sure the IC-705 would be the best choice in terms of accessibility when you’re blind or visually impaired, since, at its core, its main interface relies on a touch screen and very few physically defined buttons and controls.
Any experience here?
I would love to stand corrected, though!
Readers: If you have any advice for Shane, especially if you use the IC-705 and are visually impaired, please comment!
Shane is specifically asking if there is an external keypad out there that could be used with the IC-705. It seems with all of the connectivity of the IC-705, there might be something out there that would work.
I should add: if there are peripherals and techniques used with its 100W sibling, the IC-7300, they may also work with the IC-705 since the user interfaces are so similar.
I had the pleasure of meeting Bryce at the 2024 Hamvention, where he shared his plans for an ambitious hiking adventure next year. Knowing he wanted to incorporate radio into his journey, I asked if he’d be willing to bring us along by sharing updates on his preparations and experiences on the trail.
To help fund his adventure, Bryce has started a GoFundMe campaign, which you can learn more about at the end of this post. Additionally, please note that some of the gear links below are affiliate links that help support QRPer.com at no extra cost to you.
Bryce, take it away…
Backpacking Booky: A Quest to Hike the Appalachian Trail
by Bryce (KD9YEY)
The dream is formed, and it always seems so attainable. It’s as easy as the desire to walk in the woods and explore the beauty of nature. To find community with the world around you and discover your reflection is no different than the hills and streams that stand steadfast against time. I feel like anyone who wishes to pursue a long hike starts with these feelings and lofty ideas of what the trail will be like and the experience they will have…and then you realize you’re going to have to poop out there.
Hello, my name is Bryce Bookwalter and in 2025 I am attempting a thru-hike of the Appalachian Trail. This has been a goal of mine since I was in my freshman year of high school in 2005 and first learned about the trail.
I was in Front Royal Virginia at the time and one weekend we went hiking and our trail passed by the A.T. I remember hearing that this same trail traveled all the way from Georgia to Maine and it blew my mind.
I wanted to hike it right then, and I still want to hike it today. Life happens of course, and I had to let the dream go for some time. I have found myself in a unique time of my life recently where I will be between schooling and a new job and I realized that if I don’t hike the trail now, I may never get the opportunity again. My education has been off and on throughout the last decade and 5 years ago I ran out of my GI Bill that I received from the Army. With only 2 semesters remaining until I received my degree, I started doing construction to save money to return to school. 5 years later I have returned to Indiana University, and I am now 1 semester away from finally receiving my degree in Community Health. With this milestone accomplished, I have decided that before I start another job I need to try and complete my long-time goal of hiking the A.T.
It is an interesting turn of events that brought me back to the love of backpacking. It would seem an illogical path to say that Ham Radio is responsible for my rekindled passion for the outdoors, but this is in fact the case. Two years ago, my stepdad Joe (W9NVY) got into Ham Radio, and I decided to at least get my Technician License so that we can communicate through the local repeaters. Later that year we both participated in the GOTA team for a local Field Day club out of Indianapolis. After working to set up the antennas and operate for 24 hours, I was hooked on HF!
Since then, I have received my General License and am currently working on my extra. I learned about Parks on the Air and discovered that there is a whole side to this hobby that involves preparing gear, packing it, and carrying it into the wild to set up and operate remotely. This speaks to me in so many ways. Not only do I get to play radio, which I love, but I also get to add hiking and backpacking to the mix.
I am a gear junkie! I will admit it openly. I love researching gear and seeing what works for others and obtaining gear and putting it to the test in the field. This harkens back to some of my favorite aspects of the military and Civil Air Patrol before that.
Civil Air Patrol days.
So, let’s talk gear! When preparing for a thru-hike, there is a lot to consider. You’re not just planning for a weekend outing but for a 4–6 month long adventure. It’s hard to know what to take…and even harder to know what NOT to take. There is a saying that I agree with that says, “Backpacking is the art of knowing what NOT to take.” This is so true.
There are different levels of backpackers, from conventional to ultralight.
Conventional backpackers can find their packs weighing 30-40 lbs. or more. Ultralight typically have their base weight (weight without food and water) down to under 10 lbs. I find myself somewhere in the middle. I lean towards lightweight, but I certainly do not consider myself an ultralight backpacker. Especially considering I will be carrying radio equipment with me along the trail.

 At 7:00 AM, I headed to the nearby trailhead for the Lake Shore trail. It was a very pleasant and quiet hike—roughly 5 miles in total.


 Next, I grabbed my Elecraft K2 and connected it to the MM0OPX 40M EFHW that I had set up the previous evening.
 My friend Joshua (N5FY) at Tufteln sent me this protective cover, at no cost to me, for the BamaKey TP-III. Joshua has almost become a specialist in making bespoke protective covers for radios and accessories.
 If you buy one of these for your TP-III, I would advice that you check the polarity of the magnets on the TP-III before inserting the magnets in the cover’s holes. I didn’t do this and found that I’d aligned a couple of the magnets in opposition, thus they repelled the magnets in the case. I had to dig the magnets out and reverse them–not a complicated procedure, but one I could have avoided had I simply thought about this in advance!
 Note: All Amazon, CW Morse, ABR, Chelegance, eBay, and Radioddity links are affiliate links that support QRPer.com at no cost to you.
 I hopped on the air and started calling CQ POTA on the 40-meter band. I figured that at this time of morning, 40 meters should be in decent shape.