A few weeks ago, one of my YouTube channel subscribers asked if I could make a video showing the entire process of activating a park: everything from planning, scheduling, packing, driving, setting up, to activating.
Why not, right?
So on January 20, 2022 I scheduled an activation of K-6856 and recorded a very, very long activation video!
It’s 1 hour 42 minutes long, in fact, but I broke the video into chapters to make it easier to navigate and digest.
Since the entire process has been captured on video, my field report below will simply focus on the various sections of the video along with my results. That and I didn’t even think to take a single photo I was so busy with the camera (images here are all screen shots).
In the shack
My OSMO Action camera does a brilliant job outdoors, but in the shack it did struggle with my monitor brightness/contrast while I scheduled the activation. When I checked the quality from the camera’s built-in monitor screen, it looked pretty acceptable, but after being uploaded to YouTube, it was less so. Sorry about that!
Knowing this could be a problem, I did my best to describe everything I was doing on the screen. Frankly, I couldn’t go back and re-shoot this if I wanted to because it was all happening in real-time.
Before I scheduled the activation, I did sneak in a wee bit of park hunting! After all, this is how I do things in the shack.
Being the hopeless pack geek I am, when David (AG7SM) shared photos of his many Tom Bihn bags and how he packed for a recent radio outing, I asked if he’d mind if I shared them here on QRPer.com. He very kindly agreed!
The comments below are my own, but I’ve put David’s descriptions in each image caption:
Brain Bag
The Tom Bihn Brain Bag.
I’ve often considered grabbing a Tom Bihn Brain Bag in the past for one-bag travel, but frankly it’s a little roomier than I needed so overlooked it. I never thought about using it for field radio, but it makes so much sense
“The writing implements and log I’ve stuffed into the Brain Bag.”
If you’ve been listening to the Ham Radio Workbench Podcast, you’ve no doubt heard Mark Smith (N6MTS) talk about his “secret squirrel” project. At BayCon 2022 this past weekend, Mark revealed that the “secret squirrel” is a new product he’s designed called SOAR (Satellite Optimized Amateur Radio).
Mark announced that SOAR is basically a radio that’s “optimized for operating FM satellites.”
That’s a very modest description for a radio that can not only handle full duplex FM satellite communications, but also leverage the power of a GPS and CPU to help predict passes, aim an antenna, and adjust for doppler shift on the fly. And, oh yeah, it even records.
SOAR actually does much more than this.
If full duplex satellite work is the sort of thing that interests you, I highly recommend watching Mark’s BayCon presentation:
The Halibut Electronics website has only recently been launched, so there’s not a lot of info there at time of posting. For the latest news, I suggest you follow Mark on Twitter at: https://twitter.com/SmittyHalibut
A few week ago, my buddy Ara (N6ARA) sent me a prototype of his new ultra-portable CW key, the TinyPaddle Jack (TPJ).
You might recall, Ara introduced the original TinyPaddle late last year. His motivation for the original TinyPaddle was to have a super minimalist paddle that could be stored away as a spare in your kit for those times when you either forget or have an issue with your primary paddle in the field.
Turns out, there was a lot of pent-up demand for a product like the TinyPaddle. At $15 for the kit or $20 fully assembled, the TinyPaddle is a serious bargain. Ara and his father have been quite busy producing these.
Enter the TinyPaddle Jack (TPJ)
Whereas the TinyPaddle is designed around being the most simple/minimalist backup paddle solution–basically a wee paddle with a male 3.5mm connector that plugs directly into a rig’s paddle jack–the TPJ takes it one step further.
The TPJ is essentially the TinyPaddle with a female 3.5mm plug encased in a 3D-printed holder and protective cover.
The design is clever. The case that protects it while stored away in one’s field pack, pulls apart and is re-joined to make a very usable paddle holder.
There are actually quite a few purchase options, so Ara created this short video that describes the different components/options and how to use them:
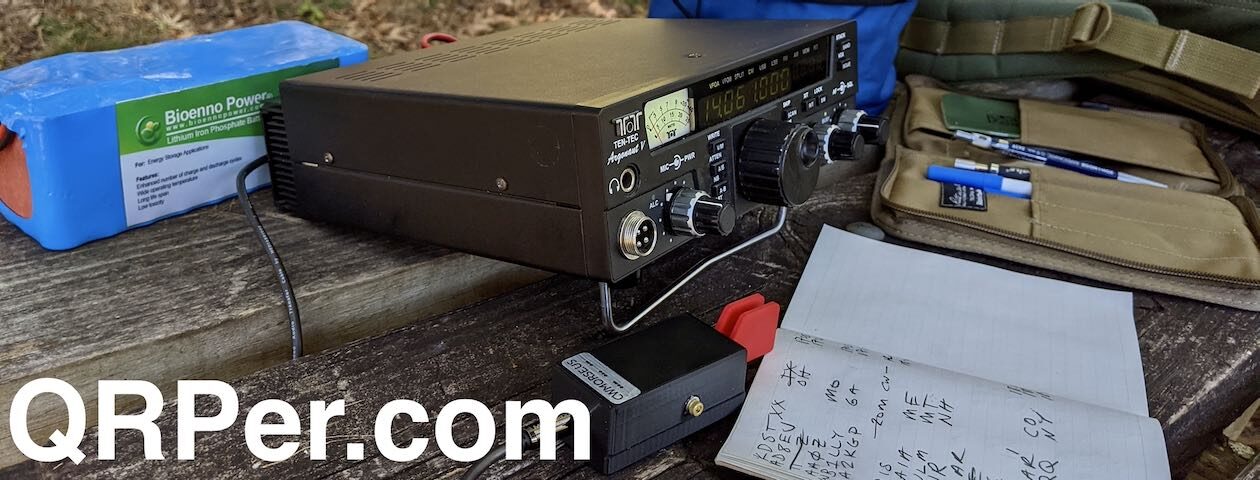
I’ve been using the TPJ with my MTR-3B and new SW-3B. As I mentioned in my field report with the TinyPaddle, the action of this paddle is actually very precise–it almost feels like a capacitive touch paddle.
I find that the holder definitely adds to the ergonomics of the paddle (although it can actually be used without a holder, too).
Ara also created a small adjustment tool that will allow you to tweak the paddle spacing if needed. Keep in mind, this is a very simple paddle design (there are no springs or magnets) and isn’t really meant to be a primarily paddle. I do feel, however, that it will hold up quite well over time. The spacing of the contacts is so fine, I believe the stress on the paddle levers is minimal .
I plan to keep a pair with my new MTR-3B field kit (above) and use it as the primary paddle for that radio. I will plan to buy a second one for the SW-3B a well.
I personally think Ara could charge $40+ for these and they’d still be a bargain. I know him well enough to know that his motivation is in the fun of designing these products and making them accessible to other field radio operators. Case in point: I’ve been pricing quality 3.5mm patch cables recently and I find his $5 cable to be an excellent price; even more competitive than cables I’ve seen on Amazon and eBay.
In addition, Ara even freely distributes the 3D printer files so you have the option to print your own paddle holder!
It’s obvious to me that these products are his contribution to the community that pays for itself enough so that he can continue to innovate. His designs are so clever, I can’t wait to see what he comes up with next!
My X6100 arrived this week and I did notice some noise on the receive audio when wearing headphones. It shows up as a 1000 Hz tone with a few harmonics and it’s loud enough to make the audio a bit fatiguing to listen to. The good news is that the noise disappeared when I added a mini line isolator between the rig and headphones. It also removes the hiss!
I thought you’d be interested since you have the same rig so I recorded a short video that illustrates how well the isolator works.
You can see the 1000 Hz carrier and it’s harmonics appear in the audio spectrum when the line isolator is removed. You’ll also notice an increase in the audio noise floor.
X6100 Internal vs. External Speaker
I also uploaded a short video that shows how the X6100 audio sounds with the internal vs. external speaker.
Note that the ICOM speaker requires a mono-to-stereo adapter to work with the 6100. Plugging the speakers mono jack directly into the rig wont work.
The camera mic doesn’t do justice to how much better the rig sounds with the external speaker, but it should give you some indication.
I like how the isolator is such a simple solution and imagine it could help other radios with similar issues. Often these noises and harmonics come from display noise. Also, your video certainly shows the improvement using an external speaker on the X6100! Thank you for sharing!
So far this winter has been a challenge in terms of activating summits. For me, at least.
Between my busy schedule, family life, and the weather, it’s been difficult to make the stars align. Activating a summit, in general, requires much more time than activating a park. At least, where I live.
Summits tend to be much less accessible and time-consuming than, say, a state or national park. Besides getting to the summit trailhead and hiking it, there can be quite a bit more research in advance including reading previous activator notes and mapping out the true summit location.
SOTA (Summits On The Air) activators (depending on their location) often have extra incentive to do activations during the winter because many of us can accumulate “bonus points” for summits above a certain height during the winter months.
As I’ve mentioned before, I’m not a numbers guy and honestly couldn’t tell you, for example, how many parks I’ve activated this year. But it would be awfully fun to eventually achieve “Mountain Goat” status in the SOTA program. It requires 1000 (!!!) points. Many of the summits where I live range from 1 to 10 points each. Each summit can only count once per year, so if I activate Mount Mitchell (our highest summit) the 10 points only count once in 2022 toward Mountain Goat status. The program is designed to encourage activators to activate a wide variety of unique summits each year. It’s a brilliant motivator.
I will be happy if I achieve Mountain Goat status in 5 years. I simply don’t have the free time to hit summits as often as I’d like. It is a really cool goal though.
I do hope I can fit in a little FYBO time this weekend! If you’ve never participated in a QRP contest, this is a good one; certainly one of my favorites. The rules are incredibly simple and you can even simply do a park or summit activation during the contest then send in the logs to FYBO as well without using any special exchanges (with that said, be ready to reply with an exchange including the temperature on site!).
Here are the rules for FYBO (Freeze Your B___ Off) Contest:
FYBO Winter QRP Sprint, sponsored by the Arizona ScQRPions
First Saturday in February from 1400Z-2400Z
QRP HF Only. CW or SSB (5W max). Near QRP calling frequencies (no WARC bands).
ENTRY SUBMITTAL AND SCORING IS NOW FULLY AUTOMATED!!! No waiting! No suspense! Submittals can be edited if you made an error. All the entry items and calculations are shown below, but you don’t do anything but count up the Contacts, SPCs (States/Provinces/Countries), number of contacts with NQ7RP and choose your multipliers based on the definitions in the sections below.
Many many thanks to Diz (W8DIZ) at QRPContest.com and Kits and Parts for including us on his QRP Contest site! This is a first class bit of work by Diz and is much appreciated!
Categories:
Single Op (Home/Field) One Operator/One Station/One Call
New starting in 2016 is the “Work Anyone” contact. Any contact you make now is a FYBO contact. There are now many more overlapping field activities especially with the advent of SOTA, POTA, Grid Squares, VEs, SITW (Squirrels In the Woods), and NPOTA (National Parks On The Air). Work everyone you can. More fun anyway. Activators and Chasers from other events are very welcome.
New in 2015 was the TEAM category. That has been discontinued starting in 2018, but you may note a team on the automated entry and scoring form.
If you operate from separate batteries dedicated to the operation of the radio while in a vehicle it qualifies for the Alternative Power bonus. The vehicle battery charging system qualifies as a petroleum driven generator. You may charge batteries from the vehicle if you wish but they cannot be charged via the vehicle while the station is on the air.
Work stations once PER band. Score 1 point per QSO.
Exchange RST, State/Province/DXCC Country (SPCs), first name, power out, and Temperature (Fahrenheit) at OPERATOR’S POSITION. Indoor stations must report INDOOR temperature.
Example: 579 AZ Frosty 2W 40F
IF you are participating primarily in a non-FYBO activity, send your normal exchange for that activity. Including Signal Report, SPC (State or Province or Country) and Temperature would be nice for us, but optional.
Multipliers:
SPCs (each counts once PER band),
Field Location: x4 (Field per ARRL FD definition),
Alternative Power: x2 (per ARRL FD definition),
QRPp (less than 1W): x2,
Lowest Operating Temp (at OP’S POSITION):
65+ F = x1;
50-64 F = x2;
40-49 F = x3;
30-39 F = x4;
20-29 F = x5;
Below 20 F = x6.
For contacts with NQ7RP, add 100 points. One contact PER mode PER band allowed. There may be multiple NQ7RP operations such as NQ7RP/5. Either one but not both, counts. See example below.
EXAMPLE SUMMARY: (Thanks KI0II – Multi-Multi – FYBO 2010)
Call Used – KI0II
Team – Red Hot Chiles
Field – Yes (or No)
Category – MultiMulti
Operator(s) – KI0II, W5RRR
Alternative Power – Yes
Lowest Temperature – 28
QRPp – No (or Yes) or QRO (>5W)
Final Score – 2183
BAND
QSOs
SPC
NQ7RP
40CW
6
5
1
40SSB
2
1
0
20CW
56
26
1
20Dig
3
3
0
20SSB
2
1
1
15CW
13
9
0
15SSB
2
1
0
10SSB
2
1
0
Totals
86
47
3
QSOs – Report the number of non-duplicated QSOs on bands that you have made contacts. SPC – Report the number of non-duplicated States/Provinces/Countries on those band. NQ7RP – Report the total number of contacts made with NQ7RP on all bands. A maximum of ONE contact with NQ7RP is allowed per band.
Stations may be contacted again on different bands, but only once within a band.
Modes are defined as CW, SSB, and Digital, but will not be differentiated in the scoring.
Final Score = 82 QSO Pts X 44 SPC = 3608 X 5 (Temp Multi for 28F lowest temp) = 18,040 X 4 (Field Ops) = 72,160 X2 (Alt pwr -Solar) = 144,320 + 100 X 3 NQ7RP bonus points = 144,620 Total points
If you work NQ7RP(/x) on a band, please enter a “1” in the NQ7RP column for that band/segment.
Alternative power is a non-generator or mains power source. Batteries count if they are charged from solar, wind, or some natural source of energy. Here is an excerpt from the ARRL Field Day rule…
7.3.8. Alternative Power: … without using power from commercial mains or petroleum driven generator. This means an “alternate” energy source of power, such as solar, wind, methane or water. This includes batteries charged by natural means (not dry cells). …
Please include your soapbox comments with your summary! We’d like to hear of the trials of cold-weather operating, and any and all anecdotes are appreciated. You can put a link to your pictures in the soapbox area.
Logs are due 30 days after contest.
Please put your comments in the Soapbox area along with a link to any pictures.
NOTE: This is a fun contest, NOT an episode of Survivor. Be aware of the temperature and the possibility of cold injury! PLEASE be careful.
I mentioned on Twitter yesterday that I recently took delivery of the Venus SW-3B three-band QRP transceiver.
Yes, I finally made the purchase after being encouraged to do so by so many of you. (I’m often accused of being an enabler, but I promise it works both ways!)
It’s very early days with the SW-3B, but I’ll admit that I like this little radio. I’ve been chasing a number of park and summit activators yesterday and today at the QTH while writing a few reviews.
I’ve discovered a few interesting quirks, but it’s a cool little radio.
All-in-all, though, the filtering is pretty good and the receiver quite capable. The CW keyer is excellent.
I’m looking forward to taking this little rig to the field soon!
Many thanks to Bill (W4FSV) of Breadboard Radio who shares the following announcement:
40 METER “Woodpecker” QRPp Transceiver Kit From Breadboard Radio
Breadboard Radio has just released the 40 Woodpecker, a 40 meter low power CW transceiver for the 40 meter band. The Woodpecker features a crystal controlled transmitter with a 500 milliwatt output. The transmitter provides sidetone, receiver muting and QSK with delay. The Woodpecker’s direct conversion receiver has an adjustable bandpass filter, attenuator and an audio amplifier suitable for headphone level output plus a selectable low / high filter which helps with band noise and static crashes. The kit is supplied with crystals for 7030 and 7056 kilohertz. Other frequency crystals may be user supplied.
The designer, W4FSV has made multiple contacts using a 40 meter dipole antenna including many from 500 to 1000 miles. The kit is complete with all parts including a cabinet and attractive front panel plastic decal. A two channel 30 meter version may be available soon. A 60 meter version is also available.
Many thanks to Ron (KK1L) who asks the following question after reading my post from January 2021 regarding the decision to keep my Elecraft KXPA100 amp instead of selling it:
Hi Tom,
If after a year of opportunity to reevaluate have you changed your mind? I am looking for an opportunity to wrestle with the same dilemma.
73 es God Bless de KK1L, Ron
Thank you for your question, Ron!
It’s funny you should ask. Only a couple months ago, when I re-arranged my shack, I thought yet again about selling the KXPA100 because it gets so little use as I run QRP 99% of the time both in the field and at the QTH.
The thought occurred to me that I could sell it and easily afford a dedicated 100 watt radio for the shack–either a brand new Yeasu FT-891, or an Icom IC-7300. With a little extra money added, I could even purchase the new Yaesu FT-DX10. That was very tempting.
Possibly most tempting would be to get a used Elecraft K3 or possibly a K3S; more of these have been appearing on the used market after the introduction of the K4.
Also, I had an opportunity to purchase a used mint Icom IC-7200 with a full side rail kit; I’ve always loved both the receiver and look of this particular radio! It, too, was tempting.
Connecting an international community through low-power field radio adventures.
Please support QRPer by adding us to your whitelist in your ad blocker. Ads are what helps us stay online. All of our ads are ham radio related--no junk, we promise! Thank you!
 A few weeks ago, one of my YouTube channel subscribers asked if I could make a video showing the entire process of activating a park: everything from planning, scheduling, packing, driving, setting up, to activating.
 My OSMO Action camera does a brilliant job outdoors, but in the shack it did struggle with my monitor brightness/contrast while I scheduled the activation. When I checked the quality from the camera’s built-in monitor screen, it looked pretty acceptable, but after being uploaded to YouTube, it was less so. Sorry about that!


