I’ve also been asked which radio is “better” and which one I’d purchase if I could only buy one.
To address these questions, I decided to make a YouTube video where I outline some of the pros and cons of both radios, and compare them in terms of features especially with regard to field use.
While I love the opportunity to head outdoors and play radio, I also love shaking up my field kit and trying different combinations of radios, antennas, and other station accessories.
When using new-to-you gear, though, a best practice is to set everything up at home before you hit the field. This way, you can confirm that you have everything you need and you can also familiarize yourself with the gear prior to activating a park or summit.
Last Sunday (May 2, 2021), I threw caution to the wind. Well, sort of. At the very last moment, I decided to squeeze in an activation en route to my sister’s home to do some brush-cutting and yard work.
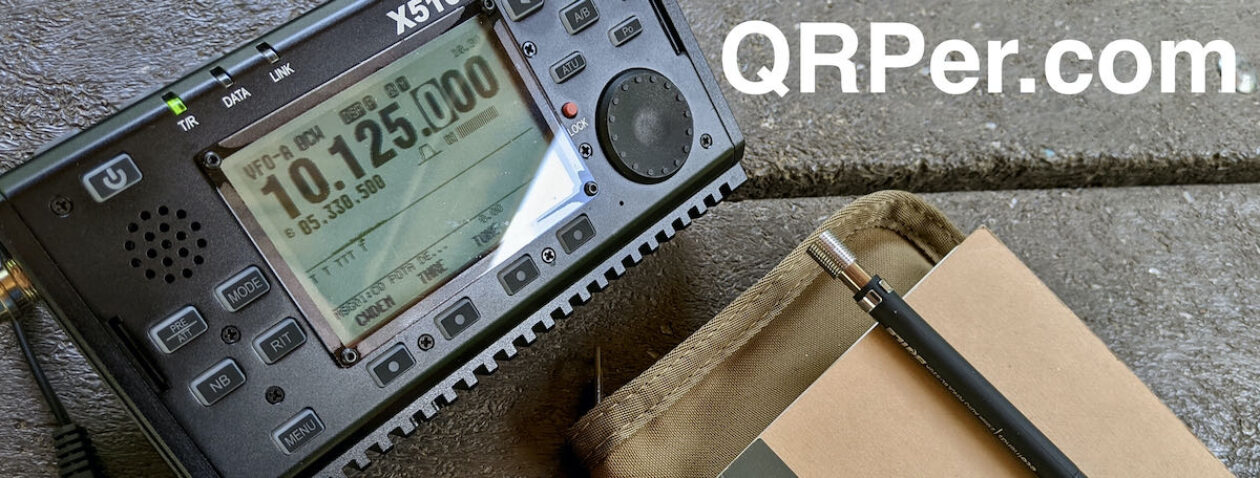
The lab599 Discovery TX-500
Basically, I was chomping at the bit to take my lab599 Discovery TX-500 to field.
You see, in August 2020, I received an early pre-production TX-500 to evaluate for one week. In that seven day span, I activated seven parks with the TX-500 and enjoyed every minute of it. Because the loan period was limited, I packed a lot of TX-500 air time that week, then wrote this review for The Spectrum Monitor magazine.
As I mentioned in a previous post, if I would have had the opportunity to buy that loaner TX-500 last year, I would have. It wasn’t an option, though, as so few working models existed at the time. Now that I had a TX-500 in hand again, I couldn’t wait to hit the field with it.
Last Sunday, the weather was beautiful in western North Carolina, but clouds were moving in and we expected scattered showers in the latter part of the afternoon. The last thing I wanted to do was my sister’s yard work in the rain, so I needed to make the activation a speedy one.
But the TX-500 wasn’t the only piece of new gear. I also recently ordered and received a PackTenna 9:1 UNUN random wire antenna. I wanted to see how well it would perform, too, so I decided to pack my Elecraft T1 ATU and give it a go, too!
For the record: when you’re in a hurry, it’s not only a really bad idea to hit the field with a new radio and antenna, but to also throw the entire field kit together in 5 minutes before walking out the door.
On the drive to Lake James, I mentally packed and re-packed the field kit trying to decide if I might have left out a crucial component (say, an adapter or cable). I also made the decision not to make a real-time, real-life video because 1.) this would surely turn into a very clumsy deployment, 2.) I was pressed for time and didn’t want to set up the video, and 3.) I only had my iPhone with me to make the recording which would mean I would be giving up Internet and mobile phone access at the park which is important for spotting purposes.
I reminded myself that the goal of my YouTube channel is simple: real-life, unedited examples of field radio operating.
All of us, at some point, use new equipment in the field and we stumble through the process as we give the system a shake-out. So why not record it, right?
My iPhone battery had about 80% capacity. I knew if I tried to use the personal hotspot while recording the video–so that I could spot myself on the Microsoft Surface Go tablet–it would run down the battery in 20 minutes or so. I immediately put my iPhone in airplane mode to preserve the battery.
Lake James State Park (K-2739)
I know this park quite well and assumed it would be busy on a beautiful Sunday afternoon. It was, in fact. I was confident I’d find a good operating spot, though, because they’ve a large picnic area and loads of tall trees to support wire antennas. And mid-afternoon, it was unlikely all of the picnic tables would be occupied.
I found a nice spot to set up and deployed the PackTenna in short order.
Since my iPhone was doing video duty, I didn’t take extra photos.
I hooked up the Elecraft T1 and attempted to find a match on 40 meters. I thought I did find a match at first, but it turns out that the T1 was in Bypass mode. I didn’t have my reading glasses handy, so thought I saw a great match on the TX-500’s display. Turns out it was floating around 2:1. Still: not a bad match.
I worked five stations, then moved to the 30 meter band. It was then I finally realized the T1 was in bypass mode. I found my spectacles, read the front panel of the T1 and remedied that in short order (I can never remember the button press combo to toggle bypass mode!).
I tuned 30 meters and got a great match.
On 30 meters, I worked two stations.
I then moved up to 20 meters where I worked two more.
Then I moved back down to 40 meters where I topped off the activation with an additional three contacts for a total of 12 as I called QRT.
I’m very grateful to my buddy Scott (KN3A) who worked me on three bands all while he was activating a park in Pennsylvania! Thanks for those P2Ps, Scott!
In fact, I’m grateful Scott took the time to work me on multiple bands because it help bring my numbers above the 10 stations needed for a valid POTA activation.
After going QRT, I quickly packed up my gear (which was easy because there were so few parts), and started the 45 minute drive to my sister’s house. Fortunately, the rain held off the whole time I did the yard work!
I’m so happy to have a TX-500 back in the field radio arsenal.
Shortly after this activation, I officially purchased this loaner TX-500 unit from lab599. As I said in my “unboxing” video, there was no way I was sending this unit back. 🙂 Now I won’t feel bad if it gets dinged or scratched!
I’m sure the TX-500 will be in heavy rotation for a while. Please comment if you have any questions about this radio or the 9:1 UNUN PackTenna. I’d be happy to answer your questions!
Last Tuesday (April 27, 2020), I grabbed my radio gear and my boots then headed to the Blue Ridge Parkway for a quick morning activation.
There were three factors motivating me: 1.) the weather was amazing 2.) I had three free hours in my schedule and 3.) I was eager to pair the LDG Z-100 ATU with the Icom IC-705 for the first time.
Hazel–my canine companion–was as eager to hit the field as I was.
“Let’s go, Dad!”
When she heard me grab my boots, she met me at the door with tail wagging.
I did plan to hit the Blue Ridge Parkway, but had not decided on an actual site. The lowest hanging fruit (easiest sites to reach from the QTH) are the Folk Arts Center and the Blue Ridge Parkway Headquarters. I wanted more altitude, though, so we drove to the Craggy Gardens Picnic Area.
This is a favorite spot for our family, but this time of year can be quite busy–especially around noon. I hoped that I could beat the crowds by arriving early. We pulled into the parking lot around 9:00 AM and were one of the only cars there (score!).
Blue Ridge Parkway (K-3378 NC)
Hazel and I found a concrete picnic table overlooking the parking area and I quickly deployed the CHA Emcomm III Portable over a short tree with my arborist throw line. (Have I mentioned before how AMAZING an arborist throw line is? Why yes, I have!)
I made a video of the entire activation including pairing the Z-100 Plus ATU with the IC-705 via the supplied command cable. In true K4SWL style, I didn’t read the Z-100 Plus owner’s manual or connect the Z-100 Plus to the IC-705 prior to recording.
Frankly, I forgot to read the manual I wanted to show what it was like pairing the Z-100 Plus and IC-705 for the first time without having even referenced the manual. Fortunately, it couldn’t have been an easier process: connect the command cable, and go into the ATU function menu to activate the tuner.
I started my activation on 80 meters and–although the band was dead quiet–I worked K8RAT, WD8RIF, K4JAZ and ND1J in about six minutes.
Next, I moved up to 40 meters where I worked nine more stations in about thirteen minutes.
Finally, I moved to the 30 meter band where I worked two more stations in about five minutes.
One first for this activation was working K8RAT in north central Ohio on all three bands! His signal was incredibly weak on 30 meters, but I recognized his sideswiper “fist” or operating style.
At the end of the activation, I tested the Z-100 Plus by having it match the Emcomm III Portable random wire all the way up the band to 6 meters. It did a fine job.
No surprise here as the Z-100 Plus is a well-loved ATU that’s been on the market for quite some time already. At $150 it’s a proper bargain of an ATU. Unlike the mAT-705 Plus which only pairs with the IC-705, the Z-100 Plus is RF-sensing and can pair with any transceiver on the market.
Video
Here’s a video of the entire activation including pairing the Z-100 Plus with the IC-705 for the first time:
QSOmap
Here’s a QSO map of the entire activation:
This was a very enjoyable activation at one of my favorite Blue Ridge Parkway picnic areas. It was especially pleasant to have the place all to ourselves–a true rarity! I think Hazel was a bit bummed that our local red squirrels (we call them “Boomers”) weren’t out in full force. They’re proper “Squirrel TV” for her since she must be on a leash on the parkway and can’t chase them as she does at home.
If you’re ever travelling the Blue Ridge Parkway, this is a great area. As I mention in the video, the Craggy Gardens Picnic Area also borders a vast tract of land–accessible by a forest service road on the site’s driveway–where the Pisgah National Forest and Pisgah Game Land overlap for a POTA two-fer (here’s a previous report including this two-fer).
Craggy Dome–a SOTA summit–is also very close by. In addition, Mount Mitchell State Park is only 20-25 north on the parkway and offers up both a POTA site and SOTA summit. So many possibilities on this part of the BRP! One could easily activate four parks and two summits in the space of a few hours.
On my way back to the QTH, April 21, 2021, I popped by Tuttle Educational State Forest for what I hoped would be a relatively quick activation.
The previous day I performed a SOTA activation of The Pinnacle and was still feeling the high from that brilliant solar flare propagation experience. Although I knew the solar flare effects were long gone over 24 hours later, I wanted to take in a quick hike and play a little radio: Tuttle was the perfect place for both.
Plus, Tuttle Educational State Forest is such a peaceful quiet place (that is, when no one is burning up rounds at the nearby shooting range). The park is never crowded and it has wide open spaces for playing radio.
My plan was to do a quick activation, then hit their longest trail loop through the forest.
In the spirit of full transparency, LDG sent this unit to me at no cost when they became a sponsor of the SWLing Post and QRPer.com recently (you may have noticed their ads in the right sidebar). While I was really curious how well the Z-100 Plus pairs with the Icom IC-705–using the supplied command cable–I didn’t have a (charged) IC-705 with me. Instead, I pulled out the trusty Yaesu FT-817ND and hit the air!
The Z-100 Plus is RF-sensing, so a command cable is never needed and the ATU will pair with any transceiver.
To use the Z-100 Plus with the FT-817ND, I only needed to hit the Tune button on the front of the ATU then send a string of dits or dashes for it to initiate a match search.
It was no surprise that the Z-100 Plus easily found matches with the Emcomm III Portable.
I started calling CQ on 80 meters and quickly worked my buddy WD8RIF in Ohio.
After a few minutes, I moved up to the 40 meter band where I worked four stations in about four minutes, then the band was quiet for a few minutes.
I then moved up to the 30 meter band and worked four more stations in about seven minutes then silence again.
At this point, I only needed one more contact to validate my POTA activation to have ten stations logged, so I moved up to the 20 meter band and in about four minutes worked two more.
If I didn’t have a limited amount of time and a strong desire to fit in a hike that afternoon, I might have called CQ a while longer on 20 meters and possibly even 17 meters, but I called QRT after a total of 36 minutes on the air.
Herein lies the advantage of having a portable ATU: it gives you frequency agility. On days when propagation is rough, and contact roll in slowly, a good ATU will allow you to find matches on multiple bands so your transceiver will be happy pushing RF through a non-resonant antenna length. I love resonant antennas, but it’s hard to beat the flexibility an ATU gives you.
[My next video, by the way, will feature the Z-100 Plus connected to the IC-705. ]
QSOmap
Here’s how my contacts looked that day on a QSOmap:
I was so busy making the activation video, I didn’t think about taking photos of my rig.
During the hike, however, I did snap these two:
It’s fun returning to the same parks and seeing how the flora changes with the seasons. There’s always something new to see.
I think the next time I activate Tuttle, it might be from the trail–I located a couple of spots that would be ideal for a park bench activation! That might make it feel a bit more like a SOTA activation (although, there are no summits in this forest).
Thanks again for reading through this activation report. Please comment with any questions or feedback. Very curious what LDG Z-100 Plus owners think of this ATU.
Last Tuesday (April 20, 2021), I decided to make a detour to a park I had never visited before: Crowders Mountain State Park (K-2726).
It’s actually quite odd that I’ve never activated this park during the weekly trip to do a little caregiving for my folks: Crowder’s Mountain State Park is a reasonable detour especially compared to some of the more remote parks I’ve visited recently.
What’s really impressive about Crowders Mountain is that although it’s not as large as a national park and it’s very close to the city of Gastonia, it has no less than two unique summits that qualify for Summits On The Air: The Pinnacle and Crowders Mountain.
Both summits are accessible from the main park visitors’ center via a well-maintained trail network.
The propagation forecast looked pretty grim and after my last activation, I thought I might increase my chances of success by hiking to both summits in one visit. This made sense because I would only need 4 contacts per summit to have a valid SOTA activation and I could combine the contacts from each summit to hit 10 total contacts to activate the state park.
I decided to call the park and ask how long it would take to hike to both summits: the ranger told me “about 5 hours, or less if you’re fast.” That meant that once I added in my setup/pack up times and on-the-air time, I would be staring at a minimum of 7-8 total hours.
I (wisely) decided to pass on that opportunity. I simply didn’t have enough time in my schedule for that many hours at the park. That, and I didn’t want to feel rushed–I wanted to enjoy my outdoor time.
I decided instead to activate one summit and simply plan on spending more time on the air then plan to come back to the park for the second summit on a different day.
Before going to bed Monday night, I checked out the trail map and decided to activate The Pinnacle.
Crowders Mountain State Park (K-2726)
I arrived at Crowders Mountain State Park around 11:00 AM local–the weather was nearly ideal.
I had pre-packed all of the radio gear and supplies in my GoRuck GR1 rucksack, so once I arrived, I grabbed the pack, put on my hiking boots, a hat, and hit the trail.
I’ve read that Crowders Mountain State Park can get very busy and it’s no surprise as the park is within easy reach of Shelby, Gastonia, and the Charlotte Metro area. Fortunately, I was visiting on a Tuesday morning, and while I saw at least 30+ cars parked in the main parking lot, I passed other hikers only a few times on the Pinnacle trail. It’s a sizable park and can easily swallow 30 groups of day hikers!
I followed the orange-blazed trail to the summit of The Pinnacle.
The hike was very enjoyable and, frankly, not what I would consider strenuous, but it had enough elevation change to feel like a proper hike. I allowed an hour to reach the summit, but it only took about 40 minutes or less.
Near the summit, there’s a fork in the trail: if you take a right, it leads to the summit, if you take a left, it’ll lead you on a much longer Ridgeline Trail that will eventually take you into Kings Mountain State/National Park–you’d better believe I’ll try that one day in the future! It would be fun to activate two parks and a summit all on foot.
I took a right at the fork and the .2 mile long trail zig-zagged up the side of The Pinnacle.
I was a little surprised to be greeted by the sign above. It’s true that the summit area is quite rocky and you have to watch your step, but this warning is a bit extreme in my opinion (especially since the SOTA activation I did with my daughter recently was orders of magnitude more dodgy!).
If you are activating The Pinnacle and don’t want to climb up the rocky path, no worries. I’m certain the area where the sign is located is well within the SOTA summit activation zone.
The Pinnacle (W4C/WP-010)
Although The Pinnacle is only a “one point” summit, when you reach the top you’re greeted by some impressive views.
The Pinnacle and Crowders Mountain are both outlying mountains so are the tallest points in the area offering beautiful, long-range vistas.
There were perhaps a half dozen hikers hanging out on the summit. I found a quite spot to set up on the side of the summit only a few meters from the top.
During the hike, my buddy Mike (K8RAT) sent a text noting that propagation on 40 meters was non existent. He suggested I play on 20 meters and above, possibly including 30 meters.
Later on, I found out that Mike was 100% correct. Several POTA activators that day mentioned on the POTA Facebook group that 40 meters was completely wiped-out.
I installed the Chameleon MPAS Lite vertical antenna next to me. I’ll admit that I was a little worried it might be too rocky to plunge the MPAS Lite’s stainless spike in the ground, but it turned out not to be the case.
The CHA MPAS Lite has really proven itself as an invaluable SOTA antenna. While the stainless spike adds weight to my pack, it’s less fussy than dealing with guy lines and telescoping fiberglass poles and much quicker to set up. You do need enough ground to plunge that spike into, but if there are trees and bushes on the summit, it’s probably doable!
I started recording a video (see below) of the activation, spotted myself to the SOTA network (even though it would have likely auto-spotted me via the Reverse Beacon Network) and hopped on 20 meters.
Solar Flare!
I had no idea at the time, but we were experiencing a solar flare which explained why 40 meters was completely wiped out.
The effect on 20 meters was simply epic.
I called CQ and was instantly rewarded with a long, continuous string of stations. Within 26 minutes, I had already worked 23 stations with 5 watts and the MPAS Lite vertical. A stark contrast to my previous POTA activation.
The view from my shack
And here’s the thing: the flare opened up 20 meters to local/regional stations as well. I worked stations as close as South Carolina, Georgia, and Tennessee–this is simply unheard of normally. Of course, stations on the west coast were also booming in.
I was a little surprised I didn’t log any European stations on 20 meters, but I suspect they were having a difficult time competing with the strong signals from North America during the flare.
I short: the band opening was amazing fun and even renewed my faith in our local star just a wee bit. (Ha ha!)
After playing on 20 meters, I decided to try 17 meters.
Wow! Without a doubt, I worked more stations on 17 meters in short order than I’ve ever worked during a field activation. In 10 minutes, I worked 12 stations. As with 20 meters, the flare opened up stations that would normally be in my 17 meter skip zone.
Here I was worried about logging the ten stations needed to validate my park activation! After logging 35 total contacts, I decided to pack up.
Here’s a QSO Map of the activation (click to enlarge):
Video
Here’s one of my unedited real-time, real-life videos of the entire activation:
Although the weather app on my phone wasn’t showing any afternoon thunderstorms nearby, there were some patchy dark clouds forming on the other side of the summit and the winds were shifting, so I decided to call it a day and enjoy the hike back down the mountain.
Fortunately, the clouds never amounted to anything but I don’t take my chances with spring weather–it’s fickle, especially along the North Carolina/South Carolina line. That, and frankly, I needed to stick to my travel schedule.
I took my time on the way back down and simply soaked up the outdoors.
I love doing field activations of all types, but I’ll admit that I’m becoming addicted to Summits On The Air because of the hiking opportunities it presents.
There are few things in the world I enjoy more than hiking.
When I’m on a trail, all of my concerns seem to dissolve.
Perspective
On the return hike, I passed by a group of three hikers. All of them were staring at their phones while hiking and one tripped on a tree root in the path. They caught themselves before hitting the ground.
I’ll admit I was thinking at the time that mother nature was saying, “Hey! Wake up, disconnect and enjoy the beauty around you! You need some perspective!” 🙂
I’m already looking forward to visiting Crowders Mountain State Park again. I believe I’ll return within a month and hike to Crowders Mountain, activating both the summit and park.
Sometime, I’d like to hit the trails as soon as the park opens and, perhaps, activate both Crowders Mountain and Kings Mountain parks on foot. That would likely take an entire day when I include the time on the air, but it would also be a lot of fun.
I was telling my wife yesterday that I actually enjoy writing up the odd field report on QRPer. It hit me that there are a couple of reasons why…
For one, a number of readers have reached out and thanked me because they enjoy living vicariously through my field reports and videos. I get it. My family and I enjoy watching YouTube videos of travelers around the world. We avoid the personality-driven channels and focus more on those that are less “produced.” It gives us an opportunity to travel to, say, Spain, France, Finland, or Turkey when we can’t presently do so. It pleases me to no end thinking that my reports and videos could, even in some very small way, offer a little vicarious travel to others.
Secondly, writing up these reports gives me an opportunity to re-experience some of my field time and sort through photos I might have taken along the way. Although it takes a few hours to write a report, I truly appreciate the experience.
Thank you, dear reader, for spending time with me during this outing!
Without a doubt, the most popular type of question I receive from readers here on QPRer.com and over at the SWLing Post has to do with making equipment purchase decisions.
In the past two months, I’ve had numerous questions from QRPer readers asking my opinion about choosing between the new Icom IC-705, or the Elecraft KX2. In fact, as I started putting this post together this morning, I received yet another email from a reader asking my opinion about these two iconic QRP transceivers!
I love both of these radios for different reasons, so the answer is not an easy one.
Let’s discuss this in some detail…
I decided to make a video talking about the pros and cons of each transceiver and note the reasons why one might pick one over the other. My hope is that this will help inform a purchase decision:
I am new – just about to start – portable, QRP operating. I’m just waiting for the weather to cooperate a bit.
Via phone, I have been looking around for the “proper” way to call CQ indicating either QRP or portable – or both! but I haven’t found that. I do see CW “calling CQ” samples. Can you give me that information or direct me to a site that might give some guidance? Not a big deal but I would like to start out on the right foot and sound like I know what I’m doing.
Thanks.
Susan
Thanks for your question, Susan! I’ll share, below, how I call CQ when QRP and portable:
Calling CQ Basics
There is no truly standard way to call CQ, but most CQs follow a certain pattern. Some are short, and some are long.
In general, if you’re calling CQ and simply want to work anyone anywhere and you’re open to a rag-chew (extended conversation), you might start by giving a longer CQ. Some operators will do CQ calls that last nearly 30 seconds, but I don’t personally do that. I use a call and repeat it leaving an interval of maybe 5-8 seconds between repeats. I’ll say something like:
“CQ CQ CQ, CQ CQ CQ, this is Kilo Four Sierra Whisky Lima, Kilo Four Sierra Whisky Lima calling CQ and listening.”
I repeat until I receive a reply.
I’ll sometimes change the length of the CQ call and add/remove words when I repeat. I might use a variation like:
“CQ CQ CQ this is Kilo Four Sierra Whisky Lima, Kilo Four Sierra Whisky Lima calling CQ and listening.”
then
“CQ CQ CQ this is Kilo Four Sierra Whisky Lima calling CQ to anyone, anywhere and listening.”
Side note: If you’re doing a Park or SOTA activation and you’ve been spotted on one of the networks, then keep your CQ short. Something like:
“CQ POTA CQ POTA CQ POTA this is Kilo Four Sierra Whisky Lima calling CQ for Parks On The Air”
Calling CQ QRP or Portable
Again, there’s no truly standard way of doing this, but when I call CQ QRP–which actually isn’t often–I’ll say:
“CQ CQ CQ, this is Kilo Four Sierra Whisky Lima calling CQ QRP and listening.”
or
“CQ CQ CQ, this is Kilo Four Sierra Whisky Lima calling CQ Portable and listening.”
I’ve even been known to say the number of watts I’m running in the CQ call.
But it’s truly rare that I note I’m running QRP in my CQ call. Why? I enjoy receiving and sending a good signal report then revealing “I’m running 5 watts into a dipole antenna.” I usually get very positive reactions and I believe I get more replies to my CQ when I’m not revealing I’m QRP until we’re in the exchange. But honestly? It’s all just a matter of personal preference.
Working stations: My favorite approaches as a QRP station
K4SWL portable VY2!
I’ve been known to spend the bulk of the summer in an off-grid cabin with my family in the Canadian Maritimes. I’m always QRP during these vacations and I love making contacts.
Here are a few approaches I use that I feel get the most contacts:
1.) Call CQ on a QRP calling frequency
When I’m operating QRP, I try to operate on or near generally accepted QRP calling frequencies–here’s a handy reference sheet. QRPers hang out there, so there’s a decent chance I might make a QRP to QRP contact on one of those frequencies. Again, I typically use a standard CQ call instead of identifying I’m QRP, but it’s also perfectly fine to say you’re QRP.
Also, when I’m at home and have a radio turned on in the background, I’ll often keep it set on a QRP calling frequency so I can answer a QRP call.
Sometimes, the best approach is to reply to other stations’ CQ calls.
This is so effective because the station is listening carefully for someone to reply to their CQ. If your signal is a little on the weak side, they’ll likely still reply.
As a QRPer, I’ll often start my search by tuning to one of the QRP calling frequencies mentioned above, but if no one is there, I look for any stations calling CQ with no replies.
3.) Move to a band with less activity
I’m sure some will disagree with me here, but I enjoy moving to bands like 17 meters when I’m QRP.
I’ve had very good success in the past if propagation is reasonably stable (an important factor in making this work).
I love 17 meters because the band is typically quiet and the density of stations isn’t that of, say, the phone portion of the 20 meter band. When I’m calling CQ on 17 meters, I’m often one of only a handful of operators I hear on that band, so I stand out a bit more. In fact, I’ve worked some of my best QRP DX on 17 meters. The trade-off is you might call CQ a while since there are less people on the band. This is where a voice memory keyer comes in handy!
Have fun!
Once you’ve made a few contacts on the bands, you’ll sort out your favorite CQ calls and what you include in them. Of course, learn from others you hear on the bands. Listening is always key.
My only advice would be not to do 30-45 second long CQ calls without leaving a break for a station to call back. Many would-be contacts will move on if they feel like they have to wait too long to answer your call. It is important, though, to send a few CQs and repeat your call at least twice anytime you’re giving a general CQ call on the HF bands.
Readers: What’s your favorite way of calling CQ QRP or Portable? What strategies work best for you? Please comment!
Many thanks to Mike (W6MVT) for sharing the following guest post:
Back to Ham Radio for a Year – A Brief Reminiscence
by Mike (W6MVT)
This story will sound like many I have heard over the past year, but I will write it nonetheless as a note of gratitude.
Last March COVID had just restricted our activities and I was wondering how to spend my time. I had received my licenses back in the 80’s. There was a code requirement, there was no internet, no QRZ, no spotting.
Though I enjoyed ham radio very much, family and work took precedence, and the equipment went into storage. I eventually sold it off (who is dumb enough to sell matching Drakes?).
Fast forward to the around 2010, when I knew I would be retiring and might want to get on the air again. I picked up some used equipment and stashed it away without really using it.
Then 2020 arrived and the world changed dramatically. One day, prompted by who-knows-what, I had the bright idea to dust off the gear and hook it up, mostly to see if it even still worked. A makeshift wire in the back yard and a quick listen and there it was – a CQ.
I was actually nervous to answer – it had been that long. It was KE8BKP, who it turns out, was activating a park. I hadn’t a clue what that meant, but I shakily answered. We exchanged reports and he went on the to the next one. I had two immediate reactions. First, I was reassured by that brief, painless interaction. The stuff worked and I could still “do this.” Second, things had changed a great deal since the “old days.” But I researched POTA and SOTA and DX Clusters and all the other magic that now exists.The point is that POTA gently reopened the door to an amazing hobby, one that still fascinates me. I went on to become an active hunter and now a prolific activator.
Since it has been a year now, I felt it important to acknowledge this moment, and to note one more thing. When an activator answers a call, we don’t know the other person’s circumstances. Maybe they are a new – or returning “old” ham. Maybe it took courage to key the mic or pound the key. I have appreciated the manner in which POTA hams enthusiastically help one another improve, learn and in turn help others. Thanks to Jeff, KE8BKP, and all the others since, and to come. And thanks to the many volunteers that keep the program running each day.
73, and be well,
Mike W6MVT
Mike, I couldn’t agree with you more. I think all POTA, WWFF, and SOTA activators are essentially ambassadors for ham radio. We never know what’s happening on the other end and I strongly believe in patience and understanding when answering calls and performing an exchange. It can have a huge positive impact for the person on the other end.
So glad you found Parks On The Air and that you’re enjoying playing radio once again!
Chameleon Antenna has sent me a number of their antenna systems to evaluate in the field over the past few months at no cost to me. I appreciate not only the opportunity to test these antennas, but to provide the company with my frank feedback.
As I’ve mentioned previously, Chameleon antennas are military grade and build here in the US (check out Josh’s tour of their factory). You pay a premium price–compared to imported options–but their gear is built for performance, easy deployment, and longevity.
What has impressed me most about Chameleon gear is how flexible and modular it is. Their antenna systems are adaptable to almost any situation and always built around the idea of emergency communications.
Recently, Chameleon sent me their new CHA TDL or Tactical Delta Loop antenna. This vertical loop antenna has been designed to be portable, and tunable from 3.5 to 54.0 MHz (80-6M), but, as Chameleon points out, “is most effective on the bands from 10.1 to 54.0 MHz (30-6M). ”
TDL deployment
If I’m being perfectly honest, I wasn’t sure what to expect this antenna to look like–in terms of size–once deployed, so I set it up in the front yard prior to taking it to the field.
Set up couldn’t have been more simple: attach the 17′ telescoping whips to the stainless steel spike (with one whip attached to the Hybrid Micro), extend the whip sections, then attach the loop wire to connect the tips of both whips.
It might have taken me four minutes to set up the TDL on the first go.
This antenna needs a little space for sure: this isn’t one you could easily deploy in a dense forest, but it has a very flat profile vertically. I can’t think of a single park I’ve activated that couldn’t accommodate the CHA TDL.
I like to try to give gear a fair chance when I do evaluations and thought I’d wait until propagation was at least stable before taking the TDL to the field and making a real-time, real-life video (as I used it for the first time). But, frankly, I’m way to impatient to wait for the sun to play fair! Trial by fire…
Lake Norman State Park (K-2740)
On Monday (March 15, 2021) I packed up the CHA TDL and headed to Lake Norman; one of my favorite parks to play radio.
Propagation left much to be desired that afternoon, but the weather was perfect.
I decided to pair the CHA TDL with my Icom IC-705. Since the CHA TDL requires an ATU, I connected the mAT-705 Plus.
NVIS on the low bands
I had no idea what to expect from the CHA TDL in terms of performance, but Chameleon notes that it provides Near-Vertical Incidence Skywave (NVIS) propagation on 40 and 80 meters. NVIS antennas are very popular for the military and for emergency communications since the propagation footprint is much closer to home than it might normally be.
NVIS is also a brilliant option for park and summit activators, especially if they’re activating in an area with a high density of park/summit chasers. For example, if you live and activate sites in the state of Maryland, employing a NVIS antenna might make your site more accessible to the DC metro area, Pennsylvania, Virginia, New York, Delaware, and New Jersey–regions that might otherwise be in the skip zone of your 40 meter signal.
On the air
Operating five watts CW, I started calling CQ POTA on 20 meters and snagged four stations in about seven minutes.
I was very pleased to work a station in California and one in Montana with five watts. (Though I need to check, this might have been my first MT station logged from a park.)
Next, I moved to 40 meters and was very curious if the TDL would provide me with proper NVIS propagation.
It did! One litmus test for me is when I work stations in Tennessee on 40 meters. Typically, I only log TN stations when on 80 meters or when I’ve configured one of my wire antennas for NVIS coverage.
Here are my logs from this 28 minute activation:
Here’s a QSOmap of the activation–the delineation between my four 20 meter contacts and eight 40 meter contacts is pretty evident:
Video
Here’s my real-time, real-life video of the entire activation which also shows how the CHA TDL easily fit in among trees:
In a future video, I’ll show how I deploy the CHA TDL.
Unfortunately, I left my tripod at home, so apologies for the viewing angle as I operated the IC-705.
Summary
This first test of the CHA TDL really couldn’t have gone better.
I was able to easily deploy it on sloping ground, among trees, in a state park, and snag both locals and QRP DX within a brief window of time on the air. All this, while our local star tried its best to interfere.
In terms of construction, the TDL is what I would expect from Chameleon: military grade.
For park activators and Emcomm purposes, the CHA TDL makes for a convenient, portable NVIS antenna on 40 and 80 meters.
While I have lighter, smaller footprint antenna options for SOTA, I must admit I’m very curious how it might perform on 20 and 17 meters from the summit of a mountain. The idea of being able to rotate the antenna and change the propagation footprint is very appealing. I’ll save this experiment for a summit that doesn’t require hours of hiking, though, and one where I know I can jab the stainless steel spike in the ground (i.e. not on top of a rocky mountain).
Any negatives? When I first deployed the TDL at home, we were having 30+ MPH wind gusts. When the gusts shifted, it did move the antenna. This could be remedied pretty easily by using a bit of fishing line filament to tie off one side of the loop. With that said, I’m not sure I’d configure the TDL as a loop if I expected strong winds. Also, as I mentioned earlier, this might not be the best antenna to pack if you plan to include a multi-hour hike in your activation.
And herein lies the brilliant thing about Chameleon Antennas: If I packed in the CHA TDL and found that winds were strong on site, I would simply configure it as a vertical instead of a loop!
The CHA MPAS Lite vertical
The CHA TDL can easily be configured as a CHA MPAS Lite portable vertical: all it’s missing is a counterpoise wire which you can buy separately from Chameleon or, better yet, just use some spare wire you have on hand!
Or, you could configure it as a random wire antenna by directly connecting a length of wire to the Hybrid Micro transformer.
That’s the thing about Chameleon HF Antennas: they can be configured so many different ways.
If you’re interested in the CHA TDL, I’d strongly encourage you to read though the user manual: it’s chock full of info and ideas. Click here to download as a PDF.
Next time I take the CHA TDL out, I think it’ll be to a summit where I’d like to see how it might perform on the higher bands with the ground sloping away from the antenna site.
On Monday, March 8, 2021, I had a very rare opportunity: nearly a full day to play radio!
I debated where to go the night before and I had a lot of ideas. Do a multi-park run? Activate some new-to-me parks a little further afield? Hit a SOTA summit?
While it was very appealing to plan a multi-park run for POTA/WWFF, I really wanted to stretch my legs and activate a summit. The weather was glorious and it dawned upon me that we’ll soon be entering the season of afternoon thunderstorms which will, no doubt, have a negative impact on my summit plans for the next few months since afternoons are typically when I have time to do activations.
After examining the map, I decided to go to Elk Knob State Park. The summit of Elk Knob is a SOTA site and the park is in both the POTA and WWFF programs.
The round trip hike to the summit (adding in a little trail loop around the park) would amount to about 4 total miles and an elevation increase of roughly 1,000 feet.
Monday morning, I left the QTH around 9:00 and arrived at the park around 11:15–it was a proper scenic drive.
The 1.9 mile hike to the summit took me about 45 minutes. The path was amazingly well maintained: 4′ wide with crushed stone most of the way.
One of the nicest trails I’ve been on in ages–Elk Knob State Park is quickly becoming one of my favorite NC State Parks.
There aren’t any antenna-friendly trees on the summit, so I was happy that I packed the Chameleon MPAS 2.0.
At first, I planned to only bring the top section of the MPAS 2.0 vertical to save space, but the hike was so short, I brought the lower aluminum sections as well. I’m glad I did.
Deployment of the MPAS 2.0 was quick and I the Elecraft KX2‘s internal ATU found a match on 20 meters very quickly.
Elk Knob (W4C/EM-005)
I spotted myself using the SOTA Goat app and received quite a 20 meter CW pileup! As you’ll see in my video below, it was testing the limits of my CW skills for sure.
With 5 watts, I quickly worked stations to my east in France, Spain, and Germany, and to my west all over the west coast of North America. It was a hoot!
I eventually moved to 40 meters and operated a bit, but 40 was suffering from poor propagation so stations that are normally quite strong, were weak that day.
I needed four stations for a valid SOTA activation and 10 stations for a valid park activation. I logged a total of 38 stations in 56 minutes. 75% of those contacts were on 20 meters.
Video
Here’s one of my real-time, real-life videos of the entire activation (less a small amount I removed while eating a quick bite):
When people tell me running QRP is like “trying to play radio with both hands tied behind your back” I’ll show them this video. 🙂
AGN?
While the hike, the weather, and the signals were all in my favor, I’ll admit I wasn’t on my “A Game” that day. We all have days like this where we struggle to copy, to keep up with the flow of contacts, and to send correctly.
In recent weeks, I’ve gotten a number of emails from readers and viewers who said they had a less-than-smooth SOTA or POTA activation and felt a wee bit embarrassed on the air when they struggled copying.
But you know what?
No worries!!!
This is all about having radio fun in the field, enjoying a hike, taking in the views, and soaking up the beautiful weather! It’s not a contest and we have nothing to prove to anyone.
I can also promise you that any chaser/hunter who has ever activated a field site will completely understand if they have to send their call a couple extra times or if they (heaven forbid!) have to re-send their call after you incorrectly copy a character.
This is totally normal.
Be easy on yourself and enjoy the ride. Even on days when I don’t feel like I’m 100% in the groove, I find doing a summit or park activation clears my mind and resets my soul.
My policy? When a mistake is made laugh it off and move on!
Photos
Here are a few extra photos from the Elk Knob hike:
QRP radios, product announcements, reviews, news and more. Low power amateur radio fun!
Please support QRPer by adding us to your whitelist in your ad blocker. Ads are what helps us stay online. All of our ads are ham radio related--no junk, we promise! Thank you!
 Since I took delivery of my lab599 Discovery TX-500, one of the most asked questions I’ve received from readers of QRPer.com and my YouTube channel is:


