Over on Mastodon, Jan (DG1JAN) posted a few images of a PCB-based antenna project he made available on github. At my request, Jan kindly shared the following information so you can order your own PCBs with design files he has made available.
Jan writes:
Hello Thomas,
I mostly do portable operation (SOTA, COTA, WWFF,…) and I
like playing around with different antennas (EFHW, Linked Dipoles, OCFD…).
So I came up with a little PCB some time ago that you can use as an UnUn (1:49, 1:9) or BalUn (1:1, 1:4) in different configurations.
I’ve put this under CC License so everybody can reuse or modify the Design (PCB Files in Kicad-Format) or order PCB from any Manufacture (e.g. like JLCPCB) by using the Gerber-Zip-File in the repository.
There are some videos from (mostly) German OMs on YT about the build and usage.
vy 73 de Jan, DG1JAN
Thank you so much for sharing this, Jan! Readers, it’s pretty affordable to use a service like OshPark to order a few of these PCBs. Simply upload the provided Gerber files and they’ll make them for you.
In the early fall and spring, I go over my QRP radios and give serious thought to how I’ll build compact field kits around them.
Why? I’m pretty sure it’s the pending change in weather that’s the catalyst. The temptation to get back out there and make some contacts.
Then again, any excuse: I absolutely love building field kits, and fortunately it never gets old.
The radios I’m considering at present are my MTR-3B (named Threepence) and KX1, now named Audrey. (Yep, I chose “Audrey”…thank you for all of the amazing suggestions!)
Both of these are ideal little radios for kitting out because they’re so compact and truly made to be taken to the field.
One of these two radios––and I haven’t decided which one yet––is going to live in my EDC bag.
The Tom Bihn Stowaway in black has been my EDC bag for many years. I’ll need to pay attention to the weight and bulk of this field kit, because I’ll be lugging it pretty much everywhere.
I’ve got some ideas and a couple of pouches in mind, so this will all start coming together soon.
But first…
Care to share your portable radio kit?
One of the things I enjoy doing when I’m putting together a new field kit is to check out what others have done. It’s a great way to get some fresh ideas…and besides, it’s just plain fun to compare notes.
If you would like to showcase your field radio kit on QRPer.com, please send a short write-up with photos detailing how/why you built your kit as you did, and list all of the components with links to the manufacturers.
We only ask that you send your own original ideas––and not just a link to another website article or video––as we’d like this content to become part of the QRPer archive. That way, if an external link is removed, it’ll still be safe and sound here. (We take our archiving seriously on this site.) Of course, we welcome links to blog articles and videos in your post.
Simply send your information via email to my callsign K4SWL at QRPer.com.
Because I receive so many tips from readers here on QRPer, I wanted way to share them in a concise newsletter format. To that end, welcome to QRPer Notes, a collection of links to interesting stories and tips making waves in the world of radio!
Field Antenna Survey
Many thanks to Phil (KA4KOE) who shares the results from an informal survey he conducted on the POTA Facebook group. Phil writes:
Tom
I’ve let the survey run for about 3 days on the POTA Facebook group. Sample size was 658 votes. I opted to do a “type” survey and not by manufacturer.
Something tossed in tree and just hoped it would work: 2%
Total: 93%.
Remaining obscure types cut-off below 2% accounted for 7%.
Again, like the poll I conducted previously on radio types, not surprised by the No. 1 spot.
What DID surprise me was #7: I put that selection in the poll types as a joke but 2% of hams throw a wire up in a tree or other support with no forethought and hope it works.
The Palm Pico: Getting a grip!
Many thanks to Terry (N7TB) who shares the following tip:
I have both the single and double Pico paddle and the KX3 mount. After watching you hand hold your paddles, I came up with a way to make small paddles easier to hold. I have attached a photo. It is a small piece of 3/8 ID pipe insulation to make holding the Pico paddle easier.
Have a great trip to Hamvention.
73,
Terry
N7TB
QRP Radios from the 70s and 80s
Many thanks to Ron (W6AZ) who shares the following video from Mikrowave1 on YouTube:
You asked for it! Here is the birth of QRP and a whack at revealing the top 10 QRP Homebrew Projects and Commercial Radios that started it all. What is all the fuss about low power?
Do you usually try to use an isolator or do you often let your wires touch branches by just pulling them over? When you deploy 20m EFHWs, for example, do you try to avoid having an end touch a branch and only have the throw line going over the branch? I tried to go through your videos and look but you don’t often mention how far you pull the wire up and possibly over. Thanks!
This is a great question!
Before I answer, I’d like to add a little context:
I am a QRP operator. The maximum amount of power I use in the field is 10 watts, but 99.5% of the time, it’s actually 5 watts or even much less.
I am answering this as a field operator, meaning I’ll be referring to temporaryantenna deployments.
That said, the quick answer is no, during park and summit activations, I do not worry about my antenna radiator wire touching tree branches.
I do isolate the end of my wire antennas from tree branches and leaves, but I don’t worry about other parts of the radiator touching.
Also, all of my antenna wire has some sort of jacket–I don’t run bare wire in the field.
Many thanks to Sam Duwe (WN5C) who shares the following guest post:
A (surprisingly good) tabletop HF antenna
by Sam Duwe, WN5C
I recently built a tabletop QRP HF antenna for 17 and 20 meters, in the spirit of the Elecraft AX-1, so I could operate at lunchtime on the campus where I teach. My wants were something small, that would fit in my work bag, that didn’t require a tuner, and could work on a couple of different bands. But on a lark I decided to attempt a POTA activation at Lake Thunderbird State Park (K-2792) pairing this antenna with my Penntek TR-35 QRP CW transceiver. I figured I’d maybe get one or two QSOs and then switch to a long wire in a tree. But what happened amazed me.
I talked to seemingly everyone. Beginning at 9:00 AM September 26th I worked both 17 and 20 meters for an hour and a half and made 37 contacts from across the country. I even had a Swiss guy call me back on 17 but he faded before we could finish. This antenna, at least as a CW POTA activator, works. Granted conditions were very good, but I’ve replicated this multiple times in the past few weeks, just recently at a picnic table in the parking lot of the Route 66 Museum (K-8644) in Clinton, OK (there is quite a thrill in urban activations).
It has also reasonably low profile and very quick to setup and take down. It is also quite a conversation piece when I set it up at school. I elevated the counterpoise by attaching it to a nearby oak and an interested undergrad sheepishly asked if I was listening to the tree!
The build is pretty simple. Physically the antenna consists of a small painters pole from Walmart and an old tabletop camera tripod. I found a nut that fit the screw portion of the tripod and hot glued it into the orange connecting section of the pole. That way the tripod can then be screwed onto the pole. The RF parts of the antenna consist of a 38” telescoping whip that I scavenged from the rabbit ears antenna that came with my RTL-SDR. It connects using the original connector which was hot-glued into a hole I drilled into the top of the painters pole. I found similar small 3 or 4-foot whips from AliExpress for cheap and these would probably work fine.
I then soldered a long length of speaker wire that was wound into two coils: the top for 17 meters (24 turns) and the bottom for 20 meters (25 turns plus the former 24-turn coil). The speaker wire was the soldered to the center of a BNC connector which I hot glued and taped to the pole. I soldered a short piece of wire from the shield of the BNC for the counterpoise and added an automotive spade connector to attach to a 17-foot length of wire. I also included a switch between the coils and the BNC connector to select either just the top coil (17 meters) or both coils (20 meters) using solder, hot glue, and tape. I then covered my shame in silicone tape.
The most time-consuming aspect of the project was tuning the antenna. It required trial and error to first tune the number of turns on the 17-meter coil and then the 20-meters coil. I extended the counterpoise (for me it’s best when slightly elevated) and the telescoping whip. I performed the tuning with the whip not fully extended to give room to tune in the field. Using a nanoVNA was useful here, as was soldering a pin to the wire to poke through the wire at various parts of the coil to find the best SWR.
In use, the antenna can be affected by both body capacitance and how the counterpoise is situated, so I found that an in-line SWR meter was helpful in making sure all was well. Once set up it is easy to fine tune by just adjusting the whip length. 1.5:1 SWR is about how well I can tune on average. Obviously if you have a tuner you would just have to get it close.
There are a million variation on a small base-loaded vertical antenna, and you can definitely improve upon this design. And, besides the super well-built and elegant AX-1, QRP Guys sells an interesting looking kit, and there are some good 3D printed designs I might want to try out. But regardless how you go about it, it might be worth giving a tiny antenna a shot.
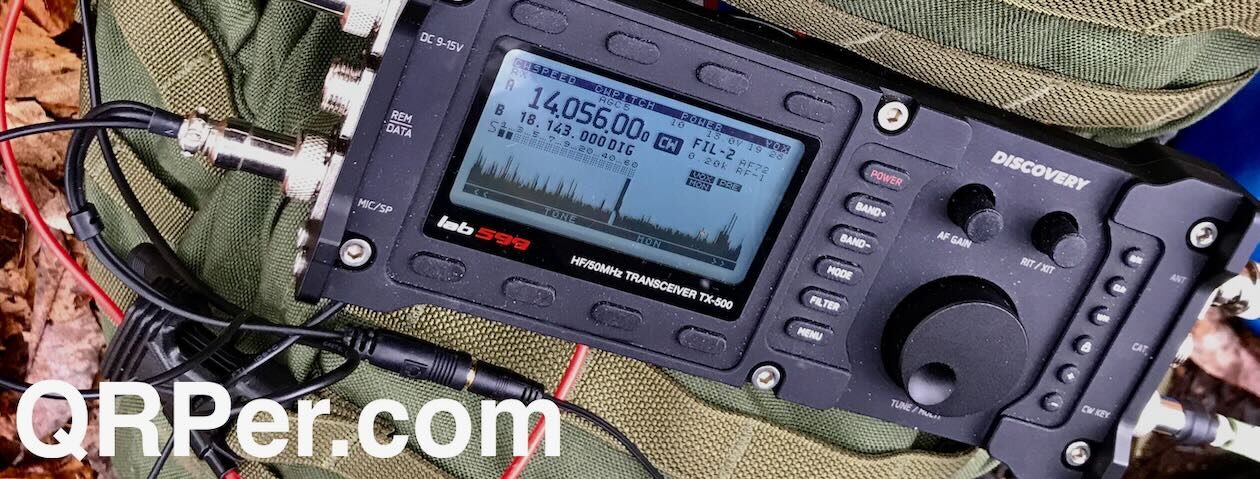
Many thanks to Vitor Morais who asked the following question in the comments section of my YouTube video:
Hi,
Greetings from UK. I recently learned that POTA [is now in the] UK so I am really looking forward to it.
I also recently put an order for [the Discovery TX-500] so I am really excited as well.
I would like to create a very compact setup pouch for field use to pair with this radio; one that I could take to summits or parks and also travel abroad.
What battery and antenna would recommend?
Would you recommend an ATU?
Or would you compromise to fewer bands or pack a secondary antenna?
I love to know your opinion. Thanks
Great questions, Vitor! In truth, these sorts of questions are easy to ask but quite complicated to answer due of the insane number of options and possibilities available. It’s impossible to cover them all so I’ll try to give you some suggestions based on what I tend to use in the field. Continue reading “What battery, antenna, and ATU should I pair with the Discovery TX-500?”→
Here’s the product description from Elecraft’s website:
The AX2 is small enough to take anywhere – just in time for lightweight field ops during the new solar cycle. Use it HT-style with a hand-held, like the KX2; on a picnic table with an AXB1 whip bipod; or with a tripod and AXT1 tripod adapter. The AX2’s rugged, nylon housing is water-resistant, with low wind resistance and our new anti-wobble design.
Illustration by Elecraft
Experimenters will love the AX2’s versatile design. A snap-off cover provides access to the high-Q inductor. Simply remove turns and re-solder one wire to cover your favorite band. Clip-off tabs are provided for band identification.
The table below shows how the new AX2 20-meter mini-whip compares to our original AX1 multi-band whip. Both are designed for lightweight portable operation. The versatile AX1 covers multiple bands via a selector switch and can handle up to 30 W continuous TX power.
The ultra-compact AX2 has a new anti-tilt base design that minimizes BNC connector wobble – ideal for hand-held (HTstyle) use. While the AX2 covers 20 meters as shipped, it can be modified by the user to cover any single band from 17 through 6 meters. The base unit includes small tabs that can be clipped off to identify the target band.
NOTE: Both whips are intended to be used with an ATU to compensate for terrain, body capacitance, height, etc.
A reader recently asked if I’d be selling my AX1 after learning about the AX2, but that isn’t going to happen. The AX2 is a 20 meters and up antenna and I see it as being a brilliant SOTA companion since its lightweight, stable design should do well on windy summits.
For POTA and WWFF, however, I really rely on the 40 meter band for most of my contacts. The AX1 covers 40 meters brilliantly (and 20M and 17M) so I’ll still rely on it quite heavily.
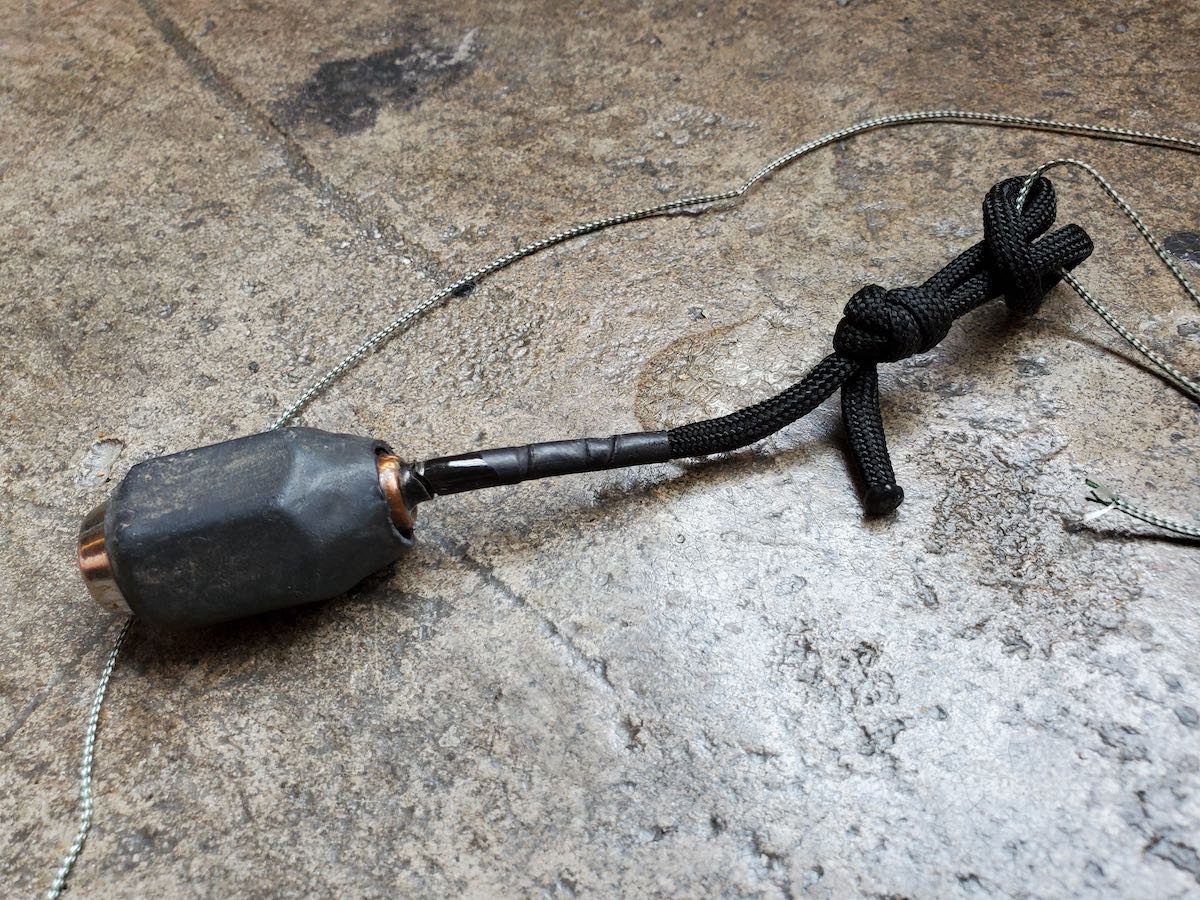
I discovered something you might have an interest in for your wire antenna deployment. Years ago when I was a building contractor, we used chalk line for floor layout. It has a very high tensile strength and is very light weight. After reflecting on this, I recently bought a 100’ spool of braided 1 millimeter chalk line and used it for a field deployment. I attached my “throw weight” to it and easily launched it about 60’ into a tree. You can see it in the attached photo holding my homebrew EFHW to my Jeep.
The magnet wire was scavenged from a HUGE transformer from a neighbor’s discarded light fixture.
Lug Nut Throw Weight: left hand threaded from a 1966 Plymouth Fury
I did the new installation for him and he gave me the old one. I promptly disassembled it and collected miles of 14 and 20 gauge magnet wire ?!
I haven’t added the capacitor to this antenna yet because it is sufficiently resonant and broadbanded on 40, 20, 15, and 10 Meters. I did some testing with the capacitors though on my previous build which was the PVC tube EFHW transformer. I believe I may have sent you a photo of that in a previous message. It too was resonant in the same places, but adding the capacitor smoothed and widened the acceptable SWR range.
The attached photos are my complete antenna assembly: matching transformer (49:1), 65.5’ speaker wire, 100’ braided 1MM chalk line, and throw weight (epoxy filled lug nut with short paracord pigtail).
Compact and lightweight.
Dan/ KQ8Q
I love this, Dan! I also like how self-contained and compact it is. What a professional job, too, with heat shrink, proper connection points and tie-offs.
Brilliant work!
Do you have an antenna or radio project you’d like to share on QRPer.com? Contact me!
Chameleon Antenna has sent me a number of their antenna systems to evaluate in the field over the past few months at no cost to me. I appreciate not only the opportunity to test these antennas, but to provide the company with my frank feedback.
As I’ve mentioned previously, Chameleon antennas are military grade and build here in the US (check out Josh’s tour of their factory). You pay a premium price–compared to imported options–but their gear is built for performance, easy deployment, and longevity.
What has impressed me most about Chameleon gear is how flexible and modular it is. Their antenna systems are adaptable to almost any situation and always built around the idea of emergency communications.
Recently, Chameleon sent me their new CHA TDL or Tactical Delta Loop antenna. This vertical loop antenna has been designed to be portable, and tunable from 3.5 to 54.0 MHz (80-6M), but, as Chameleon points out, “is most effective on the bands from 10.1 to 54.0 MHz (30-6M). ”
TDL deployment
If I’m being perfectly honest, I wasn’t sure what to expect this antenna to look like–in terms of size–once deployed, so I set it up in the front yard prior to taking it to the field.
Set up couldn’t have been more simple: attach the 17′ telescoping whips to the stainless steel spike (with one whip attached to the Hybrid Micro), extend the whip sections, then attach the loop wire to connect the tips of both whips.
It might have taken me four minutes to set up the TDL on the first go.
This antenna needs a little space for sure: this isn’t one you could easily deploy in a dense forest, but it has a very flat profile vertically. I can’t think of a single park I’ve activated that couldn’t accommodate the CHA TDL.
I like to try to give gear a fair chance when I do evaluations and thought I’d wait until propagation was at least stable before taking the TDL to the field and making a real-time, real-life video (as I used it for the first time). But, frankly, I’m way to impatient to wait for the sun to play fair! Trial by fire…
Lake Norman State Park (K-2740)
On Monday (March 15, 2021) I packed up the CHA TDL and headed to Lake Norman; one of my favorite parks to play radio.
Propagation left much to be desired that afternoon, but the weather was perfect.
I decided to pair the CHA TDL with my Icom IC-705. Since the CHA TDL requires an ATU, I connected the mAT-705 Plus.
NVIS on the low bands
I had no idea what to expect from the CHA TDL in terms of performance, but Chameleon notes that it provides Near-Vertical Incidence Skywave (NVIS) propagation on 40 and 80 meters. NVIS antennas are very popular for the military and for emergency communications since the propagation footprint is much closer to home than it might normally be.
NVIS is also a brilliant option for park and summit activators, especially if they’re activating in an area with a high density of park/summit chasers. For example, if you live and activate sites in the state of Maryland, employing a NVIS antenna might make your site more accessible to the DC metro area, Pennsylvania, Virginia, New York, Delaware, and New Jersey–regions that might otherwise be in the skip zone of your 40 meter signal.
On the air
Operating five watts CW, I started calling CQ POTA on 20 meters and snagged four stations in about seven minutes.
I was very pleased to work a station in California and one in Montana with five watts. (Though I need to check, this might have been my first MT station logged from a park.)
Next, I moved to 40 meters and was very curious if the TDL would provide me with proper NVIS propagation.
It did! One litmus test for me is when I work stations in Tennessee on 40 meters. Typically, I only log TN stations when on 80 meters or when I’ve configured one of my wire antennas for NVIS coverage.
Here are my logs from this 28 minute activation:
Here’s a QSOmap of the activation–the delineation between my four 20 meter contacts and eight 40 meter contacts is pretty evident:
Video
Here’s my real-time, real-life video of the entire activation which also shows how the CHA TDL easily fit in among trees:
In a future video, I’ll show how I deploy the CHA TDL.
Unfortunately, I left my tripod at home, so apologies for the viewing angle as I operated the IC-705.
Summary
This first test of the CHA TDL really couldn’t have gone better.
I was able to easily deploy it on sloping ground, among trees, in a state park, and snag both locals and QRP DX within a brief window of time on the air. All this, while our local star tried its best to interfere.
In terms of construction, the TDL is what I would expect from Chameleon: military grade.
For park activators and Emcomm purposes, the CHA TDL makes for a convenient, portable NVIS antenna on 40 and 80 meters.
While I have lighter, smaller footprint antenna options for SOTA, I must admit I’m very curious how it might perform on 20 and 17 meters from the summit of a mountain. The idea of being able to rotate the antenna and change the propagation footprint is very appealing. I’ll save this experiment for a summit that doesn’t require hours of hiking, though, and one where I know I can jab the stainless steel spike in the ground (i.e. not on top of a rocky mountain).
Any negatives? When I first deployed the TDL at home, we were having 30+ MPH wind gusts. When the gusts shifted, it did move the antenna. This could be remedied pretty easily by using a bit of fishing line filament to tie off one side of the loop. With that said, I’m not sure I’d configure the TDL as a loop if I expected strong winds. Also, as I mentioned earlier, this might not be the best antenna to pack if you plan to include a multi-hour hike in your activation.
And herein lies the brilliant thing about Chameleon Antennas: If I packed in the CHA TDL and found that winds were strong on site, I would simply configure it as a vertical instead of a loop!
The CHA MPAS Lite vertical
The CHA TDL can easily be configured as a CHA MPAS Lite portable vertical: all it’s missing is a counterpoise wire which you can buy separately from Chameleon or, better yet, just use some spare wire you have on hand!
Or, you could configure it as a random wire antenna by directly connecting a length of wire to the Hybrid Micro transformer.
That’s the thing about Chameleon HF Antennas: they can be configured so many different ways.
If you’re interested in the CHA TDL, I’d strongly encourage you to read though the user manual: it’s chock full of info and ideas. Click here to download as a PDF.
Next time I take the CHA TDL out, I think it’ll be to a summit where I’d like to see how it might perform on the higher bands with the ground sloping away from the antenna site.
QRP radios, product announcements, reviews, news and more. Low power amateur radio fun!
Please support QRPer by adding us to your whitelist in your ad blocker. Ads are what helps us stay online. All of our ads are ham radio related--no junk, we promise! Thank you!