Yes, Scott will freely admit that his sticker is tongue-in-cheek!
Many thanks to Scott (KN3A) who recently commented with his thoughts and impressions of the Xiegu X6100. Scott writes:
When you published your X6100 [field] report, I could not wait to see the video! You tipped me off when we had our QSO that you were using it! As you said in your YouTube comment, a X6100 to X6100 was accomplished at your activation!
I am an avid POTA/SOTA QRP operator and mostly use my Icom IC-705 on activations. It is a superb radio and no intention of ever selling it. The reason I was attracted to my X6100 was the fact it’s an SDR, has a very nice display screen and has a built in ATU. I use many different antennas on activations, and some require a ATU, like my Sotabeams Bandhopper 3. I like using it when I go backpacking and activating due to how easy it is to deploy and lightweight.
To those who attempt to compare the X6100 to the IC 705 is like comparing a Ford F-150 to a Toyota Tacoma. I had an X5105 for a few months and went on a few activations with it. I would mostly compare the X6100 to the X5105 and call it a big upgrade to the X5105.
I got familiar with the X6100 in my hamshack the past 3 weeks, and although I know of it’s shortcomings, which I did share with Thomas prior to it’s arrival at his QTH, I am very pleased with the radio even with the features that are not enabled yet.
On Christmas eve, I went hiking and afterwards did a quick POTA activation inside my car using my IC 7100 and 50 watts. The temperature was getting warmer and warmer out, so I made a hasty decision to go home and get the x6100 and take it to another local park and sit outside on a picnic table. I decided to use my spark plug antenna and use my 17 ft. Shakespeare fishing pole. I had almost 1:1 SWR on 40 and 20 meters and had to use the ATU as I was having about a 3:1 on 30. The ATU kicked in and had a perfect match in seconds, which is also the same response as the G90 and x5105. Continue reading Xiegu X6100: Scott’s thoughts and impressions→
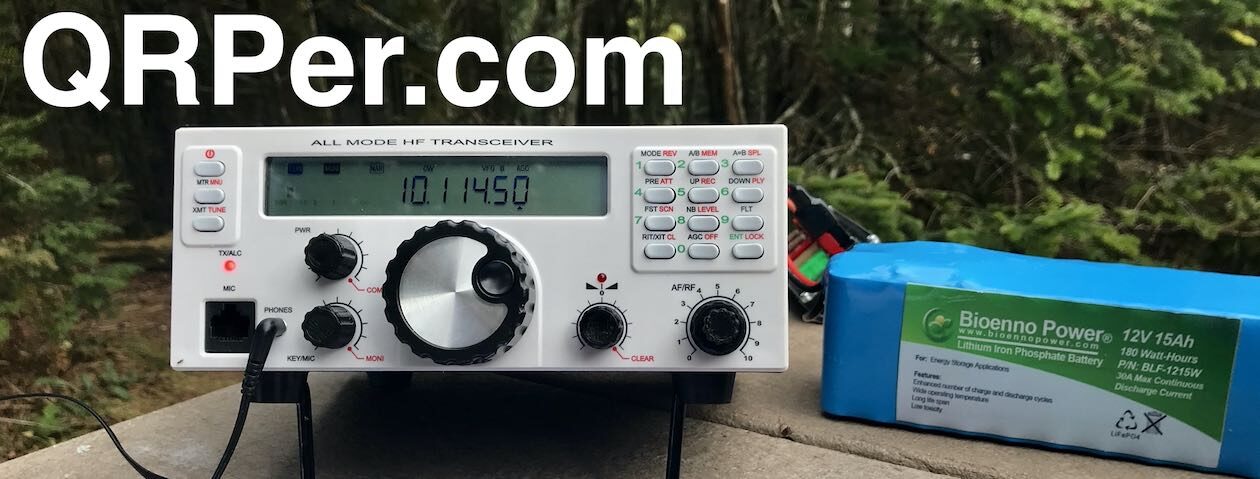
Many thanks to Josh for sending me this X6100 so promptly and performing the first firmware update!
I took delivery of the X6100 last week after returning from vacation in the Outer Banks. It was bittersweet as I was soeager to check out this new radio but simply had too many projects on the table to complete before Christmas day.
That and in the morning light after our return, my daughter pointed out that one side of my horizontal delta loop antenna had fallen to the ground. Fortunately, I was able to fix the antenna in short order. It’s certainly time to push the schedule up for completely replacing this 10 year old wire antenna!
X6100: Known issues
I had gotten a few messages from X6100 early adopters like Scott (KN3A) and Rich (KQ9L) noting that the current firmware version (the December 7, 2021 release) had taken care of a few initial bugs, but there were still a few outstanding points that specifically affect CW operators. Most notably:
Noise reduction (or DNR) in CW mode severely distorts audio
CW message memories can be stored and saved but cannot yet be played back on the air (SSB message memories are fully functional, however)
Fine tuning is limited to 10 Hz steps at the moment
Someone had also noted possible CW keyer timing issues.
At the same time, I had read mostly positive comments about SSB operation from QRPer readers and subscribers.
Frankly, knowing Xiegu’s history of pushing the production and distribution timeline ahead of a radio being fully-functional and properly tested, I expected a few bugs and issues that would need to be sorted out in firmware updates.
To be very clear: I’m not a fan of the “early adopters are the Beta testers” philosophy. I wish Xiegu would thoroughly Beta test their products so that they were more polished and fully-functional right out the door much like we expect from the likes of Elecraft, Icom, Yaesu, and Kenwood. There are almost always minor post-production bugs to sort out even with these legacy manufacturers, but issues should be of the variety that somehow slips past a team of Beta testers who actually use the radio.
On Sunday, November 28, 2021, my family needed a little time outdoors after a Saturday full of home projects.
I packed my field radio kit in the GoRuck Bullet Ruck, then we jumped in the car and drove to the Clear Creek Access of South Mountains State Park (the same site in my previous POTA field report).
South Mountains State Park (K-2753)
It was a gorgeous day and we had the park to ourselves. First thing we did was hike the short Lakeview Trail loop.
This trail is only 1.3 miles long, but offers up some beautiful views.
Hazel also came along and enjoyed the sights, smells, and even got her feet wet in a stream!
Fortunately, no one was using the one solitary picnic table at the Clear Creek access, so we claimed it!
First thing I did was launch a line and deploy my 28.5′ speaker wire antenna.
I knew it would pair perfectly with the Elecraft KX2!
I love this compact Weaver throw line bag!
The new N6ARA TinyPaddle
This activation also gave me an excuse to check out a paddle my buddy Ara (N6ARA) recently designed.
He calls it the TinyPaddle:
An appropriate name, because this key is wee! Ara notes:
As someone who likes bring experimental gear to summits, I have had paddles break on me multiple times. […] I don’t like carrying the extra weight/volume of a second set of paddles, so I designed my own “TinyPaddle” for backup as a middle ground option. It weighs roughly 3.7g and is 1.2cm x 1.2cm x 5.0cm in size.
He’s right, the TinyPaddle could tuck away even in the most compact of field kits. You’d never know it was there.
Here’s the TinyPaddle connected to the side of my Elecraft KX2:
Ara sent this key to me for frank feedback (prior to doing a small production run of them) knowing I’d not only check it out in the shack, but (of course!) take it to the field.
I decided to do my activation at South Mountains State Park using only the TinyPaddle.
Before taking it to the field, I had some concerns that the TinyPaddle might turn in the 3.5mm key port on the side of the KX2 as I used it. Once plugging it in, though, I could tell that it would not be a problem at all. The paddle is so lightweight and so sensitive, it’s simply not an issue. In fact, it would be rather difficult to use it in such a way that it would shift in the 3.5mm port.
On The Air
Knowing in advance that it was a contest weekend (the CQWW), I decided I would stick with the WARC bands during this activation.
I tuned the speaker wire antenna to 10.112 MHz on the 30 meter band.
Hazel asks, “Got any doggy treats in that pack, daddy?”
The 30 meter band was more crowded than usual as many other POTA/SOTA/WWFF and casual operators sought refuge from the signal density on 40 and 20 meters.
Since I had the family with me and since we’d spent most of our time at the park eating a late picnic lunch and doing a casual hike, I allotted only 20 minutes of air time for this activation. I was hoping I could validate the activation with 10 contacts in that amount of time.
I started calling CQ with the N6ARA paddles. First thing I noticed was how sensitive and precise they were. Although the TinyPaddle is a mechanical paddle (with spaced contacts), they feel more like a capacitive touch paddle they’re so sensitive.
I started calling CQ POTA and soon logged KE4Q.
A few minutes later, I worked AI8Z, followed by W5WIL, WO0S, WA2JMG, AA0Z, WA2FBN, N0VRP, KA3OMQ, W9SAU, and K1MZM.
With a total of 12 stations logged in 21 minutes, I went QRT.
QSO Map
Here’s what 5 watts into a 28.5′ speaker wire did on 30 meters that fine day (click map to enlarge):
Video
Here’s a video of my full activation. Hazel was being very camera shy; for some reason, she doesn’t like the OSMO Action camera. My wife and I think it must resemble something she’s seen at the vet’s office? We may never know!
Ara is obviously a talented engineer. I’m always impressed with devices like this that are so simple, yet so effective.
The TinyPaddle is going to live in my KX2 field pack as a backup to the KXPD2 paddles which have actually failed me in the field before.
That time the KXPD2 failed me…
I mention in the video that I once needed to use my Elecraft KXPD2 paddles to communicate with my buddy Mike (K8RAT) to share my SSB frequency for a very rare park activation I activated in the spring of 2020. After plugging the KXPD2 paddles into the KX2, I found that I could only send “dits.” I couldn’t even set it up to send as a straight key from one side of the paddle.
This forced me to drive 25 minutes to a spot where I had cell phone reception to contact Mike with info for a spot, then drive back to the site. That effectively shortened my activation of this ATNO park by 50 minutes!
KXPD2 missing one of the two center posts.
I sent Elecraft the photo above and they quickly identified the problem: turns out, one of the center posts had loosened and fallen out. They immediately sent me a replacement post free of charge (typical Elecraft customer service).
I use the KXPD2 paddles quite a lot because they mount directly to the front of the KX2 making it possible to use my kneeboard during SOTA activations. Since that mishap in the field, I tighten the KXPD2 posts at least once a month and also carry a precision screwdriver with me in my field kit.
A proper backup!
But having the TinyPaddle now is even extra insurance that a paddle failure won’t stop me from completing my activation!
When I made the video, I wasn’t certain if Ara was planning to do a production run of these or not. I’m very pleased to see that he has!
I’m certain he could actually fetch much more for these paddles, but he wants them to be an affordable, accessible backup paddle for anyone doing CW field activations.
He even includes a link to his Thingiverse page where you can download and 3D print accessories (including a TinyPaddle holder) and replacement parts at home free of charge.
Ara, thanks for making your project so available and accessible to everyone!
I hope you enjoyed this field report and activation.
I’d like to send a special thanks to those of you who are supporting the site and channel through Patreon and the Coffee Fund. While certainly not a requirement as my content will always be free–I really appreciate the support.
Thank you!
73,
Thomas (K4SWL)
Bonus photos!
My daughter Geneva (K4TLI) took a few extra photos at the park that day. Enjoy!
She took this candid photo of me as I packed up the KX2. Check out my KSKO (McGrath, AK) tee shirt! Thanks for that, Paul Walker!
If you’re interested in the new Xiegu X6100 QRP transceiver, I’d strongly encourage you to check out Josh’s latest view on the Ham Radio Crash Course YouTube channel:
I’m very pleased to see that Xiegu has addressed some of the issues found in their pre-production model. Most encourgaing!
I look forward to checking out the X6100 soon and putting it through the paces in the field. Although I say this with some apprehension, the X6100 does look promising.
I know that Scott (KN3A) will have his X6100 soon and also will share his thoughts and field experience. [Update] Scott comments with some unfortunate news:
“Sadly, I received mine on Monday morning, and I had to return it to HRO last evening. Intermittent problems with transmit/receive on all bands except 40 meters. Did a couple of videos to document the issues before returning it last night. Hopefully it was just a fluke and there will be a replacement. There are a lot of things I liked about the radio in the short time I used it on Monday. It certainly does have potential.“]
A couple days ago I finally took delivery of the uSDX/uSDR transceiver I ordered in late October from this seller on eBay. I’ve been tinkering with it in the shack since then and have started to form some initial impressions.
The uSDX is a super cheap transceiver and, to be clear, my expectations were (spoiler: thankfully) very low.
If you’ve been here for long, you’ll know that I don’t normally test or review super cheap transceiver varieties found on eBay, AliExpress, etc. So many people asked me to check out the uSDX, however, that I decided I would try to give it a shake out.
I’ve yet to take this little radio to the field, but I have made a couple dozen contacts from the shack, all in CW and I’ve done a lot of listening. Yesterday afternoon, I even hooked it up to an oscilloscope.
It’s still early days and I’m sharing the following observations and notes with the hope that uSDX owners might be able to guide me if I need to make menu adjustments to sort out a few issues.
More specifically, there are two big cons with my uSDX:
Con #1: The Audio
Trying to be diplomatic and kind with my words here, but let’s just say the uSDX audio leaves much to be desired.
I think it’s great this little transceiver has a built-in top-mounted speaker, but it produces some of the harshest, most spluttery audio I’ve ever heard in a radio.
On top of this, the volume control (which requires going into an embedded menu item to adjust) is just…strange. It’s hard to explain, but the audio feedback isn’t what I would expect from a volume control or AF gain. It seems like each volume control step (starting at “-1” and going up to “+16”) is a mix of both AF and RF gain values. It doesn’t have a fluid amplification progression like I would normally expect.
In fact, I can’t really turn the volume up to +16 because on many bands around level +14 or +15, it starts to emit a really loud squeal.
Although very minor compared with the issues above, the audio amplification chain also has an ever-present hiss.
In addition, even with the volume turned to “-1” I can still hear splattering and even garbled whispers of CW signals if connected to an antenna.
I hope I’m missing something here and the audio can be tailored for better listening. Perhaps there’s a combination of adjustments I can make in the menu options to help?
Please comment if you own a uSDX and can provide some feedback.
Con #2: The Receiver
Again, unless there’s a magic combination of adjustments I can make in menu items, I find the receiver of the uSDX to be incredibly anemic.
I took the uSDX to my buddy Vlado (N3CZ) yesterday and we hooked it up to an analog oscilloscope and signal generator.
We concluded that the uSDX is very sensitive, but the front end seems to be as wide open as a barn door.
This confirmed my on-the-air observations made over the past two days: even with the 500 Hz DSP filter engaged, CW signals as far away as +1.7 kHz could easily bleed through. In fact, quite often when I tune to a POTA or SOTA station operating CW, I could even hear FT8/FT4 stations bleeding through from far across the band.
I couldn’t help but think if I had taken the uSDX on my recent Mt Mitchell SOTA activation instead of the QRP Labs QCX-Mini, there’s no possible way I could have handled the pileup. The uSDX receiver would have completely fallen apart because it shows no ability to handle tightly spaced signals.
Again, if you’re a uSDX owner and can provide some insight here, I would very much appreciate it.
Still testing the uSDX TX
One of my main goals with purchasing the uSDX was to test the transmit signal to see how clean it might be and if there were spurs in any harmonics.
Vlado hooked up the uSDX to his oscilloscope and we discovered that it did produce spurious emissions in harmonics of the 40M band. The spurs were negligible and we both assume it might possibly be within FCC guidelines.
With that said, Vlado didn’t completely trust this particular analog oscilloscope because there appeared to be a slight fault in its BNC input port. We ran enough tests–and even compared the uSDX to my KX2–to know that there are definitely faint spurious emissions and that the CW transmit signal isn’t nearly as clean as the KX2.
Here’s a 2 second video clip showing the uSDX transmitting CW on 7 MHz into the scope:
I plan to hook the uSDX to a digital oscilloscope to get more accurate results in the near future.
Not all cons
The uSDX does have some positive attributes.
For example, the QSK is quiet and even full break-in. This little radio is also chock-full of features. I’ve even found that though it’s advertised as an 8 band radio, mine will transmit on 10 bands; everything from 160-10 meters.
I think if I planned to operate the uSDX on SSB when the bands were relatively quiet, it might do quite well for casual contacts.
Time will tell…
To be clear, though, the issues above can be deal-killers for me.
I want my transmitted signal to be clean enough to at least meet FCC requirements–I like being a good neighbor on the bands. This might require some modifications on the output, but let’s see what a digital oscilloscope might reveal.
Of course, if the uSDX can’t handle multiple CW signals being thrown at me at once, I can’t see how this would possibly work as a SOTA or POTA field radio.
I can already tell that the ergonomics of the particular uSDX model I purchased will likely lead to–as Spock put it in Star Trek IV–some “colorful metaphors.” Especially when I reach for the volume control buried behind a menu item. (I mean, seriously?)
Again, if you own a similar uSDX, I’d love to hear your comments and suggestions!
Here’s the product description from Elecraft’s website:
The AX2 is small enough to take anywhere – just in time for lightweight field ops during the new solar cycle. Use it HT-style with a hand-held, like the KX2; on a picnic table with an AXB1 whip bipod; or with a tripod and AXT1 tripod adapter. The AX2’s rugged, nylon housing is water-resistant, with low wind resistance and our new anti-wobble design.
Illustration by Elecraft
Experimenters will love the AX2’s versatile design. A snap-off cover provides access to the high-Q inductor. Simply remove turns and re-solder one wire to cover your favorite band. Clip-off tabs are provided for band identification.
The table below shows how the new AX2 20-meter mini-whip compares to our original AX1 multi-band whip. Both are designed for lightweight portable operation. The versatile AX1 covers multiple bands via a selector switch and can handle up to 30 W continuous TX power.
The ultra-compact AX2 has a new anti-tilt base design that minimizes BNC connector wobble – ideal for hand-held (HTstyle) use. While the AX2 covers 20 meters as shipped, it can be modified by the user to cover any single band from 17 through 6 meters. The base unit includes small tabs that can be clipped off to identify the target band.
NOTE: Both whips are intended to be used with an ATU to compensate for terrain, body capacitance, height, etc.
A reader recently asked if I’d be selling my AX1 after learning about the AX2, but that isn’t going to happen. The AX2 is a 20 meters and up antenna and I see it as being a brilliant SOTA companion since its lightweight, stable design should do well on windy summits.
For POTA and WWFF, however, I really rely on the 40 meter band for most of my contacts. The AX1 covers 40 meters brilliantly (and 20M and 17M) so I’ll still rely on it quite heavily.
Josh (KI6NAZ), over at the excellent Ham Radio Crash Course YouTube channel, has just published a video demonstrating a pre-production Xiegu X6100.
If you’ve been interested in the X6100, I highly recommend checking it out.
Josh compares the X6100 with the X5105 in terms of size and functionality, and even makes a QSO with it. For CW ops, he also demoes the relay clicking sound (spoiler alert: it uses relays instead of PIN Diode switching).
His particular unit is really a pre-production unit–it sounds like the first production run (that many early adopters should soon be receiving) will have upgraded software and even hardware.
Josh (rightfully so) holds out on making a recommendation until he’s able to test the first production run unit–the same version early adopters will receive–which is being sent to him soon.
I’ve gotten so many questions about the X6100 from readers and YouTube subscribers. Fear not! I will get a chance to check out the X6100 in the near future. In fact, Josh is sending me the Radioddity loaner unit he’ll be testing. I’m not sure how long I’ll get to hold onto it, but I’ll give it a thorough workout.
In addition, I know Scott (KN3A) has purchased one of the first production run units and will give us his impressions–since he owns the IC-705 and has owned the X5105 in the past, he should have some valuable insight. Stay tuned!
If you’re considering purchasing the X6100, you might check out Radioddity’s upcoming Black Friday sale. They have a sign-up form on the X6100 product page. I have no inside information, but I must assume the X6100 will either be discounted or come with extra goodies (or both?).
Do you already have an X6100 on order? Curious if it looks like the X6100 is on track to meet your expectations after watching Josh’s demo.
Many thanks to Pete (WB9FLW) who shares the following information about the new QDX transceiver from QRP Labs:
The “QDX” (QRP Labs Digital Xcvr): a feature-packed, high performance, four-band (80, 40, 30, 20m) 5W Digi-modes transceiver kit, including embedded SDR receiver, 24-bit 48 ksps USB sound card, CAT control, synthesized VFO with TCXO reference. QDX transmits a SINGLE SIGNAL, it is not an SSB modulator with associated unwanted sideband and residual carrier, or intermodulation due to amplifier non-linearity. QDX outputs a pure single signal.
The Optional enclosure is black anodized extruded aluminium, very sturdy and elegant. The enclosure size is 89 x 63 x 25mm without protrusions. The front and rear panels are drilled and cut to match the QDX PCB with laser-etched lettering. The enclosure includes four self-adhesive feet.
List of features:
Four bands 80, 40, 30 and 20m
5W output at 9V supply (can be built for 4-5W at 12-13V supply)
Single signal transmission (zero unwanted sideband, zero residual carrier, zero intermodulation distortion)
Solid-state band switching and transmit/receive switching under CAT control
High performance embedded SDR SSB receiver with 60-70dB of unwanted sideband cancellation
Built-in 24-bit 48ksps USB sound card
Built-in USB Virtual COM Serial port for CAT control
Si5351A Synthesized VFO with 25MHz TCXO as standard
Easy to build single-board design, Professional quality double-sided, through-hole plated, silk-screen printed PCBs
All SMD components factory assembled
Connectors: 2.1mm power barrel connector, USB B (for audio and CAT control), BNC RF input/output
Built-in test signal generator and testing tools
Receive current 100mA, Transmit current 1.0-1.1A for 5W output with 9V supply (around 0.7A for 5W with 13V supply).
Optional aluminium extruded cut/drilled/laser-etched black anodized enclosure
Absolutely amazing! I’m not sure how Hans is able to innovate at the pace he does, but I think we’re all better for it. This will be a big seller for those who’ve been looking for a high performance QRP digital mode transceiver.
UPDATE 09 (Oct 2021): Larry (N0SA) informs me that he sold all of his SOTA Paddle inventory as of last night. In other words, very quickly. If he produces another run of them, I’ll post it here on QRPer.com!
A couple weeks ago, Larry (N0SA) reached out to me and asked if I’d like to evaluate a new set of precision field paddles he’s designed. Having purchased a set of 3D-printed paddles from N0SA last year, I didn’t hesitate.
Larry simply calls this model the SOTA Paddle. An appropriate name because this paddles is incredibly compact, lightweight, and perfect for hiking and backpacking. They also have a short Allen wrench cleverly stowed within the paddle body for any adjustments in the field. The Allen wrench is locked in in such a way, there’s no possibility it’ll fall out either. Clever!
They come with a high quality three foot cloth braid cord with molded 1/8” plug.
Over the past week, I’ve taken these paddles to two different park activations with the Elecraft KX2 and AX1 antenna.
My activation videos and field reports are perhaps a week down the road yet, but I couldn’t help but post my initial impressions.
So how would I describe N0SA’s new SOTA Paddles–?
The Bee’s Knees!
I love them.
These truly feel like precision paddles. They’re entirely constructed of aluminum and stainless steel parts.
Although the body/frame of the paddles are open, they feel incredibly sturdy. No doubt, they’ll survive the environment inside a backpack or field kit.
They’re very compact, yet feel perfect in the hand.
Larry also includes 6 pieces of 3M dual lock for mounting the paddles on a clipboard, radio, or any other surface.
As readers know, I love my CW Morse Paddles–they represent an amazing amount of quality at such an affordable price.
If you’re in the market for a compact precision aluminum key, however, I can recommend these without hesitation.
Here’s the deal as I understand it: Larry may only make a couple small production runs of these. He does this as a fun side hibby, not for scaled-up production and distribution. I believe he may have as many as 20 units available soon.
Again, you’ll see the SOTA Paddles in action in upcoming videos, but I wanted to mention it here on QRPer so that–if this sort of thing interests you–you might have a chance to place an order before the first and/or second production runs are spoken for.
The price is $125.00 US (each) plus $15.00 for priority mail shipping. You’ll have to inquire if located outside the US (I’m not certain if he ships internationally).
Payment can be made via PayPal to his email address which is his callsign @att.net. (You can also check out his contact details on QRZ.com.)
Email him with questions and to check availability in advance.
Larry is a long-time reader of QRPer.com, so he might add notes in the comments section.
Speaking of which, thank you so much, Larry, for sending me these paddles. They are simply amazing.
QRP radios, product announcements, reviews, news and more. Low power amateur radio fun!
Please support QRPer by adding us to your whitelist in your ad blocker. Ads are what helps us stay online. All of our ads are ham radio related--no junk, we promise! Thank you!