Many thanks to Scott (VO1DR) who shares the following guest post:

Portable/Kite QRP Operation in Central Newfoundland Wilderness by Float Plane: Part 2 – Radio Gear and Portable/Kite Operation
by Scott Schillereff, VO1DR
Introduction
This is Part 2 of a two-part story of a portable QRP adventure with a kite antenna at Mount Sylvester in the Bay du Nord Wilderness Area in central Newfoundland by float plane.
Part 1 described the setting, history, geology, access, and outdoor/survival gear.
Part 2 here describes radio stuff and some dramas with kite antenna operation. I hope you enjoy reading this.
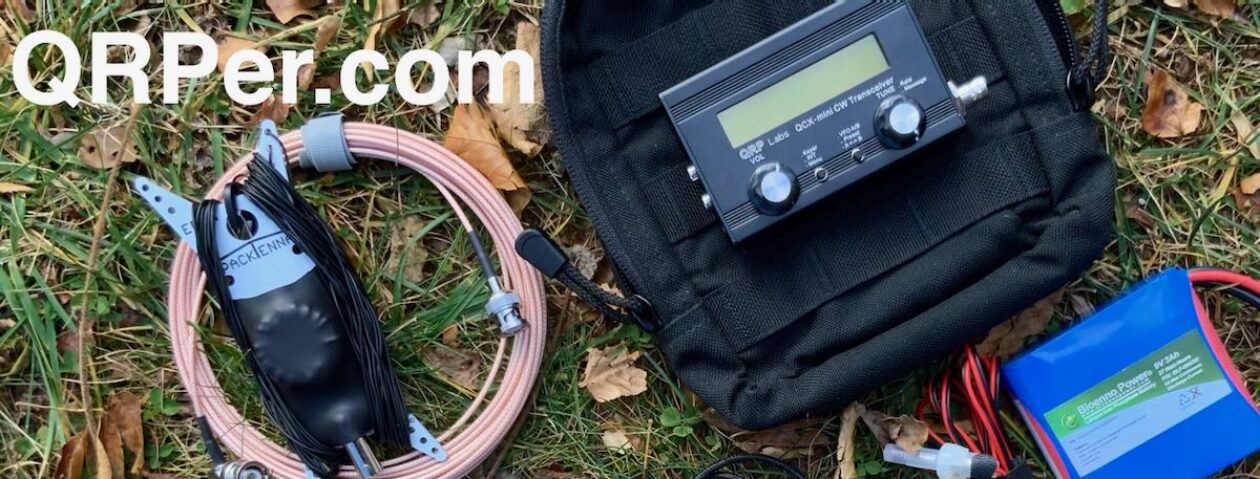
Radio Gear
Given that our hike up Mount Sylvester would be relatively easy (about half an hour up a gentle bedrock slope), I chose to bring a fair bit of radio gear with lots of backups.


The Kite
A common kite style used for antennas is a sled kite. Rigid sled designs maintain their flying shape with struts, while soft sled designs use a rigid air-filled tube (tapering Venturi tube) to maintain flying shape.
I chose a soft sled design since it can be folded and easily packed, but it can be a bit harder to get aloft.


Portable Operations on Mount Sylvester
After reaching the top and poking around, I found what I thought would be a great spot for an operating position, near the up-wind cliff edge. This gave me just enough distance to lay out my kite and antenna (on the ground), anchor things, then stretch the kite line tight, fill the kite side tubes with wind, release it, and watch it gracefully sail upwards, carrying my 31 m (102 ft) end-fed wire aloft! But my great expectations were dashed…repeatedly.

I tried getting the kite aloft many times. There was moderate wind which appeared to be directly toward me, but each time I raised the kite, it would fill up with wind but, when released, it would immediately turn, distort and crumple into the ground. It finally dawned on me what was happening – have you figured it out?

So, we literally “upped stakes” and moved everything about 1/3 down the slope, away from the summit, tried again, and the kite shot up like a rocket! My antenna wire was loosely attached to kite line and came back to my operating position at the kite anchor point. This formed an end-fed sloper at about 60o inclination with low end toward the S-SW.
A comment about the kite antenna: I did not think this through. I was more concerned on getting the kite built and flying; thinking that “a Z match can tune anything”. I know a 102 ft doublet makes a pretty good multi-band antenna (with open line and an ATU), so I thought “why not try it as in an end-fed configuration, hanging along an inclined kite line?”
I had a couple of radials (one 9.8 m/32 ft; and one 2.0 m/6.5 ft), so I brought those along to try. I had several hi-Z to low-Z couplers (56:1, 49:1, 36:1) that I have used successfully with other end-feds, so I stuck one of them in the kite configuration. That’s about the extent of it. I think this whole set up was poorly-conceived and turned out to perform poorly (see below). Plenty of “room for improvement”.


Within the ATU, I had soldered a 1 megohm 1W carbon resistor from the antenna center lead to ground. At RF, this causes a negligible power loss, but effectively bleeds off electrostatic energy generated by the wind blowing over the kite line and antenna wire.
At the base of the kite antenna, I connected a 49:1 coupler, with 5 m of RG-174 coax (laid on ground) to the input of my ATU. I added the two radials laid along the ground (essentially bare granite) and connected them to the coax BNC housing leading from the coupler. Also, I drove the two electrostatic grounding stakes (metal tent pegs) into shallow soil and clamped the ES grounding wire to the barrel of the BNC connector entering the ATU.
After raising both antennas, I tried the kite antenna first. During the days here, the 20, 17, and 15 m bands are typically open. I tuned the kite antenna for low SWR on 17 m using the ATU with a good match (<2:1). I could hear (and see on waterfall) many CW signals. I called about 10 stations over the course of 30 minutes using output powers ranging from 1-10 W, but not a single reply. Odd – something wasn’t right; usually /P contacts come easy.
I then tried the pole-mounted end-fed and quickly raised Larry, WB9ICH, in New London, Wisconsin with 3W (distance about 2,660 km (1,650 mi)); my RST 559. The end-fed pole antenna was working fine! I had a long QSO, describing my equipment, setting, and antennas. I tried an A/B live antenna comparison by switching to the kite antenna and retuning, then back to the pole end-fed. Larry told me the kite antenna was definitely worse, nearly lost in the noise. On reflection, I can see a number of possible reasons for this:
- insufficient radials for the 31 m kite antenna,
- improper impedance transformation at coupler,
- propagation from the inclined sloper kite antenna propagation was directed either skyward (cloud-burning) or toward the S-SW (which from central NL is nothing but ocean until ~Cuba), and/or
- a faulty piece of coax from the kite antenna.
Based on reading and videos of more knowledgeable kite antenna users, I have since abandoned the 31 m kite wire and gone with a 40 m half-wave vertical (about 19.8 m, 65 ft long) along with those same radials and a 5 m piece of RG-174 coax. In later testing, using a nanoVNA while this wire was suspended vertically from the kite line, I trimmed the antenna length for low SWR on 40, 20 and 15 m. It works adequately on those three bands without an ATU (but better with an ATU). Still, I feel the 40 m HW vertical kite antenna performance is not as good as the HB9EAJ Standard end-fed antenna system.
I admit I am a newcomer to kite antennas. I welcome advice and direction to learn more. I’m getting the kite flying figured out; it’s the performance of the antenna that is still not great. I would like to figure out both vertical and sloper kite antenna set ups that work well (within constraints of /P use) and ideally better than a pole-mounted HB9EAJ-style lazy-7 end-fed set up). Kites are fun, but if the antenna performance is only mediocre, why bother?
Regarding end-fed multi-band wire antennas, I highly recommend Stephan’s (HB9EAJ) designs. The are simple to build, very thoroughly documented, and they work (see: A Portable 7-Band End-Fed Half-Wave Antenna; https://hb9sota.ch/hb9eaj/ ).
Portable vs *OTA Operations
I add this section as food for thought.
It may be heresy to write this here, but I’m not an *OTA person. I could never wrap my head around the arbitrary requirement for 10 QSOs to “validate” an activation (as well as all the tangle of spotting, submitting of logs to satisfy hunters/chasers, etc.). What is “invalid” about one QSO? My whole Mount Sylvester adventure was fun, instructive, and deeply satisfying with just one QSO.
Let’s examine this in historical context.
I live in sight of the Signal Hill National Historic Site in St. John’s, Newfoundland. At 12:30 on Dec. 12, 1901, Guglielmo Marconi, using a kite-borne random wire antenna at Signal Hill, received the letter “S” from a spark transmitter in Poldhu, Cornwall, England. Marconi later wrote:
“Shortly before midday I placed the single earphone to my ear and started listening. The receiver on the table before me was very crude — a few coils and condensers and a coherer — no valves, no amplifiers, not even a crystal. But I was at last on the point of putting the correctness of all my beliefs to test. The answer came at 12: 30 when I heard, faintly but distinctly, pip-pip-pip. I handed the phone to Kemp: “Can you hear anything?” I asked. “Yes,” he said. “The letter S.” He could hear it. I knew then that all my anticipations had been justified. The electric waves sent out into space from Poldhu had traversed the Atlantic — the distance, enormous as it seemed then, of 1,700 miles — unimpeded by the curvature of the earth. The result meant much more to me than the mere successful realization of an experiment. As Sir Oliver Lodge has stated, it was an epoch in history. I now felt for the first time absolutely certain that the day would come when mankind would be able to send messages without wires not only across the Atlantic but between the farthermost ends of the earth.”
So, Marconi launched the whole paradigm of wireless communication based just on receiving a single Morse letter – that is, based on half a QSO! I’d say he did rather well in creating an “epoch in history”, but his efforts would not satisfy *OTA requirements for an “activation”! …hmmm.
I’ll stick with “raw” portable operation – hike/fly/boat to some remote location, put up a portable antenna, turn the dial and listen, and see who I can work with a few watts – no spotting, no alerted chasers, no laptops, no cell phones. Those on the other end of portable QSOs are always interested to hear about everything – the rig(s), power source, antenna, location, etc. For me, one or two QSOs with meaningful exchange of info is far more satisfying than would be ten rushed “5NN TU” *OTA-type contacts.
I admit, I am not an awards-motivated ham; maybe you are and get a kick out of all the book-keeping and certificates. Fair play – the *OTA upsurge has certainly brought more hams back to QRP /P operations, especially CW, and I’m glad of that. My point is to not get cornered into thinking that modern QRP /P operation must be within some *OTA framework, where if you “don’t get your 10 contacts” somehow your efforts are a failure. Just remember, half a QSO changed the world! ?
We all play radio to our liking – to each his own… It is a delightful luxury to have the freedom, health, wherewithal, and time to get outdoors, set up portable ham gear, and work the world, then fix, refine, build or acquire new gear, repackage, rinse and repeat… I take none of it for granted. How fun is ham radio!
Thanks for reading this article. I hope you enjoyed it!
72, Scott VO1DR
This was an amazing two-parter, Scott!
I especially appreciate all of the gear detail and notes about your prep, travel by plane, and operating! Of course, I think you should have taken Chico with you! 🙂
I hear what you’re saying about *OTA. It’s funny, I love the *OTAs because it gives me convenient motivation to play QRP every week and connect with a community of others who fare my on-the-air radio family. Right now, I couldn’t tell you how many parks or summits I’ve activated, but it’s fun from time to time just to check it out and see. And I consider each contact I make “valid.” Sure, to have that “valid” SOTA activation I need 4 contacts, and for POTA 10, but I really don’t fret over it that much. No contact is invalid because they all count. To me it’s about playing radio outdoors!
And you certainly did some adventurous stuff here. I’ve never experimented with kite antennas–I think taking one to a remote location like this and putting it on the air is pretty darn amazing. I especially love the fact you built the kite and so much of your gear.
We’re looking forward to any other field reports you might post, OM! Thanks for taking us along for the ride!
Cheers,
Thomas
K4SWL
Good morning Scott, and yes I most certainly did enjoy reading your article! Well done OM!
I’ve done a little QRPp operating from NL, on one of my ventures out to the Rock via my Suzuki VStrom motorcycle. All the way up Gross Morne to St Anthony and on the opposite side around Port Rexton. Love it!
I really enjoyed the descrip of your kite setup and operation. Makes me want to dabble in that, but first, I’m itching to read the builder’s manual for the QRP Labs QMX that just arrived via FedEx.
Thanks again for sharing es 72,
Brent VA3YG
Another fabulous post Scott! Re: xOTA: I used to go out QRP/P before POTA started but often returned home with no QSOs in the log. POTA changed everything. Now I always get QSOs. After over 100 activations I only failed to get my 10 twice. I am not keen on long rag chews, I prefer the excitement of making contacts in as many places as possible. As you said, Marconi was excited to receive just one letter; I get excited to receive a simple POTA exchange from a new DX. The pressure of working a pile-up can be quite tiring so it’s often a pleasure to set up a portable station in the field and just hunt xOTA at my own pace. Anyway, thanks again for a great account of your trip. Please post again sometime.
Well worth waiting for this the conclusion to Part 1 of the story. So much to digest here! Thanks for this!
Boy, I’d sure like plans for that ZM-4! Great build.
Epic DXpedition, Scott! Thanks for the write-up!
Great post Scott! Your detailed account, field deployment and your OTA comments were all insightful. I too just love to play simple QRP field operations, and would echo your OTA comments.
But I also have to acknowledge the huge contribution of S/POTA. John’s (VA3KOT) comments are ever so true, and I appreciate those whose quest is ‘actively activating’ S/POTA. These organizations make help promote activations, via structure, protocals, and reporting. The benefits of which, filters down to the peripheral players like you & I!
Thanks again Scott for the field report. I hope you’ll post again, and one day to ‘see you down the log.’
72 de W7UDT