When my wife and I made the difficult decision to move back to the US in 2003, we had a wide variety of options of where to live. There was no doubt in our minds, though, that we would end up settling down somewhere in the Asheville, NC area.
We’re both from western North Carolina and had both–at different times–lived or worked in Asheville. It’s a beautiful area with a good arts scene and loads of outdoor activities.
These days, as I’m involved with both Parks On The Air and Summits On The Air, it’s an especially appealing place to live. We’ve a number of accessible POTA/WWFF entities and loads of summits to activate.
Blue Ridge Parkway (K-3378)
Any time I drive into Asheville, I pass by the Blue Ridge Parkway.
There are a number of easy parkway access points on the north, east, south and west sides of Asheville. I typically pass by the eastern access point of the BRP on Tunnel Road. Both the Blue Ridge Parkway Headquarters and the Folk Art Center are within spitting distance and both have picnic tables making setup and deployment quite easy for POTA/WWFF ops!
On Monday, November 29th, 2021, I found that I had a good 30-45 minutes to kill before heading home after running errands in town. My car was empty, as I was hoping our collision shop would ask me to finally bring the Subaru in for repair. They were waiting for one critical component to arrive.
Side note: Bears in cars
As I mentioned in a previous post, in late October, a bear opened all four doors of our car and proceeded to check inside for food. He wasn’t exactly “surgical” in his investigation and was likely frustrated when he realized there was no food to be found inside (never store food in your car in bear country).
On Sunday, November 28, 2021, my family needed a little time outdoors after a Saturday full of home projects.
I packed my field radio kit in the GoRuck Bullet Ruck, then we jumped in the car and drove to the Clear Creek Access of South Mountains State Park (the same site in my previous POTA field report).
South Mountains State Park (K-2753)
It was a gorgeous day and we had the park to ourselves. First thing we did was hike the short Lakeview Trail loop.
This trail is only 1.3 miles long, but offers up some beautiful views.
Hazel also came along and enjoyed the sights, smells, and even got her feet wet in a stream!
Fortunately, no one was using the one solitary picnic table at the Clear Creek access, so we claimed it!
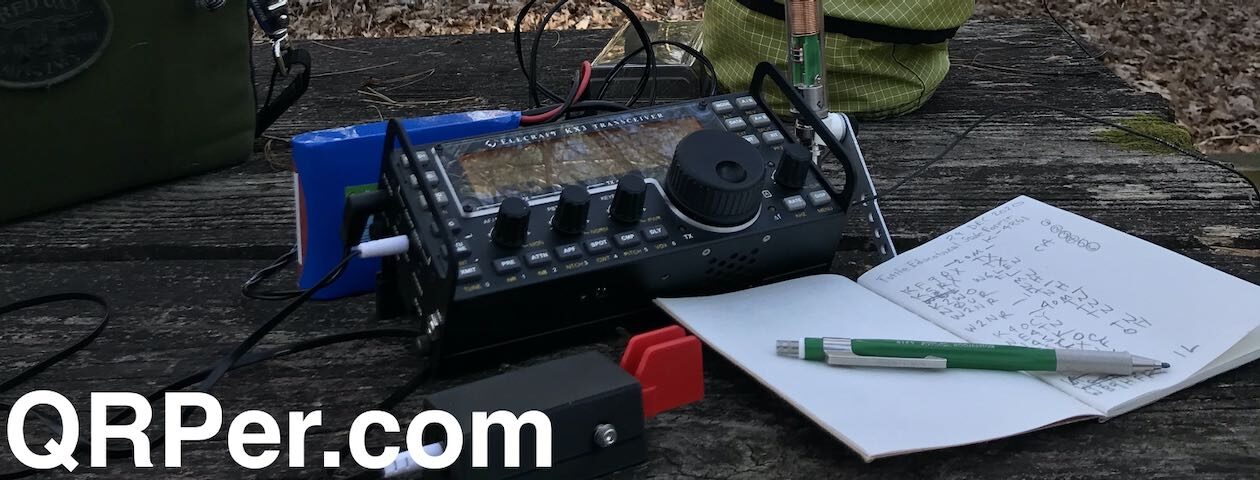
First thing I did was launch a line and deploy my 28.5′ speaker wire antenna.
I knew it would pair perfectly with the Elecraft KX2!
I love this compact Weaver throw line bag!
The new N6ARA TinyPaddle
This activation also gave me an excuse to check out a paddle my buddy Ara (N6ARA) recently designed.
He calls it the TinyPaddle:
An appropriate name, because this key is wee! Ara notes:
As someone who likes bring experimental gear to summits, I have had paddles break on me multiple times. […] I don’t like carrying the extra weight/volume of a second set of paddles, so I designed my own “TinyPaddle” for backup as a middle ground option. It weighs roughly 3.7g and is 1.2cm x 1.2cm x 5.0cm in size.
He’s right, the TinyPaddle could tuck away even in the most compact of field kits. You’d never know it was there.
Here’s the TinyPaddle connected to the side of my Elecraft KX2:
Ara sent this key to me for frank feedback (prior to doing a small production run of them) knowing I’d not only check it out in the shack, but (of course!) take it to the field.
I decided to do my activation at South Mountains State Park using only the TinyPaddle.
Before taking it to the field, I had some concerns that the TinyPaddle might turn in the 3.5mm key port on the side of the KX2 as I used it. Once plugging it in, though, I could tell that it would not be a problem at all. The paddle is so lightweight and so sensitive, it’s simply not an issue. In fact, it would be rather difficult to use it in such a way that it would shift in the 3.5mm port.
On The Air
Knowing in advance that it was a contest weekend (the CQWW), I decided I would stick with the WARC bands during this activation.
I tuned the speaker wire antenna to 10.112 MHz on the 30 meter band.
Hazel asks, “Got any doggy treats in that pack, daddy?”
The 30 meter band was more crowded than usual as many other POTA/SOTA/WWFF and casual operators sought refuge from the signal density on 40 and 20 meters.
Since I had the family with me and since we’d spent most of our time at the park eating a late picnic lunch and doing a casual hike, I allotted only 20 minutes of air time for this activation. I was hoping I could validate the activation with 10 contacts in that amount of time.
I started calling CQ with the N6ARA paddles. First thing I noticed was how sensitive and precise they were. Although the TinyPaddle is a mechanical paddle (with spaced contacts), they feel more like a capacitive touch paddle they’re so sensitive.
I started calling CQ POTA and soon logged KE4Q.
A few minutes later, I worked AI8Z, followed by W5WIL, WO0S, WA2JMG, AA0Z, WA2FBN, N0VRP, KA3OMQ, W9SAU, and K1MZM.
With a total of 12 stations logged in 21 minutes, I went QRT.
QSO Map
Here’s what 5 watts into a 28.5′ speaker wire did on 30 meters that fine day (click map to enlarge):
Video
Here’s a video of my full activation. Hazel was being very camera shy; for some reason, she doesn’t like the OSMO Action camera. My wife and I think it must resemble something she’s seen at the vet’s office? We may never know!
Ara is obviously a talented engineer. I’m always impressed with devices like this that are so simple, yet so effective.
The TinyPaddle is going to live in my KX2 field pack as a backup to the KXPD2 paddles which have actually failed me in the field before.
That time the KXPD2 failed me…
I mention in the video that I once needed to use my Elecraft KXPD2 paddles to communicate with my buddy Mike (K8RAT) to share my SSB frequency for a very rare park activation I activated in the spring of 2020. After plugging the KXPD2 paddles into the KX2, I found that I could only send “dits.” I couldn’t even set it up to send as a straight key from one side of the paddle.
This forced me to drive 25 minutes to a spot where I had cell phone reception to contact Mike with info for a spot, then drive back to the site. That effectively shortened my activation of this ATNO park by 50 minutes!
KXPD2 missing one of the two center posts.
I sent Elecraft the photo above and they quickly identified the problem: turns out, one of the center posts had loosened and fallen out. They immediately sent me a replacement post free of charge (typical Elecraft customer service).
I use the KXPD2 paddles quite a lot because they mount directly to the front of the KX2 making it possible to use my kneeboard during SOTA activations. Since that mishap in the field, I tighten the KXPD2 posts at least once a month and also carry a precision screwdriver with me in my field kit.
A proper backup!
But having the TinyPaddle now is even extra insurance that a paddle failure won’t stop me from completing my activation!
When I made the video, I wasn’t certain if Ara was planning to do a production run of these or not. I’m very pleased to see that he has!
I’m certain he could actually fetch much more for these paddles, but he wants them to be an affordable, accessible backup paddle for anyone doing CW field activations.
He even includes a link to his Thingiverse page where you can download and 3D print accessories (including a TinyPaddle holder) and replacement parts at home free of charge.
Ara, thanks for making your project so available and accessible to everyone!
I hope you enjoyed this field report and activation.
I’d like to send a special thanks to those of you who are supporting the site and channel through Patreon and the Coffee Fund. While certainly not a requirement as my content will always be free–I really appreciate the support.
Thank you!
73,
Thomas (K4SWL)
Bonus photos!
My daughter Geneva (K4TLI) took a few extra photos at the park that day. Enjoy!
She took this candid photo of me as I packed up the KX2. Check out my KSKO (McGrath, AK) tee shirt! Thanks for that, Paul Walker!
It was pouring rain, but I had a respectable three hour window to fit in a park activation while visiting my parents in the foothills of the NC mountains.
I had such an enjoyable experience pairing my Elecraft KX2 and AX1 antenna under a shelter at Tuttle Educational State Forest during a previous rainy day activation, I decided to revisit the same site.
Tuttle Educational State Forest (K-4861)
I knew I would likely be the only visitor at Tuttle that day; it was pretty cold and very wet.
Knowing rangers might not expect visitors on a day like this (keeping in mind this type of park caters to educational groups and are otherwise relatively quiet) I made a courtesy call to the park headquarters. I asked the ranger for permission to use their main shelter for an activation.
I recently finished my Phaser digital mode QRP transceiver kit and have had a hankerin’ to take it portable, and today was the day.
Temps were in the upper 60s with clear blue sky. About fifteen minutes from home is the Watauga Point Recreation Area on Watauga Lake in Carter County, Tennessee. It’s a day use area and is not an official POTA site, though it is in the Cherokee National Forest, which is. I opted to not make this a POTA activation as it was more of a first time “proof of concept” trip.
The Phaser is a small digital mode transceiver designed by Dave Benson, K1SWL with the enclosure the design of AA0ZZ, Craig Johnson. Phasers were available for most all of the HF bands, put out between 3 to 5 watts, and in addition to FT8, have the ability to program a second frequency to operation other digital modes such as PSK-31. They were sold and supported through Midnight Design Solutions, but unfortunately are no longer being offered. Occasionally I see them coming up for sale on the QRZ.com swapmeet forum.
In addition to the Phaser, I brought an FT-891, an LDG Z-11Pro 2 tuner, a netbook computer, and two batteries; a small AGM for the Phaser and a deep cycle lead acid power pack for the FT-891. I brought my W2LI magnetic loop antenna and a homebrew “NorCal Doublet” that sets up as an inverted V on a 20 ft kite pole as a backup antenna. The whole kit (excluding the batteries) fits in two wooden ammunition crates which make it really easy to drive, set up, and operate.
One note on using the W2LI mag loop. You need to first tune the antenna using the radio and listen for an increase in the background noise level. Using the Phaser while connected to my computer made that not possible. If I had brought a small set of earphones I could have plugged them into the audio out jack on the Phaser and tuned for max background noise. So, instead I connected FT-891 to the loop and used it to tune the antenna to 30 meters. Next time bring earphones.
After about fifteen minutes I had the station set up. The waterfall on WJST-X showed that the Phaser was receiving transmissions but no displayed text. Unfortunately I had neglected to synchronize the computer clock before I left the house. The netbook is pretty old and the internal battery needs to be replaced. What to do? First I tried to manually sync the clock to WWV but Windows 10 won’t let you set the seconds in the clock to 00. As I had cell service I figured I could use my cell phone as a hotspot. Never having set it up before I have to say that it was pretty easy. Thank you 21st century tech! This allowed me to sync the internal netbook clock, but it also let me log contacts on QRZ.com, and check my propagation on PSK Reporter.
The Phaser puts out around 3.5 watts, so I didn’t respond to a CQ that was less than -5 dB. While PSK Reporter showed reception of my signal up and down the East coast, contacts were scarce. I seemed to have a window open up into New England as I worked PA, MA, and CT. I was right in the middle of my fifth contact when the computer battery died so that was it. WSJT-X reported these stations on the +dB side for reception but my signal strength was always reported at < -10 dB.
The 30 Meter band was up and down with band conditions being reported as only Fair on the Solar-Terrestrial Data report on QRZ, and at one point for about a half hour there were no signals displayed on the waterfall.
With a loop antenna on a tripod and 3.5 watts I can’t complain. I’m thinking of building an RF amplifier to boost the output up to 10 watts which should help. My next step is to load WSJT-X on my tablet and see how portable of a kit I can assemble. As FT8 was designed as a weak signal mode, it’s perfect for QRP portable operating.
Do you know what it’s like when you have a new radio and you can’t wait to take it to the field?
Yeah, me too!
Even before I received my QCX-Mini in October 2021, I already knew where I’d take this pocket-sized, single-band QRP CW transceiver for its first field activation: Mount Mitchell (W4C/CM-001).
Mitchell is the highest summit east of the Mississippi river and only about 6 miles from my QTH as the crow flies. I had yet to activate Mitchell this year for SOTA although I have activated it for POTA/WWFF several times. As I’ve probably mentioned in the past, Mount Mitchell park is my “happy place.” Our family loves this site and we visit it frequently to hike in the spruce-fir forest.
I say “lately” but in truth I’m always tinkering with something in the shack.
The radio room/office at my QTH is pretty small, though, and I don’t have a dedicated, full-time workbench. I’ve been mentally re-arranging the room and trying to sort out a way to make space for one because it would be so nice to have a spot where my soldering iron could remain hooked up at all times.
For the moment, when I work on kits I use our dining room table so I try to stick with one or two session kits as opposed to the multi-day variety.
I have a lot of field antennas, so I don’t really need another EFHW, but then again I like having a dedicated resonant wire antenna with each of my radios and, (hey hey!) it’s a great excuse to build a kit!
KM4ACK Image
I purchased the KM4ACK kit and received it within a week. Building the antenna was incredibly straight-forward. Jason packaged the components in small bags so finding parts was easy. I really appreciate kits that aren’t one large “bag-o-parts.” Continue reading Putting the KM4ACK End-Fed Half-Wave on the air at Table Rock!→
Thursday, October 28, 2021 was a wet, rainy day but I wanted to do a POTA activation on the way back to the QTH after having visited my parents for a couple nights.
I didn’t have a lot of radio gear with me on that trip, but I had the right gear: my Elecraft KX2 transceiver and AX1 antenna. If I could activate a park under a covered picnic shelter, I knew I would stay dry while playing radio.
There are only two parks within a reasonable detour that have covered picnic shelters: Lake James State Park and Tuttle Educational State Forest.
Lake James was the shortest detour, but they tend to be busier than Tuttle and last time I was there? Yeah, the picnic shelter was occupied.
I don’t often read comments in ham radio forums and discussion groups.
Recently, however, I was trying to dig up information on a field antenna design and the search results lead me to two articles and discussions on two of the most popular ham radio sites on the internet.
I read through the comments and (you might have guessed) was really disappointed with the number trolls who seemed to thrive in that fertile environment. It blows my mind that discussions like these seem completely unmoderated. I assume it’s a conscious decision since we seem to live in a society that rewards drama and division–I assume this leads to more site traffic and thus more revenue.
It’s a shame. It would be incredibly discouraging to a new ham who is reading the same article and comments looking for ideas. Gives one the impression the hobby is full of (I’ll keep my language clean here) schmucks.
But I digress…
What was perhaps equally discouraging were all of the comments from those who were trying to explain to the authors how the antenna design in their article simply wouldn’t work. Even when the author posted positive results/data from having used the antenna.
While not all of the naysayers were being rude–and sometimes in their roundabout way I’m sure they felt they were being helpful–I can’t help but feel sorry for them.
Someone asked me recently which activity I prefer more: Summits on the Air (SOTA) or Parks On The Air (POTA)?
Truth is, I like both.
I like SOTA because I love hiking and playing radio on the summits of some pretty impressive mountains. I’m often treated to amazing views and the DX can be spectacular. I love the sense of accomplishment when the activation goes well and I’m back home later feeling a bit tired from a long hike. Good stuff!
I like POTA because it’s incredibly accessible (thus fits in my tight schedule easily). Many of the parks have great hiking trails, and there’s almost always a picnic table available making set up so much easier. Here in western North Carolina it’s almost a given that park picnic tables are surrounded by large trees and have a reasonable amount of space, thus POTA sites can be ideal for antenna experimentation.
I don’t typically experiment with antennas during SOTA because after hiking 2-3 hours to a summit, I feel pretty invested in the activation and the last thing I want to do is roll the dice with my antenna. With POTA, I can bring a few extra supplies or “plan B” antennas if something goes sideways. Plus, unlike parks, summits are often lacking in tall trees so I stick with shorter wire antennas and self-supporting verticals.
On the morning of October 20, 2021, I decided that I wanted to try a new antenna or an antenna I hadn’t used in quite some time. My intention was to dig out my Wolf River Coils TIA vertical, but when I reached into my antenna bag, I pulled out a nondescript Shure microphone pouch. I scratched my head for a moment…
For the life of me, I couldn’t remember what this was, so I opened it up and discovered a doublet inside! Not just any doublet, either–based on the use of a 35mm film canister in the antenna’s construction, I knew it had to be a creation of my buddy Eric (WD8RIF).
On Monday, October, 18, 2021, I finished a few errands in Asheville, NC and realized I had just enough time to squeeze in an afternoon activation. The weather was beautiful, the fall air felt amazing, and although I had no clue what propagation was like, I needed some field radio therapy!
Blue Ridge Parkway to the rescue!
I’ve mentioned in previous videos that pretty much anytime I drive into Asheville I pass by the Blue Ridge Parkway. Over the years, I’ve discovered numerous POTA (Parks On The Air) spots scattered along “America’s Favorite Drive.”
It’s fall, so we’ve autumn leaf colors and loads of tourists in the region–especially on the BRP.
Even so, I’ve one favorite overlook that is often overlooked by tourist!
It’s a little unofficial turn-out on the parkway that offers up spectacular views. I believe the reason tourists pass by it is because it’s located just beyond one of the most popular overlooks in the area: the Tanbark Ridge Overview. Tourists stop at Tanbark to enjoy the views not knowing that a mere +/-200 meters away, there’s one they could enjoy all on their own. Continue reading Field Report: POTA Roadside activation with a view!→
Connecting an international community through low-power field radio adventures.
Please support QRPer by adding us to your whitelist in your ad blocker. Ads are what helps us stay online. All of our ads are ham radio related--no junk, we promise! Thank you!