Tag Archives: QCX-Mini

Matt’s Weekend POTA Roundup!

Many thanks to Matt (W6CSN) who shares the following post from his blog at W6CSN.Blog:


Weekend POTA Roundup

by Matt (W6CSN)

It’s been a stormy past several days here in Northern California, but if anything, the weather only amplifies my motivation to go outside and get on the air.

Rather than do a separate writeup for each, this post is a roundup of my last four POTA activations, from Friday, February 2nd through Sunday, the 4th.

A faint rainbow splashes down in front of Angel Island

Thursday and Friday had been wet, with one storm in a series moving across the Bay Area. However, by Friday evening the cold front had passed and there was a break in the rain. This was a perfect opportunity to try an after work activation at the Presidio of SF (K-7889).

I hadn’t used the QCX-Mini in a while, and this activation reminded me why. I believe what is happening is that being so close to the antenna, RF interference causes clicking while keying, nearly to the point of distraction. I need to experiment with RF chokes on the key and audio lines to see if that improves the situation.

Fed up with the RFI on the QCX-Mini, I switched over to the MTR-4B which doesn’t seem to suffer the same issue. I wrapped up the activation after netting 21 QSOs in the cold west wind.

All QSO maps in this post are from http://tools.adventureradio.de/analyzer/

The next bout of rain wasn’t due to arrive until later Saturday afternoon. This was a change in the forecast that subsequently altered my plan to stay in Saturday soldering on my QMX Hi-Bander project.

Initially I went to Fort Point (K-0819) in the hopes of changing it up from my usual activation park but there were just too many people there. So seeking relief from crowds, I crossed the Golden Gate Bridge and went up on the slopes of Mt. Tamalpais.

I parked at Trojan Point at an elevation of approximately 1800 feet. See this post for more views from this location. The temperature was in the mid-40s, which is cold for us coastal Californians. Besides, the winds were picking up ahead of the next storm so I operated from the comfort of my vehicle using the Gabil 7350T base loaded vertical antenna on 15m and 20m.

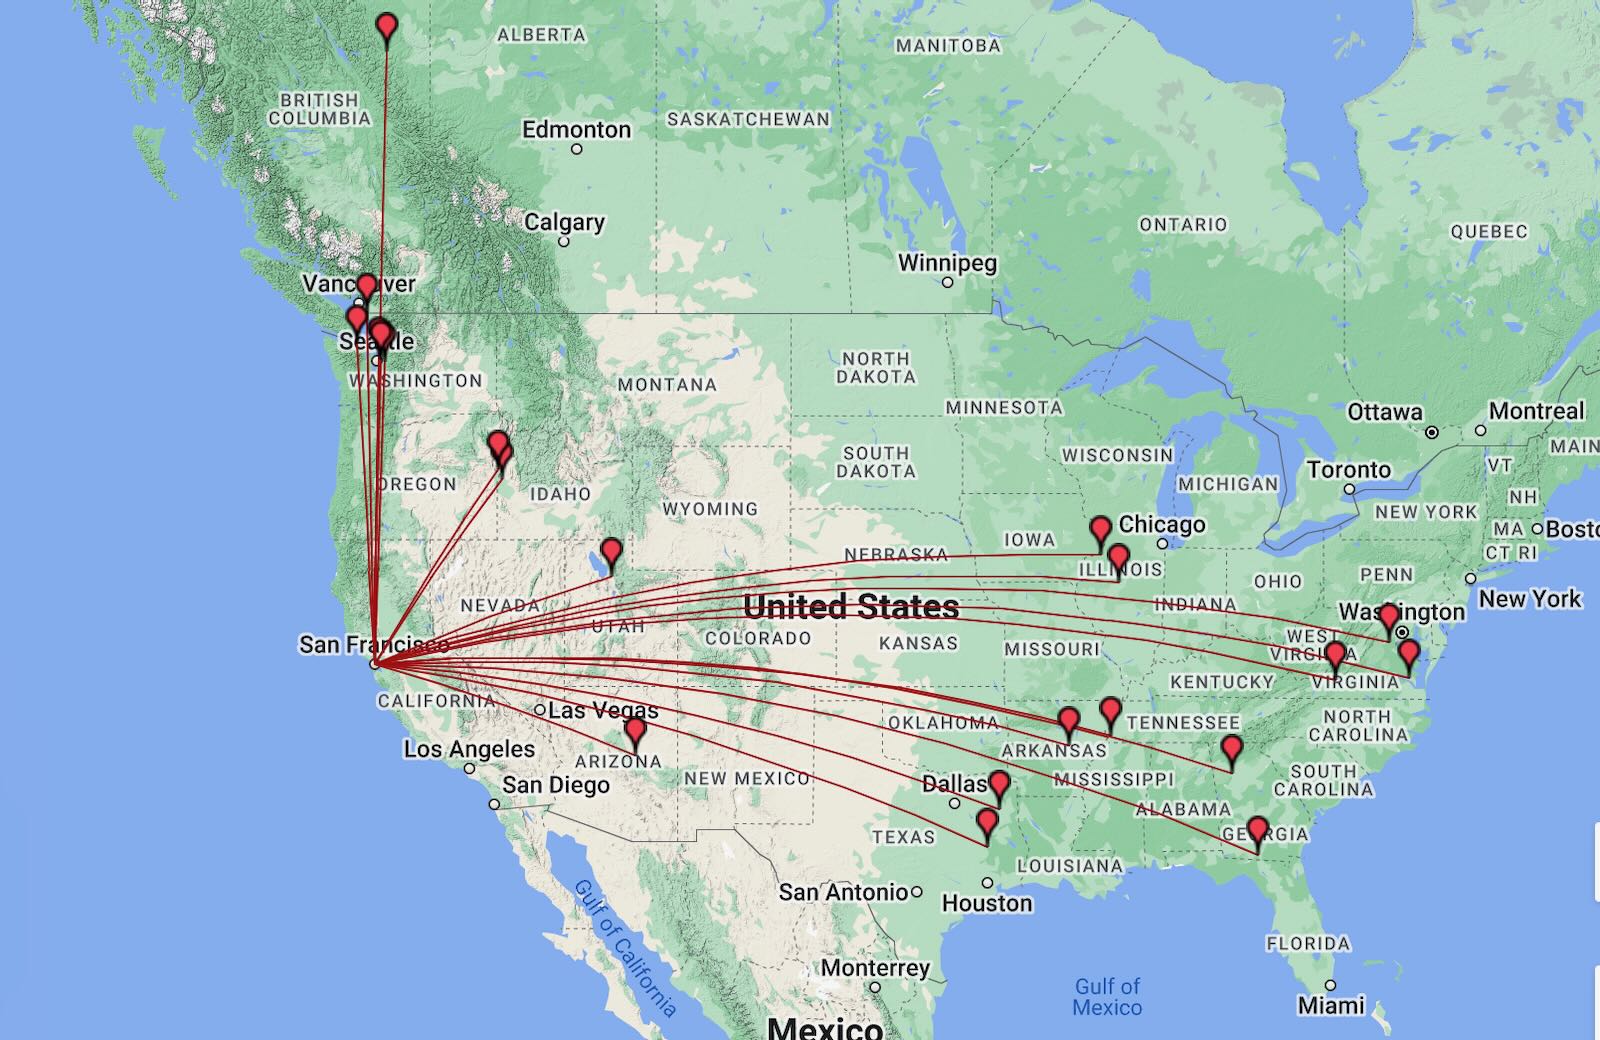
This activation used the FT-818 and yielded 23 contacts, including JH1MXV from northwest of Tokyo, Japan coming in fairly strong on 21 MHz.

Driving back to San Francisco takes me right through the Presidio of SF (K-7889) and noticing that it was after 00:00 UTC, I made the last second decision to divert to East Beach to see if I could work in another activation before the anticipated rain.

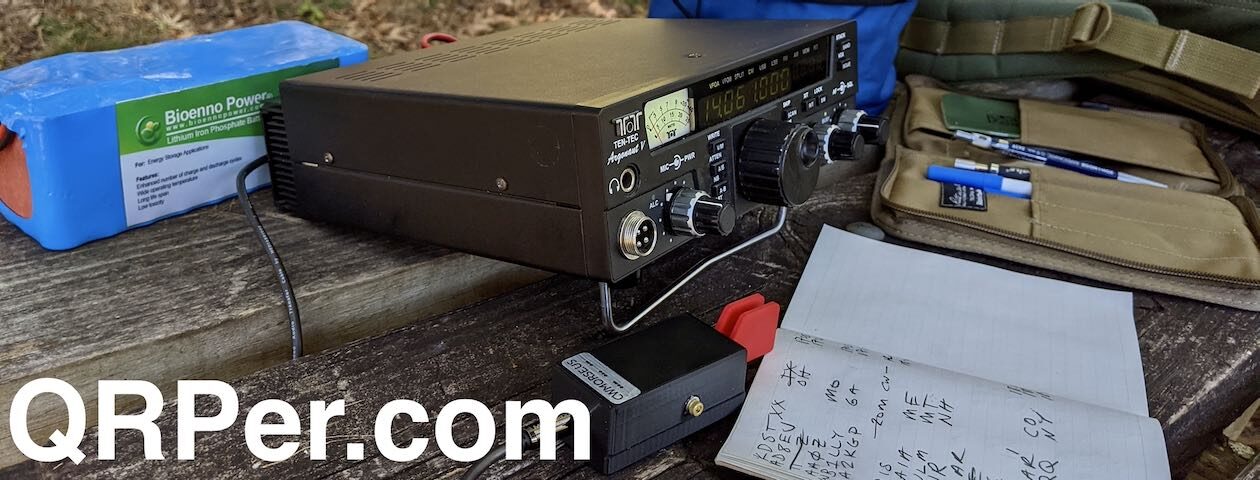
At my usual spot for activating this park, it took only moments to raise the MFJ-1979 20m quarter wave and do a quick deployment of the MTR-4B on the trunk of the car. The wind was picking up, but not nearly as strong as it was up on the mountain.

After seven QSOs, the skies began spitting raindrops, this was going to be close! I closed the cover of the Maxpedition pouch to protect the radio and battery while the Bencher paddles could tolerate a little bit of moisture.

I was happy to have a Rite-In-The-Rain notepad for logging [Amazon affiliate link], because now I was certainly writing in the rain! Three more contacts and the activation was concluded with a hunt of Jim, WB0RLJ, in K-4011. Continue reading Matt’s Weekend POTA Roundup!

Guest Post: “It Was Bound To Happen…”

Many thanks to Matt (W6CSN) who shares the following post  from his blog at W6CSN.Blog:


It Was Bound To Happen…

by Matt (W6CSN)

You’d be safe to guess that Mt. Davidson would have been my first SOTA activation seeing as it’s the closest SOTA summit to my home QTH. However, it actually took me a little while to get around to heading up W6/NC-423.

The trail begins near the corner of Dalewood and Lansdale.

Today was the day! I dropped my hiking buddy off at work at 8 AM then drove up Market Street, over Portola Drive and wound my way around Mt. Davidson, finding easy parking on Dalewood Way near Lansdale Ave.

The easy trail up Mt. Davidson.

From the trailhead near the bus stop, it a short and easy hike up to the activation zone. On this route you reach the east end of the summit, opposite the large cross, which is a well known landmark.

Except for the occasional exercise enthusiast, I had the place to myself this morning. Not wanting to lug the fiberglass mast up the hill, I deployed the Gabil Radio tripod and loading coil, using a 3 meter collapsible whip antenna. This is an easy setup and not too much of a compromise on 20 meters.

While I can do a lot of back and forth the get the loading coil set just right for a good match, I find it easier just to get the coil close enough and touch it up with a tuner for a low SWR reading.

I sent a spot via Sotamāt and started calling CQ SOTA on 14.058 using the QCX-Mini. My first call was from JG0AWE from Nagano City, Japan. This was followed quickly by several more stateside calls and I was able to gather the four QSOs needed within a span of five minutes.

QCX-Mini on 20 meters.

I continued working stations and chasing some Summit-to-Summit contacts for another half hour. It was at that point I noticed that I failed to throw the switch to the “Operate” position on the ZM-2 tuner. This whole time I had been operating in “Tune” mode with the 50 ohm absorptive bridge in circuit! It was almost like using a dummy load for an antenna!

Oops! I left the ZM-2 in the “tune” position!

Later, at home, I measured this tuner configuration with this radio using an actual 50 ohm load instead of an antenna and found that I was most likely operating with an effective power to the antenna of only 300 milliwatts!

Despite this extremely low power I was able, using CW, to complete the activation with no difficulty. This is a testament to the effectiveness of the CW mode, and not so much this operators skill.

Sutro Tower and Twin Peaks to the North.

After logging 10 contacts, I called it quits, packed up the station and headed back down for some breakfast. Next time I’ll try to remember to set the switch correctly after tuning up, but I make no promises. I’m guessing pretty much everybody that has a ZM-2 has at one point or other forgot to switch into “operate” mode, It was bound to happen.

Guest Post: Lake Thunderbird (K-2792) with a homebrew transmitter!

Activating (sort of) Lake Thunderbird (K-2792) with a homebrew transmitter

Sam Duwe WN5C

When I dove into radio a couple years ago a few sub-hobbies caught my attention: QRP, portable ops, CW, and homebrew. Of course, these all fit nicely together, but in my mind there was a huge leap between soldering an unun and a building a radio. But why not try? What’s the worst that could happen by melting solder and then sitting at a picnic table? This is how I built a simple transmitter and kind of activated a park.

The Michigan Mighty Mite

Nearly everyone has heard about the Michigan Mighty Mite (MMM), a QRPp transmitter popularized by the Solder Smoke blog. There are countless YouTube videos and posts across the internet. It’s very simple: a single transistor, a variable cap, a coil, a crystal and some resistors and a cap. Supposedly one can get up to half a watt of output (I couldn’t). But with a small purchase from Mouser one can oscillate. That seemed pretty cool.

I hadn’t touched an iron until I started playing radio. But I’ve been drawn to homebrew projects. I built a regenerative receiver last year which was very rewarding. I’ve also put together kits (a QCX mini and a TR-35). But my dream has always been to construct a transmitter/receiver combo, or a transceiver. I thought a good place to start was the MMM.

I built the transmitter based on the common schematic for the 40-meter band. The MMM is crystal controlled but I opted to solder in a socket and buy a handful of crystals, so I have the luxury of operating on 7056, 7040, and 7030 kHz. I made a few other improvements, too. The first was to build a low pass filter to attenuate harmonics. Second, although I haven’t finished it yet, the switch on the right will be to choose between multiple crystals. And third, I added a BNC jack to connect a receiver, with a transmit switch. When not in use the transmitter will dump into a dummy load. This receiver switching idea was lifted from the design of the MMM that QRP Guys produces.

When I tested the transmitter at home the best I could get with my charged Bioenno 3 Ah battery was about 300 mW output. The filter is reducing things somewhat, but maybe I need to look into a different transistor or rewind the coil. But I was able to get a 339 signal report from Illinois (no sked) in the midst of distance lightning crashes, so I had a little confidence going forwards. School is out for me this summer, so I decided to head to the park. Continue reading Guest Post: Lake Thunderbird (K-2792) with a homebrew transmitter!

CQ From Latvia with Love

CQ From Latvia with Love

by Leo (DL2COM)

A completely under-prepped SOTA & WWFF activation which turned out to be perfect

In preparation for a tough conversation a good friend once told me: “You know what, just walk into the fire. If you have bad news to deliver, don’t sugar coat it and do it right away. You’ll be fine.” 

“Just walk into the fire.” I believe this can be applied to many other situations in life. While I would consider myself to be well-prepared on most trips, hikes and activations and getting a lot of joy out of optimizing my kits I try to stay open-minded. Imagine the things you would miss out on if you wouldn’t be spontaneous or only do things while fully prepared and 100% safe – even if it means taking risks.

On the road back to Riga
The QCX-Mini silently drying after a successful activation

Last Wednesday, I kind of walked into the fire. Not fire as in fire-fire but fire as in Latvian winter storm. In general this wouldn’t be such a big deal had I brought the right clothes, gear and shoes to my short business trip to Riga.

Due to very strict luggage restrictions I could only bring one small backpack for three days. Inside I had enough room for a laptop, washbag, spare clothes and the compact QCX-Mini Kit I built for exactly these occasions. I was wearing sneakers and jeans. At this point I had not planned a specific activation but I wanted at least to be able to operate YL/ & /p maybe 30 minutes from a nearby park – not a problem if you can jump right back into the warm hotel afterwards.

My rental car rocking summer tires in Winter (yes, I was driving veeeeeeery slowly)

During our stay, my schedule for Wednesday morning freed up so I decided to try activating one out of only three SOTA summits in Latvia: YL/YL-003. It turns out this summit is also located within WWFF territory YLFF-0007 about a 1,5h drive from Riga. Big Thanks to Val (YL2SW), Latvia’s WWFF manager, for assisting me with local rules and processing my log. A quick look at the weather forecast showed freezing temperatures, 90% chance of snow, heavy winds and overcast. Many of you will understand why a SOTA&WWFF combo in a rare country could be a small reason not to use the hotel’s sauna on a day like that. Sometimes things just need to get done.

Summit watchtower
The majestic watchtower on YL/YL-003

I got up early the next morning and was very happy to be able to grab a Bolt rental car from the street and get going quickly. The drive went by without issues up to a point just about 3km away from the mountain (well, 1-pointer hill I should say). The roads were completely covered in snow so I could barely see where I was driving. Latvia is a rather flat country but here it started to get a bit hilly and the tires were certainly not cut out for that. Continue reading CQ From Latvia with Love

Testing a new QCX-Mini Field Kit built in an Evergreen 56 Watertight case

In early November, I happened up a new waterproof case called the Evergreen 56. As with Pelican cases, it’s waterproof and also made in the USA. Like Nanuk cases (that are also waterproof and made in Canada) Evergreen cases have a built-in locking mechanism to keep the latch from accidentally opening during transport.

I thought the price for the Evergreen 56 at $28 US was fair and in-line with the Pelican 1060 and Nanuk 903 which are similar in size. I grabbed one made of a clear material with one radio in mind: my QCX-Mini!

There are a number of color options available for this Evergreen case, but I like the clear polycarbonate one because it makes it so much easier to see what’s inside (for a quick gear check) but also to confirm that no one part of the kit is being pressed too hard inside the case after the lid is sealed.

After receiving the Evergreen 56, I was very pleased with the quality–again, on par with what I would expect from Pelican or Nanuk.  It is incredibly solid and the seal is watertight.  The Twist Lock Latch (see above) is easy to operate and the case comes with two “keys” for adjusting the inner lock.

The Evergreen case has a soft egg crate-like rubber boot interior as opposed to the pick foam material you’d typically find in a water tight case. The case also has a hammock-like rubbery webbing on the inside of the lid that can be used to organize smaller contents (I knew instantly I’d use this to hold the antenna!).

The QCX-Mini fits in the Evergreen case perfectly–this was no surprise–but I was eager to see if my other station components could also fit. Note that I didn’t buy anything specifically to be used in this case; I used components I already owned. I could minimize the contents even further if I used a smaller battery, antenna, and key.  Here are the components of the first version of the QCX-Mini Field Kit: Continue reading Testing a new QCX-Mini Field Kit built in an Evergreen 56 Watertight case

A Few Field Radio Gift Ideas for Less Than $100!

I received an email from a reader’s spouse asking about gift ideas for the holidays and beyond; ideas that could not only be used this month, but also tucked away for the future. They weren’t looking for the obvious things like a transceiver–they were looking for accessories that might enhance their significant others’ field radio fun.

Being the enabler I am, I was happy to oblige and, in fact, decided to turn my reply into a post (since it quickly turned into a very long email) with their permission. For obvious reasons, I’m keeping their ID secret! 🙂

Here’s a rather random sampling of things that came to mind. I tried to limit this to items that retail for less than $100 US. Note that some of these product links are affiliate links:

A quality LiFePO4 battery

Being a QRPer, I don’t need a large battery to enjoy hours of radio fun per charge. My favorite battery chemistry is LiFePO4 due to its weight, safety, shelf life, and recharge cycles (which is in the thousands as opposed to hundreds).

For me, a 3Ah battery is more than enough capacity to keep my QRP radios on the air for 3-5 activations per charge (depending on length of activation, etc.).

I’m a big fan of Bioenno batteries. Their customer support is excellent. You can purchase their 3Ah 12V battery for $64.99 US including the charger. If you already have a charger, the battery alone is $49.99. Click here to check it out.

If your significant other likes to push 100 watts, consider a larger capacity battery. I also have a 15Ah Bioenno battery for this purpose, though it exceeds the $100 gift price threshold). Click here to check it out.

A very affordable Li-Ion rechargeable battery


One of the most affordable rechargeable battery packs for the QRPer in your life is the TalentCell Rechargeable 12V 3000mAh Battery Pack. This pack typically costs around $30 US and is sometimes even less expensive.

This little pack is great because it will not only output 5V to recharge USB devices, but it also outputs 12 volts which is brilliant for QRP radios like the Elecraft KX series, TX-500, FT-817/818, Mountain Toppers, Penntek TR-35,  Venus SW-3B, and many others. I actually now pair this with my QCX-Mini. The battery comes with the charger and standard barrel connectors on the included DC cord which fits Elecraft and Penntek field radios among others.

This is a small battery, so can only be paired with efficient QRP radios.

While I don’t consider this a high-quality solution like a Bioenno battery, it is insanely useful and affordable. Click here to check it out.

Morse Code Keys!

I could easily write a series of articles about Morse Code keys. That’s not what you’re looking for, though, right? You want some quick suggestions. Here is a sampling of some of my sub $100 favorites listed in alphabetical order.

If your budget is flexible, you might also consider these paddles which are still less than $200:

Okay, so if you don’t mind pushing more than $200, I highly recommend any key made by the amazing Begali family. Their Simplex paddle was my first set of paddles and I still use them today. I plan to buy their Traveler next year. They’ve a massive selection of models and styles. Continue reading A Few Field Radio Gift Ideas for Less Than $100!

Jay discovered that his first CW POTA activation wasn’t scary at all!

Many thanks to Jay (W1ASP) who, last week, sent me a note about his first POTA CW activation. I asked if he’d consider writing up a short field report about his experience to share with others and he was happy to do so. Thank you, Jay.


Halloween POTA

by Jay (W1ASP)

Halloween doesn’t have to be scary.

I set out to Bear Brook State Park (K-2643) for my first CW POTA activation.

Bear Brook is relatively close by, its the largest state park in New Hampshire with over 10,000 acres. There’s camping, hiking and biking trails along with an archery course and plenty of swimming and fishing areas.

I didn’t give it much thought about what day it was, just that I had the time to do an activation and it was nice out, what a perfect opportunity to break in the newly assembled kit.

I decided on a spot next to the water and as luck would have it there was a picnic table right there. I took out my gear, set up and proceeded to tune around and listen. The band seemed pretty quiet. I wasn’t sure if I’d get enough QSO’s in to make it an official activation. I decided on 14.038 MHz, I sent QRL? I then held down the memory button, took a deep breath and hit it again to transmit: CQ POTA DE W1ASP

I waited a second or two and used the memory keyer once more, again nothing. I went to the POTA website on my phone and added my activation.

The memory keyer was used for a third time, I noticed a message pop up on my logging app, the Reverse Beacon Network spotted me. It wasn’t too long after, the first call came back to me!

I was nervous and fumbled a bit here and there but once I took my time I was fine, sending their call back and TU UR 599 599 NH BK. I cheated a little and left the CW decoder enabled. I wanted to be sure I had the call correct as I logged my 13 QSO’s. (I swear the 13 wasn’t intentional.) for my first CW park activation! I only realized that it was Halloween while walking back to my truck.

I thought to myself, “that wasn’t scary at all.”

Once I decided that, as an activator I’m in charge of the QSO, I relaxed and it was a lot of fun. I may have made a few mistakes but everyone was patient with me. I later received an email from another Ham in Delaware. He was using the same radio, and referred to them as the perfect “picnic portable radio” we emailed back and forth a few times and I look forward to hearing him on the air again soon.


The week before, I finished building my second QCX Mini. The first kit I built was for the 30 meter band around this time last year, this second one is a 20 meter version. I love these little radios, there’s something about these little transceivers that I just can’t seem to put them down.

I took my time making sure it was working properly, I hooked it up in my shack and I had my first QSO with another POTO activator in Maryland just over 400 miles away.  To say I was excited is an understatement!

I planned on putting together a kit about a month ago for POTA and eventually SOTA with the QCX Mini as the radio. I decided on using a small pack, I wanted it to be a self contained kit that had everything I needed to do an activation and nothing extra.

I keep the wire and radios together,  and depending what band I choose to operate on is the one I pack. I’m considering a third kit; maybe a 10m version? I threw the EFHW matching transformer in the bag along with a notebook, mechanical pencil and a battery pack I put together using four 3.2v LifePo batteries. The paddle I’m currently using is a stainless paddle I found on online with a mini CW paddle for backup and set of folding headphones.

I’m looking forward to my next park, this was a great experience. I wanted to learn CW since I became a Ham in 2016, that’s another story of what got me into Ham Radio in the first place.

Leo’s complete QCX-mini field kit and ZM-4 manual tuner kit

Many thanks to Leo (DL2COM) who recently reached out after watching my livestream with Josh at HRCC on the topic of QRP/CW portable. 

Leo shared some photos of a complete radio kit he built around the QCX-mini along with a ZM-4 ATU kit he also recently built. Leo has kindly agreed to share these on QRPer.com.

Leo notes:

Attached is a photo of my ultra light kit.

It consists of a QCX-Mini 20m version (self-built), K6ARK EFHW, Palm Radio Pico Paddle, Eremit 2Ah LiFePo battery, headphones and a few cables.

I usually also carry a small arborist kit and if there is still room also the 6m mast from Sotabeams, depending on what I think will work best.

I chose a hard case and went for the Peli 1060 Micro. It has room for everything I need and it could easily hold a bit of RG316 coax in addition (even more if I chose to shorten the 30m arborist line).

The main benefit for me is that I really don’t have to worry at all about what’s inside – compared to a soft pouch. So I can just shove it into my backpack or glove box and forget about it since this configuration is a lot more rugged and water proof – while being slightly heavier. Continue reading Leo’s complete QCX-mini field kit and ZM-4 manual tuner kit

SOTA & POTA with the QRP Labs QCX-Mini and Packtenna EFHW on Flat Top Mountain

When I head out the door to activate a summit, if it involves a long hike, I reach for one of my super compact QRP transceivers like the Mountain Topper MTR-3B, Elecraft KX1, or KX2. If you’re carrying your entire station and all of your hiking provisions in your backpack, it’s best to keep the load as light and compact as possible.

I purchased the single-band QRP Labs QCX-Mini last year specifically with Summits On The Air (SOTA) in mind. My QCX-Mini is built for 20 meters which tends to be my most productive SOTA band.

The QCX Mini has a rugged, utilitarian feel: basic controls, two line backlit LCD display, and a sturdy aluminum enclosure. It’s super compact.

One of the first things I did was build a dedicated field kit around the QCX-Mini. Everything–save my throw line–fits in my Spec-Ops Op Orders pouch:

After the QCX-Mini’s insane debut on Mount Mitchell in November, I was eager to hit the field with it again.

A window of opportunity opened on the morning of Thursday, December 9, 2021, so I packed my new Spec-Ops EDC backpack with the QCX-Mini kit and drove 1.5 hours to Flat Top Mountain off of the Blue Ridge Parkway near Blowing Rock, North Carolina. Continue reading SOTA & POTA with the QRP Labs QCX-Mini and Packtenna EFHW on Flat Top Mountain

My QCX-Mini Field Kit

So I just finished putting together a dedicated, compact field kit for the QCX-Mini. I’m planning to do a SOTA activation tomorrow, if the stars align. Hopefully, they’ll align!

Everything in the photo above, save the throw line bag, fits in my Spec-Ops Brand Op Order Pouch.

QCX-Mini Field Kit Contents:

One of the newest products in this kit is my high viz 2mm x 50M Marlow throw line. I learned about this throw line from Mike (W4MAF)–thank you, Mike! It is much less bulky than standard poly throw line and fits in my Tom Bihn small travel tray. We’ll see how well it works tomorrow. First impressions from having used it at the QTH once was very positive.

Again, with any luck I’ll have this kit in the field tomorrow on a summit. If you’ve nothing better to do, look for me on the SOTA Watch spots page!