 Many thanks to Mike (2E1BFH) who shares the following photos of a new field kit he’s built around the Icom IC-705:

Continue reading Photos of Mike’s uber-organized Icom IC-705 field kit

Many thanks to Mike (2E1BFH) who shares the following photos of a new field kit he’s built around the Icom IC-705:
Continue reading Photos of Mike’s uber-organized Icom IC-705 field kit
Many thanks to Ken (WW5A) who writes:
Hello Thomas-
I enjoy reading the posts on the QRPer. The size comparison photos recently posted got me thinking. I had taken a photo several months back of a X5105, 817, RS918 (McHF), G90 and a 705, basically to do the same thing (size comparison).
I have attached them for your amusement [click to enlarge]:


73,
Ken WW5A
Thanks for sharing these, Ken. To me, it’s interesting to see the comparison between the FT-817 and the G90. When I owned a G90 I didn’t have an 817 at the time for comparison. It reminds me just how long/deep that G90 was! Also interesting to see that the mcHF clone is a wee bit wider than the IC-705. Thanks for sharing!

Many thanks to Don (W7SSB) who shares the following notes about a small LED book lamp he’s added to his IC-705 and Peovi cage:
This is a book lamp from Amazon that uses 3 AAA’s and costs $8.99.
It has 3 brightness settings and clips onto the Peovi cage.


It really brightens up the radio in a dark room.

Click here to check it out on Amazon (affiliate link).
Thank you for sharing this, Don! That’s a clever use for that book lamp. I’ve often thought that all field radios ought to have a logging lamp on them like the KX1. This is a nice and inexpensive workaround!
 Turns out, if you go to Canada for nearly two months, when you return home you’re going to have about two months worth of catch up.
It’s all explained in one of Einstein’s theories. If memory serves, Einstein stated:
“One cannot simply ignore stuff for two months and expect no repercussions. Time lost must be accounted for due to the principles of the conservation of energy. Plus…what in creation were you thinking?”
 When we returned from Canada in early August I had some pretty big plans about the parks and (especially) summits I would hit here in North Carolina. But after returning, I quickly realized I had so much work to do around the house and a number of DIY jobs I’d postponed at our investment property. They all immediately took priority.
Indeed, in the one month span after returning from Canada, I only performed three park and no summit activations. There was a three week period of time without activations of any sort. I simply didn’t have the time to fit anymore in my schedule. This all gave me a serious case of activation withdrawal.

If you’ve been following my field reports, you’ve no doubt noticed that I never do multi-hour activations at one site unless I happen to be camping at a POTA park.
I’m asked about this fairly regularly (why I don’t do longer activations to achieve Kilo awards, etc.) but the truth is I make POTA/SOTA fit in my busy family schedule. This often equates to short (30-60 minute) activation windows.
Then quite often, I’m on the road or doing errands in town and realize I have a short opening for an activation, so I squeeze it into the day. This is why I always have a fully self-contained field radio kit in my car. At a moment’s notice, I can set up a station, and play radio.
In a way, I find this style of quick activation fun, too. “Can I seriously validate a park during this short window of time–?”
These activations remind me of that scene in A Christmas Story where the father gets a small thrill out of timing himself as he changes a flat tire on the side of the road. I totally get that.
Except with me it’s deploying antennas instead of managing lug nuts.

Friday, September 2, 2022 was a big day for me. On the way back from visiting my folks that morning, I spent a couple of hours at the Shelby Hamfest.
The Shelby Hamfest typically has the largest outdoor tailgate market in all of North Carolina and likely one of the larger ones in the southeast US. I had no items on my wish list, I just wanted to see what was there.

This was the first hamfest I’d attended in a little over a year. It was a lot of fun and I got to meet a number of friends and readers/subscribers.
If you’d like to see the treasure I found at the Shelby Hamfest, by the way, check out the large photo gallery I posted over on the SWLing Post.
Back to the topic of impromptu activations…
 Driving home after the Shelby Hamfest that early afternoon, I realized I was passing dangerously close to the Clear Creek access of South Mountains State Park.
I had a couple of errands to run back home before the post office closed at 17:00 that day, but in my head I believe I had just enough time for a quick activation. The total amount of detour driving would only be about 15 minutes; I’d just need to keep the activation (including most set up and pack up) under 45 minutes or so.
At the last minute, I took a right turn and headed to the park!

Fortunately, the one lonely picnic table at the Clear Creek access was unoccupied.
I grabbed my IC-705 kit and a new antenna!

A few weeks prior, Colin (MM0OPX) reached out to me and asked if I would consider testing a new high-quality, highly-efficient QRP EFHW he’d designed.
Of course, there’s nothing new about an EFHW–it’s one of the most popular field antenna designs on the planet–but Colin’s goal was to make one with the lowest insertion loss possible in a compact, lightweight (50g), and durable format.
I say he succeeded.
In fact, this activation was actually the second one where I used Colin’s QRP EFHW. The previous day, I paired it with a then very Beta version of the Penntek TR-45L at Tuttle Educational State Forest (K-4861).

In short, the antenna made for a wildly successful QRP activation. Here’s the QSO Map (you’ll need to click and enlarge to see the number of contacts):

The Penntek TR-45L was still quite new at the time and even though I got John’s (WA3RNC) blessing, I didn’t post the activation video and mini overview on YouTube. Keep in mind the TR-45L was still in Beta so not all features had been finalized.
I did, however, post the entire TR-45L activation video on Patreon.
 As I mentioned in a previous post, I’ve now invested in a Pro account with Vimeo that allows me to post completely ad-free videos that my Patreon supporters can enjoy and even download. I recently discovered that YouTube unfortunately inserts ads even though I have monetization turned off. I pay for Vimeo’s bandwidth and server space, so I also can control the ad experience completely (basically eliminating any possibility of ads!).
My Patreon supporters are the ones making it possible for me to pay the annual $420 fee to Vimeo and I am incredibly grateful, so I pass along the benefit to them.
Continue reading QRP DX: Pairing the MM0OPX EFHW & Icom IC-705 during an impromptu activation
 Many thanks to QRPer.com reader, Charles, who recently sent me the following question:
Thomas, I’ve watched a number of your videos and read your activation reports. I’m studying for both my Technician and General class license right now and hope to pass both in one session later this month. I’m also learning CW.
I consider myself an audiophile and appreciate good audio fidelity. I know that amateur radio modes are narrow and by their very nature have less audio fidelity than commercial broadcast modes.
I’ve already obtained a Kenwood TS-590G for the shack. It was practically given to me by a friend. I’m very pleased with its audio fidelity especially when I connect it to an external speaker.
Next year, I plan to buy a dedicated QRP field radio. Out of the radios you’ve owned, what are your favorites in terms of audio fidelity. Also, what are your least favorites?
Thank you.
What a great question, Charles!
Being an audiophile, I’m sure you understand that this is a very subjective area: one person’s idea of good audio might not match that of someone else’s.
I can only speak to how I evaluate a transceiver’s audio.
 A lot goes into what I would call “good audio” in an amateur radio transceiver.
To me, “good audio” means the radio
In contrast, radios with poor audio
I would add that a good receiver front end is an important part of audio because it keeps imaging and overloading at bay, thus producing a less cluttered and noisy audio experience.
I’ll keep this discussion limited to QRP field portable radios. There are numerous 100 watt desktop radios with excellent audio because those models aren’t trying to limit their current consumption like field radios typically do. They can use more amperage to benefit audio amplification and push a much larger speaker.
In addition, I’ll limit the scope to field radios with built-in speakers. There are some great CW-only radios out there that lack an internal speaker but have great audio (thinking of the Penntek TR-35 and the Elecraft KX1, for example); choice of earphones or headphones can have a dramatic effect on audio. That’s a different discussion altogether!
The following are three of my favorite portable field radios in terms of audio quality. I limited myself to three simply because all of the radios I use regularly in the field have what I would consider good and acceptable audio.
The following are simply stand-outs, in my opinion:
Continue reading What are my favorite QRP field radios in terms of audio quality–?
Many thanks to Scott (VO1DR) who shares the following guest post:

By Scott Schillereff (VO1DR)
St. John’s, NL, Canada
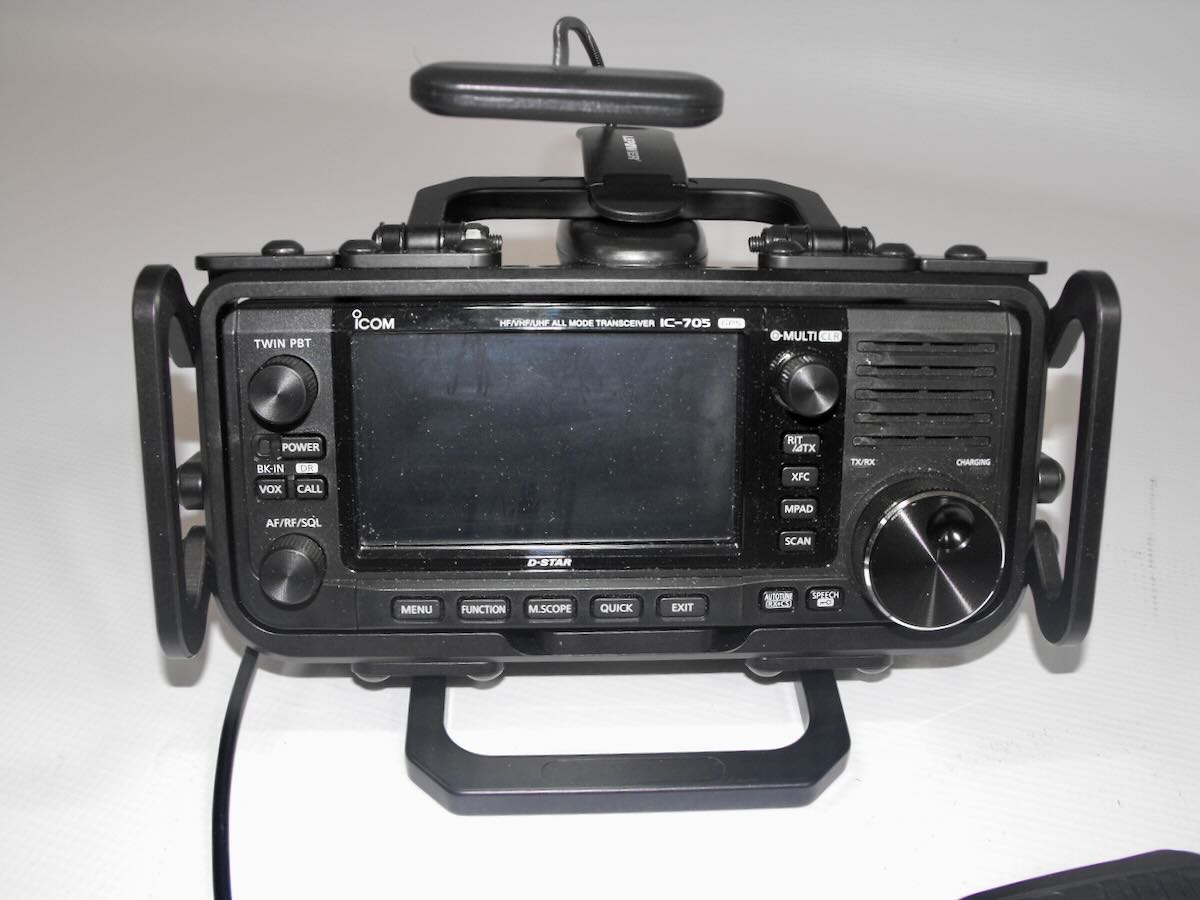
Since getting my novice ticket in 1970 (WB9CXN) under the watchful direction of Charles “Rock” Rockey, W9SCH (SK), I have been a dyed-in-the-cloth homebrewer and QRPer. My one and only commercial rig before this year was a Ten Tec PM-3 I bought with paper-route money in 1971 (still have it). Fast-forward to today. I now live in Newfoundland, and Europe is as close as Georgia. I continue to build my station components and antennas. A recent sea-change though – I inherited some money and decided to splash out on a for-life rig that would serve well in the shack and on the road (RV or hiking). After researching options, I settled on the ICOM IC-705. A fantastic performer; a receiver like I’ve never heard before; more bells and whistles than I could dream of, and a form-factor like a….. delicate, expensive brick!
The 705 is not a sleek, trail-friendly radio. It’s on the heavy side and, well…awkward to pick up! But, man, what a radio! So, my first step was to buy a Windcamp ARK-705 exoskeleton. This protects the rig on all sides and gives you something to grab onto. I don’t mind the weight and size; I want this rig to be working in 25 years.
My operating interests are home use, mobile in my 25 ft motor home, and portable on day hikes. I’m new to POTA and SOTA but maybe that’s next, thanks to you, Thomas!
I’m genetically wired not to buy the luxury ICOM backpack; I prefer to build my own and integrate with my hiking gear. With that in mind, I would like to share my field package system to move the 705 around safely with little risk of damage. Also some other homebrew portable gear. Continue reading VO1DR’s Cheap and Bomb-Proof Field Package for the Icom IC-705
Many thanks to Scott (KK4Z) who shares the following project from his blog KK4Z.com:

I kinda like the idea of being able to mount your paddle to your radio when operating portable. You can use the weight of the radio to help prevent the paddles from moving around and it frees your off hand for other tasks. We see examples of this with the Elecraft KX series of radios and there are some adapters for radios such as the Yaesu Ft-817/818.
I really like my IC-705. It is probably my best radio for POTA/potable operation. I think the only time I would leave it home is if weight became a problem or I needed to exercise one of my other radios. Recently, Begali came out with a mount to attach their Adventure paddle to the IC-705. It is a sweet set-up; however, the approx. $400 USD price tag got me looking for other alternatives. I have nothing against Begali, I own three of their paddles, and they are superb instruments. I think I wanted to tinker, and this gave me a good excuse.
For paddles, I have a set of Larry’s (N0SA) SOTA paddles. I love these paddles. When I go on an activation/Portable Operation, I bring these and my Begali Travelers. If I was going to do a SOTA activation, I would just bring Larry’s Paddles. Next was a trip to Tractor Supply Company (TSC) for a sheet of 16 ga. Steel. That set me back $16. I cut it to 3″ by 3 1/2″ using a cutoff wheel on my grinder.

I already have a stand I made out of 1″ x 1″ angle aluminum so I cut this to fit behind it.

The blue on the metal is Dykem Blue which is a layout fluid. In creating this project, I am only using hand tools. Power tools consisted of a grinder with a cut-off wheel. a hand drill, and my trusty Dremel tool. Here is a picture of me giving the mount a rough finish with a file. Continue reading Scott Builds a clever Icom IC-705 Paddle Mount
Many thanks to Barry (KU3X) for sharing the following guest post originally posted on his website:

by Barry (KU3X)
There are times I find myself in need of an ATU. One example is when I use my half wave end fed 40. I can not always erect this antenna in the clear. I did purchase the LDG Z100 Plus 705 with interfacing cable. The unit does as advertised but I am not impressed with its performance. My biggest complaint is, when interfaced and the IC-705 tells the LDG to tune and it does not know the antenna is matched and resonant, the LDG adds capacitance and inductance which actually raises the SWR. It’s too dumb to go into bypass. I resolved this by not using the interface cable. Now I only tell the LDG to tune where needed. Most of the time I turn the LDG off by toggling between bypass and tune using the button of the front of the unit.
Size matters to me and the LDG ATU is too big. Another downside is it uses SO-239 connectors instead of BNC connectors. Everything I have relating to QRP operating uses all BNC connectors, including my home brew two position antenna switch. I do want to get my hands on an Elecraft T1 ATU but Elecraft can’t get the parts from the manufactures to make them. So the hunt was on for a small ATU with internal batteries and BNC’s instead of the dreaded SO-239 connectors. Here is what I came up with.
I ordered the above pictured ATU-10 from Banggood.com. I have also seen them posted on Amazon.com. They can be found on eBay as well. I did not provide a link for ebay because some ebay adds are dated. There is a very good demo posted on YouTube. Here is an overview of the ATU-10 [PDF].
My ATU-10 arrived 11 June 2022. Here are my findings:
The package contained an Allen wrench and a USB cable for charging the battery as well as for updating the firmware. The package DID NOT include the interface cable for the Icom 705 nor did it included any paperwork…….no manual! My battery showed about half charged and firmware version 1.4 was installed. If you forget to charge the battery and go on site with a dead battery, you can supply power to the ATU-10 via the USB charging cable. You may have to give it a few minutes for the batteries to take a little charge, but from that point on just leave keep the ATU-10 connected to the USB cable.
The needed interface cable is nothing more than a stereo audio cable with 1/8″ male plugs on both ends. But, the ATU works without the interface cable, it’s just not controllable from the radio. As for the matching, I can say it works as good as or as bad as my LDG Z-100 Plus. Where ever the LDG provided a match, so did the ATU-10. On 80 meters where the LDG did not do so well, neither did the ATU-10.
I first tried the ATU-10 without the interface cable. I just sent a carrier from the radio and the tuner went into the tune mode. It’s that simple. It takes anywhere from 2 to 5 seconds to find a reasonable match.
To use the ATU-10 with the interface cable, there is the setup procedure. Hook up all of the cables, including the interface cable to the IC-705. Now turn the ATU-10 on. Once booted, turn on the IC-705. Go into the, “Function” screen and tap the, “tuner” icon. You are ready to go. You do not have to change modes to have the ATU-10 go into the tune mode. In any mode on the radio, like SSB, just key the mic and the tuner will tune. Give it a second or two and you are ready to go. Change bands and key the mic, same results. I lost communication between the radio and the ATU-10 when I went to 80 meters. I have no idea why? I just turned the radio off, then back on and everything was reset…ready to go.
When I received my ATU-10, I noticed all of the hardware was not that tight. I retightened each nut and Allen screw.
User group for the ATU-10 and the ATU-100.
For the price, it think this is a great buy. It does exactly what I want it to do and provides a reasonable match to make the radio happy. You can use the ATU-10 with any radio at power level of 10 watts or less. It’s a perfect size for backpackers. I don’t think the interfacing between the radio and the ATU-10 is all that importable. I myself choose not to use the interface cable. Since the tuner will go into a tune mode if the SWR is too high, that’s all that is really needed.
Many thanks to John (VE3IPS) who shares the following guest post:
 Nova Scotia POTA After-Action Report
by John VE3IPS
We had planned a vacation trip out to Nova Scotia to get our lobster fix. As I always do, I prep my radio with local repeaters, look up local radio clubs, museums and check the POTA and SOTA map for locations to operate from.
I noticed that several park locations had not been activated. Thus I had an opportunity to be first activator and to get some much needed Nova Scotia parks in the Hunters logs. I printed the map and noted the park identifiers. I decided to just activate the parks that were never activated. I could have worked more parks but you have sights to see and can’t be behind the mic all the time. My antenna was prepped to be rapidly deployed in a few minutes and torn down accordingly.
 I also was able to attend the Halifax ARC Hamfest on June 4, 2022.
So a vacation with ham radio elements to keep me excited with some objectives in mind.

We did visit Peggy’s Cove, Burnt Coat Head to watch the tides in the Bay of Fundy, local wineries, Lunenburg (a movie shoot was underway), the Halifax Citadel and of course eat lobster every day. I spent over $200 in gas as we did a lot of driving around (gas is just over $8 a gallon CAD), retail tax at 15% and prices for food and restaurants up by 30%. Nova Scotia is a bit more expensive than other cities.
I decided to bring my Icom 705 with a LifePO4 battery to offer 10 watts instead of the FT-891 or FT-818. Why? Because it offered a voice memory for calling CQ Parks, built in SWR meter and better IF filters over the FT-818. I wanted to cover the Marine and VHF/UHF repeaters as well and that ruled out the FT-891.
Due to the Kleenex box form factor I ended up using a Lowe Pro Omni Trekker camera bag to use as a carry on. This included a Nikon V1 camera and Binoculars.
 Continue reading John’s trip and POTA field reports from Nova Scotia
 Recently, I was in in touch with Jim (WA7VFQ) who was trying to decide which radio to take on a vacation to the North Carolina coast. He replied with details about the field kit he put together for the trip which will require air travel. Jim writes:
Last year in one of your QRPer posts you mentioned your search for a case for one of you radios. I commented that I had a Nanuk case that I liked and promised pictures.
Well, we are finally there!
It wasn’t until yesterday that I decided to take my Icom IC-705 over my Elecraft KX3 [on vacation]. I had new foam for the case and last night I did my “foam plucking” and I’m pleased with the outcome. I had a couple of Icom decals and since it wasn’t the Elecraft, one of them wound up on the exterior. Some guy on the internet was touting the Tom Bihn Travel Trays; we have 4 on them, 3 large and one small. All are headed to NC with us. One of them will carry my extra radio gear.

The Nanuk 915 (above) houses the Icom IC-705 (with cage), a RigExpert 230 Stick analyzer, Bioenno 4.5 Ah battery and Mat 705 Plus ATU. Continue reading Jim’s Icom IC-705 travel kit housed in a Nanuk 915 rugged waterproof case