 Yesterday, I started the day hoping I might fit in one afternoon activation at a local park. In the morning, however, my schedule opened up and I found I actually had a window of about six hours to play radio!
Instead of hitting a local park, I considered driving to parks I’d been planning to activate for months.
I may have mentioned before that, earlier this year, I created a spreadsheet where I listed of all of the parks I planned to activate in 2020.

Each park entry had the park name, POTA designator, priority (high/medium/low), difficulty level for access, and a link to the geo coordinates of where I could park and possibly hike to the site. I spent hours putting that list together as finding park access–especially for game lands–isn’t always easy.
Yesterday morning, I looked at that sheet and decided to knock two, or possibly three off the list.
I had already plotted the park run, driving to Perkins State Game Land (K-6935) near Mocksville, then to the NC Transportation Museum State Historic Site (K-6847) in Spencer, and finally Second Creek Game Land (K-6950) in Mt Ulla.
The circuit required about three hours of driving. Here’s the map:
 When I plan an activation run, I factor in the travel time, add ten minutes extra if it’s my first time at the site (assuming I’ll need to find a spot to operate) and then assume at least one hour to deploy my gear, work at least ten stations, and pack up.
Using this formula, I’d need to allow three hours for driving, plus an additional three hours of operating time, plus a few minutes to sort out an operating spot at Perkins Game Land. That would total six hours and some change.
Knowing things don’t always go to plan, I decided I’d quickly omit the NC Transportation museum if I was running behind after the Perkins activation. In fact, I felt like the NC Transportation Museum might be out of reach, so I didn’t even schedule the activation on the POTA site.
Perkins State Game Land (K-6935)
I arrived at K-6935 a little before noon (EST).
Since this is the week after Christmas, I had a hunch game lands could be quite busy with folks trying out their new hunting gear and I was correct. I passed by the first small parking area and it was packed with vehicles, so I drove on to the second parking area I identified via Google Maps satellite view.
The second parking area was also busy, but was larger. There was just enough room for my car to park between two trucks.
Gear:
- Elecraft KX3
- Chameleon CHA MPAS Lite
- CW Morse “Pocket Paddle”
- Red Oxx C-Ruck
- Bioenno 3 aH LiFePo Battery (Model BLF-1203AB)
- Ham Radio Workbench DC Distribution Panel
I donned my blaze orange vest–a necessity at any game land–and walked outside to asses the site. In short? It was a tough one. There were no easy trees to use for antenna support and I simply didn’t have the space. I knew folks would walk through the area where I set up my antenna so a wire antenna would have acted a lot like a spider’s web.
I pulled out my trust Chameleon MPAS Lite vertical antenna and deployed it next to the car. I rolled out the counterpoise into the woods paralleling a footpath so no one would trip on it.
Since I had no room to set up outside, I operated from the backseat of my car–it was actually very comfortable.
I pulled out the Elecraft KX3 and hooked it directly to the MPAS Lite–it easily tuned the antenna on both 40 meters, where I started, then later 20 meters.
I very quickly logged 13 stations on 40 and 20 meters.
While on the air, a number of other hunters discovered the parking area was nearly full–some turned around and left. I decided to cut the activation with 13 logged and skipped doing any SSB work. I accomplished what I set out to do here, was short on time, and I wasn’t actually using the game land for its intended purpose. Better to give others the parking space!
I quickly packed up and started the 30 minute drive to my next site.
NC Transportation Museum State Historic Site (K-6847)

I knew what to expect at the NC Transportation Museum because I’ve visited the museum in the past and, earlier this year, scoped out a spot to activate the park in their overflow parking area.
The museum is closed on Mondays. In general, I avoid activating parks and sites that are closed. I never want to give anyone at the park a bad impression of POTA activators.
In this case, however, the overflow parking area is wide open even when the park is closed and there was no one at the site. I felt very comfortable setting up the CHA MPAS Lite which is a pretty stealthy antenna. Indeed, as I was setting up, I’m guessing it was a museum employee that passed by in their car and waved–no doubt, POTA activators are a familiar site!
Gear:
- Icom IC-705
- Mat-Tuner mAT-705Plus
- Chameleon CHA MPAS Lite
- CW Morse “Pocket Paddle”
- Red Oxx C-Ruck
- Bioenno 3 aH LiFePo Battery (Model BLF-1203AB)
- Ham Radio Workbench DC Distribution Panel
I set up my portable table behind the car under the hatchback so I took up the least amount of space.
I used the table primarily so I could shoot one of my real-time, real-life videos of a park activation. Readers have been asking for more of these and I’m happy to make them if they’re helpful to even one new ham.
In the end, I logged 13 stations and didn’t try to work more because I was still on track to activate one more park. I didn’t feel bad about only working 13 stations, because this site has been activated many times in the past–in other words, it wasn’t exactly rare.
Here’s my video of the activation:
Second Creek Game Land (K-6950)

I arrived at K-6950, the final park, around 14:50 EST (19:50 UTC).
Only one vehicle car was in the parking area, so it was easy to pick out a spot to set up.
Gear:
- Icom IC-705
- Mat-Tuner mAT-705Plus
- Chameleon CHA MPAS 2.0
- CW Morse “Pocket Paddle”
- Red Oxx C-Ruck
- Bioenno 3 aH LiFePo Battery (Model BLF-1203AB)
- Ham Radio Workbench DC Distribution Panel
Again, since I planned to make a video of the activation, I set up my portable table.
I decided en route to the site, that I’d use the Chameleon MPAS 2.0 vertical at Second Creek. Although I’ve used the more compact Chameleon MPAS Lite at a number of parks–including the two previous parks–I had a great spot to deploy the taller MPAS 2.0.
As with the MPAS Lite, deployment was very quick. the MPAS 2.0 vertical is made up of folding pole sections–much like tent poles. As with all Chameleon gear I’ve ever used, the quality is military grade. Full stop.
I started calling CQ on the 20 meter band in CW this time. Within a minute or so I logged my first contact, followed by five more.
I then moved to the 40 meter band and logged twelve more stations in twelve minutes.
I decided to then give SSB a go as well and logged two more stations for a total of twenty stations logged.
Here’s a video of the activation:
I would like to have stayed longer at Second Creek and even used the MPAS 2.0 on 80 meters, but frankly I was pushing my time limit to the edge.
All in all, it was a brilliant three park run!
These days, it’s difficult to pack more than three parks in my available time–in fact, I think this was the first three park run I’d done in months. During National Parks On The Air (NPOTA) in 2016, I’d been known to pack four or five parks in a day–it was so much fun.
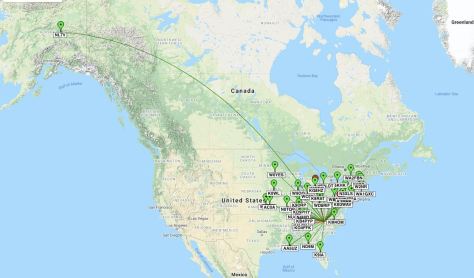
Here’s my QSOmap for the day (click to enlarge):
Getting outside on such a beautiful day, driving through some picturesque rural parts of my home state, and playing radio? Yeah, that’s always going to be a formula for some amazing fun!


