 I made a short post yesterday morning noting that I planned to take my Venus SW-3B and new field kit out on a maiden SOTA/POTA activation.
While I will be publishing a full activation report and video, it could be a good two weeks down the road.
I’ve gotten so many inquiries about the SW-3B, I thought I’d write up a short recap with some of my initial notes using the SW-3B in the field.
This isn’t a comprehensive review; just some beginning field notes I made for a full review I’ll write for The Spectrum Monitor magazine.
Dogback Mountain (W4C/EM-066)
 I decided to activate Dogback Mountain knowing that it would easily fit in my travel plans. The views (see above) were extraordinary. Thank you for the tip, Dave (W4JL)!

This was also a shake-out for my Tom Bihn HTL2 field kit which will likely be shared with the SW-3B and Elecraft KX1. It includes everything I need to deploy the SW-3B in the field–including an arborist throw line!
I confirmed that everything in the kit worked and there were no missing components.
I paired the SW-3B with my PackTenna Mini 20 meter EFHW. This limited me to the 20 meter band, but I suspected it would yield enough contacts to validate my summit (4) and park activation (10).

I fed the Venus SW-3B with a 3 Ah 12V Bioenno LiFePo4 battery pack–my output power would’ve been about 5 watts.
Results
In short? It really couldn’t have gone better.
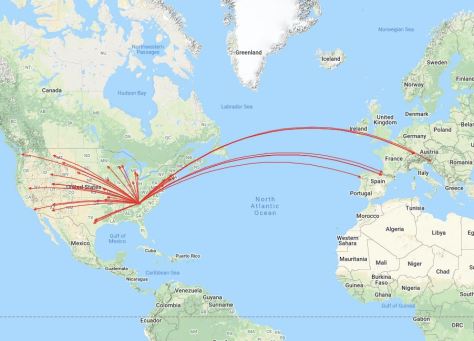
I worked a total of 43 stations in 44 minutes on the air. Here’s what my contacts look like on a QSO Map (click image to enlarge):
Venus SW-3B Field Notes
Overall, the experience of using the SW-3B was brilliant.
Since this little rig doesn’t have an internal speaker, I recorded the audio with an in-line Sony digital recorder. Later, when I produce the activation video, hopefully I can blend the separate audio channel with the video successfully. (Any YouTuber worth their salt can do this, but keep in mind I’m not really a YouTuber!)
SW-3B Pros:
- Excellent receiver for field activations. I noticed no overloading and it handled the pileups very well.
- Very pleased with CW filtering.
- I was able to successfully program the “CQ” button with the following message: “BK TU 72 DE K4SWL” This is huge. At one point, the SW-3B could only handle a simple CW + callsign message. I’m very pleased its only message memory slot can hold the end of my exchange. Also, it is very easy to program.
- The SW-3B is incredibly compact; only slightly bulkier than the MTR-3B if you include the encoder and AF/RF gain pot protrusions.
- I am loving the dedicated AF and RF gain pots.
- Display is very easy to read in the field.
SW-3B Cons:
- Changing the CW keying sped on the fly is really not an option. It’s an awkward process.
- The sidetone isn’t adjustable without modifying an internal component. If I could, I’d lower it just a notch or two. As-is, it’s perfectly fine, but adjustable sidetone would be a nice feature.
SW-3B Quirks:
- When switching bands, the SW-3B defaults to saved memory allocations (not the last used frequency). If you forget and switch bands, then turn the encoder, it cycles through saves memory allocations instead of up/down tuning.
Summary

Keep in mind: this is my first activation with the SW-3B. I don’t typically form strong opinions until I’ve taken a radio on at least three or four activations and used it at the QTH extensively. With that said, first impressions are great. This radio offers much more than I would ever expect for $188.
I see why it has has become so incredibly popular among CW field activators. Now that the Mountain Topper MTR-3B is no longer available, this is a viable alternative.
I’m sure some of you may be trying to decide between the MTR-4B and the SW-3B. I will be reviewing an MTR-4B soon, but based on my experience with the MTR-3B, I don’t think you could go wrong with either radio, frankly.
The MTR-4B does allow for a total of 3 CW message memories that are very easy to access and include beacon mode. You can also adjust the sidetone volume on the MTR-4B (requires opening the enclosure to make the adjustment). Obviously, the MTR-4B is a four band radio including 80 meters in addition to 40, 30, and 20.
The SW-3B, however, has an AF and RF gain control–the MTR series has no volume control at all. The SW-3B also has a rotary encoder which makes chasing contacts across the band much easier.
The MTR-4B receiver current is roughly 27 milliamps. The Venus SW-3B closer to 40 milliamps. (Yeah, splitting hairs here!)
Stay tuned!
 In the coming weeks, I will be posting a number of activation reports and videos using the SW-3B. As I mentioned, I’ll also post a comprehensive review for The Spectrum Monitor magazine in the coming months.
I can say this: if you’re a CW op who is searching for a compact field radio? The SW-3B is a no-brainer. Just grab one.
If you still can’t decide between the MTR-4B and the SW-3B, consider getting both. Why? You could easily kit out two independent fully self-contained field packs on the (relative) cheap!
This will give you two choices for grab-and-go field activations.
Thank you

As always, I’d like to send a special thanks to those of you who have been supporting the site and channel through Patreon and the Coffee Fund. While certainly not a requirement as my content will always be free, I truly appreciate the support.
Your support not only pays the bills at QRPer.com, but makes it possible for me to purchase radios like the SW-3B.
Thank you!
I hope you get an opportunity to play radio this week. Stay healthy and safe out there!
Cheers & 72/73!
Thomas (K4SWL)
 As mentioned in my last field report, on January 26, 2022, I decided to fit in multiple park activations in one day as a RaDAR (Rapid Deployment Amateur Radio) run. My hope was to activate four or five sites between 14:00 – 21:30 UTC.
 I parked the car on one of the many roadside camping areas right there on the ridge line. It was an ideal spot for a field activation: good altitude, no obstructions, and lots of trees. Continue reading POTA RaDAR Run Activation #2: Pisgah National Forest & Pisgah Game Land


