My cootie/sideswiper was inspired by an article (http://sideswipernet.org/articles/w9ok-modernization.php) by W9LA about how hams in the 1930s might have constructed a cootie/sideswiper using a ceramic DPST knife switch. I didn’t have a ceramic DPST knife switch, but I did have a nice Leviton ceramic DPDT knife switch which I used as the basis for my cootie/sideswiper. Instead of using tape for the fingerpieces as described in the article, I used Fender guitar picks.
This cootie is the key I use most often for home-based operations.
This (see photo above) is the one I built a few years ago from a hacksaw blade, cabinet fixtures and a crafter’s block of wood. The felt pad finger pieces allow me send more smoothly than with the bare metal lever.
I also used 4 pads under the base for gripping.
Since I had most of this stuff on hand the cost of the project was less than $4 dollars.
Fantastic, Mike! And I understand Hermione sends like a dream!
Thanks for sharing, Mike! Anyone else care to share a photo of their homebrew key? Please comment or contact me!
Many thanks to Ray Novak (N9JA) at Icom America who shares photos of the Begali-05 bracket prototype that is being developed for the Icom IC-705 transceiver.
Those who already own a Begali Adventure key will soon be able to mount it on the IC-705 with the Begali-05 bracket.
Ray notes that this is still an early prototype, so the finished product might look quite a bit different.
He also noted, “The plan is for the Begali-05 to be available at Authorized Icom Amateur Dealers.”
I’m a massive fan of Begali keys. Not only do they make some of the best, highest precision keys in the world, but the Begali family are proper ham radio ambassadors. I love supporting them!
Pietro Begali (I2RTF) winner of the 2019 Hamvention Technical Achievement Award.
I’ll attempt to acquire a Belagi-05 bracket and Adventure Key for review with my IC-705. In truth, though, I’m sure it’ll work beautifully. It’ll be a Begali!
Many thanks to Alex (W3AVP) who shares this photos of his homemade cootie/sideswiper originally posted on the POTA Faxcebook page. Alex notes:
I didn’t want to lug my Begali key to the parks so I made my own using the plans from KA8VIT. Worked great! I had a little QRP key but my fat fingers would make so many mistakes. The DIY aspect of this hobby is extremely entertaining!
And I bet your “cootie” serves you well in the field! I love the simple design and the fact it even has an adjustable action. At the end of the day, keys are merely switches so are perfect for homebrewing!
If you have a sideswiper/cootie or any other key you’ve built and would like to share it here on QRPer, contact me (K4SWL at QRPer.com).
Weather in North Carolina has been absolutely stunning over the past week, with the exception of two days where the remnants of Hurricane Sally dumped torrential rain. Two cold fronts provided us with gorgeous clear skies and dry conditions before and after Sally’s visit.
Of course, what better way to enjoy the outdoors than taking my radios to the field?
Last Wednesday, after several hours of knocking out home projects, my wife and I decided to enjoy the fall-like weather and get lost in Pisgah National Forest. My daughters were also keen for a little outdoor adventure, waterfalls, and hiking.
And our canine family member, Hazel? Always up for an outing!
“Let’s go, daddy!”
Of course, my wife was throwing me a bone as she knew I was chomping at the bit to try the new-to-me Chameleon Emcomm IIIantenna.
CHA Emcomm III antenna
Photo Source: Chameleon Antenna
I decided I’d pair the Emcomm III with the amazing Mission RGO One transceiver (a rig I’ll be reviewing in an upcoming issue of The Spectrum Monitor magazine).
Up to this point, I’d never used a Chameleon antenna in the field.
Chameleon Antenna kindly sent me both the CHA Emcomm III and CHA P-Loop a couple weeks ago for an honest field evaluation (and disclaimer: at no cost to me).
And being honest? The overall length of the Emcomm III wire antenna was intimidating. I’m used to field-ready wire antennas that are perhaps 30-41 feet in total length. The Emcomm III has a 73 foot long radiator and 25′ counterpoise! Holy smokes!
In my head, I imagined the only places I’d be able to use the Emcomm III would be in an open park with large, widely-spaces trees.
Turns out, I was wrong.
Two things make deploying the Emcomm III a breeze–even in the middle of a forest:
1.) An arborist throw line: this piece of kithas revolutionized my field antenna deployments. Not only does it give me the ability to suspend antennas much higher than I could before, but also to raise/lower antennas with ease compared with fishing line.
2.) The Emcomm III also has a floating dielectric ring on the radiator wire that allows you to create a suspension point. In fact, there are a number of ways you can deploy the Emcomm III which, I see now, makes it such a popular antenna among POTA operators.
To the field!
The first activation was actually a “two-fer”–meaning, two geographically-overlapping POTA park entities.
Wednesday, September 16: Pisgah National Forest (K-4510) & Pisgah Game Lands WRC (K-6937)
Propagation conditions on Wednesday were so crappy I found myself breaking with QRP to run 40 watts with the Mission RGO One into the Emcomm III. (The Emcomm III can actually handle up to 50 watts CW, 100 watts SSB.)
I first deployed the Emcomm III by pulling the radiator over a tree branch about 50′ high with the balun and winder near the ground. I then unrolled the counterpoise stretched out on the ground.
After only snagging about eight contacts in 50 minutes (a very meager amount for the typical park activation), I decided to re-configure the Emcomm III Portable so that it would act more like a NVIS antenna and perhaps grab a few regional hunters on 80 meters. There was no way I was leaving the forest without my 10 contacts to validate the activation!
I reeled in the radiator and re-attached my throw line to the floating loop and reconfigured the antenna to roughly match this “V” shape with a lower (roughly 25 ft) apex point:
NVIS “V” configuration (lifted from the CHA Emcomm III Portable product page)
I used the RGO One’s internal ATU to match the 80 meter band 1:1.
I started calling CQ on 80 meters CW and, evidently, the POTA site auto-spotted me via the Reverse Beacon Network (RBN) because within a minute, I found myself at the other side of a mini pile-up! I very rapidly worked 8 stations–most of them were in nearby Tennessee. These were callsigns I was not used to logging because typically they’d be under my skip zone–a little too local.
It was nice to get solid copy on 80 meters without the deep QSB on 40, 30 and 20 meters.
The thing that struck me about the Emcomm III at this first activation was how easy it was to reconfigure in the field despite the lengthy radiator. The wire is Copper Clad KEVLAR PTFE (Telflon-coated) and doesn’t easily tangle. It slides so easily through the trees–there’s no coil or bulky bits to get caught in the limbs.
When packing up, it wraps around its built-in winder very easily. Kudos to the designer.
Saturday, September 19: Pisgah National Forest (K-4510) & Pisgah Game Lands WRC (K-6937)
Last Saturday, I wanted to try the CHA Emcomm III in a different region of Pisgah National Forest and see how well it might pair with my Elecraft KX2.
We found an ideal spot to set up: a forest service road that had obviously been closed the entire season.
I deployed the Emcomm III Portable in the same “V” configuration as I did during the first activation, but this time raising the apex of the “V” up to 45 feet.
It’s important to note here that being a random wire antenna, the Emcomm III relies an an ATU to get good matches on each band. The Mission RGO One’s internal ATU did a brilliant job finding matches and, turns out, my KX2 did as well.
In fact, before I started calling CQ, I moved across the bands to see if I could get good matches with the KX2 ATU. From 80-20 meters, I think the highest SWR I had was 1.3:1. (The KX series ATU is truly a benchmark in my book!)
That day, even though the weather was gorgeous, propagation was terrible. I read a few reports from experienced POTA and SOTA folks who couldn’t snag the needed 10 contacts for a valid activation earlier that day. There were contests and QSO parties on the bands so lots of signals–but more than once on the phone portion of the 40 meter band, I could hear two stations calling CQ on the same frequency and trying to work the same stations totally unaware of each other. Not a good day to play radio in the field and was starting to wonder if I could even snag my needed ten contacts.
Turns out, I had nothing to fear.
Since I could, quite literally, pick any band the KX2 could transmit on, I was able to float across the HF spectrum, call CQ, and the RBN would make sure I was spotted properly to the POTA network.
Getting that first ten is a great feeling!
I pretty effortlessly snagged my ten, and then a number to boot.
When I seek a spot to set up in a national forest, I often look for forest service roads with locked gates. When I set up on an unused road, it typically means I’ll have a high branch to hang the antenna and also a little space to deploy it without touching other trees. Our spot on Saturday was ideal.
Again, hanging and deploying the Emcomm III was effortless. I did bring about 12 feet of paracord with me this time allowing me to tie off the end of the radiator if I chose the “V” shape.
Monday, September 21: Mitchell River Game Land (K-6926) & Stone Mountain State Park (K-2754)
Monday was another stunning weather day.
I decided I wanted to finally make a pilgrimage to an ATNO (All Time New One) POTA site I’d been eyeing for a few months: Mitchell River Game Land.
Because propagation was fickle and this site was a good 3 hour round trip from where I was staying with family, I planned to use the Mission RGO One and run 40-50 watts or so.
However, when I got to the site, I realized I’d left the RGO One’s power cable at home. Fortunately, I still had my Elecraft KX2, so 10 watts would have to do.
I found a large parking pull-off area surrounded by trees. There was a ton of room to deploy the Emcomm III.
I decided to extend the radiator in a sloping configuration and elevate the 25 foot counterpoise.
The configuration was Identical to the one above , but the balun/center winder and counterpoise were suspended about 4 feet off the ground.
I fired up the KX2 and started calling CQ on 80 meters. The RBN picked me up and the POTA site auto spotted me. In a couple of minutes, I snagged my first three stations, then I heard no other calls, so moved up to 40 meters where I worked a big pile-up of stations. It felt like a mini-DXpedition at times. I loved it!
I even hopped on the phone portion of the 40 meter band and worked a few stations, getting respectable signal reports despite unstable propagation.
This activation went so well and the weather was so ideal, I decided to fit in another park that was only a 30 minute drive and was new to me: Stone Mountain State Park.
The thirty minute drive was relaxing and reminded me how much I enjoy this portion of the NC foothills leading up to the Blue Ridge Parkway and escarpment.
By the time I reached the park it was 1:30 pm on a Monday and I essentially had the place to myself (even though in my head I was preparing for crowds).
I had my pick of picnic spots so I found the one with the highest branches. One shot with the arborist throw line and I snagged a branch that must have been 45-50 feet high.
I first deployed the Emcomm III by simply running the radiator over a tree branch and laying the counterpoise on the ground–much like I did in the first Emcomm III activation and deployment.
I started calling CQ and worked about 4 stations, then nothing. The bands simply died on me!
After 30 minutes, I reconfigured the Emcomm III into a similar “V” shape I used at Pisgah National Forest with the apex at about 40 ft and the center winder and counterpoise elevated about 3 feet.
After some persistence, I finished off my ten contacts and then packed up–I spent about 70 minutes on the air and needed to grab lunch!
I honestly believe I would have found this activation even more challenging if I didn’t have an antenna that could snag stations on the 80 meter band since it was in the best shape that afternoon.
Again, I was very impressed with how easy it was to reconfigure the Emcomm III.
Tuesday, September 22: Tuttle Educational State Forest (K-2754)
After staying two nights with my parents in the Piedmont of North Carolina, I made my way back home to the mountains Tuesday afternoon. Again, the weather lured me back out to make just one more activation! (Let’s face it: the weather is a bit of an excuse).
One of my favorite parks that’s only a 20 minute detour off my path is Tuttle Educational Forest. It’s never busy there and they have a large picnic area with ideal trees for hanging antennas.
After searching through my main field pack (a Red Oxx C-Ruck), I found a spare power cord that would work with the Mission RGO One transceiver.
I didn’t have a microphone, though. That’s okay: it would be a CW-only activation.
Although I had the park to myself, I didn’t want to take up a large portion of the picnic area by deploying the Emcomm III in a sloping configuration similar to my activation at Mitchell River. I decided, instead, to be space efficient and use the “V” configuration once again with the apex at about 35 feet and the counterpoise on the ground. By doing this, the antenna footprint could almost fit within my picnic table area (although my counterpoise did snake into the woods).
I can’t remember how long I was on the air, but I do remember it was a breeze logging contacts that afternoon. Very enjoyable. I do love the Mission RGO One–the receiver is amazingly quiet, sensitive, selective, and signals simply pop out of the ether. It also sports silky-smooth QSK. Again, although I’m 90-95% a QRPer, it’s nice to push the juice a bit when propagation isn’t kind. The RGO One will push 55 watts.
The Mission RGO One ATU also snags excellent SWR matches across the band with the Emcomm III.
Emcomm III initial impressions
This past week, I gained some serious respect for the Emcomm III.
What impresses me most is its versatility and robust quality.
Don’t get me wrong: it’s not a magic antenna or anything. It’s essentially a random wire antenna.
What makes it such a fabulous field antenna, though, is its configurability. That and its uncompromised military-grade construction.
I shouldn’t have been so concerned about the radiator length as it’s actually pretty easy to accommodate and helps make this an efficient antenna on the low bands. (Look for me activating parks on 160 meters this winter!)
I believe I can deploy the Emcomm III anytime I have a half-decent tree nearby. I believe I could also use my 31′ Jackite fiberglass pole to extend one end or even the middle of the antenna if I wanted to go NVIS, but I would have to be careful to accommodate strain relief since the Emcomm III Portable is made of heavier materials than my EFT Trail-friendly antenna, for example.
I’m not sure I’d ever reach for the Emcomm III for a SOTA activation when I’d need to take a close look at weight and size. But for POTA? It’s brilliant. And, of course, for emergency communications (as the model name implies). The Emcomm III would also be an excellent addition to a radio club’s antenna arsenal.
The Emcomm III, like all Chameleon products, is designed and made in the USA. Since they use military-grade components, you pay a premium. The Emcomm III is one of their least expensive products at $139 US. Is it worth the price? Absolutely. In fact, I’m thinking about buying a second one to keep in my camper.
Thank you, Chameleon Antenna, for sending me the Emcomm III Portable for a proper field evaluation. I’d also like to thank Chameleon Antenna for agreeing to be a sponsor of QRPer.com!
Note: the following post originally appeared on our sister site, the SWLing Post.
The Par EndFedz EFT-MTR triband (40/30/20M) antenna
In July, I purchased a tiny QRP transceiver I’ve always wanted: the LnR Precision MTR-3B. It’s a genius, purpose-built little radio and a lot of fun to operate in the field.
It’s also rather bare-bones, only including a specific feature set built around ultra-portable CW operation.
While the MTR-3B has features like CW memory keying, a wide operating voltage (6-12 VDC), extremely low operating current (20 ma in receive), real-time 24 hour clock, and a full compliment of keying adjustments, it lacks other features like a volume control, SWR meter, speaker, and built-in antenna tuner.
Some of those may seem like big omissions but SOTA and POTA activators who like extremely lightweight/portable gear love the MTR-3B for being so purpose-built.
The MTR-3B (and its predecessors) operate on three bands: 40, 30, and 20 meters. These are, without a doubt, my favorite bands when operating portable since antenna lengths are reasonable.
Since the MTR-3B doesn’t have an internal ATU, you need to pack an external tuner or, better yet, a resonant antenna–ideally, one that can be used on all three bands.
Although many of my portable transceivers have built-in ATUs, I rarely use them because I primarily operate with resonant antennas. Resonant antennas are more efficient–giving you the maximum mileage per watt. In addition, they’re also more simple: connect them to the rig and hop on the air. No tuner or tuning required.
The EFT Trail-Friendly antenna is incredibly compact and quite easy to deploy.
I’ve mentioned in previous posts that I’m a big fan of the Par EndFedz Trail-friendly EFT tri-band antenna (above) which is resonant on 40, 20, and 10 meters. I’ve activated well over 130 parks with this little antenna.
After I took delivery of the MTR-3B, I borrowed the Trail-friendly EFT antenna from my KX2 field kit. It worked well on 40 and 20 meters, but it doesn’t cover the 30 meter band. Also, by borrowing the EFT from the KX2 kit, I broke one of my rules: never borrow from one field kit to feed another. This led to me leaving the EFT hanging in a tree at a remote park and returning a week later–a three hour round-trip(!!!)–to retrieve it. (FYI, in all fairness, I also blamed my trusty canine companion for this mishap!)
I was very pleased with this decision as I’m guessing LnR Precision wanted to hand off antenna production so they could focus on the very popular Mountain Topper transceiver line.
Vibroplex is owned by my buddy, Scott Robbins (W4PA), who is not only a successful entrepreneur, but also an award-winning contester and DXer. I’ve known Scott for years and knew he’d not only be a great steward of the Par product line, but also push new innovations.
I emailed Scott asking if Vibroplex had a field-portable antenna that would be resonant on 40, 30, and 20 meters. Turns out, there’s a Par antenna designed specifically to pair with the MTR-3 series transceivers: the Par EndFedz EFT-MTR.
The new EndFedz ® EFT-MTR is a 40m/30m/20m tri-band QRP antenna rated up to 25 watts. The “MTR” name was selected as LNR Precision developed this antenna to be the perfect companion to the wildly popular 40/30/20m Mountain Topper QRP transceiver. The EFT-MTR’s total length is 65′ of 22 AWG polystealth wire and weighs less than 4 ounces! It is built with the same high level of workmanship and quality that you have come to expect with all EndFedz ® antennas.
A particular innovation on this antenna: This EndFedz is a little different than previous designs. The user has the option to remove an SMA connector at the end of the 30M resonator to enable just 30 meters, or keep the SMA installed for 40 and 20 meters. Because of the broad bandwidth of the antenna, it is unlikely that it will require tuning in the vast majority of deployments. This is particularly true of 30 meters where the band is very narrow. As our tagline states, “They Just Work!”
Included with the EFT-MTR is the EndFedz Antenna Winder. Conveniently allowing winding up the antenna line to not have a tangled mess at the end. The winder will hold both the antenna and 25 feet of RG-174U coaxial cable (optional accessory).
Scott offered to send me an EFT-MTR to evaluate in the field (disclaimer: at no cost to me) and I accepted without hesitation, of course!
An EFT-MTR field review
I’ve taken the EFT-MTR antenna to three park activations at this point and have formed some opinions about it.
The EFT-MTR fits perfectly in a slide-in pocket in the main compartment of the Boot Boss.
First of all, I couldn’t be more pleased with the size as it fits perfectly in my MTR-3B field kit built around my Red Oxx Booty Boss pack.
I really like the built-in antenna winder: it’s larger than that of the EFT Trail-Friendly, but also much easier to wind up and manage post-activation.
I’ll admit, the length of the EFT-MTR was a bit surprising the first time I deployed it: 65 feet. Keep in mind, though, I had been used to a much shorter 41 foot radiator on the EFT Trail-friendly. Occasionally, I operate in spots where I simply don’t have the room to deploy a long antenna. I also worried that the EFT-MTR resonance might be negatively affected by winding its way through trees and over a branches. The MTR-3B transceiver does not like high SWR values and has no built-in SWR meter to monitor it. Last thing I wanted to do was harm the MTR finals.
You might be able to spot the feed point of the EFT-MTR at my activation of K-6952 this week.
Fortunately, winding its way through trees doesn’t seem to have a significant impact on SWR.
Each time I’ve taken the EFT-MTR to the field, I’ve also taken my KX2 which I’ve used to read the antenna’s SWR value. So far, the difference has only been negligible and SWR well within the tolerances of the MTR-3B. Score!
I should note here that since I’ve started using an arborist throw line, I’m also able to hang antennas much higher than I could before. This has had a huge impact on all of my field activities.
Removing the SMA cap changes the EFT-MTR from a 40/20 to a 30 meter resonant antenna.
To be resonant on 40, 20 and 30 meters, the EFT-MTR requires a field modification. On the coil about 2/3 the way up the antenna, there’s an SMA connector with a small screw on cap (see above). When the cap is on (thus completing the connection) the antenna is resonant on 40 and 20 meters. You must remove the cap for it to be resonant on 30 meters.
Since I’ve been using the EFT-MTR, I start an activation on 40 meters (which is typically my most productive band), then move to 20 meters (typically, my least productive). If I have the time, or need the extra contacts to confirm a valid activation, I lower the antenna, unscrew the SMA cap, and raise the antenna again.
I thought at first this would be a major pain, but it hasn’t. Now that I’m using an arborist throw line, it’s super easy to lower and raise antennas. But even when I’ve used fishing line, it really hasn’t been an issue.
The only issue I see is I’m afraid I’m going to lose that little SMA cap in the field. To prevent this, I’ve made it a routine to immediately put it in the internal zippered compartment of the Booty Boss pack. I might find a source for those caps, though, just in case I still lose this one.
I’ve been very pleased with the EFT-MTR’s performance. I’m guessing it’s actually higher gain than my beloved EFT Trail-Friendly antenna. On my last activation with the EFT-MTR, I knocked out eight 40 meter contacts in about eight minutes during a period of poor propagation. Note that the MTR-3B was only pushing 3 or 4 watts of power.
I then moved to 20 meters where, frankly, propagation was so crappy I didn’t hang out there long. Instead, I lowered the antenna, removed the SMA cap, and started calling on 30 meters. Within a few minutes, I racked up the rest of my contacts.
I was very pleased with how quickly the Reverse Beacon Network picked up my CQs and was thus auto-spotted on the POTA website.
Conclusion?
If you own a Mountain Topper MTR-3 series transceiver, I highly recommend the EFT-MTR antenna. As with my EFT Trail-friendly and Par sloper, the quality is top-shelf. I expect the EFT-MTR will last even longer than the EFT Trail-friendly since the winder is so accommodating and the in-line coil is designed so that it doesn’t snag on branches as easily.
I’m looking forward to much more field fun with the MTR-3B and EFT-MTR combo!
Over at our other radio blog, the SWLing Post, I’ve been publishing reports and videos of the lab599 Discovery TX-500 general coverage QRP transceiver. If you haven’t been following those posts, you might like to check out the following articles in particular:
I received my Mountain Topper MTR-3B last week, and I’ve already taken it on a POTA activation.
Last weekend, I decided to break it in on a POTA “two-fer” site: Hampton Creek Cove State Natural Area (K-6246) and The Overmountain Victory Trail (K-4577) in Tennessee. Hampton Creek Cove was actually an ATNO (all time new one) so it was a trial by fire!
In short, the MTR-3B was marvelous. I’m so impressed.
As I mentioned in a previous post, I’m building a full SOTA/POTA activation kit for the MTR-3B. I already have a kit built around my KX2 and I don’t want to “borrow” any items from it (so I’m not surprised later in the field when an item is missing).
The TalentCell Rechargeable 12V 3000mAh Lithium Ion Battery Pack is the little black box.
I also used my Whiterook paddle (which needs new paddle arms at this point) but that will soon be replaced with a set of N0SA portable paddles I recently ordered.
Since the MTR-3B has no volume control, I used a pair of 20 year old Sennheiser earphones I bought when I lived in Munich. These have been in a drawer for ages because I now prefer using in-ear earphones with silicon earpieces for better comfort and sound isolation. But the Sennheisers have one thing none of my other earphones sport: in-line volume control.
While the earphones worked well for this activation, I’d still prefer a set of in-ear earphones with in-line volume control. Any suggestions from MTR-3B owners? Also, I’d like a compact amplified speaker with volume control to carry as an option when needed. If you can recommend one, please comment!
I’m writing an article for The Spectrum Monitor magazine about portable power later this year. I noticed that a number of MTR-3B owners swear by 11V rechargeable cells that are used in the RC and drone markets. Many have a similar compact form-factor as the common 9V battery. I understand, however, some of these cells need special chargers and equipment to balance them.
I would appreciate any and all information about these batteries.
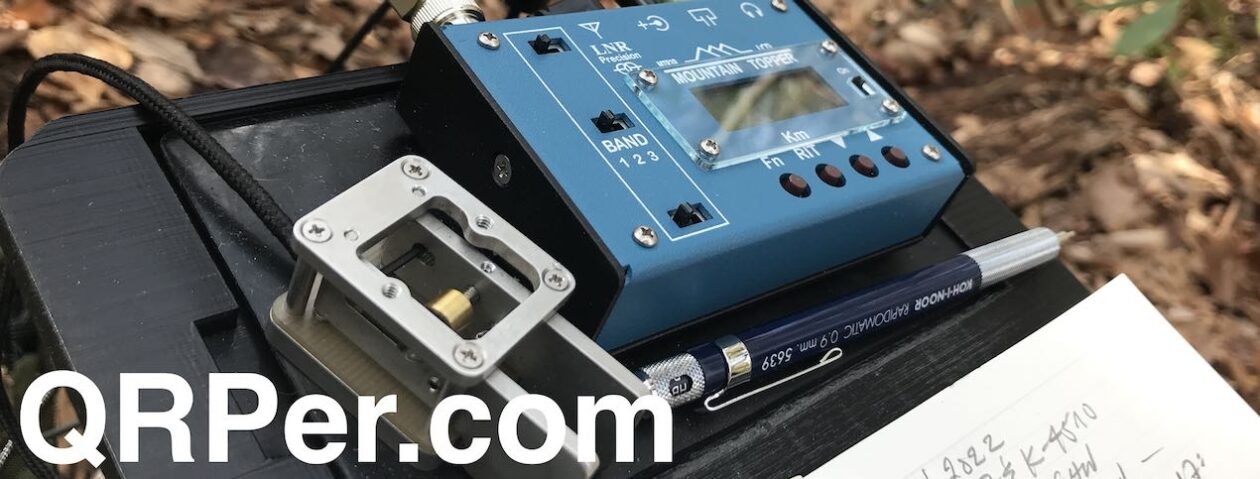
In the meantime, Rich (N8TGQ), recently shared a pic of his Mountain Topper portable pack. Check it out:
I think it’s brilliant how he’s mounted everything on a compact plastic cutting board inside the case. Rich says that what he loves about this set-up is that everything is there, ready to go–simply plug in the antenna!
I love seeing how others build out their field kits! Please comment or contact me if you’d like to share yours here on QRPer.com!
Many thanks to Valery Titievsky (UA9OTW) who writes:
Perhaps it will be interesting to SWLing Post subscribers. A short video for those wishing to improve their skills in Morse code. Poem by George Byron “Prometheus».
The channel also has lessons in studying Morse code and a few videos with my SWL on shortwaves of various radio broadcasting, weather and other service and number stations.
When I practice my CW skills, I do like listening to real content like this instead of randomly-generated characters. One reason is you start to recognize the sound of common words (like “the” “an” “and” “is” etc).
QRP radios, product announcements, reviews, news and more. Low power amateur radio fun!
Please support QRPer by adding us to your whitelist in your ad blocker. Ads are what helps us stay online. All of our ads are ham radio related--no junk, we promise! Thank you!
 Many thanks to Eric (WD8RIF) who writes:


