I have been a fan of QRP operating since I got licensed in 1983. The sticker in the picture is a joke a good friend who is not into CW or QRP, so I include it in my field pictures.
My interest in ham radio had reached a point I was getting away from the hobby. In 2020, I learned about Parks on the Air (POTA) and Summits on the Air (SOTA). I got hooked on activating parks and summits, and now I mostly do QRP CW, much like Thomas Witherspoon, K4SWL does.
Over the past year, I’ve been refining my antennas and radios in the field. I have different radios and antennas for different reasons, and to just mix it up a bit. Occasionally, I will take my IC-7100 or IC-7300 out into the field with my Bioenno 20aH battery, if I’m not planning to hike or go far from the parking lot, or if the bands are just not cooperating.
Back in November 2020 I had my left knee replaced so I had lots of down time and made an important purchase for field activities – an IC-705. It is fantastic and does everything I want it to do without a lot of wires. I’ve also owned and sold within the past 18 months a Yaesu FT-891 (which I sold when I got the IC-705) and had both the Xiegu G90 and X5105. I would expect one day to get another FT-891 as it has amazing filtering and pulls in weak CW signals better than any radio I’ve owned. The G90 and X5105 are okay, however I was not impressed with the G90 from the start for out in the field. There were just too many wires in order to set up and use with my portable laptop computer if I was taking that along.
The X5105, which I had high expectations for, disappointed me in the fact that storing and using CW memory keying is not user friendly. The nice thing about that radio is, no microphone, no problem, I had some success using the 5105 and got great audio reports.
I’ve been looking ahead to my projected retirement and hopes of through hiking the Appalachian Trail in 2026. Although the IC-705 is an excellent field radio, all mode, VHF/UHF/D-Star/HF/6 meters, I already know for a 7 month hike from Georgia to Maine, it will just be too bulky in my backpack. I have heard really good things about the QCX-mini, however I’m an appliance operator and not good with kit building and soldering.
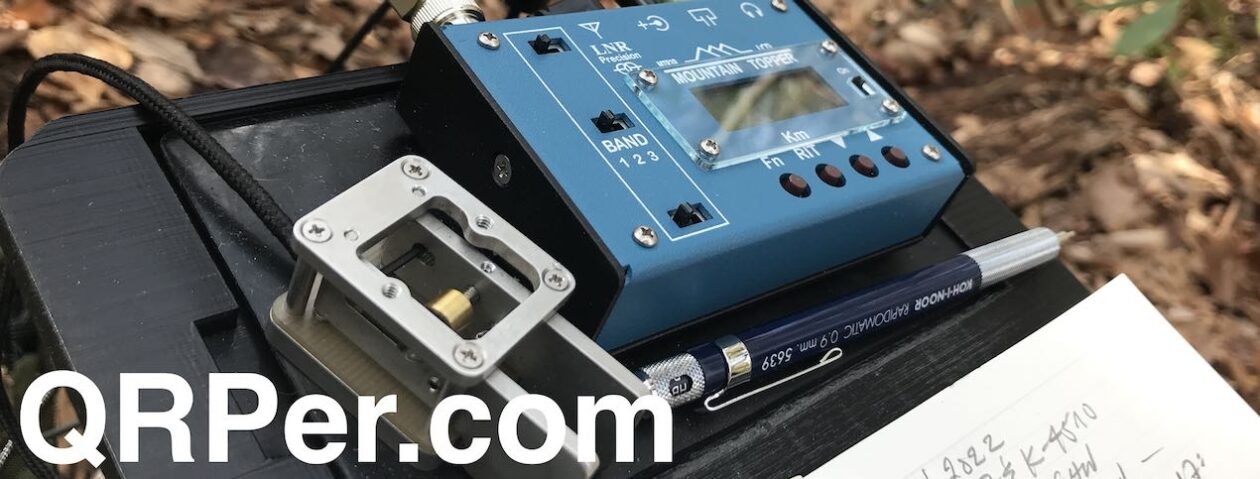
I saw there are options to purchase an assembled QCX-mini, so I decided to check out a 40 meter radio. It took about 2-1/2 weeks before it arrived at my QTH on Saturday afternoon. I hooked it up to one of my HF antennas in my yard used for my IC-7300 that was resonant on 40 meters. I had to use my Heil headset in order to hear the audio, plugged into the 3.5 mm jack. I used my CWMorse paddle and tuned around the band. I called CQ several times before finally I heard WA0USA in Palm Beach, FL calling CQ. I called him and got a 579 report and he was a solid 599. We chatted for about 10 minutes, and he was running a kW while I was using 5 watts. It felt good to know that I was being heard.
Sunday morning I had time to go activate a local park (K-1418) before some afternoon commitments. I had also recently purchased a link dipole for 20/30/40 meters off eBay from N9SAB. I had tested this antenna out a couple of times last week, so I wanted to pair it with the QCX-mini. I went with little expectations about the little mini, so I also packed my IC 705 just in case I needed it to complete my 10 contacts to have a successful activation. To my surprise, I spotted myself on the POTA page, and in 45 minutes I had a total of 26 QSOs in my HAMRS log! It was amazing and I think I found the perfect combination for true lightweight, portable operations.
I was so impressed with this activation that last night I ordered the 20 meter QCX-mini! These can be ordered from qrp-labs.com and they have a lot of other kits available as well. The kit itself is $55, and I opted to have it assembled ($45) and purchased the enclosure ($20).
This little radio is very user-friendly. I was able to easily access the menus, customize it to my liking, including the paddle, preset frequencies, several stored CW memories, and was on the air calling CQ Saturday evening without seeking out the instructions.
I had mentioned previously about my disappointment with the Xiegu X5105 and not being able to easily store and recall memories. Not a problem at all with this little radio. I enabled the decoder feature just to test it out, and it decodes better than the G90 or X5105, including very weak signals. The size is a fraction of the size of the X5105 and total weight for everything, including the Bioenno 12v 3aH battery is less than 2 pounds and it all stores very nice.
These quick videos were taken this evening before storms hit; that’s why you will hear lawnmowers in the background. I wanted to first show a demo of the receive decoder and how well it decodes even weaker signals:
My biggest complaint about the X5105 was how the memory was next to impossible to use. I do a quick demo how to access a stored message and send it over the air. I also have it set to repeat every 6 seconds:
I did make a couple of changes to the radio setup. I did not like having to use the headset, so I went on Amazon and purchased a mini portable 3 watt mobile phone speaker line-in speaker with 3.5mm audio interface (affiliate link). That cost under $15 and works extremely well. It has a built in charger that plugs into a micro-USB to charge the battery when not in use. I also have a cell phone holder that fits perfectly on my Neewer stand I purchased several months ago for my IC 705, and it sits nice and firm on the table. I may not take that to the field if I’m doing a lot of hiking.
Here are some other details about the QCX-mini from their website:
The Optional enclosure is black anodized extruded aluminium, very sturdy and elegant. The enclosure size is 95 x 63 x 25mm without protrusions. The top and side panels are drilled and cut to match the QCX-mini with laser-etched lettering. The enclosure includes four self-adhesive feet.
Special portable-friendly features:
Small size: 95 x 63 x 25mm enclosure (plus protusions)
Low current consumption (for example 58mA receive current, with 12V supply and display backlight off)
Low weight, 202 grams
Sturdy extruded aluminium enclousre
All-metal BNC short connector, bolted to enclosure
List of features:
Easy to build, two-board design, board with main circuit and connectors, display panel board with LCD; all-controls board-mounted on a press-out sub-board. No wiring, all controls and connectors are board-mounted
Professional quality double-sided, through-hole plated, silk-screen printed PCBs
Choice of single band, 80, 60, 40, 30, 20 or 17m
Approximately 3-5W CW output (depending on supply voltage)
High performance receiver with at least 50dB of unwanted sideband cancellation
200Hz CW filter with no ringing
Si5351A Synthesized VFO with rotary encoder tuning
16 x 2 yellow/green LCD screen
Iambic keyer or straight key option included in the firmware
Simple Digital Signal Processing assisted CW decoder, displayed real-time on-screen
On-screen S-meter
On-screen real time clock (not battery backed up)
Full or semi QSK operation using fast solid-state transmit/receive switching
Frequency presets, VFO A/B Split operation, RIT, configurable CW Offset
Configurable sidetone frequency and volume
Connectors: 2.1mm power barrel connector, 3.5mm keyer jack, 3.5mm stereo earphone jack, 3.5mm stereo jack for PTT, 3.5mm stereo jack for CAT control, BNC RF output
Built-in test signal generator and alignment tools to complete simple set-up adjustments
Built-in test equipment: voltmeter, RF power meter, frequency counter, signal generator
Beacon mode, supporting automatic CW, FSKCW or WSPR operation
GPS interface for reference frequency calibration and time-keeping (for WSPR beacon)
CAT control interface
Optional 50W PA kit
Optional aluminium extruded cut/drilled/laser-etched black anodized enclosure
Just a quick note on the link dipole. It is well made and I had a 1:1 SWR on the CW part of the band, which is perfect. I did put the IC 705 to work when I attempted to work a couple of SSB stations on POTA, and at 7.235 the SWR was only about 1.3:1, so minimal loss. Check out the N9SAB antennas on his eBay site. His shipping is very quick. I took a picture of the balun with the included choke in the package I purchased, and the second picture is the link between the 20 and 40 meters. It works great.
I mentioned my goal about hiking the Appalachian Trail in 2026. I’m sure there will be other multi band mini size radios available by then and I’m hopeful QCX will have one in 5 years for me to use. My goal is to activate summits along the way while taking breaks from the hiking, or at night before calling it an evening. Since I’ll be on the A.T. I’ll also have lots of opportunity to activate POTA as well. Most thru hikers are not hams and they are always concerned about no cell phone coverage. I won’t have that issue and I’m confident I’ll be able to be in touch with other hams throughout the journey.
Thank you once again Tom for allowing me to post on QRPer. I think I finally have a QRP radio that you have not tested or purchased yet. I hope your readers find this short article useful.
73
Scott – KN3A
Scott Lithgow (KN3A) is a regular contributor on QRPer.com. Click here to check out his previous posts.
Most of my on-air time is in the field. While I enjoy operating from the shack, I’ve discovered I especially enjoy operating in the great outdoors.
Besides being a fan of hiking, camping, and the great outdoors generally, I also am particularly fond of radio field gear. I like portable transceivers, portable antennas, battery packs, and all of the accessories that make field operation efficient and enjoyable.
I appreciate the emergency communications skills I’ve developed in the field, too. Should the need (or opportunity) arise, I now keep a complete field kit packed and ready to go at all times, and can even deploy all of it within just ten minutes. In my early days of ham radio operation, I might have easily spent thirty minutes setting the antenna, alone…especially on Field Day, with folks watching me struggle to untangle wires and cables, followed by the undoubtedly entertaining attempts I made to put a line into a tree to deploy the antenna. But after deploying a variety of antennas hundreds of times now, I find that––while I’m still not perfect––I finally have a bit of skill and the process of tossing up a line is becoming much swifter and smoother.
Confessions of a pack geek
The Red Oxx C-Ruck loaded and ready for the field!
If I’m being honest with myself, I admit: I also simply get a thrill out of kitting out my field packs, as well as organizing and tweaking them over time. Yes, (don’t judge me!) I actually like packing up my field gear.
I think my passion for organizing and packing gear goes back to a former career when I lived in the UK, Germany, and France, and was required to travel throughout Europe frequently. Originally inspired by travel guru Rick Steves, I’ve always appreciated the footloose feeling of having all of my travel gear in one lightweight pack. I don’t like checking in luggage, but love the freedom of grabbing my backpack and skipping the baggage claim carousels. And I also like knowing that, even though my gear is compact, it contains everything I need.
I’ve become something of a “less-is-more” traveller. Two years ago, for example, I traveled for one week using what Frontier Airlines classifies as a “personal carry-on.” My Tom Bihn Stowaway pack, which only measures 14.0″ (w) x 9.4″ (h) x 8.1″ (d), carried everything I needed for a conference, including my own presentation gear.
My Tom Bihn Stowaway personal carry on convertible pack with everything I needed for a one week trip including a conference.
Packing for that trip was great fun as it really challenged me to decide what was essential and what was not. My iPad doubled a computing and presentation device, for example, but I also packed a small flashlight and a mini first aid kit, which I felt were important. Of course, I also carried a small portable Shortwave/AM/FM radio and my Yaesu VX-3R handheld…also vital, as I can’t leave home without radios!
Getting started with a field kit
Putting together a field radio kit is so similar to packing for travel: you must first do an assessment of what you need, starting with the basics––then organize it, pack it, and test it.
In my world, this is a very deep topic. We’re going to break down this topic into two parts.
This article, Part 1, we’ll dive in:
first, going over the obvious components of a basic field radio kit;
second, discussing the benefits of going low-power (QRP) if that appeals
In Part 2, we will:
look at variations of kits based on activity, and finally
review what I consider the “golden rules” of a good field radio kit
The basics of a field radio kit
First, let’s go over the basics of your field kit, considering that that these primary components will dictate your bag, pack, or case size.
A transceiver
The lab599 Discovery TX-500
Since I’m a bit radio obsessed, I have a number of QRP transceivers I like to take to the field. But if you have selected one transceiver you plan to dedicate to field work, or simply have only one transceiver, period, you can build a kit around it (and see my note below about “modular” kits). If budget allows, you might consider buying a radio specifically for field use, so it can always be packed and ready to go.
There are a number of transceivers on the market that are designed with field use in mind. Some are compact, power-stingy CW-only QRP transceivers that might only operate on three ham radio bands, while others are 100-watt general coverage transceivers that even have built-in antenna tuners––there’s a wide range of options.
Look for field-friendly, built-in options like:
CW and voice-memory keying;
SWR and power meter readings;
a battery voltage indicator;
low current consumption;
the ability to lower power to at least one watt;
an internal battery option; and
an internal antenna tuner option
And the more such options are already built into your field rig, obviously, the less separate accessories you’ll need to pack and keep track of in the field, which is a good thing.
The Elecraft KX2 has a built-in ATU, battery pack, and even attachable CW paddles!
Some of my favorite field-ready general-coverage transceivers currently in production are:
The Elecraft KX2 A full-featured, inclusive, and compact 80-10 meter transceiver that’s truly a “Swiss-army knife” of field operation (see November 2016 TSM review)
The Elecraft KX3 Benchmark performance, wide array of features, and compact design
The lab599 Discovery TX-500 Military-grade engineering, weatherproof, spectrum display, and benchmark current consumption for a general-coverage radio (see October 2020 TSM review)
Mission RGO One Top-notch performance, 50-watts out, and excellent audio (see November 2020 TSM review)
The Yaesu FT-817/818 Rugged chassis, 160-6 meters, VHF and UHF multi-mode, both BNC and PL-259 antenna inputs
The Xiegu X5105 Affordable, 160-6 meters, 5 watts output, built-in ATU, and built in rechargeable batttey
The Xiegu G90 Affordable, relatively compact rig with built-in ATU, color screen with spectrum/watefall, good audio, and 20 watts of output power (see August 2020 TSM review)
The Icom IC-705 Benchmark performance, a multitude of features, exchangeable battery packs, 160-6 meters, VHF and UHF multi-mode, D-Star, GPS, WiFi, Bluetooth (see February 2021 TSM review)
The Yaesu FT-891: Affordable relatively compact radio with detachable faceplate, 100 watts output, and excellent audio (see November 2017 TSM review)
An important side note for field contests: if you plan to use a field transceiver in an event like the ARRL Field Day and/or another popular radio contest, make sure you choose a transceiver that can handle tightly spaced signals in an RF-dense environment. This is not the time to pull out a lower-end radio with poor receiver specifications. Use Rob Sherwood’s receiver test data table as a guide.
An antenna––and a means to deploy/support it
The CHA LEFS sloper
This particular topic, alone, might warrant a three-part series of articles. So, to keep the scope of this article realistic, let’s just say that you should build or buy an antenna that can comfortably handle the wattage you’re pushing into itin all the modes that you operate, considering that some 100-watt SSB-rated antennas might melt or arc if you run 100 watts CW or FT8.
I would suggest you consider having at least one resonant antenna, like an end-fed half-wave (EFHW) that might cover 40 and 20 meters without the need of an antenna tuner to match the antenna impedance to your rig.
Some of my favorite portable antenna systems?
I’m a big fan of Chameleon Antennafor their ease of deployment and benchmark build quality. Their prices range from $145 for the Emcomm III random wire, to $550 for their MPAS 2.0 vertical antenna system. These prices are near the top of the market, but Chameleon antennas are all machined and produced in the US and the quality is second to none. These are antennas you might well pass along to the next generation, meaning, really heirloom-worthy kit!
The PackTenna 9:1 UNUN
PackTennas, likewise, are pricey for such a compact product, but they are also beautifully engineered, lightweight, and designed for heavy field use. PackTenna produces an EFHW, 9:1 UNUN random wire, and linked dipole models. They’re some of the most compact field antennas on the market that can still handle as much as 100 watts of power output.
My Wolf River Coils “TIA” vertical antenna
Wolf River Coils verticals are affordable, compact, and resonant––thus an ATU isn’t needed. It will take some time to learn how to adjust the coil during frequency changes, but they work amazingly well. I have the WRC Take It Along (TIA). Their antennas are designed to handle 100 watts SSB, 50 watts CW, or 20 watts digital.
The EFT Trail-Friendly
Vibroplexsells a number of compact field portable antennas and is the manufacturer of Par End Fedz offerings. I’m very fond of the EFT Trail-Friendly and the EFT-MTR.
The MFJ-1984LP EFHW packs a lot of performance for the price
MFJ Enterprisesalso has a few portable antennas in their catalog, and it’s very difficult to beat the price and performance of their antenna gear. I have their $50 EFHW antenna (the MFJ-1982LP) and love it.
The Elecraft AX1 attaches directly to the BNC port on the KX3 and KX2.
I’ve also had tremendous fun with the uber-compact Elecraft AX1 antenna. Unquestionably, it’s the most compact and quickest-to-deploy antenna I own. It’s designed to pair with the Elecraft KX2 and KX3 using the optional internal antenna tuner.
There are a number of other antenna manufacturers who cater to portable operators. For example––although I’ve not yet had the opportunity of testing their antennas––SOTAbeams is highly regarded among SOTA enthusiasts.
Short on cash? No worries; you can build your own! In fact, until 2016, I had never purchased a field antenna; I built all my own. EFHW antennas and random-wire antennas are no more than a carefully-wound coil, a female antenna connector, an enclosure or mounting plate, and some wire. Some of the most active field operators I know homebrew all of their antennas. It’s easy, affordable, and fun!
Make sure you choose a battery that is sized appropriately for your transceiver power output. I will say that I’m a huge fan of LiFePo4 rechargeable batteries for their voltage range, lightweight design, and longevity. Being primarily a QRPer, I typically use 3 to 4.5 amp hour batteries as they’ll carry me through as many as three or four activations without needing to be recharged. For longer field deployments, or when I’m powering my 100W KXPA100 amplifier, I’ll use my 15 aH Bioenno LiFePo4 pack.
I use my 15Ah Bioenno LiFePo4 pack for QRO transceivers
It should go without saying that you need to pack these, but I have gone to the field with operators who forgot their key or mic and asked if I had a spare.
Keys are fairly universal, but keep in mind legacy transceivers often want a ¼” plug while newer rigs typically accept an ⅛” plug. Microphones, however, vary in port type and pin configuration based on the manufacturer and model. You could damage your mic or rig if you plug in a multi-pin mic that was designed for a different transceiver. Most mics that use a ⅛” plug are universal. Still, check before you plug it in if using an after-market or non-OEM mic.
Of course, choose a key, microphone, or boom headset that’s compact and rugged so that’ll be easy to pack and will stand the test of time.
I also always pack a set of inexpensive in-ear earphones. These can dramatically help with weak-signal interpretation.
Also, if you plan to operate a digital mode, you’ll likely need some sort of computing device. Even though I rarely operate digital modes in the field, I often pack my Microsoft Surface Go tablet in case I change my mind.
My Microsoft Surface Go tablet
In addition, I like logging directly to N3FJP’s Amateur Contact Log application directly in the field to save time submitting my logs later. Soon, I’ll be using the new HAMRS field log on my iPhone.
Speaking of logging…
A means of logging
I like compact notepads like Muji and Rite In The Rain for field use.
As simple as it is, it’s very important to take at least some paper and a pencil for logging your contacts. I like using small, pocket-sized Muji notebooks (affiliate link) for logging, and if the weather is even a little questionable, I’m a huge fan of getting my contacts down in Rite In The Rain mini notebooks (affiliate link) or notepads using a good old-fashioned pencil.
I like logging to paper and sometimes simultaneously logging to my Microsoft Surface Go. I have completed phone-only field activations where I only logged to my Surface Go tablet: in those cases, I snap a photo of my N3FJP call log, just in case something happens to my tablet between the field and the shack! Having endured enough technology failures, it gives me peace of mind to have at least one other backup.
Keep in mind that when you’re activating a park or summit, the folks calling you are relying on you to submit your logs to the appropriate programs so that they can get credit for working you. Many times, this might also help their awards for a state, county, or grid square. Always submit your logs after an activation even if you didn’t make enough contacts to validate the activation (POTA requires 10 contacts, SOTA requires 4 logged). It helps other folks out.
A pack or case
If you have a field radio kit, you’re going to need a means to organize and contain it for transport. There are at least three types of systems used for field kits.
A backpack or soft-sided case
My GoRuck BulletRuck is a brilliant SOTA pack
Since I enjoy the option of hiking with my radio gear, I love using backpacks. Although I’ll speak to this more next month in “Part 2,”, I choose quality packs that have at least one waterproof compartment and are comfortable to carry on long hikes. I also try to look for packs with Molle or some sort of external strapping so that I can attach portable antenna masts or even my hiking poles to the exterior of the pack.
A waterproof case or flight case
Ruggedized, weatherproof cases come in all sizes. This Pelican 1060 can house my entire KX1 radio kit.
Many field operators who want extra protection for their gear––especially when they don’t plan to hike or carry their gear long distances to the operating site––like hard-sided cases. I have built field radio kits in waterproof Pelican cases and appreciate knowing that I could drop my kit in a whitewater river, and it would likely survive the adventure unscathed. If you are one of these operators, look for quality watertight cases from brands like Pelican and Nanuk with interiors lined in pick foam padding that allows you to perfectly accommodate and safely protect your radio and accessories.
Portable ready-to-deploy cases
Although this option is almost outside the scope of this article, many emergency communications enthusiasts love having their gear loaded in rugged, portable––often rack-mounted and hard-sided––cases that they can simply open, hook to an antenna, and get right on the air. These systems are often the heaviest, least “portable,” and less suited for long distance hikes, but they’re often completely self-contained, with all of the components, including the power, hooked up and ready to go on a moment’s notice. While a system like this would be impractical for many Summits On The Air sites, it could be ideal for a park or island activation where you’re never that far from your vehicle.
Optional: Antenna cable
An ABR Industries RG-316 cable assembly
This doesn’t sound like an option, but it’s true. I’ve often operated my Elecraft KX3, KX2, and KX1 without a feedline at all: I simply attached two wires to a BNC binding post, and connected that to the radio. It makes for a super-compact setup.
Even an 8-12 foot feedline can make it easier to configure your operating position in the field. If you want to keep the feedline as low-profile as possible, especially if you’re operating QRP, consider investing in a quality RG-316 feedline terminated with the connector that fits your radio and antenna.
Optional: Antenna Tuner/Transmatch
A portable ATU with RF-sensing like the Elecraft T1 will give you an amazing amount of frequency agility. I’ve been known to use the T1 to tune my CHA Emcomm III random wire antenna on 160 meters..
Again, this topic could easily warrant a multi-part series of articles, but I’ll sum this one up in a nutshell: while I love (and even prefer) using resonant antennas that require no antenna tuner, I almost always carry a radio with a built-in ATU or an external portable ATU like the Elecraft T1 or ZM-2.
Why? Because an ATU will give you a certain amount of frequency agility or freedom. If I’m using an antenna that’s resonant on 40, 20, and 10 meters, but there’s a contest that day and the bands are incredibly crowded, I might use the ATU to find a match on 30 meters or 17 meters, thus finding a little refuge and space to operate. Also, sometimes antenna deployments aren’t ideal––due, for example, to site limitations such as dense vegetation that may alter the antenna deployment and thus its resonance. An ATU can at least keep your transceiver happy with the SWR when your resonant antenna might not be perfectly resonant.
But the main reason I carry it? A portable ATU gives you operational flexibility.
QRP or QRO?
I have operated QRO in the field with my KXPA100 amplifier on Field Day.
Its good to keep in mind that many of the station accessories listed above need to be matched to the output power of your transceiver and modes you use.
Many ham radio friendships have been placed in jeopardy over the question of either using QRP (low power) or QRO (high power) for field operations. This is a shame. Some operators have very strong opinions, but the truth is, there is no right or wrong answer.
In the spirit of full disclosure, I operate 97% of the time at QRP power levels––in my world, this means five watts or less. Personally, I enjoy the challenge of low-power operating. But I also appreciate the portability QRP gear offers.
The wee Mountain Topper MTR-3B
Speaking pragmatically––and this fact really isn’t open to debate––QRP and lower-power transceivers and accessories tend to be more efficient, more compact, and lighter than their higher-power siblings.
Most of my QRP transceivers weigh anywhere from two to five times less than their 100-watt equivalents. If you’re operating mobile (from a vehicle or camper/caravan, for example), an eight to twelve pound difference might not be a big deal. But the moment you’re hiking several miles to a mountain summit, weight becomes an important factor.
QRP transceivers have modest power requirements: everything from battery, to antenna, and even to tuners, are smaller, lighter, and more compact.
When operating QRP, you don’t have to worry as much about RF coming back to the radio from, say, an end-fed antenna. If I’m pushing over 20 watts into an end-fed half wave or end-fed random wire, I’ll likely want an in-line RF choke to keep some of that energy from affecting my transceiver or giving me an RF “tingle” when I touch the radio chassis or my key. Too much RF coming back to the transceiver can also affect things like electronic CW keying. But at five watts? I don’t worry. This is almost a non-issue, unless your transceiver happens to be very RF-sensitive indeed.
And even though I’m predominantly a QRPer, I definitely do pack radios like the 50-watt Mission RGO One and occasionally my Elecraft KX3 and KXPA100 100-watt amplifier, especially for an event like Field Day where my club is operating at higher power. I simply size up my gear appropriately. Again, this is especially important with your antenna, feed line, ATU, and battery selections.
If you primarily activate parks and are never far from your vehicle, it’s quite easy to accommodate a 100 watt transceiver like an FT-891, for example. Of course, if you wish to operate low-power and save your battery, simply turn down the output power. If you plan to hike a lot with your gear, then get your mind around QRP!
Stay tuned for Part 2!
In Part 2 we’ll dig into some of the details, looking at different approaches to field radio kits and some guidance and suggestions based on my real-life experience (read: operating mistakes).
On a gray Friday afternoon last spring, Steve Galchutt sat high atop Chief Mountain, an 11,700-foot peak along Colorado’s Front Range. An epic panorama of pristine alpine landscape stretched in almost every direction, with Pikes Peak standing off to the south and Mount Evan towering just to the west.
It was an arresting view, and the perfect backdrop for a summit selfie. But instead of reaching for his smartphone, Galchutt was absorbed by another device: a portable transceiver. Sitting on a small patch of rock and snow, his head bent down and cocked to one side, he listened as it sent out a steady stream of staticky beeps: dah-dah-di-dah dah di-di-di-dit. “This is Scotty in Philadelphia,” Galchutt said, translating the Morse code. Then, tapping at two silver paddles attached to the side of the radio, he sent his own message, first with some details about his location, then his call sign, WG0AT.
At this point, a prying hiker could have been forgiven for wondering what, exactly, Galchutt was doing. But his answer—an enthusiastic “amateur radio, of course!”—would likely only have further compounded their confusion. After all, the popular image of an amateur-radio enthusiast is an aging, armchair-bound recluse, not some crampon-clad adventurer. And their natural habitat is usually a basement, or “ham shack,” not a windswept peak in the middle of the Rockies.
Galchutt fits part of this stereotype—he’s 75—but the similarities end there. An avid hiker and camper, his preferred shack is atop a mountain, and the higher the summit, the better.
Another rapid-fire burst of dits and dahs sprung from the radio. “Wow!” Galchutt said, “Spain!”
Nearby sat Brad Bylund (call sign WA6MM) and Bob and Joyce Witte (K0NR and K0JJW, respectively). Together, the four are part of a group called Summits on the Air (SOTA), an international, radio version of high pointing. […]
Ham Radio Forms a Planet-Sized Space Weather Sensor Network
For researchers who monitor the effects of solar activity on Earth’s atmosphere, telecommunications, and electrical utilities, amateur radio signals a golden age of crowdsourced science.
Space weather events, triggered by solar emissions and their interactions with Earth’s atmosphere, can have significant effects on communications and navigation technology and on electric power systems. As with terrestrial weather events, the economic impacts of space weather–related disruptions can be substantial, affecting satellite systems as well as systems on the ground. A severe geomagnetic storm (on the order of the Carrington Event of 1859) could have a catastrophic effect on modern infrastructure. Even solar storms of more ordinary size can induce currents in the power grid that drive up energy prices, affecting manufacturing and commerce.
Considerable interest exists in developing space weather forecasting technologies that use Earth’s ionosphere as a sensor for events in its neighboring atmospheric layers. The ionosphere occupies a privileged niche in the geospace system, as it is coupled into both the terrestrial weather of the neutral atmosphere below and the space weather of the magnetosphere above.
Although we have a good understanding of ionospheric climate—diurnal and seasonal variations are well known, as are the rhythms of the sunspot cycle—there are new and vital areas of research to be explored. For example, it is known that the ionosphere—and near-Earth space—experiences variability (e.g., radio signals can fade in and out over periods of seconds, minutes, or hours due to changes in ionospheric electron densities along signal propagation paths), but this variability has not been sampled or studied adequately on regional and global scales.
[…]The Ham Radio Science Citizen Investigation (HamSCI) is a collective that unites amateur radio operators with the research community in the space and atmospheric sciences. This confederation of scientists, engineers, and hobbyists holds annual workshops during which ham radio operators and space scientists share findings. A new HamSCI effort, the Personal Space Weather Station project, aims to develop a robust and scalable network of amateur stations that will allow amateurs to collect useful data for space science researchers. The next HamSCI workshop will be held virtually 19–21 March 2021, and it will focus on midlatitude ionospheric measurements.
A Ready-Made Volunteer Science Community
From a communications point of view, the electromagnetic spectrum is a finite resource. Signals from broadcasting, telecommunications, and navigation all have their own demands of bandwidth and range. Spectrum allocations are managed by government agencies, such as the Federal Communications Commission (FCC) in the United States. Most countries allot some of the available spectrum to amateur users for the purposes of recreation, experimentation, and the promotion of international goodwill. There are more than 760,000 licensed amateur radio operators and uncounted shortwave listeners in the United States alone.[…]
I’ve been a massive fan of RadCom since I lived in the UK. I’ve always felt this RSGB publication strikes the right balance of technical information and human interest.
A few years ago, at Hamvention, an RSGB representative encouraged me to write a review for RadCom. Even though I feel pretty fortunate to write for the likes of The Spectrum Monitor magazine, the World Radio TV Handbook, and others, I was honored to even be asked.
With RadCom, I focus on gear that’s readily available in the UK and Europe (meaning, not North American versions of gear–yes, there are differences).
My first review–of the Aerial-51 ALT-512 QRP Transceiver–was published in the March 2020 issue.
This week, I received the December 2020 issue of RadCom. Typically, I receive my RadCom issues a week or so after the beginning of the subscription month due to normal international post times. These aren’t normal times, though, so it took 6 weeks longer than normal to be delivered.
I’ll admit that I’m chuffed to see my review in RadCom especially since my daughters (now K4TLI and K4GRL) were an integral part of it! My daughters are trying to sort out whose hands are in the photo above. They assembled the uBITX V6 by themselves.
If you’d like to learn more about RadCom and the Radio Society of Great Britain, I would encourage you to check out the RSGB website. I’m a proud member and a big fan of RadCom even though they had the poor judgement to ask me to write for them!
Many thanks to QRPer, Curt, who recently left the following comment on a recent post and noted:
I too was a NPOTA activator. My first HF contact ever was on 9/10/2016 and then I threw myself to the wolves so to speak activating my first park on 11/12/2016.
When NPOTA was over I went into withdrawal and I thought POTA was going to fill that void but here in Western PA there’s not much to pick from. We have a lot of parks but none that fall into the park list. One of the local parks I’ve been told not to bother because it’s in the middle of the city and the local police don’t seem to like any activations there for whatever reason.[…]
You’re right, Curt, and I totally understand. Many local, county, and private parks are not included in the Parks On The Air (POTA) program. POTA tends to include parks that are on a state, provincial, or national level. Not always in every country, but it’s the general rule of thumb.
I don’t know the POTA scene in western PA well because I’ve never thoroughly researched it. With that said, I’m willing to bet there are more accessible parks in your neck of the woods than you might realize at first blush.
The only entry to this state park is very easy to find and marked well along the highway.
Historic sites and parks–both state and national ones–tend to have very defined borders with conspicuous entry points. They’re, in many senses, “low-hanging fruit” for POTA because they’re super easy to find and usually have picnic and camping areas.
You simply locate one on the POTA map, tell your smart phone to take you there, arrive, find a picnic table or parking area near trees, setup,…et voilá! You’re on the air and activating. Typically, a very straight-forward process.
I would suggest new POTA operators start with these types of parks to give their field radio kit a good shake-out.
Digging deeper…
There are so many other POTA entities out there, though, and the POTA map (while an excellent resource) can’t represent them well.
I should add here, that POTA is an international radio activity and I do not know the various types of parks and POTA entities in other countries. There’s a lot of variability.
Here in the States, aside from parks and historic sites, we have other POTA entities like:
Game Lands
Rivers
Trails
Wildlife Management Areas & Refuges
Recreation areas
Conservation areas
and Forests
These types of public lands can be vast with many possible parking areas and entry points. Some have multiple, disconnected tracts of land and the POTA map only typically represents them as one clickable geo point because it would be incredibly difficult to represent them otherwise.
It requires the POTA activator to do a little planning and research.
One example
Here in North Carolina, we have a lot of state game lands and they’re some of my favorite spots to activate.
Some game lands may only be a couple hundred acres large, others may encompass hundreds of thousands of acres.
Case in Point: Nantahala Game Land is only one entity on the POTA map, but it is located in no less than six western North Carolina counties–dominating the majority of them, in fact.
There are probably hundreds of spots where you can find public access to activate this particular POTA park.
Trails are another POTA entity that should not be overlooked. They often snake through areas and have multiple trailheads where you can easily find parking and ample room to activate.
Here’s how I find the more elusive POTA parks…
Being a bit of a map geek, I actually love this process!
1. Take a close look at the POTA list
The POTA map is amazing, but as I said, it simply can’t display the size and geographic shape of each park.
Start with the complete list of POTA entities in your location.
If you have lived the majority of your life where you are now, you’ll likely recognize some of the names associated with the park entities in this list.
Regardless, comb through this long list carefully. Do an internet search on the park names and you’ll quickly discover roughly where the land is located
2. Make a spreadsheet of potential parks
A sample of my park spreadsheet from early last year.
On this sheet make column headers for at least:
The park name
The POTA designator for that park (K-6937, for example)
The travel time to the park
The geo coordinates of potential activation spots
I also added
How “rare” the park might be (how many times it’s been activated)
How easy access to the park might be
If it could potentially be a two-fer (meaning two POTA entities overlapping)
3.) Find an activation site with Google Maps satellite view
Now that you’re developing an activation plan (via your spreadsheet), and you’ve located all of the nearby parks, game lands, wildlife management areas, trails, refuges, etc. it’s time to research each entity and find activation sites.
Most states (and provinces, counties, regions) have sites that will help you find access points to public lands. Each state is different–some (like North Carolina) have amazing online resources, others may not.
If you can’t get the details you need online, don’t hesitate to call those public departments in charge of the lands and ask them about access points. They’re experts on the subject and often your taxes pay their salary.
To find game land activation sites in North Carolina, I first go to the WRC Map and click on a site. The WRC site will offer up maps and even indicate obvious parking and camping locations.
I then find public roads in/around the game lands and do a Google Map search (you can pick your favorite mapping tool).
I compare the WRC map with the Google map (side by side) and search for parking spots using a satellite view.
Here’s how to find the satellite view on Google Maps using a sample POTA site:
Find the park area based on public roads, then click on satellite view:
Now you’ll be able to see a bird’s eye view of the land:
When you zoom in, you often can identify a nice parking spot:
Using the satellite view I can zoom in and see that there’s a parking space with trees surrounding it. Score!
That’s how I do it.
Important note: of course, it’s incredibly important that you compare public land boundaries with your activation site and make sure you will, indeed, be on that POTA entity when you activate. While there are no POTA police–nor will there ever be–I personally want to be 100% sure I’m activating entirely within the boundaries of my chosen park. Google Maps can’t be trusted to indicate unit boundaries–one needs to compare the state or federal maps of the unit to be sure.
Next, I take those geo coordinates (map links) and embed them in my POTA spreadsheet.
Later on, when I decide to activate that park, all of my research is done! I simply grab my gear and go.
That’s it!
If you’re like me, you may be surprised how many potential activation sites there are in your region when you take a closer look at public land boundaries and access points.
I found at least five POTA sites within a 90 minute drive of my home that were ATNOs (All-Time New Ones) that no one had activated.
How do you research parks–?
I probably should not call this a “Pro Tip” because I’m not a professional!
There are many different ways you can find great POTA sites within your region. Please feel free to share your POTA procedure with us in the comments!
Cover of the new “On The Air” e-magazine from the ARRL
[Please note: this is a cross-post from our sister site, the SWLing Post.]
Today, the ARRL released their new electronic magazine for ham radio newcomers: On The Air.
The ARRL describes On The Air‘s mission:
“On the Air magazine is the newest ARRL member benefit to help new licensees and beginner-to-intermediate radio communicators navigate the world of amateur radio. Delivered six times a year, the magazine will present articles, how-to’s, and tips for selecting equipment, building projects, getting involved in emergency communication as well as spotlighting the experiences of people using radio to serve their communities, and those using it for enjoyment.”
I checked out On The Air and was quite pleased with the scope of the magazine. The first issue covers topics such as: understanding the ionosphere, choosing your first radio, building simple antennas, and much more. I love the fact that the articles are written with newcomers in mind, too; less technical jargon and more explanations.
I mentioned in a previous post that I’ve been teaching a ham radio class to a group of high school students. Most of the students have now acquired their Technician licenses, and we’re even plotting a General class course for the fall.
Last month, I shared some copies of QST (the ARRL monthly member magazine) with my students. While they enjoyed looking through the pages of QST, many told me they simply didn’t understand the articles yet…There’s just not a lot inside a QST issue to grab the attention of a fifteen or sixteen year old who’s just gotten her ticket. Understandable.
Then, I learned about On The Air from a friend with the ARRL. I was so glad to hear that the League was finally making a bi-monthly magazine aimed squarely at newcomers! I was also pleased it was an e-publication, because it will be that much easier to share with my class and propagate to prospective students.
But today, I discovered, to my dismay, that other than the premier issue, On The Air is for ARRL members only. Here’s a screen grab from the website:
But…”for members only”––?
Alas, in limiting access, the ARRL has essentially insured that most of their target audience won’t ever have the opportunity to read On The Air, and thus they’ve crippled the best ARRL recruitment tool I’ve ever seen.
What a shame.
I’ve contacted my ARRL representative and asked that they reconsider the decision to hide this brilliant magazine behind a membership paywall. I’m pretty sure that ad revenue and membership fees could readily cover the cost of publishing this electronic edition. After all, On The Air could lead to a lot more ARRL members! And, indeed, I hope it will.
If you feel as I do, please contact your ARRL Section manager. It may be that those making the decisions are, in this case, a little out of touch with the future of amateur radio.
Update – To be clear about this post: I’m not implying anything bad about the ARRL here, I just think it’s a lost opportunity if they keep future editions of On The Air behind the member pay wall. I imagine that ad revenue alone could more than support this niche publication if they simply release it as a free PDF. The real benefit, though, could be an increase in ARRL membership as On The Air readers get a taste of what the League could offer! In other words: this is an opportunity!
What do you think? Should On The Air be free to anyone interested in amateur radio, or for members only? Please comment!
RAC supports Canadian National Parks on the Air event
Radio Amateurs of Canada is pleased to announce its support of the Canadian National Parks on the Air (CNPOTA) event which will be held next year from January 1 to December 31.
The CNPOTA Event Committee describes the event in this way:
“All Radio Amateurs worldwide will have an opportunity to operate portably from any of Canada’s 48 National Parks and 171 National Historic Sites (these are ‘activators’). Amateurs around the world will be able to chase these adventurous operators in an effort to confirm the most QSOs (these are ‘chasers’).
Activity for activators and chasers will be tracked on a dedicated website and real-time leader board and other statistics will be available throughout the year. Activators and chasers will be able to compete for and collect online awards and certificates created specifically for the event.
Come join the fun and plan to visit one of Canada’s beautiful Parks and Historic sites next year!”.
RAC will be assisting the organizers in promoting the event through articles in The Canadian Amateur magazine, the RAC website and in social media.
For more information about the event please visit the Canadian National Parks on the Air website at: https://cnpota.ca/
Alan Griffin
RAC MarCom Director
Radio Amateurs of Canada
The first article deals with buying used and new equipment, while the other article is a review of the uBITX QRP transceiver. Thanks go to Ken Reitz for graciously allowing these to be posted after their initial publication!
And thank you, Robert!
Readers, I highly recommend both of these articles. In his used equipment guide, Robert makes practical suggestions for navigating the world of pre-owned radio gear and shares some important tips. His uBITX QRP Transceiver article is essential reading for anyone who has considered building this incredibly affordable kit.
Note: this post was originally publish on my other radio blog, The SWLing Post.
I’ve owned my Elecraft KX3 for five years, and this little rig continues to amaze me.
In 2013, I gave the KX3 one of the most favorable reviews I’ve ever published–and it continues to hold its own. That’s why last year I recommended the KX3 to my buddy and newly minted ham radio operator, Sébastien (VA2SLW), who had already been eyeing the KX3 as his first HF transceiver.
A few weeks ago, Sébastien bit the bullet and is now the proud owner of a KX3 with built-in ATU. He purchased the KX3 with plans to do a lot of field operations including SOTA (Summits On The Air) and also use the KX3 at home.
Wednesday, I popped by Sébastien’s flat to help sort through some low-profile antenna options. I had suggested that he not invest in a factory made antenna just yet, but instead explore what he’s able to do with a simple wire antenna directly connected to the KX3 with a BNC Male to Stackable Binding Posts adapter. I’ve had excellent luck using this simple arrangement this in the past with the KX3, KX2 and even the KX1.
I did a quick QRM/RFI survey of his flat and balcony with my CC Skywave SSB. While there were the typical radio noises indoors, his balcony was pleasantly RFI quiet. At 14:00 local, I was able to receive the Voice of Greece (9,420 kHz), Radio Guinée (9,650 kHz) and WWV (both 10,000 and 15,000 kHz) with little difficulty. His building has incredibly thick concrete walls–I assume this does a fine job of keeping the RFI indoors. Lucky guy!
We popped by a wonderfully-stocked electronics shop in Québec City (Électromike–which I highly recommend) picked up some banana plugs and about 100′ of jacketed wire. We took these items back to the flat and cut a 35′ length of wire for the radiator and about 28′ for the ground. We added the banana plugs to the ends of each wire.
Sébastien temporarily attached one end of the antenna wire to the top of the fire escape and we simply deployed the ground wire off the side of the balcony. Neither of these wires interfere with his neighbors and neither are close to electric lines.
I had planned to cut both the radiator and ground until we found the “sweet spot”: where the ATU could find matches on 40, 30, 20 and 17 meters (at least).
Much to my amazement, the KX3 ATU got 1:1 matches on all of those bands save 80M where it still could achieve a 2.8:1 ratio. I couldn’t believe it!
Frankly, Elecraft ATUs are nothing short of amazing.
Even the ATU in my little KX2 once tuned a 20 meter hex beam to 40 meters and found a 1:1 match to boot. In contrast, the Icom IC-7300 sitting next to the KX2 wasn’t able to match that hex beam even though we performed a persistent ATU search. Not surprising as I wouldn’t expect a 40 meter match on a 20 meter antenna, but the Elecraft ATU did it with relative ease.
Sébastian did a quick scan of the ham radio bands where we heard a number of EU stations. I also took the opportunity to point out how well the KX3 operates as a broadcast receiver with the AM filter wide open and using headphones in the “delay” audio effects mode. The Voice of Greece sounded like a local station–absolutely gorgeous signal.
It was getting late in the day, so I couldn’t hang around to call CQ with Séb, but I left knowing that he is going to have a blast playing radio at home and, especially, in the field. Next, he plans to build a simple mag loop antenna, get a BioEnno LiFePo battery and eventually add other Elecraft accessories to his station. I’d say he’s off to a great start!
Connecting an international community through low-power field radio adventures.
Please support QRPer by adding us to your whitelist in your ad blocker. Ads are what helps us stay online. All of our ads are ham radio related--no junk, we promise! Thank you!