Tag Archives: Field Radio Kits

Testing my new Headrest QRP POTA Field Kit!

I love field radio kits.

If you’ve read my “Anatomy of a Field Kit” series, you’ve likely gathered that field kits are a bit of an obsession. [Yeah, understatement alert!]

My field kits roughly fall into two main categories: modular and fully self-contained. My modular kits are ones where components like the battery, antenna, throw line, key, and radio are in separate pouches and can easily be combined to make a complete station before I leave for an activation.

My fully self-contained kits are ones that quite literally have everything needed to perform a park or summit activation in one pouch or box. A good example that I’ve documented here is my MTR-3B field kit.

For more on this, again, check out my “Anatomy of a Field Kit” series.

Vehicle kit

If you’re a devoted park and/or summit activator, I think it’s important to keep a dedicated kit kit in your car at all times. Why?

  • It’s ready to grab for impromptu activations
  • It’s handy in case of road-side emergencies in remote areas
  • It’s always  accessible to demonstrate amateur radio to those who are curious
  • It’s always always there for those times when you hadn’t planned to play radio, but the opportunity presents itself

I always have a full radio kit in my Subaru and over the years, I’ve changed and adapted it. For the most part, though, it’s been located in the trunk/boot and lives with anything and everything else I keep back there. Sometimes, it’s in the way when we need to fill that trunk space with family items for a trip or when we’re hauling things around town. Other times, it’s floating/sliding around freely in the back.

On long family trips, I’ve been known to store radios under the floor, but it’s a true hassle to remove them because I have to remove anything in the trunk before lifting the floor.

Contraband I hid in the car during our two month Canada trip last year.

I’ve always wanted a way to store my kit in the car in a dedicated space. In the past, I’ve tried to make a kit that could fit under the driver’s seat–thinking that might be ideal–but there’s very little clearance under it and it’s difficult to remove.

Enter the BROG Headrest Pouch Kit

Before I placed my initial order for the Blue Ridge Overland Gear (BROG) Gadget Bag, I checked out other items on their website. One that immediately caught my attention was their Headrest Kit.

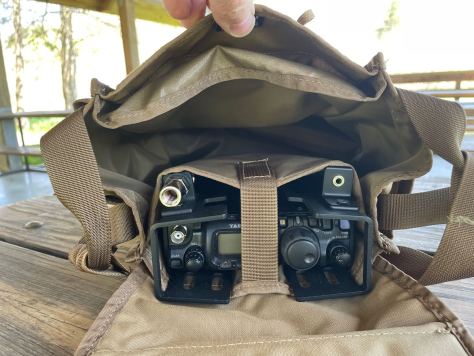
It consists of a Velcro panel that fits around a vehicle headrest and a pouch (or pouches) attach to it.

BROG caters to Overlanders and vehicle storage/organization is huge in that community. The headrest kit makes a lot of sense: it’s using space that’s accessible, doesn’t interfere with any passengers, is off the floor, and is otherwise underutilized!

The big questions, of course:

  1. would the pouch offer enough space to store an entire radio kit,
  2. and would the kit weight too much for the Velcro back to hold it in place?

I asked for the Headrest Pouch Kit ($47.99) to be sent with my Gadget Bag order.

BTW: Big thanks to BROG for giving me flexibility with this order. Since I had no experience with their gear, I asked that they send me a list of items and allow me to evaluate them, then pay (full price) for what I decided to keep. 

Would it work?

I knew I’d need to store a very small transceiver in this dedicated pack. A few could potentially fit the bill–namely the:

  • Mountain Topper MTR-3B
  • Venus SW-3B
  • QCX-Mini
  • TEN-TEC R4020

I eliminated the QCX-Mini from this list because it’s mono band (mine is set for 20M) plus, I really love the field kit I already designed for it. Same for the MTR-3B–the kit I built for it is now time-tested and I love it as-is. The R4020, while quite compact, is the largest in this group of wee rigs. Continue reading Testing my new Headrest QRP POTA Field Kit!

First look at the Blue Ridge Overland Gear Gadget Bag

In early February, Jeff (KD4VMI) sent the following message to me:

Good evening. Love your YouTube videos and QRPer posts and, from them, I know you appreciate rugged packs and gear.

I enjoy POTA, although I don’t get out as often as I’d like, but I’ve found Blue Ridge Overland Gear’s various bags and modular systems to be very handy for bundling my radios, batteries, cables, and antennas.

It’s been on my mind for some time to let you know about them (if you don’t know about them already) and I finally decided to take the time to write you. I’m not associated with them in any way, and I didn’t approach them about passing this on to you, or anything like that. I just really appreciate their gear and I think you might, too.

The BROG materials are high quality and stout, the zippers are beefy and smooth, everything is double or triple stitched and everything is modular so it can be used for just about anything, and in pretty much endless combinations with their various bags and gear.

Their products are not overly cheap, but are guaranteed for life. They’re located in Bedford, Virginia and all their things are made in the USA (I think mostly in Bedford).

I often use their tire puncture repair kit bag, for instance, to carry my FT-891, Bioenno battery, cables and mic, and PackTenna, and then strap the coax to the Molle system on the front of the bag.

They posted a YouTube video showing their gadget bag with accessory pouches for HTs, etc.

Their website is: https://www.blueridgeoverlandgear.com/.

Anyway, I appreciate all you do for our great hobby and just wanted to share this info.

Take care and all the best to you and yours…

Thank you so much for the kind words, Jeff, and for the tip about Blue Ridge Overland Gear (BROG). You’re obviously a skilled pack enabler because you had my attention by the second paragraph–!

Shortly after my exchange with Jeff, I checked out the BROG website and was really impressed with their line-up of packs and gear–all with a focus on modular organization, especially in-vehicle since it’s for Overlanding. It’s just the icing on the cake that their gear is made in the USA.

I was very curious if their Gadget Bag, in particular, would lend itself to being a modular flied radio kit pack.

Thing is, there are so many options and configurations for the Gadget Bag, I wasn’t entirely sure what to order.

Being a fellow who expects to pay a premium for rugged products, made in the USA–especially ones that carry a lifetime warranty–I was prepared for some sticker shock. Turns out, BROG pricing is pretty reasonable in comparison with other cottage industry pack manufactures.

Still, I wasn’t quite sure how easily some of my radios and gear might fit in their zippered pouches, so I reached out to BROG–mentioning QRPer and my constant search for field radio packs–and asked if I could order some packs and pouches, test them with my radio gear, then pay for what I decided to keep.  I didn’t want free gear, I just couldn’t tell based on the product images and posted dimensions what pouches and packs might fit my various radios and accessories. Also, I knew readers might ask if certain pouches and packs might fit certain radios.

The good folks at BROG kindly obliged, so I asked for the following list of items:

– QTY 1 Gadget Bag (shell) in black
– QTY 3 Large Velcro Pouches
– QTY 6 Medium Velcro Pouches
– QTY 1 Velcro Cord Keeper
– QTY 1 Medium GP Pouch
– QTY 1 Velcro Headrest
– QTY 1 Headrest Pouch Kit

Some of these items weren’t in stock, so it was a week or so later when I received notification that the package had shipped. It arrived a couple days later.

I love the feed bag style packaging, by the way.

Photos

Although you’ll start to see this field kit in upcoming activation videos, I thought I share a photo tour of this pack… Continue reading First look at the Blue Ridge Overland Gear Gadget Bag

André’s All-Season Yaesu FT-891 Go-Box

Many thanks to André (PY2KGB/VE2ZDX) who writes:


Hi Thomas!

I’m writing to share my idea for a cheap and easy to build go box. It’s not for a QRP rig, but the concept can be applied for the ft818, for example. Check out this YouTube video:

I’ve been operating under snow with this box, in “ninja” style.

Because if I wait for it to stop snowing here I’ll do nothing for 3 months, hehe!

Photos:

Continue reading André’s All-Season Yaesu FT-891 Go-Box

Allen’s 22.5 ounce, super affordable, QCX field kit

Many thanks to Allen (N4NN) who writes:

Hello Thomas,

Enjoyed your last video with the QCX-mini as it reminded me of my first portable setup.

Last August, I celebrated my fifth year as a ham and at 74 I’m still able to do some backpacking. This was my first attempt at taking a radio along. The QCX-original was the only model at the time and sold for $49 + shipping. The case is a dollar store pencil box with the radio mounted on stand-offs.

I changed the antenna you see to K6ARK EFHW setup with counterpoise. No coax. I used the on-board key. The throw line was arbor line much like yours and my weight was the tent peg pouch filled with rocks from the camp site. This was my food bag hanging setup. Under $100 for everything.

Before I used it much I discovered POTA from you and purchased a KX2. Haven’t camped much lately but I have activated 70 of Georgia’s 203 parks and having a ball!

[I should note that a] few years back when I made the kit, prices were lower so it may be more difficult to hit that $100 mark. For example, a QCX-mini (no case) runs $57.79 and the QRPGuys EFHW kit is now $30. Adam’s (K6ARK) EFHW kit I changed to is only $20. The “water resistant “ pencil case is still $1! I was more interested in weight rather than cost and as shown the weight is 22.5 ounces.

Thanks Thomas and wish you and yours a Merry Christmas and peace and good health in the coming year.

Allen

72
Allen
N4NN

I love it, Allen! Pure QRP fun on a shoestring budget. Not bad at all! You make a good point here that many kits can be built into a waterproof (or in your case a water resistant) case. I’ve often wanted to do this myself and may very well one day! 

Thank you for sharing!

Photos of Mike’s uber-organized Icom IC-705 field kit

Many thanks to Mike (2E1BFH) who shares the following photos of a new field kit he’s built around the Icom IC-705:


Continue reading Photos of Mike’s uber-organized Icom IC-705 field kit

A tour and deep-dive of my SOTA/POTA Backpack (Spec-Ops Brand T.H.E. Pack EDC)

As many of you know, I’m a bit of a backpack geek (okay, that’s an understatement).

If you don’t believe me, listen to the Ham Radio Workbench episode where they invited me to take a deep dive into my world of packs, bags, and organization. It’s not for the faint of heart or the short of time. (It was seriously fun, though!)

You would think being a pack geek that I would produce more videos showing a breakdown of what’s in my packs and how I organize them. The irony is I watch numerous videos on YouTube of how others pack out their various field and travel kits.

In truth, I have done this before, of course–once showing how I pack out my GoRuck GR1 for field radio and travel and another time showing how I pack out my TX-500 field kit in a Red Oxx Micro Manager. I plan to do more.

I’ve had several requests to do a video about my main SOTA pack which is designed around the Spec-Ops Brand T.H.E. Pack EDC tactical backpack (see above). I think the reason why I haven’t made a video and post yet about this pack is because I knew it would be quite detailed and, frankly, take a lot of time to detail.

That said, here we go!

Designed to be modular

This particular pack is not set up to be a fully self-contained field backpack for just one radio. Quite the opposite: I use its main compartment to hold a wide variety of modular field kits I’ve put together.

What do I mean by “modular”–?

As I prepare my pack to hit the field, I decide which radio I plan to take; typically that radio is in a pouch, bag, or case of its own that contains radio-specific connectors and accessories.

Mini Mini Arborist Throw Line Kit in a Tom Bihn Small Travel Tray

I put the radio in the main compartment, then I add a battery kit, logging kit, an antenna kit, arborist throw line, and an accessories kit that contains a key, cables, adapters, etc. Continue reading A tour and deep-dive of my SOTA/POTA Backpack (Spec-Ops Brand T.H.E. Pack EDC)

The New Penntek TR-45L: A Video Tour/Overview, then a full POTA activation!

Yesterday, John (WA3RNC) opened orders for his long-awaited Penntek TR-45L 5 band, CW-only, QRP transceiver.

As I mentioned yesterday, I’ve had the pleasure of helping John beta test this radio for the past month. In that time, I’ve gotten to know the radio from the inside out and have even taken it on a few POTA activations. In fact, with John’s permission, I just posted my first TR-45L activation video for Patreon supporters yesterday. The radio was using an early firmware version in that video.

TR-45L Video Tour and Overview

Yesterday, after an early morning appointment, my schedule opened up; a rarity in my world.

I then got the idea to take the TR-45L out to a park, do a full video overview of its features, then put it on the air in a POTA activation.

Hazel loved this idea too.

So I packed the TR-45L, a log book, my throw line, and two 28′ lengths of wire. Hazel jumped in the car before I could invite her.

I’ve used a wide variety of antennas on the TR-45L over the past weeks, but I hadn’t yet performed a park activation only using two lengths of wire and relying on the TR-45L’s optional Z-Match manual antenna tuner. This would make for a great real-life test!

Quick note about video timeline

Side note for those of you who follow my field reports and activation videos

I pushed this video to the front of the line since the TR-45L just hit the market. I wanted to give potential buyers an opportunity to see and hear this radio in real world conditions thinking it might help them with their purchase decision.

I’m currently about 7 weeks behind publishing my activation videos. Much of this has to do with my travel schedule, free time to write up the reports, and availability of bandwidth to do the video uploads (I’ve mentioned that the Internet service at the QTH is almost dial-up speed).

I was able to publish this video within one day using a new (limited bandwidth) 4G mobile hotspot.  Patreon supporters have made it possible for me to subscribe to this hotspot service and I am most grateful. Thank you!

So that I can publish this report quickly (this AM), I’m not going to produce a long-format article like I typically do. Instead, this is one of those rare times when the video will have much more information about the radio and the activation than my report.  I’ve linked to and embedded the video below.

Now back to the activation…

Continue reading The New Penntek TR-45L: A Video Tour/Overview, then a full POTA activation!

Arborist throw lines: Ideal lengths, weights, and packs for field radio

Many thanks to Barry (WD4MSM) who writes:

Thomas,

I thoroughly enjoy the website and movies!

Could you answer one question?

How much arborist throw line do you take into the field? 150’ – 100’ – less?

Thanks for taking the time to answer.

Barry WD4MSM

Great question, Barry!

I basically have four variations of throw line kits.

You’ve asked about line lengths, but I’m also asked frequently about the throw weight sizes and throw line bags as well.

First, let’s take a look at my kit variations, then I’ll share my thoughts on throw line lengths, weights, and bags. Note that many of these products are Amazon so there are affiliate links:

Throw Line with folding cube

One is my original Weaver throw line kit made up of two parts:

The line length is 150 feet (45.72 meters).

I tend to use this throw line when I’m doing a POTA activation very close to my vehicle. It’s lightweight, but a bit bulky to take on a long hike.

Compact Arborist Throw Line Kit

This kit is identical to my large folding cube kit above, but the throw weight is 12 oz and I store it in a small Weaver stuff sack.

Continue reading Arborist throw lines: Ideal lengths, weights, and packs for field radio

John’s trip and POTA field reports from Nova Scotia

Many thanks to John (VE3IPS) who shares the following guest post:


Nova Scotia POTA After-Action Report

by John VE3IPS

We had planned a vacation trip out to Nova Scotia to get our lobster fix. As I always do, I prep my radio with local repeaters, look up local radio clubs, museums and check the POTA and SOTA map for locations to operate from.

I noticed that several park locations had not been activated. Thus I had an opportunity to be first activator and to get some much needed Nova Scotia parks in the Hunters logs. I printed the map and noted the park identifiers. I decided to just activate the parks that were never activated. I could have worked more parks but you have sights to see and can’t be behind the mic all the time. My antenna was prepped to be rapidly deployed in a few minutes and torn down accordingly.

I also was able to attend the Halifax ARC Hamfest on June 4, 2022.

So a vacation with ham radio elements to keep me excited with some objectives in mind.

We did visit Peggy’s Cove, Burnt Coat Head to watch the tides in the Bay of Fundy, local wineries, Lunenburg (a movie shoot was underway), the Halifax Citadel and of course eat lobster every day. I spent over $200 in gas as we did a lot of driving around (gas is just over $8 a gallon CAD), retail tax at 15% and prices for food and restaurants up by 30%. Nova Scotia is a bit more expensive than other cities.

I decided to bring my Icom 705 with a LifePO4 battery to offer 10 watts instead of the FT-891 or FT-818. Why? Because it offered a voice memory for calling CQ Parks, built in SWR meter and better IF filters over the FT-818. I wanted to cover the Marine and VHF/UHF repeaters as well and that ruled out the FT-891.

Due to the Kleenex box form factor I ended up using a Lowe Pro Omni Trekker camera bag to use as a carry on. This included a Nikon V1 camera and Binoculars.

Continue reading John’s trip and POTA field reports from Nova Scotia

Dale’s solution for enhanced CW field ergonomics

Many thanks to Dale (N3HXZ) who shares the following guest post:


Ergonomics of Operating CW in the Field

by Dale (N3HXZ)

About a year ago I started getting active in Parks On The Air (POTA) and Summits On The Air (SOTA). I had always been an avid hiker and backpacker, and though I am getting up there in years (recently retired!) these amateur radio opportunities were just the medicine I needed to rekindle my passion for the outdoors and amateur radio.

Thanks to Thomas (K4SWL) and his blog post and videos I was able to quickly come up to speed on the basics and get out into the field for CW activations.  I quickly discovered that operating CW in the field is quite different from operating at home. The creature comforts of a good chair, a level and spacious operating table, and isolation from the weather makes for a great experience in the shack, but is not available in the field, especially if you are backpacking to your destination. My early activations were sitting on a rock, or the ground, and using only a clip board to mount my rig (Elecraft KX2), locate my CW paddle, and place a notepad to record QSO’s.

While simple, this operating setup poses problems. Attaining and maintaining a flat workspace is tough in the field in order to keep things from shifting or falling off the clipboard, especially if you are not firmly seated. There is not enough space to set your wrist in order to steady your CW operating, and the notebook pages can flap in the wind, or the wind can blow your logbook clear off the table while operating. I realized I needed to upgrade my mobile station! Continue reading Dale’s solution for enhanced CW field ergonomics