Tag Archives: Begali Traveler

On a POTA Mission with the RGO One!

On Thursday, June 6, 2024, I had two missions:

  1. To help fellow volunteers at the Asheville Radio Museum assemble shelving.
  2. To fit in a POTA activation over lunch.

I started out the day pretty early at the QTH sorting out a few chores, then I made my way to the museum around 9:30.

The Asheville Radio Museum

I’m a member and volunteer of the Asheville Radio Museum, a small – but brilliantly curated – museum on the campus of Asheville-Buncombe Technical Community College.

That Thursday morning, we organized a shelf-building party to assemble a shipment of new shelves we’re going to use to house our collection in a new space A-B Tech has given us on the third floor of the Elm building.

We’re super excited about the new space not only because it’s much larger, but there’s even a dedicated workbench where we can invite students and guests to learn some soldering and repair skills.

If you’re ever in the Asheville, North Carolina area, I’d strongly encourage you to check out the Asheville Radio Museum. Check our website for directions and hours.

We ended up working on the shelves for a couple of hours, and once assembled, I decided to grab lunch at Bridge & Tunnel Coffee in the Coman Student Activity Center next door. The food and coffee were absolutely amazing. A-B Tech students are so lucky to have a café of this caliber on campus!

I spent more time hanging with my friends at lunch than I had planned. No regrets there.

I knew there was still plenty of time to make my way to the Vance Historic Birthplace and fit in a POTA activation! Twenty minutes of driving later, and I was pulling into the Vance parking lot.

Zebulon B. Vance Birthplace (US-6856)

As I made my way around the visitor’s center, I was very pleased to see that the picnic shelter was unoccupied. School was still in session for many districts in the area and field trips tend to take place near the end of the term. Had there been a school group at this small historic site, I would have gone elsewhere to activate so as not to disturb them.

The weather was pretty amazing – the perfect day to be outdoors playing radio.

Speaking of radio, I brought a special one with me that day.

The Mission RGO One

As I mention in my activation video below, I receive more questions about this radio than any others I take to the field. Some have seen it in previous activation videos, and many see it in my QRPer.com banner rotation.

Typically, I’ll get a message with the following question, “Thomas, what is that cool radio with the white faceplate I see in the banner on QRPer?”

It’s no wonder I get a lot of questions about it. The Mission RGO One is a very low-production run modular transceiver – the creation of Boris Sapundzhiev (LZ2JR).

Boris produces the Mission RGO One in small batches at his facility in Bulgaria. This is very much a cottage industry radio – one you won’t find in many shacks or on Field Day because there just aren’t a lot out there (compared with Yaesu, Elecraft, Icom, etc.).

I’m a massive fan of the RGO One. So much so, that if I had to pare down my radio collection to only two HF transceivers, the RGO One would be one of those two.

I love the RGO One’s legacy design and the fact it’s a down-conversion superhet receiver with 9MHz IF. The receiver is absolutely amazing.

You don’t see the RGO One in many of my POTA videos mainly because I tend to use my smaller, portable radios in the field. That said, the RGO One was designed with field operating in mind – it’s a very capable radio and lightweight compared to other tabletop radios.

The RGO One is my main HF radio in the shack, so it actually gets heavy use. If I’ve ever hunted you at the QTH while you were activating a park or summit, it was likely with the Mission RGO One.

As I mention in the video, I will plan to make a “Getting To Know You” video with the RGO One in the near future, so I’ll speak a bit more about it then.

In the meantime, you can read my full review of the Mission RGO on The SWLing Post and check out more about any upcoming production runs on Boris’ website.

Setting Up

I decided to deploy my KM4CFT EFHW kit that I trimmed for 30 meters with a 40-meter extension. This antenna is brilliant because it resonates on 30 and 17 meters as a 30-meter EFHW, then if you link the 40-meter extension, it’ll give you 40, 20, 15, and 10 meters. That’s six bands on one antenna without the need for an ATU.

Next, I paired my Begali Traveler paddles with the RGO One.

Although the RGO One has a maximum output power of 50 or 55 watts, I had it set to my standard 5 watts QRP.

Gear

Note: All Amazon, CW Morse, ABR, Chelegance, eBay, and Radioddity links are affiliate links that support QRPer.com at no cost to you.

On The Air

Being in the early afternoon, I decided to hop on 20 meters first, as I assumed it might be one of the more productive bands. Conditions – as we all know – have been quite rough as of late, so I tend to start my activation on the band where I think I’ll accumulate the most contacts. Continue reading On a POTA Mission with the RGO One!

POTA Field Report: Pairing the Yaesu FT-817 and a 40M EFHW at Table Rock!

After a fun little activation of Lake James State Park (K-2723) on the morning of Monday, July 31, 2023, I decided to fit in at least one more POTA adventure on a mini rove.

The logical choice was Table Rock Fish Hatchery since it’s such a short drive from Lake James and I always enjoy activating that particular site.

The weather that morning was beautiful and so was the drive.

Table Rock Fish Hatchery (K-8012)

I pulled into the driveway of the picnic area and–no surprise here–I had the place to myself.

In fact, according to the POTA website, I’ve activated this site 12 times and I’ve never seen another soul in the picnic area save my canine friends, park staff, and one guy who was hunting muskrats in the creek. That’s about it. Never anyone actually hanging around the picnic area.

On the drive over, I hadn’t considered what antenna or radio to use–I had a few in the back of my car.

I thought about using my Elecraft KX1, but then realized I didn’t have an extra shielded audio cable to connect to my Anker Soundcore Mini speaker nor did I have my in-line digital audio recorder. Without those things, I wouldn’t be able to make a video of the activation.

My next choice was the Yaesu FT-817ND and, in fact, it would be ideal. I was looking forward to putting the ‘817 on the air again–it’d been a couple of months!

First, though, an antenna. I pulled out the 40 M End-Fed Half-Wave Steve (MW0SAW) made for me some time ago.

This antenna has been in heavy rotation lately because it’s been in my main radio backpack as I’ve been traveling around the region.

I deployed the EFHW in short order, then hooked it up to the ‘817. Continue reading POTA Field Report: Pairing the Yaesu FT-817 and a 40M EFHW at Table Rock!

Fred’s simple hack to secure the Begali Traveler

Many thanks to Fred (KE8TBM) who writes:

Here is a solution I came up with for the slipping issue with the Begali Traveler.

It’s very easy to push a pin through the (front only) plastic/rubber feet on the key. This will stop it from sliding on everything including formica counter tops.

After you push the pin through the plastic/rubber feet using a needle nose pliers, simply snip the sharp end off to leave it blunt.

You can leave the little ball on the other end of the pin to retract it if you wish, however, I’ve found that not to be necessary. —-I find that the pins really don’t snag on anything as they just barely peak out the bottom of the foot, but the option is there.

This makes for a rock solid hold on your surface and is a game changer. It’s so nice to be able to push away and not worry about the key slipping around.

Mike, K8MRD just did a review on the Traveler Lite and mentioned the slippage issue.

Best 73 Thomas and thank you for being a great image for the ham community.

Fred, KE8TBM

What a simple and effective idea! Thanks for sharing this tip with us, Fred. Also, thank you for the kind words, OM. 

POTA Field Report: Testing my CP Gear Tactical Aircrew/Pubs Bag with FT-817ND and Armoloq TPA-817 Pack Frame

Last year, during a Black Friday sale, I took a calculated risk and purchased a bag I hoped would accommodate my Yaesu FT-817ND that has been outfitted with an Armoloq TPA-817 Pack Frame.

CP Gear Tactical Aircrew/Pubs Bag

Rod (VA3ON) first introduced me to CP Gear Tactical–a  military pack manufacturer based in New Brunswick, Canada.

I’d had their their Aircrew/Pubs Bag with Padded Tablet Pocket on my wish list since the Ham Radio Workbench podcast episode where we talked about backpacks and pouches. CP Gear Tactical manufactures a wide variety of gear primarily for the Canadian military market. Everything is made either in Canada or the US (or both).

I contacted CP Gear Tactical shortly after outfitting my FT-817 with the TPA-817 pack frame. I measured the frame carefully and asked if the interior padded pocket (which is actually designed to hold a tablet–might fit my radio.

I never heard back from them. I could have called them, but on Black Friday, when it was on sale for 20% off and free shipping, I decided to throw caution to the wind and simply purchase it. My total price in USD was something like $62 shipped.

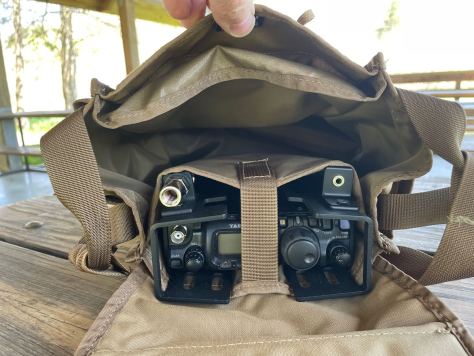
As soon as I opened the CP Gear pack, the first thing I did was check to see if the FT-817 with pack frame would fit in the interior pocket.

Much to my surprise, it fit it perfectly!

Indeed, it’s as if the pocket were specifically designed to accommodate the FT-817ND/TPA-817 combo.

Even the middle Velcro strap fits precisely in the middle of the radio between the pack frame side extensions. The strap holds the rig securely; once, I accidentally fumbled while holding the bag and even though it was upside down, the FT-817 remained securely inside. The strap held it in place.

The bag has loads of room inside. In fact, you can very easily transform it into a fully self-contained field radio kit.

I actually give a small tour of this pack in my activation video below, so if you’d like to see some of the exterior pockets, I would encourage you to check it out!

Zebulon B. Vance Birthplace (K-6856)

On Tuesday, April 11, 2023, I once again popped by the Vance Birthplace for a leisurely POTA activation–I thought this activation, in particular, would be a good one to test my new Aircrew/Pubs bag! Continue reading POTA Field Report: Testing my CP Gear Tactical Aircrew/Pubs Bag with FT-817ND and Armoloq TPA-817 Pack Frame

Finally did it! First POTA activation with my new-to-me Yaesu FT-891

Yep. I finally did it.

Over the past few years, I’ve received numerous requests to check out the Yaesu FT-891 HF transceiver. Almost all of my ham friends have one and they are widely considered one of the best 100 watt HF radios for park activators. Indeed, I bet it is *the* most popular 100W radio among POTA activators.

I’ve been tempted to ask Yaesu for a loaner model and I even came within one button click of ordering a new FT-891 from DX Engineering during a Black Friday sale in 2020.

I’ve resisted the FT-891 temptation, though, because I tend to use smaller, more portable QRP radios in heavier POTA rotation. I knew if I purchased an FT-891, it just wouldn’t get a lot of field use. It also demands a beefier field battery due to its current requirements and, frankly, it’s so rare I run more than 5 watts (and 5 watts is the lowest power setting on the ‘891) I would simply have a lot of radio for my needs.

A few weeks ago, however, a friend reached out because he wanted to sell his FT-891 and 30Ah Bioenno battery and downsize to a smaller field portable radio like the Xiegu X5105. Long story short, we worked out a trade/purchase which included the ‘891 and his battery. I had been thinking about a large capacity battery to use as a backup in the shack, so this worked out well for both parties.

Zebulon B. Vance Birthplace (K-6856)

On Tuesday, March 14, 2023, I once again had an hour to fit in an activation at the Vance Birthplace before picking up my daughters at school. I’ve really enjoyed the opportunity to play radio at Vance so much during this particular school term; next term, it’s unlikely I’ll have this opening, so I’ll enjoy it while I can!

I deployed the Chelegance MC-750 vertical again. I’ll admit that it’s so convenient keeping an antenna in the car trunk/boot that can be made resonant so easily from 40 meters and higher.

I was going to show the antenna deployment again in my activation video, but received a call and decided to deploy the antenna while finishing up the phone call. It only takes a couple of minutes to set up.

Next, I connected my 15Ah Bioenno battery to the FT-891. Even though I was only using five watts, the ‘891 needs more capacity than the 3Ah packs I normally carry with my QRP rigs.

I also connected the Begali Traveler key–I do love this key (thanks again, Jackie!). Continue reading Finally did it! First POTA activation with my new-to-me Yaesu FT-891

Lunch Box POTA: Pairing the Elecraft AX1 with the Penntek TR-45L!

As I mentioned in previous posts, I’ve been using the Elecraft AX1 in heavy rotation this year. I made a commitment to myself to do a string of activations with it in January and February and also pair it with a wide variety of radios beyond the Elecraft KX2 and KX3.  So far, I’ve paired the AX1 with the:

In truth, the AX1 can be paired with any radio when you use a tripod mount.

It’s a bit trickier when connecting the AX1 directly to a radio and using the Bipod as a support because 1.) the antenna connector on the radio mustn’t be too high off of the surface, 2.) there needs to be enough clearance on the back of the radio to accommodate the bipod legs and 3.) ideally, it’s nice to have a ground point on the radio, else you’ll need to clamp the counterpoise to the shield of the BNC connector.

In addition, if your radio doesn’t have a built-in ATU of some sort, then you’ll also need a capacity hat or external ATU to finish off the impedance match. (For more notes about the AX1 and AX2, check out this previous post.)

Of course, you don’t have to use Elecraft’s bipod to support the AX1 when directly connected to a radio–you can build or 3D print your own support–but the bipod is really convenient when it does work.

Objective: Lunch Box Radio

One radio I’ve been eager to pair with the AX1 is the Penntek TR-45L.

Why? Because I love the form-factor.

Something about having a lunch box-sized radio sitting on a table with a telescoping whip protruding out the back and, with that combo, the potential of making contacts all over the globe. Continue reading Lunch Box POTA: Pairing the Elecraft AX1 with the Penntek TR-45L!

Pairing the Elecraft K2 with the AX1 at Tuttle for some QRP P2P DX!

If you recall from my last field report, I’ve been pairing the Elecraft AX1 antenna with a number of radios. For me, it’s been a fun exercise because I always enjoy seeing what sort of results the AX1 might produce. So far, it has never disappointed.

On Thursday, February 2, 2023, I packed two radios in my car with the idea of fitting in two consecutive park activations.

At my first activation of the day–Lake James State Park–I paired the AX1 with my Mission RGO One transceiver. The activation was a blast! Not only did I stay busy working stations, but I also managed a little QRP DX thanks to a hunter from Italy.

K2 and AX1 Under Shelter

Little Guatemala Café

After grabbing a curried chicken salad wrap at Food Matters and a coffee at Little Guatemala roasters in Morganton, I hit my second and final park of the day: Tuttle Educational State Forest (K-4861). It was rainy, so the park was empty which allowed me to take over the very large picnic shelter at Tuttle.

Even though this particular shelter is in a bit of a dip in the land and has a large metal roof, I’ve had successful activations there in the past employing the AX1 antenna.

My hope was that history would repeat itself!

Setting Up

Attaching the AX1 antenna to the back of the Elecraft K2 was not complicated because the K2 has a BNC connector with nothing protruding to get in the way of the Bipod. Continue reading Pairing the Elecraft K2 with the AX1 at Tuttle for some QRP P2P DX!

Taking the Xiegu G106 on its maiden POTA activation!

Last year (May, 2022), Xiegu announced a new compact field radio that would be added to their line of transceivers: the Xiegu G106.

As I was capping off my summer in Canada (August, 2022), Radioddity started shipping the G106. Radioddity had me on their list of folks to send a loaner G106 to, but I didn’t have time to even look at the radio I was so busy upon my return, so didn’t immediately request it.

I did watch, however, K8MRD’s initial review and updated review of the G106. It was less than stellar [understatement alert!] but more than relevant to me because Mike shipped his second unit to me on behalf of Radioddity.

I connected that G106 to a dummy load, checked the transmitted signal, and it simply didn’t look very clean. It looked worse than it did when Mike checked it only a couple weeks prior.

I shared my results with Radioddity, told them I didn’t feel comfortable putting it on the air for testing in the field, and they asked to have that unit returned and checked out.

Updated G106

Fast-forward to January 2023 when I was once again contacted by Radioddity to see if I would like to field test an updated G106. I was happy to do so, in fact, because I was curious if the whole G106 experience had improved.

In the spirit of full disclosure: keep in mind that Radioddity is a Xiegu retailer/distributor–they are not the manufacturer nor are they owned by Xiegu. They are a sponsor of QRPer.com, but have no say in what I post nor any sort of editorial input. Indeed, this is always a condition of sponsorship from day one.

To Radioddity’s credit, some of my most critical reviews have been of products they’ve sent me on loan (especially the GSOC).  They take criticism on the chin and keep on moving forward. This is why they are still a sponsor and I like working with them. They understand that I call it like it is and stand by what I publish.

This G106 has been sent to me on loan for a few weeks to review. I plan to take this unit on a number of activations and pair it with a variety of antennas and accessories.

Very early impressions

I will eventually publish a full review of the G106 (likely in The Spectrum Monitor magazine first) once I’ve put in a lot more field and shack hours with the G106. In the activation video, below, I do make a lot of comments about the radio–thinking out-loud–so if you’re considering purchasing the G106, you might at least listen to a few of my initial impressions.

I will say this: for a modern SDR-based transceiver, it’s pretty bare-bones. It lacks a number of features I assumed it might have despite the incredibly affordable $320 US price point:

  • No SWR meter
  • No Power meter
  • No CW or Voice message memories
  • No RF gain control
  • No AGC control
  • No dedicated headphone audio output

But, again, it has more features than many of the bare-bones CW-only QRP transceivers out there, so for the price perhaps expectations should simply be in check–?

Zebulon B. Vance Birthplace (K-6856)

On Tuesday, January 31, 2023, I took the G106 on its maiden POTA activation to K-6856.

The G106 doesn’t have a built-in ATU (which I would never expect at this price point) so I decided to pair it with a resonant antenna. Since it was a very rainy day and the area/ground where I tend to deploy my wire antennas at Vance was squishy and soft, I opted to deploy my Chelegance MC-750 next to the picnic shelter. Continue reading Taking the Xiegu G106 on its maiden POTA activation!