Because I receive so many tips from readers here on QRPer, I wanted way to share them in a concise newsletter format. To that end, welcome to QRPer Notes, a collection of links to interesting stories and tips making waves in the world of radio!
Field Antenna Survey
Many thanks to Phil (KA4KOE) who shares the results from an informal survey he conducted on the POTA Facebook group. Phil writes:
Tom
I’ve let the survey run for about 3 days on the POTA Facebook group. Sample size was 658 votes. I opted to do a “type” survey and not by manufacturer.
Something tossed in tree and just hoped it would work: 2%
Total: 93%.
Remaining obscure types cut-off below 2% accounted for 7%.
Again, like the poll I conducted previously on radio types, not surprised by the No. 1 spot.
What DID surprise me was #7: I put that selection in the poll types as a joke but 2% of hams throw a wire up in a tree or other support with no forethought and hope it works.
The Palm Pico: Getting a grip!
Many thanks to Terry (N7TB) who shares the following tip:
I have both the single and double Pico paddle and the KX3 mount. After watching you hand hold your paddles, I came up with a way to make small paddles easier to hold. I have attached a photo. It is a small piece of 3/8 ID pipe insulation to make holding the Pico paddle easier.
Have a great trip to Hamvention.
73,
Terry
N7TB
QRP Radios from the 70s and 80s
Many thanks to Ron (W6AZ) who shares the following video from Mikrowave1 on YouTube:
You asked for it! Here is the birth of QRP and a whack at revealing the top 10 QRP Homebrew Projects and Commercial Radios that started it all. What is all the fuss about low power?
“What QRP radio do you tend to use the most in the field?“
The responses started flowing in immediately and within the first day we had already accumulated over 400 votes.
I turned off the survey this morning at 5:00 EDT with a total of 696 responses.
Survey Results
Here’s a pie chart showing the top 26 results in the survey. To see detail, you will need to click on the image below (or click this link) to enlarge it in a new window:
The top choice was the Elecraft KX2 which received 131 votes. I’ll admit, this was my top choice, too.
The KX2 is the most compact, full-featured radio currently on the market. I know of no other radio that weighs less and is smaller in size that also sports options for an internal battery and internal ATU. It’s also one of only about five radio models on the market that has a built-in microphone.
The KX2 is one of the pricier QRP transceivers on the market, so in that sense, it did surprise me that it was number 1.
The YaesuFT-817 and FT-818 series transceivers took second place with 105 votes.
Since this radio enjoyed one of the longest production runs in the history of amateur radio–and the price floated around $650 US new–we shouldn’t be surprised. It has so many good things going for it; click here if you want a deep dive into why I think the 817/818 is a fantastic field radio.
The Icom IC-705 took third place with 101 votes.
The IC-705 is an incredibly versatile radio as well and it packs some serious performance! It’s also one of the priciest QRP radio on the market at around $1,400 US. Click here to read my full review of the IC-705.
These are only the top three radios–check out the full results below to see how the top ten ranked among a total of 48 entrants.
The last weekend was pretty nice and just like an invitation to operate outdoors. As I wrote in one of my previous posts, I often activate summits on the Swabian Alp, a high plateau, which falls with steep cliff-like edges and many SOTA summits to the northwest. If you approach it from the foothills where I live, the sharp edge is clearly visible.
On the way to the ascent, you came along old, picturesque villages. If you look closely, you can see the “Maibaum”.
The tradition of erecting a “Maibaum” (Maypole) is a long-standing custom in Germany, particularly in the southern regions. The Maibaum is a tall wooden pole that is decorated with colorful ribbons, wreaths, and symbols of the local community. It is usually erected on May Day or the night before and is a symbol of spring, fertility, and community spirit. In some regions, it is also accompanied by folk dances, music, and festivities.
It was my third activation of the summit Römerstein, and every time I used another transceiver.
My transceiver history
When I started with ham radio, I used an old Icom IC-706.
The lack of modern features such as DSP and filters, and the current consumption made it not the first choice for portable operators. I soon switched to an Icom IC-7300 at home and got used to a waterfall and spectrum display. After two activations with the 706 I bought a Xiegu G90.
During the time of my first activation of the Römerstein, I operated only in SSB. So, I was happy with the G90. The display was small, but way better than my old 706. I was satisfied and used the G90 until I started with CW. In CW, I prefer using headphones until today. The sound of the G90 was uncomfortable for me. The lowest volume was too loud, a lot of loud cracks annoyed me, and I was never happy with the filters. Continue reading A Triple activation and why I switched from a KX3 to Icom’s IC-705→
Last week, Phil shared results from a survey he conducted on Facebook regarding the most popular radios used for POTA. The survey was informal and, of course, only open to those in the POTA Facebook community.
The survey confirmed my suspicions that both the Yaesu FT-891 and Xiegu G90 were among the top radios used by POTA activators. Heck…I hardly know a POTA op that doesn’t have one of these two rigs–!
The survey also made me realize that I live in the world of QRP and often forget that the vast majority of ham radio operators do not, necessarily.
QRP Radio Survey Series
I thought it might be fun to publish a series of surveys over the course of the next few weeks that specifically focus on QRP transceivers. Each survey will contain only one question.
These will all be informal surveys, but I’d like to have a fairly specific question in mind with each and would ask that you think about that question and answer it as honestly as you can. Many of these are subjective, so this isn’t always an easy task.
This first question, though? It’s easier to base on fact…
What QRP radio do you use the most in the field?
At the end of the day, our “favorite” radio might not be the one we actually use the most in the field.
In this first survey, please select the QRP radio you use most often in the field.
Notes:
If you see a glaring omission in this list–a popular, mass-produced QRP radio I’ve overlooked–please comment and I’ll add it to the list. Otherwise, simply select the “Other” choice and provide the manufacturer and model.
This list is pretty comprehensive, but I didn’t include some of the more obscure models, nor did I include vintage or Japanese Novice models simply because I see so few people using them as daily drivers in the field.
For this survey, I included radios with a maximum output power of roughly 20 watts.
The survey form has no place for comments, so if you’d like to tell us about your selection (even if it’s your only QRP radio), feel free to leave a comment on this post!
Last year, during a Black Friday sale, I took a calculated risk and purchased a bag I hoped would accommodate my Yaesu FT-817ND that has been outfitted with an Armoloq TPA-817 Pack Frame.
CP Gear Tactical Aircrew/Pubs Bag
Rod (VA3ON) first introduced me to CP Gear Tactical–a military pack manufacturer based in New Brunswick, Canada.
I contacted CP Gear Tactical shortly after outfitting my FT-817 with the TPA-817 pack frame. I measured the frame carefully and asked if the interior padded pocket (which is actually designed to hold a tablet–might fit my radio.
I never heard back from them. I could have called them, but on Black Friday, when it was on sale for 20% off and free shipping, I decided to throw caution to the wind and simply purchase it. My total price in USD was something like $62 shipped.
As soon as I opened the CP Gear pack, the first thing I did was check to see if the FT-817 with pack frame would fit in the interior pocket.
Much to my surprise, it fit it perfectly!
Indeed, it’s as if the pocket were specifically designed to accommodate the FT-817ND/TPA-817 combo.
Even the middle Velcro strap fits precisely in the middle of the radio between the pack frame side extensions. The strap holds the rig securely; once, I accidentally fumbled while holding the bag and even though it was upside down, the FT-817 remained securely inside. The strap held it in place.
The bag has loads of room inside. In fact, you can very easily transform it into a fully self-contained field radio kit.
I actually give a small tour of this pack in my activation video below, so if you’d like to see some of the exterior pockets, I would encourage you to check it out!
The kit version has been delayed for the time being due to several (most) beta builders experiencing frustration with the process of assembling the front panel onto the main board with 15 loose and unsoldered switches, jacks, and controls. These issues indicate that the TR-45L kit version will most likely be offered as a semi-kit with the main board being largely factory assembled, leaving the pre-aligned plug-in RF board in kit form. The internal battery option would be available in this kit version, but not the Z-Match ATU.
TR-45L Skinny (left) TR-45L (right)
A second kit version in a thinner housing is also being considered (see the TR-45L “Skinny” photos). This version would be offered with no options available (other than a $20.00 tilt bail) as there is no room inside the thinner housing for the internal battery nor the ATU option. It does, however, contain an internal speaker. Unfortunately, while greatly simplifying construction, these semi-kits will erode the normally expected cost savings with a kit. The best guess price for these TR-45L semi-kits would be around $500.00. We welcome your thoughts and opinions on these semi-kit concepts.
For those interested in signing up for the reservation list, you can use the reservation form linked here. Be advised, it could take up to 6-8 weeks until they are ready to be shipped.
The TR-45L has been a long time coming, and I thank you for your patience during the development cycles with parts procurement issues due to the covid pandemic. Let’s hope that the ugly covid experience is behind us…
In a nutshell, the TR-45L Skinny will simply be a TR-45L in a skinnier chassis with no option for an internal battery nor Z-Match ATU, but will still have an internal speaker.
For those of you who don’t care for the Z-match or internal battery, the TR-45L Skinny will certainly be more portable and less bulky than the original TR-45L.
I suspect the performance will be identical. I’m sure the internal speaker will work well, but I will be curious if it sounds as full-fidelity as the original TR-45L. I might ask John for a loaner to check it out once released!
Again, if interested in this variant of the TR-45L, you might wish to fill out the reservation form.
Many thanks to Dennis (WQ7O) who shares the following article:
POTA – Getting There
by Dennis (WQ7O)
POTA activity seems to be popular and growing. I have been a ham since the 60s and I am excited by how fun POTA hunting and activating this “new” radio sport can be. I have heard it called “Field Day” every day.
Drawing on decades of hamming experience, I contemplated how we got here. I remember my first field day and the effort required. Basically, equipment meant to be used in an indoor and fixed environment was adapted for portable use. Let’s take a look at what that might mean.
Power supplies that operated on DC were available but expensive. Looking at say, a Drake
TR-4, a popular transceiver at the time, the rig cost $700 in 1968 dollars. The power supply and speaker ran another $200 or so. You’ll need a mic and key, which were not included. Few tuners were available. You could go for a Johnson Matchbox. Drake made the MN-4 and
MN-2000 to match your TR-4. Count on another $200 or so. If you are a CW op and you want a keyer, the Hallicrafters TO keyer and a Vibroplex paddle were another $200. The gear described here would just fit on an office sized desk and don’t ask about the weight.
Now just gather that up and take it to the park, right? Well for starters the DC supply was for mobile use not portable use. You won’t operate for long off a battery with the amperage needed to warm all those tubes. So, bring along a generator and that’s what we did. BTW, we used a truck to transport it all because we needed it. Backpacks weren’t useful.
Antennas were all for fixed use as well. We brought a tri-band yagi and lashed it on a mast to the truck. We ran some wire antennas and we were on the air. Antenna analyzers simply did not exist, we tuned around and graphed it by hand.
Image Source: RigReference.com
This may sound much like a modern field day but hardly the “light and fast” deployment of a SOTA/POTA activation. Also, take it from me, running tube gear in the field is tough. I had a Gonset Communicator (2 meters) issued to me by our ARES group. It was about 100 times the displacement of your trusty handheld and many times the weight.
So since the 60s, the microprocessor, large scale integration and SDR technology have reduced the size and power requirements for all the gear we use. Today a radio that fits in a pocket can include a rechargeable power source, an antenna tuner and run from 160 meters through UHF offering all modes.
From lead acid, NiCads, NiMH, Lithium Ion and now LiPO batteries, the availability of reliable and portable power sources to power rigs and accessories is a fairly recent development. The increased efficiency coupled with decreased power demand have set us free. How many of us have quick deployment solar panels to keep those batteries topped off during extended operation? It beats the noise, smell and mess of gas cans and a generator. Also, you do not want to backpack a lead acid battery for a SOTA activation. Too much weight and not enough power.
Then there is the internet. If you do POTA like I do POTA, you go to the web page and look for spots. How many would you find without the spots and the RBN? When an activation is deployed one of the first actions is to spot it on the POTA app. Thus, as with other digital modes, the internet becomes an integral part. We could do POTA without the internet, but it would be a whole lot harder. And our taken for granted cell phone brings the internet right to the picnic table.
Image Source: Universal Radio
What about the gear? What should we use and how available is it? Early rigs for portable and QRP use were not plentiful or feature rich. The styling of the popular Penntek TR-45 is reminiscent of the Heathkit “Benton Harbor Lunchbox.” At the risk of understatement, the features do not compare.
The manufacturers responded. We weren’t all going to home brew our QRP rigs. So came the Yaesu FT-817. In 2001, Yaesu introduced the 817 which did all modes, 160 through UHF, ran on batteries, fit in your backpack and was affordably priced. Suddenly, portable operation was possible, versatile, affordable, reliable, practical and fun. We were freed from attics, basements and garages and embraced nature.
I recently built a QRPLabs QCX mini. This tiny rig has more features than we ever knew we needed when we were operating that Drake TR-4. If you want more bands the LNR Mountain Toppers are wildly popular. Other manufacturers, large and small, increased the offerings with different form factors and features.
This included antennas. An early entry was the Buddipole. Many cottage industry entrepreneurs followed and today the selection of quick and easy deployment antennas is broad and deep. From a whip antenna to attach to the rig itself to wire antennas for 160, there are a lot from which to choose. Don’t forget that 3D printing also accounts for a lot of our accessories like keys, cages, stands and winders.
Want to add a tuner to your station? The Elecraft T1, I built mine as a kit, is a superb, self contained tuner and offers broad, automatic matching running on a 9 volt battery. Since the T-1, LDG, MAT MFJ, Icom and others have offered great tuner choices that travel easily as part of your kit.
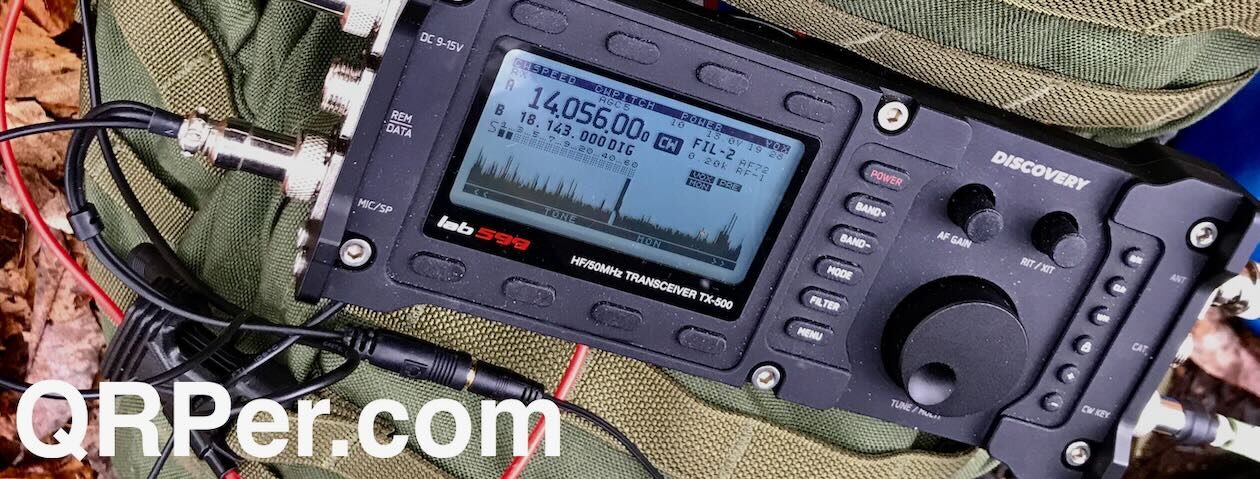
Anyone who owns a Baofeng knows that the Chinese have entered the ham radio market. While the quality and availability of these rigs can be an issue, they are quite affordable. This brings in new users who learn the hobby and progress to greater things. I have heard hams criticize the quality of MFJ products. MFJ makes the accessories the major manufacturers don’t and at popular prices. When there are more licensed operators, the manufacturers can offer more products at better prices as markets expand. Xiegu HF radios have powered many activations with its built-in battery, tuner and microphone. If POTA and QRP were not driving activity would Icom have brought out the IC-705? The Elecraft KX-2 and 3, the Lab 599 TX-500 and these types of boutique radios answer market demands.
The “Prepper” movement evolved from natural disaster “EmComm” and operating “off the grid” has increased the demand and thus the supply of gear. Building a portable kit has gotten easier and more affordable with a broad selection of choices and options. More is better.
Lots of other simple things have come together to bring us to the “10 minute setup” of the QRP SOTA/POTA activation of today. A whole room full of heavy, power hungry gear has been reduced to a device that literally fits in a pocket. Add a wire and you are on the air. My ham career began as a boy with a tube driven Heathkit transmitter with crystal control fixed frequency in the attic of our family home. I don’t think anybody appreciates more than me opening a backpack and in a few minutes setting up a modern station, wherever I am. QSOs around the country and around the world roll in with a few watts and a wire.
Many thanks to Adam (BD6CR) who shares the following guest post about his latest project:
From Open Source Project ADX to Kit ADX-S
by Adam (BD6CR)
BD6CR @ CRKits.COM
Original Design: WB2CBA
Modification and Kitting: BD6CR
I knew Barb, WB2CBA from his uSDX design a few years ago and I introduced both DL2MAN and his designs in my blog. So, when I came across the ADX – Arduino Digital Xcvr a few months ago, I immediately ordered both the ADX (through hole) and the ADX UNO (surface mount) PCB samples.
I started building the ADX UNO and put it in a dental floss case and made a few contacts on park bench. However, the soldering is too much for my eyesight. So, I turned back to the ADX because I don’t need to solder any SMD parts, since both the M328P and SI5351 are module based. I could build the project in 3 hours and it worked the first time.
However, I felt unsatisfied with the strong BCI since the CD2003 radio receiver chip was connected as a direct conversion receiver. JE1RAV mentioned in his QP-7C modification project that he tried JA9TTT’s idea to build a superhet SSB receiver with the TA2003 or CD2003, so I tried and it worked very well. I have decided to name the new circuit as ADX-S, where S stands for Superhet.
I shared the great news with Barb and he encouraged me to carry the flag to make it a kit, since my design D4D was his first digital radio and he loved it.
My hardware modification can be outlined in this schematic. I have added an FL1, PFB455JR ceramic filter by Murata and a C25 coupling capacitor from CLK2 of SI5351 module. The RX audio comes from pin 11 instead of pin 4.
On Friday, February 10, 2023, I had a hankering to fit in a POTA activation that morning. South Mountains State Park was an easy detour on my drive back to the QTH, so I scheduled an activation.
Brooks has been steadily working on his CW skills and is dangerously close to doing his first CW activation. We’ve managed to set up one late evening casual CW rag chew and I think his CW chops are very good. We plan to do more evening rag chews when our schedules align. He’s made amazing progress.
I contacted Brooks that Friday morning and he was game to meet up and do some POTA. He wasn’t quite ready to do a CW activation, so I suggested he log for me using the HAMRS app on my iPhone. I find that logging for CW ops during past Field Days really helped build my own confidence before I started using CW daily.
Brooks was 100% game to log for me.
And let me just say what a luxury it is to have someone log to HAMRS for me on my iPhone! It frees up my brain to simply log on paper (which I always do) and enjoy working stations without the extra busy work! Hat tip to good ole’ Brooks.
South Mountains State Park (K-2753)
I arrived at South Mountains State Park (the Clear Creek Access), put on my hiking boots, then Brooks pulled into the parking lot only a few minutes later.
We agreed in advance to fit in a quick hike up the Clear Creek Trail prior to the activation. I, for one, really needed to stretch my legs!
After the hike, I grabbed some gear from the car and we set up at the one picnic table at the Clear Creek Access.
Brooks and I both had commitments that day so could only play radio for 45-60 minutes max including set-up and take-down.
I deployed the same antenna I’d used the previous day: MW0SAW’s homebrew EFHW on a SOTAbeams winder.
Many thanks to Jens (DJ2GMS) who recently reached out to share results from some very simple tests he performed on the Icom IC-705 and Yaesu FT-818. Jens writes:
A comparison of the Yaesu FT-818 and the Icom IC-705 (no comments, just facts):
On ext. 10,1V the FT-818 only needs 32 mA more than the IC-705
IC-705 (342 mA):
FT-818 (374 mA):
Min ext. voltage for TX of the IC-705 is 10,1V (appr. 1,8 Watts)
With 10,1V the FT-818 delivers 5 Watts
Minimum ext. voltage for TX of the FT-818 is 8V (appr. 3,5 Watts)
QRP radios, product announcements, reviews, news and more. Low power amateur radio fun!
Please support QRPer by adding us to your whitelist in your ad blocker. Ads are what helps us stay online. All of our ads are ham radio related--no junk, we promise! Thank you!
 Because I receive so many tips from readers here on QRPer, I wanted way to share them in a concise newsletter format. To that end, welcome to QRPer Notes, a collection of links to interesting stories and tips making waves in the world of radio!
 Many thanks to Phil (KA4KOE) who shares the results from an informal survey he conducted on the POTA Facebook group. Phil writes:


