The REZ Ranger 80 antenna system ships with everything you need, including a nice backpack.
Back in March, I received an email from Mike Giannaccio (W5REZ) the owner of REZ Antenna Systems–he was curious if I’d like to check out his REZ Ranger 80 antenna system.
At the time, my plate was pretty full, so he arranged to send it to me on loan in July.
If you’re not familiar, the Ranger 80 is a portable vertical antenna with a tuning coil at the base that employs a sliding tap for tuning. The Ranger 80 will cover anywhere from 80 – 15 meters without needing any sort of external matching device (like an ATU).
The Ranger 80 Tuning Coil.
If you’re familiar with the Wolf River Coils antenna systems, then you’re familiar with this type of vertical antenna. The difference is that the Ranger 80 is built to what I could only describe as MilSpec standards.
Much of the Ranger 80’s components are CNC machined from premium materials. It sports a Delrin body, black anodized 6061 aluminum, and all stainless steel hardware.
This is not a featherweight antenna: it has the heft to match the caliber of materials used in its construction. It’s not an inexpensive antenna either–it’s currently about $560 US at DX Engineering.
The base of the Ranger 80: note the beautifully CNC-machined holes for the four counterpoises.
The Ranger 80 is also rated for 500W SSB and 250W CW/Digital–in other words, quite a bit more power than I’d ever use in the field, but this design will make activators and field ops happy that like to push some wattage.
I was curious how easy the Ranger 80 would be to deploy and tune, so on Sunday, August 6, 2023, I took it to one of my favorite parks on the planet.
Mount Mitchell State Park (K-2747)
I wasn’t alone on this trip: it was a proper family picnic with my wife, daughters and, of course, Hazel.
If you own a Xiegu G106, X6100, or any other radio that is prone to overloading when in the presence of an AM broadcaster, you should consider building an in-line BCI filter!
As many of you know, I’ve been testing the Xiegu G106 over the past couple of months for a review that will be published in the May 2023 issue of The Spectrum Monitor magazine.
One criticism of the G106 is that its front-end overloads when there’s an AM broadcaster within a few miles of where you choose to operate. The Xiegu X6100 is identical in this regard.
One quick way to remedy this is to build or buy a BCI filter. We’ve mentioned in the past how you can homebrew them and I planned to do so. After checking my parts drawer, though, I realized I needed to buy a capacitor, toroids and at least one of the two BNC connectors needed if I wanted an in-line filter in a small project box.
In early February, Jeff (KD4VMI) sent the following message to me:
Good evening. Love your YouTube videos and QRPer posts and, from them, I know you appreciate rugged packs and gear.
I enjoy POTA, although I don’t get out as often as I’d like, but I’ve found Blue Ridge Overland Gear’s various bags and modular systems to be very handy for bundling my radios, batteries, cables, and antennas.
It’s been on my mind for some time to let you know about them (if you don’t know about them already) and I finally decided to take the time to write you. I’m not associated with them in any way, and I didn’t approach them about passing this on to you, or anything like that. I just really appreciate their gear and I think you might, too.
The BROG materials are high quality and stout, the zippers are beefy and smooth, everything is double or triple stitched and everything is modular so it can be used for just about anything, and in pretty much endless combinations with their various bags and gear.
Their products are not overly cheap, but are guaranteed for life. They’re located in Bedford, Virginia and all their things are made in the USA (I think mostly in Bedford).
I often use their tire puncture repair kit bag, for instance, to carry my FT-891, Bioenno battery, cables and mic, and PackTenna, and then strap the coax to the Molle system on the front of the bag.
They posted a YouTube video showing their gadget bag with accessory pouches for HTs, etc.
Anyway, I appreciate all you do for our great hobby and just wanted to share this info.
Take care and all the best to you and yours…
Thank you so much for the kind words, Jeff, and for the tip about Blue Ridge Overland Gear (BROG). You’re obviously a skilled pack enabler because you had my attention by the second paragraph–!
Shortly after my exchange with Jeff, I checked out the BROG website and was really impressed with their line-up of packs and gear–all with a focus on modular organization, especially in-vehicle since it’s for Overlanding. It’s just the icing on the cake that their gear is made in the USA.
I was very curious if their Gadget Bag, in particular, would lend itself to being a modular flied radio kit pack.
Thing is, there are so many options and configurations for the Gadget Bag, I wasn’t entirely sure what to order.
Being a fellow who expects to pay a premium for rugged products, made in the USA–especially ones that carry a lifetime warranty–I was prepared for some sticker shock. Turns out, BROG pricing is pretty reasonable in comparison with other cottage industry pack manufactures.
Still, I wasn’t quite sure how easily some of my radios and gear might fit in their zippered pouches, so I reached out to BROG–mentioning QRPer and my constant search for field radio packs–and asked if I could order some packs and pouches, test them with my radio gear, then pay for what I decided to keep. I didn’t want free gear, I just couldn’t tell based on the product images and posted dimensions what pouches and packs might fit my various radios and accessories. Also, I knew readers might ask if certain pouches and packs might fit certain radios.
The good folks at BROG kindly obliged, so I asked for the following list of items:
– QTY 1 Gadget Bag (shell) in black
– QTY 3 Large Velcro Pouches
– QTY 6 Medium Velcro Pouches
– QTY 1 Velcro Cord Keeper
– QTY 1 Medium GP Pouch
– QTY 1 Velcro Headrest
– QTY 1 Headrest Pouch Kit
Some of these items weren’t in stock, so it was a week or so later when I received notification that the package had shipped. It arrived a couple days later.
Because I receive so many tips from readers here on QRPer, I wanted way to share them in a concise newsletter format. To that end, welcome to QRPer Notes, a collection of links to interesting stories and tips making waves in the world of radio!
Adrian Ciuperca (KO8SCA): 3Y0J Presentation to the Northern Illinois DX Association
Many thanks to Eric (WD8RIF) who shares this excellent presentation by Bouvet activator, Adrian (KO8SCA):
Many thanks to Scott Wooten who shares the following announcement via YouTube:
Welcome to the Georgia State Parks on the Air event. Our goal is to have all fifty Georgia State Parks on the air in one weekend. This event is open to all licensed Amateur Radio Operators whether you live in Georgia or not.
There are two ways to participate: Activating or Hunting. Activators fall into two different categories: Single Operator or Club, and there is a special category for Georgia ARES operations.
The first annual 36 hour event kicks off on April 1, 2023 at 1200 Zulu and concludes at 2359 Zulu on April 2, 2023.
If you participate please remember this event is considered a CONTEST, so while casually operating Parks on the Air on the WARC bands is permissible, this event does not allow operations on the WARC bands.
For more information or to sign up as an activator, go to GAPARKS.org
Some of you might be familiar with Mike (N2HTT)’s Etsy Shop, HamGear3d.
Mike is a long-time QRPer reader/subscriber who designs 3D-printed radio frames for select QRP radios. In the past, Mike has designed frames for radios in his own collection including one for the LnR Precision LD-11, Xiegu X6100, Icom IC-705, and now the Xiegu X5105. Mike has also kindly sent me frames for many of these radios (knowing I also have them in my collection).
Mike has never asked to be plugged or promoted–in fact, the first frame he sent me was for my daughter’s radio–but I think his radio frames are functional and well-designed, so I’m happy to share info here on QRPer.com.
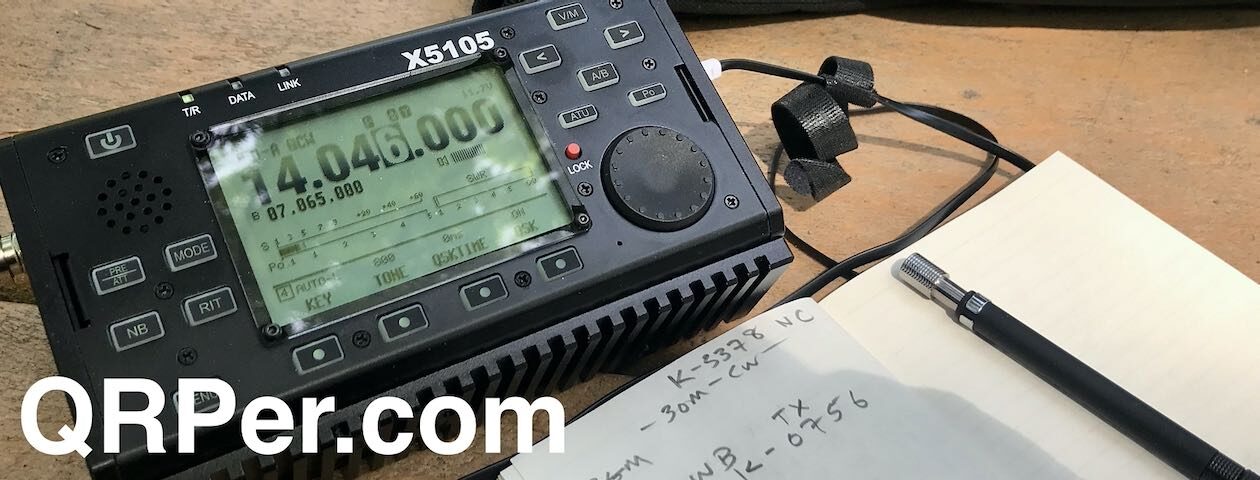
A couple months ago, Mike sent me a frame for the Xiegu X5105 and I realized yesterday that I never posted photos of it.
Like his X6100 frame, the X5105 frame fits around the radio; assembly is very simple (and well-documented on his website) and it doesn’t require modifying the radio in any way. It simply friction fits around the radio and is secured, thus can also be removed quite easily.
The frame, I’ve found, also protect the X5105 power button from accidentally being turned on in transit!
Below, I’ve posted a few photos of the Xiegu X5105 frame.
Thanks, again, Mike for sending me this radio frame. Very kind of you. Note that Mike can add your callsign to the front screen protector of the radio frame at no additional cost.
Elecraft KX2 owners that follow Elecraft’s email discussion groups have heard that the new KX2 internal battery charger, the KXIBC2, has been tested and would soon be available for purchase.
I checked the Elecraft website this morning and the KXIBC2 has been added to the KX2 product page within the past 12 hours or so.
There are two model numbers:
KXIBC2-F: The “F” in the model number indicates that it will be factory installed with a new KX2 order.
KXIBC2: This is the part you would order if you already own a KX2 and plan to install it yourself. This one is referred to as the “Kit” version since the user installs it.
The price is $139.95 US plus shipping.
I just ordered the Kit version and paid a total of $149.30 US with shipping.
According to Elecraft, the kit version is actually very simple to install, but there’s an option to have the factory install it for you via an RMA. Elecraft notes:
Anyone with a modest amount of soldering experience should be able to do the KXIBC2 installation. Based on lots of feedback from field testers, we dramatically simplified the installation procedure. For field installation, we recommend “Method 1” (see the revision B2 instruction manual or later). There’s no need to do any disassembly other than removing and replacing the right side panel. And there are only two wires to solder. If after having a look at the instructions you feel that you’d rather let Elecraft to the job, we’ll be happy to. Simply contact [email protected] to obtain an RMA.
I’ve been looking forward to this particular KX2 upgrade.
While I don’t find removing the internal battery, charging it, then replacing it very cumbersome–I’ve literally done this hundreds of times–the new internal charger will make topping off the battery that much easier.
The KXIBC2 replaces the previous KXIO2 Real-Time-Clock optional module. If you have the KXIO2 installed, you’ll need to remove it and replace it with the KXIBC2.
The KXIBC2 retains the RTC (real-time-clock) function.
I try to start each year by doing a POTA or SOTA activation on New Year’s Day.
POTA actually issues a certificate for completing an activation on New Year’s Day so there are typically loads of activators and hunters working the bands. It’s an ideal time to play radio.
This year, we had a number of family activities on New Year’s Day, but I made a little time to fit in an activation during the late afternoon at my most accessible spot on the Blue Ridge Parkway: the Southern Highland Folk Art Center.
As with my last activation, I suspected I would be operating in the dark, so I brought my LED lantern along for the ride.
Although not intentional, this New Year activation had a lot of new-to-me stuff involved!
New VK3IL Pressure Paddle
The prior evening–on New Year’s Eve–while my wife and daughters were watching a classic movie movie marathon, I used the time to heat up the soldering iron and work through a few kits and projects that had been sitting on my desk.
Michael (G0POT) sent me the Pressure Paddle circuit board and heat shrink via Andy (G7UHN) several months prior. [Thank you so much, fellas!]
To my knowledge, the VK3IL Pressure Paddle isn’t available in complete kit package, but it’s quite easy to source everything yourself.
On his website, David provides the Gerber files you’ll need in order to purchase the circuit boards from your favorite manufacturer (I’m a huge fan of OshPark here in the States).
Next, you simply need to order the components. Here’s the list assuming you’re using DigiKey:
Quantity of 2: 732-7579-1-ND (CAP CER 10000PF 10V C0G/NP0 0805)
Quantity of 2: 1738-SEN0294-ND (RP-C18.3-ST THIN FILM PRESSURE S)
Quanity of 1: Three conductor wire with a (typically) 3.5mm plug (note that I had one of these in my junk drawer)
Keep in mind: the components are surface-mount. If you’re not used to working with SMD components (ahem…that would be me) I suggest buying a few spares of each in case you lose or damage one or more during the build.
It also helps to cover the finished board in heat shrink not only to protect the board and make it easier to grip, but most importantly (if you’re me) hide your electrically-sound yet unsightly surface mount soldering job.
The build might have taken me 20 minutes.
New FT-817ND Narrow CW Filter
Some time ago, I purchased a second FT-817ND with the idea of doing full-duplex satellite work. I later realized I could be taking the second FT-817ND out to the field more often if I simply had another narrow CW filter installed, so I built one.
This New Year’s Day activation was actually the first time I’d taken this particular FT-817ND and its new narrow filter out to the field!
New Armoloq TPA-817 Pack Frame
Earlier this year, I also decided that I wanted to outfit my 2nd Yaesu FT-817ND with an Armoloq TPA-817 pack frame. The idea was to experiment with building a rapid-deployment field kit around it.
Back in September, I was contacted by Jesse Chen (BD7LLY) who has been a long-time reader of QRPer.com. Jesse is also the founder of Chelegance (a.k.a. JNCRadio): a company that has been producing ham radio gear and accessories since 2020.
Jesse reached out and asked if I would consider evaluating a couple of the field portable antennas he designs and produces in China.
In truth, I get a lot–and I do mean loads–of requests to evaluate products and I pass on 97% of them. I only have so much time and I simply don’t bother with gear I think is unnecessary or that could be cheaply made.
Before replying to Jesse, I did a little research on Chelegance and discovered that DX Engineering now distributes their products. I decided that if DX Engineering liked the quality well enough to add Chelegance products to their catalog, then it must be up to a decent standard. I’ve never purchased anything sub-quality from DX Engineering.
I also like the fact that Jesse is a real amateur radio operator.
After checking back in with Jesse, he decided to send me two of his portable HF antennas: the M-104 and the MC-750. In full disclosure, he sent these to me at no charge–i.e. free–with the idea I could do a proper evaluation and share my thoughts both with him and with my readers.
He knew that both of these antennas had the potential to compliment my style of portable operating. I also told Jesse not to rush ship them to me as I was quite busy. I received both antennas at the end of October.
The first antenna I wanted to try was the MC-750.
The Chelegance MC-750
When I received the parcel from Jesse, I was very impressed with the MC-750’s custom soft-sided case. The stitching and quality of it are much better than I would have expected. The interior is custom designed to hold all of the MC-750 antenna components. There’s enough extra space in it, in fact, that I can also carry a 40′ RG-316 feedline inside.
Product Photo by Chelegance
The antenna basically consists of the following components in the supplied padded bag:
A heavy stainless steel ground spike and matching unit
40 meter coil
50 cm antenna arm/extension
5.2 meter telescoping whip
4 yellow counterpoise wires with a wire winder board
The only antenna I have that might compare with the MC-750 is the Chameleon CHA MPAS Lite which is one of my favorite portable HF antennas for its quick deployment, and overall quality. For reference, the CHA MPAS Lite retails for about $360.
I’ve just learned that my buddy Mark (N6MTS) at Halibut Electronics has just kitted up a new batch of his CMCC Test Rigs and is now accepting orders. I know that some of the experimenters in our community might appreciate this brilliant bit of gear that Mark originally designed as a piece of test gear for his own workbench.
I asked Mark to shed a little light on this kit and exactly what it does:
A Common Mode Current Choke, aka a 1:1 Current Balun, is a common (pardon the pun) device in a ham shack. They can be used: at the Antenna feed point to prevent dangerous unbalanced return currents on the outside of the feedline, at the Radio’s antenna port to minimize RF noise picked up on the feedline, on DC or AC power cables and other interconnect cables to minimize RF pick-up in the shack, etc.
Most RF test equipment, such as a (Nano)VNA, measures the Differential Mode of a system, that is, the balanced currents that flow on the INSIDE of a coax cable. This is great for measuring things like: the frequency response of a filter, the complex impedance (or SWR) of an antenna, or the loss of a length of coax.
It cannot measure the Common Mode of a system, that is, the unbalanced current that flows on the OUTSIDE of a coax cable. This means it cannot (directly) measure a Common Mode Current Choke.
The Halibut Electronics Common Mode Current Choke Test Rig converts the Differential Mode signal generated by the VNA into a Common Mode signal, and places it on the outside of the shield of a coax system. This allows the VNA to directly measure how effective the choke is at choking common mode RF currents. Once you can directly measure a device, you can measure the real world effect of changes you make, and optimize the device for your specific use case. As opposed to relying on calculations and predictions of ideal conditions in free space.
The Common Mode Current Choke Test Rig is a kit that requires some assembly, using a soldering iron and Philips head screw driver.
The SP4 POTA/SOTA CW Morse Magnetic Iambic Double Paddle – Designed By N0SA.
Super Lightweight, Portable Compact Paddle With An Attached 3.5mm Cable.
Uses Magnetic Tension And Easily Adjustable With Stainless Steel Contacts.
Great for portable operations, and supplied with 3M Dual Lock Velcro for easy mounting and removal of the paddle from base or anything of your choosing.
FEATURES: Small and light weight – only 1.7ozs. WITH BASE: Small and removable from base – 1.25 lbs.
Measures 2.5″ x 1.1″ x 1″
Frame and finger pieces are 3D printed with carbon fiber reinforced PETG.
Levers are solid CNC Machined 6061 aluminum.
3 foot flexible cloth covered cord with molded 1/8” plug stays flexible down to 0 Deg F.
All fasteners used are Stainless Steel.
Allen wrench that is needed for spacing adjustment is also included with the key.
Adjustments stay put when set, so adjust once and forget about it! 🙂
This paddle is available with or without a steel base.
I have not tried this new paddle yet, but I did know it was in the works. I’m so glad it’s now being offered because I’m a huge fan of both N0SA and CW Morse (disclaimer: CW Morse is a proud sponsor and affiliate of QRPer.com).
The price for the new key is $82.95 without a base or $109.95 with base.
QRP radios, product announcements, reviews, news and more. Low power amateur radio fun!
Please support QRPer by adding us to your whitelist in your ad blocker. Ads are what helps us stay online. All of our ads are ham radio related--no junk, we promise! Thank you!