If you’ve been reading QRPer for long, you’ll note that I’ve become quite a fan of the uber-compact Elecraft AX1 antenna.
Not only has the AX1 never let me down, but it can even outperform my other antennas in terms of snagging contacts during an activation. Yes, it can even work some DX as well.
Normally, I pair the AX1 antenna with my Elecraft KX2 (above) or KX3 (below).
The AX1 needs a little help from an antenna tuner (ATU) to get a match across the 40, 20, and 17 meter bands. Of course, I could always mount the AX1 on a tripod and attach an in-line ATU, but I love the simplicity and speed of setup when paired directly to a transceiver that sports an internal ATU. To be clear, the Icom IC-705 has no internal ATU, but I was able to get away with using a capacity hat to match impedance on 20 meters.
The new Xiegu X6100 (above) has an internal ATU–a good one at that! As soon as I took delivery of this loaner unit from Radioddity, I plotted hooking it up to my AX1 to see how it might shake out in the field!
Many thanks to Vitor Morais who asked the following question in the comments section of my YouTube video:
Hi,
Greetings from UK. I recently learned that POTA [is now in the] UK so I am really looking forward to it.
I also recently put an order for [the Discovery TX-500] so I am really excited as well.
I would like to create a very compact setup pouch for field use to pair with this radio; one that I could take to summits or parks and also travel abroad.
What battery and antenna would recommend?
Would you recommend an ATU?
Or would you compromise to fewer bands or pack a secondary antenna?
I love to know your opinion. Thanks
Great questions, Vitor! In truth, these sorts of questions are easy to ask but quite complicated to answer due of the insane number of options and possibilities available. It’s impossible to cover them all so I’ll try to give you some suggestions based on what I tend to use in the field. Continue reading “What battery, antenna, and ATU should I pair with the Discovery TX-500?”→
This past weekend, my good friend Vlado (N3CZ) and his wife came over to the QTH for the afternoon. It’s been a while since our families got together, so it was fantastic to hang with them.
I’ve been trying to tempt Vlado to do more field activations–we’ve done a number together in the past and it has always been loads of fun. Thing is, both of us have pretty active family/work lives, so it’s challenging to make schedules work out.
Nonetheless, our 2022 goal is to do at least one activation per month as a team!
MK-911
If you recall, a couple months ago, I posted an activation report and video using my buddy Eric’s 40-10 meter doublet. I called it a “stolen” antenna because it had been on loan to me for so long, I think Eric forgot it even existed.
Exhibit A: The stolen antenna.
Eric’s doublet was build around a Hughes Aircraft MK-911 Dipole Fixture that was designed and manufactured for the US Military and appears to have been part of the PRC-74 manpack radio-set.
I had assumed Eric found this as a one-off at a military surplus sale. Turns out Eric (and a few readers) made me aware that it was available at Fair Radio Sales in Ohio for $10.
Image of the MK-911 from Fair Radio’s product catalog.
I decided to buy two of them: one for me, and one for Vlado. The temptation was strong to purchase a few more just for the 30 feet of 72-ohm military-surplus twinlead, however I understand that there’s a limited inventory and wanted others to be able to purchase this gem.
I was also thinking this antenna fixture would pair beautifully with Vlado’s Yugoslavian RUP-15/PD-8 manpack or even his IC-703 Plus.
Doublet time!
While our wives were catching up, Vlado and I made our way to the storage shed and opened my antenna parts boxes.
I did a little digging and found what I was looking for: some wire I purchased at a thrift store many years ago.
This wire has a black jacket that’s quite slick. Guessing it might be 20 gauge and might even be teflon coated. It was ideal for antennas and eyeing it, I thought there might be enough for two doublets.
For a Norcal-inspired doublet–which covers 40-10–we would need two 22′ legs. I decided (prior to cutting) that I wanted our doublets to go as low as 60 meters (5,332 kHz) and cover everything above. 60 meters is such a useful band. Thing is, I hadn’t done research into suggested leg lengths in advance.
We decided to pick a longer non-resonant length and just give it a go. If it worked, great–if not, we’d cut them down to 22 feet and be happy with 40M and up.
We cut the legs to 31 feet, so there’d be a total of 62 feet of wire in each doublet. Many thanks to my daughter Geneva (K4TLI) for helping stretch, measure, and cut the antenna wire with us!
Assembling the antennas was incredibly simple as there are built-in binding posts attached to the twin lead on the winding fixture.
Vlado and I both decided to use the winder as the center-insulator of the antenna. This is actually how this military fixture was designed to be used. The negative, of course, is that the center insulator is relatively heavy. This isn’t a problem for me at all since I use super strong arborists throw lines to deploy my antennas.
From WD8RIF’s website.
Eric (WD8RIF), by the way, actually detached the twin lead from the fixture and posts on his unit and built a new center-insulator from a discarded 35mm film canister (see photo above). He wanted to keep the weight down so he could support the center of the doublet on his fiberglass masts.
Testing QRV!
I had planned to hook up the doublets to my RigExpert antenna analyzer, then I realized it was essentially an unnecessary step.
The big question for me was, “Will my Elecraft KX2 find impedance matches on 60M and above?”
Vlado and I connected the doublet to the KX2 and tuned to 5,332 kHz. After confirming the frequency was clear, I pressed the ATU button. The KX2’s internal ATU churned for a couple of seconds and confirmed a 1.4:1 match.
Score!
We checked all of the bands above 60M and the matches were even better.
Standing in the middle of my driveway, I asked Vlado to load the POTA.app website and look for CW spots.
I couldn’t put the antenna away without chasing some parks!
We then proceeded to work about three stations on the air in CW with 5 watts. All of them gave us 599 reports!
Vlado chasing a POTA activator.
It was serious fun.
As I mentioned to Vlado, it might have been the first time I’ve ever used an HF “Handy Talky” with a doublet antenna!
In the end, we both walked away with two effective military-grade field doublets. A perfect antenna for our monthly “Team Baklava” activations.
2022 Activation Challenge
Last year, my personal challenge was to validate all of my park and summit activations with 5 watts or less.
Since I’m very much a QRPer and primarily a CW op these days, this turned out to be low-hanging fruit; lower than I would have guessed in this part of the solar cycle.
For 2022, I plan to continue the 2021 five watt challenge and add another layer…
This year, my challenge will be to build a new antenna each month and deploy it at least once during that month during a field activation.
The MK-911 doublet will count as January’s antenna.
I’m going to allow myself to build these antennas from anything and everything. I might even cannibalize a few of my broken/worn-out antennas.
[…]A random note on the Chameleon MPAS lite that I purchased a month ago through DX Engineering; I was surprised to find that the matching unit I received was white – it’s always pictured as black on the Chameleon shop page.
Note the black matching unit to the right of the counterpoise winder.
I was a bit disappointed at first; the “stealthiness” of the black colour was something I was hoping for. It also had me wondering if perhaps I’d somehow gotten a test-unit.
[…]I was curious about the colour change and shot Chameleon a note.
Here’s what they came back with:
“Phillip, due to the black Delrin being much more in demand and causing supply chain issues, we opted to switch to the less commonly used white material. The two colors have the same specifications, and should perform identically, besides the color. The issue being more noticeable for some was anticipated, but could not be helped if we were to continue production. Hit it with some flat spray paint?”
I will add that I do like this antenna a lot and the build quality is excellent. I’ve also come around on the colour; I like to think of the white version as a Canadian-Winter Edition.
[A]ll the best,
-p
ve3omi
It does look like an antenna ready for deployment with the Arctic Forces!
Thank you for sharing this, Phillip. I had seen a few photos of the white matching unit but assumed it was a different size or configuration than the one I have. This explains it.
I’m not sure if I’d have a preference for one or the other, frankly. If it was being used in a semi-permanent stealthy installation and in an area without snow, I’m sure painting it flat black or wrapping it with a dark color fabric/tape would help.
Last week, my family hopped in the car and took an eight hour drive to the Outer Banks of North Carolina.
We’ve had such a busy 2021 that we decided to take a full week prior to Christmas and fit in some proper vacation and family time.
We love going to the coast off-season to avoid big crowds. Turns out, we chose well, too: it’s as is we have the whole of the Outer Banks to ourselves. Other than a couple days with some “invigorating” weather (which we actually enjoy) it’s been absolutely spectacular.
The view from our cottage
While radio plays an important role in any travels, my family time always takes priority. The good thing about activating parks is that radio and family time often go very well together!
On Friday, December 17, 2021, my daughter Geneva (K4TLI) and I decided to spend the day together while my wife and other daughter worked on an art project at our rental cottage. We had a few loose plans, but mainly wanted to fit in a nice beach walk, possibly discover some new scenic spots, and enjoy a take-out lunch together.
She very much liked the idea of fitting in a bit of POTA, so we hit the field with two sites in mind.
The plan
My Subaru is still in the body shop getting repaired after a bear decided to open the doors and make himself at home, so we have a Toyota Camry rental car on this trip. It’s been a great vehicle for sure, but its trunk space is limited and we packed quite a lot of food knowing local restaurants would be closed this time of year.
We all limited our luggage and I limited the amount of radios and gear I took. I could write an entire article about my holiday radio and antenna selection process (seriously, I put too much thought into it) but in a nutshell I limited myself to two radios and two antennas.
Do you know what it’s like when you have a new radio and you can’t wait to take it to the field?
Yeah, me too!
Even before I received my QCX-Mini in October 2021, I already knew where I’d take this pocket-sized, single-band QRP CW transceiver for its first field activation: Mount Mitchell (W4C/CM-001).
Mitchell is the highest summit east of the Mississippi river and only about 6 miles from my QTH as the crow flies. I had yet to activate Mitchell this year for SOTA although I have activated it for POTA/WWFF several times. As I’ve probably mentioned in the past, Mount Mitchell park is my “happy place.” Our family loves this site and we visit it frequently to hike in the spruce-fir forest.
I say “lately” but in truth I’m always tinkering with something in the shack.
The radio room/office at my QTH is pretty small, though, and I don’t have a dedicated, full-time workbench. I’ve been mentally re-arranging the room and trying to sort out a way to make space for one because it would be so nice to have a spot where my soldering iron could remain hooked up at all times.
For the moment, when I work on kits I use our dining room table so I try to stick with one or two session kits as opposed to the multi-day variety.
I have a lot of field antennas, so I don’t really need another EFHW, but then again I like having a dedicated resonant wire antenna with each of my radios and, (hey hey!) it’s a great excuse to build a kit!
KM4ACK Image
I purchased the KM4ACK kit and received it within a week. Building the antenna was incredibly straight-forward. Jason packaged the components in small bags so finding parts was easy. I really appreciate kits that aren’t one large “bag-o-parts.” Continue reading Putting the KM4ACK End-Fed Half-Wave on the air at Table Rock!→
Here’s the product description from Elecraft’s website:
The AX2 is small enough to take anywhere – just in time for lightweight field ops during the new solar cycle. Use it HT-style with a hand-held, like the KX2; on a picnic table with an AXB1 whip bipod; or with a tripod and AXT1 tripod adapter. The AX2’s rugged, nylon housing is water-resistant, with low wind resistance and our new anti-wobble design.
Illustration by Elecraft
Experimenters will love the AX2’s versatile design. A snap-off cover provides access to the high-Q inductor. Simply remove turns and re-solder one wire to cover your favorite band. Clip-off tabs are provided for band identification.
The table below shows how the new AX2 20-meter mini-whip compares to our original AX1 multi-band whip. Both are designed for lightweight portable operation. The versatile AX1 covers multiple bands via a selector switch and can handle up to 30 W continuous TX power.
The ultra-compact AX2 has a new anti-tilt base design that minimizes BNC connector wobble – ideal for hand-held (HTstyle) use. While the AX2 covers 20 meters as shipped, it can be modified by the user to cover any single band from 17 through 6 meters. The base unit includes small tabs that can be clipped off to identify the target band.
NOTE: Both whips are intended to be used with an ATU to compensate for terrain, body capacitance, height, etc.
A reader recently asked if I’d be selling my AX1 after learning about the AX2, but that isn’t going to happen. The AX2 is a 20 meters and up antenna and I see it as being a brilliant SOTA companion since its lightweight, stable design should do well on windy summits.
For POTA and WWFF, however, I really rely on the 40 meter band for most of my contacts. The AX1 covers 40 meters brilliantly (and 20M and 17M) so I’ll still rely on it quite heavily.
I think you had said you were going to test the MFJ-1899T at some point.
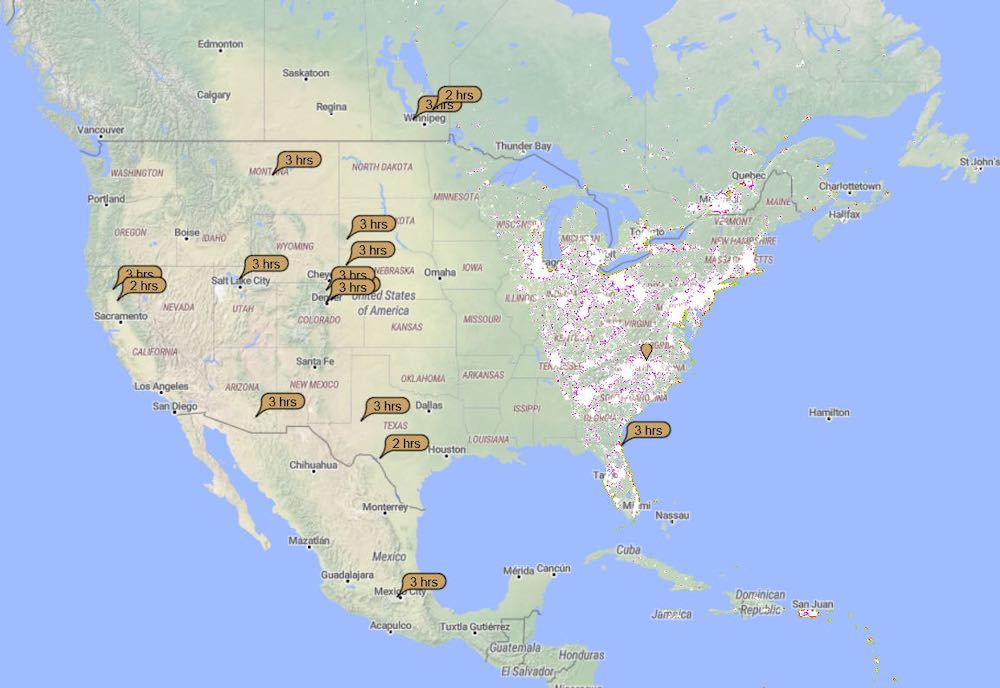
I remembered I had one in a bin so I pulled it out, went to the local park and did some FT8 as my radiation test. All of the PSK reporter screen shots (below) are using the 1899T at 8 watts from my IC-703. I was pleasantly surprised at how well it did plus I was able to work several POTA folks from Texas to NY on voice still at 8 watts.
Because I receive so many tips from readers here on QRPer, I wanted way to share them in a concise newsletter format. To that end, welcome to QRPer Notes, a collection of links to interesting stories and tips making waves in the world of radio!
Connecting an international community through low-power field radio adventures.
Please support QRPer by adding us to your whitelist in your ad blocker. Ads are what helps us stay online. All of our ads are ham radio related--no junk, we promise! Thank you!


 I’ve even paired the AX1 directly to my Icom IC-705 using a homebrew simple capacity hat (thanks again for that idea LY2H!)
 The AX1 needs a little help from an antenna tuner (ATU) to get a match across the 40, 20, and 17 meter bands. Of course, I could always mount the AX1 on a tripod and attach an in-line ATU, but I love the simplicity and speed of setup when paired directly to a transceiver that sports an internal ATU. To be clear, the Icom IC-705 has no internal ATU, but I was able to get away with using a capacity hat to match impedance on 20 meters.