Each time our family spends the summer in Québec, we make time to visit the Saguenay region which is just a couple hours north of Québec City.
We enjoy the hikes, the river walks, and other outdoor activities. It’s a beautiful part of Québec.
This year, we spent more time along the north shore of the St. Lawrence visiting Baie-Comeau and later camping and whale watching a little north of Tadoussac. We also explored more of the Charlevoix region and even parts of the Québec City area we’d never visited in the past. I really enjoyed driving some new-to-us back country roads.
A couple weeks before leaving Québec, we took a family poll and unanimously decided to squeeze in a trip to Saguenay despite our other travels.
Due to other activities we’d scheduled, we only had a window of a couple of days to make the trip. The weather didn’t look that wonderful for the drive north and, in fact, it wasn’t. We drove along a line of torrential rain that was so heavy at one point, I (along with many other drivers) pulled off the road to wait out the heaviest bit.
Otherwise, the drive was/is a beautiful one through the Jacques-Cartier National Park on 73/175 North. Had it not been for the thunderstorms and rain, I would have taken a small detour to make at least one activation.
The first day in Saguenay was all about walking on the river, and hitting some of our favorite spots when the rain finally moved on; I didn’t attempt a park activation. I decided instead to do an early morning activation the following day (July 22, 2022).
Finding a park
You may have noticed that quite a lot of my activations in Québec have been ATNOs (All-Time New Ones). I didn’t specifically set out to activate ATNOs–in fact, they were hard to avoid because there were so many.
Not so in Saguenay!
POTA activators in Saguenay are an active bunch and they are spoiled for choice in terms of the density of parks; there are so many!
It really pleased me to see so many previous activations at the parks I researched–not only activations in the summer months, but also winter (and they have proper winters in Saguenay/Chicoutimi–!).
There were so many parks to choose from, I decided I would simply choose the one closest to our hotel and that turned out to be Parc de la Rivière-du-Moulin.
It was so close to our hotel, I could have easily walked there.
Many thanks to Brian (K3ES) who shares the following field report:
Field Report: Reflections on a Kilo at Cook Forest State Park
by Brian (K3ES)
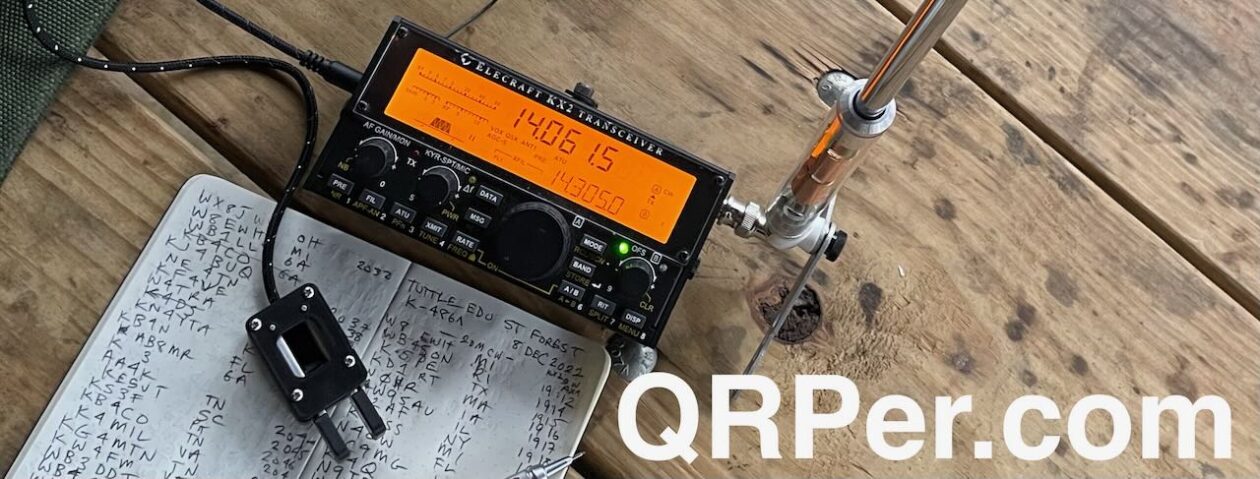
Contemplating my favorite antenna tower during the Kilo activation.
Cook Forest State Park in northwest Pennsylvania has always been a special place for me. It abounds in trees (including some of the last virgin timber around), wildlife (deer, turkeys, song birds, squirrels, and the occasional bear), and also includes the scenic Clarion River. When I found out about Parks on the Air (POTA) after getting licensed in 2020, I knew that I had to put POTA entity K-1345 on the air.
Our family cabin; which has been central to all of the phases of my life – including milestones, joys, sorrows, and unadulterated wonder – is located on a plot of land bordered on two sides by the park. It just seemed natural and right for me to do my first-ever POTA activation under an ancient hemlock tree just a few steps over the line from the back corner of our property. That mostly-SSB activation happened in May 2021 with my TX-500 pushing 10 watts into a homebrew dipole suspended from a dead branch up 30 ft in the hemlock.
An early activation of K-1345 from beneath the ancient Eastern Hemlock Tree
Last weekend, I reached a meaningful personal goal by completing my 1000th activator contact from K-1345. After the first activation I never again operated mostly-SSB, and I never increased radiated power. Nearly all of my contacts since have used CW, and many were completed at 5 watts. The added challenge of QRP CW undoubtedly made the Kilo more difficult, but it was also much more fulfilling. It has taken me 28 successful activations, a lot of work to improve my CW skills, and a lot of patient support from the hunters who have shared this journey with me.
My activations at K-1345 tell the story of my journey as a CW operator. I took my first steps on that journey in late 2020, months before I had a portable radio or a plan for my first activation. I started with an Android app, V-Band, and listening to CW exchanges on webSDR. Eventually that progressed to CW Academy basic, intermediate, and advanced classes. The classes really upped my CW game, but what helped even more was using CW on the air. I finally got my HF station on the air in March 2021 and started hunting parks, SSB at first, then increasingly CW. During my first mostly-SSB activation I did manage to hunt down three park-to-park contacts using CW. I started my second activation by calling CQ using CW, and I have not looked back. Wow, those hunters were patient during that first first CW activation! My skills have improved greatly since then, but I’m still not where I want to be. The next goal for me is to gain confidence and proficiency in less-structured QSOs.
I want to thank Thomas – K4SWL, whose real time, real life activation videos challenged, motivated, and inspired me to learn and use CW. I greatly appreciate the work of the CW Academy advisors who guided me through some of the hard work needed for improvement. I also need to thank the hundreds of hunters who have patiently endured my developing CW skill set. Finally, my hat is off for the dedicated POTA volunteers, who continue to improve and expand this amazing activity to the benefit of radio amateurs around the world.
Completing the Kilo activation would have taken me longer if it were not for the tremendous encouragement provided by my gracious, intelligent, and beautiful XYL. As I was contemplating indoor chores on a Friday morning, she pointed out the opportunity to go out and activate during the best weather of the weekend, and save the chores for a rainy day. Who am I to argue with such impeccable logic? Off to the woods we went!!!
I made a point of using the TX-500 with the homebrew dipole suspended in that ancient hemlock tree to complete the Kilo activation, going back toward the starting point, as it were. Of course I did finish with CW mode and 5 watts to commemorate my personal growth during the journey, too. I was set up to go by mid-afternoon. Needing 57 contacts to complete the Kilo, I decided to get some contacts on 20m, then move to 40m a bit later.
Getting started on 20m.
After calling CQ for almost half an hour to get two contacts, I decided to move to 40m a bit sooner than planned…
With the antenna lowered, I am reconnecting the links for 40m.
40m was hot! I completed the eight additional contacts needed for a successful activation in less than 15 minutes. By the 2 hour mark, I had racked up a total of 69 contacts and finished the Kilo.
As a final note, I picked up 55 more contacts on Saturday, bringing my total CW mode contacts over 1000. The rain started early Sunday morning, and I got my indoor chores finished after all.
An arborist throw line works great for setting up the antenna here!Almost any weather is great when you are doing a POTA activation!But sometimes cold fingers limit your endurance…My starting kit for the TX-500.Antennas and accessories for the TX-500 kit. Home-brew linked dipole is on the right.Arborist throw line for the TX-500 kit.TX-500 kit packed for POTA!
At some point during my Canada travels this summer, I realized I had been using the Elecraft KX2 quite heavily. If you’ve been following my recent field reports, you’ve no doubt seen a lot of the KX2.
This was never intentional–it’s just how it played out.
Why the KX2 in heavy rotation?
For starters, I only brought two general coverage radios with me to Canada: the KX2 and the Discovery TX-500. I also tucked away my KX1 and MTR-3B (hidden under the floor of my boot/trunk space), but band conditions were so incredibly poor most days, I liked the option of a QRP “full gallon” (ie. 5 watts+) for activations. The KX2 and TX-500 can push up to 10 watts when needed.
The KX2 tends to be the radio I reach for when I don’t know what to expect at a park. Most parks I activated in Québec were firsts for me so I liked having my most versatile radio option on hand.
Since the KX2 has a built-in ATU, battery pack, and even an internal mic; it’s so self-contained, I pretty much take it everywhere.
Operating from my kneeboard at the Manicouagan Uapishka Biosphere Reserve (check out that activation)
The KX2 is also one of the most compact radios I own–so compact, in fact, it fits on a small folding knee board my friend Carolanne (N0RNM) made (see in photo above and read more about the design in her guest post). With this kneeboard, I’ve no need of a table: just strap the board to my leg, add radio & log book, and I’m good to go!
Whereas I feel like the KX2 is a Swiss Army Knife of a radio, the TX-500 feels more like a tactical radio–ready for any changing weather environment. The TX-500 is water resistant, weather/dust sealed, and insanely rugged. It’s also the most efficient general coverage QRP radio I own, needing only 100-110 mA in receive.
The TX-500 is super portable and I tend to reach for it when weather conditions are uncertain. In a way, I often don’t think about it when there’s good weather. Odd, but true!
It’s a wee bit too wide for my current knee board, but (hint) if you own a TX-500, hang tight. There may be a knee board in your future.
All that said, the big reason I didn’t take the TX-500 to the field a lot is because it served as my “home base” transceiver at our rental condo in Québec. I had it set up for hunting POTA and SOTA activators and making casual contacts. The TX-500 sat on a table next to the deck at the condo and was hooked up to the CHA MPAS Lite most of the time; the KX2 stayed packed away for POTA/SOTA.
TX-500 field time!
On July 18, 2022, I grabbed the TX-500 from the table and packed it in my field radio backpack.
My wife and daughters were up for a trip to Québec City, so I picked out a park in the Sainte-Foy part of town.
There are many POTA parks in Sainte-Foy (indeed, I already activated four of them) but the one that immediately came to mind was one of the few I’d explored previously in Québec: Base de plein air Sainte-Foy.
I was very surprised to discover that Base de plein air Ste-Foy was also a POTA ATNO. No doubt, there had been plenty of radio activity on-site int he past, but no POTA activations.
This spring, as we planned our two months of travel in Québec, Canada, I jotted down one location in particular that I wanted to visit: Baie-Comeau.
Baie-Comeau is located about 420 km (260 miles) northeast of Québec City on the north shore of the mighty St-Lawerence river. It’s a small city with a population of around 21,000 and is pretty darn isolated. For many travelers, Baie-Comeau is the last major stop before a long, lonely road journey north to Labrador City or further northeast along the St-Lawrence.
I’ve always wanted to visit Baie-Comeau and my wife and daughters were game to make a proper trip out of it!
While in Québec, we plotted the details of our trip to coincide with a good weather opening.
We packed our gear, left the home base near St-Anne-de-Beaupré on July 13, 2022, and drove up the St-Lawrence, crossing the Saguenay River by ferry, and on up to Baie-Comeau with a few stops along the way.
Les Escoumins, Québec (click to enlarge)
It’s a beautiful drive.
We reserved lodging at the Hôtel Le Manoir Baie-Comeau (an excellent hotel, if you ever find yourself overnight in Baie-Comeau). We’re frugal travelers, so this was a bit of a splurge, but the stay coincided with our 20th wedding anniversary, so why not?
I was very happy to see that the Manicouagan Uapishka Biosphere Reserve was on a hill only a short drive from the hotel. It was approaching dinner hour, so I didn’t want to fit in a late afternoon activation with the family; we had other plans that evening. My wife suggested instead that we check out the park and walk the trails before dinner which would allow me a bit of time to scope out an activation site.
Manicouagan Uapishka Biosphere Reserve (VE-0054)
We discovered that Google Maps doesn’t have the trailhead marked very well. It led us to a neighborhood street a short walk from the park. I remembered reading a note from a local (online) mentioning there was ample parking at “the church” so we drove to a beautiful church nearby and immediately spotted the trailhead. If you ever find yourself in Baie-Comeau, here are the coordinates for the trailhead.
Turns out, the church is no longer a church, but has has been converted into the headquarters for the park which is a part of the Jardins des glaciers.
There are some brilliant views of the St-Lawrence from the parking lot.
We quite easily found the trailhead of the sentier which led into the biosphere reserve. I used my GPS to confirm when we were well within the boundaries.
We enjoyed a scenic hike that evening.
As I mention in my activation video, this is one of the amazing things about doing POTA during travels: you discover so many incredible parks that would have otherwise gone unnoticed. My family truly appreciates this particular aspect of POTA. It opens the opportunity to find spots only locals might otherwise know about.
After our hike that evening, I had a pretty good idea where I could set up in the morning. We made our way back to the hotel and enjoyed dinner and a movie.
Morning activation
So that my activation time wouldn’t interfere with family plans that day, I scheduled an early morning activation for July 14.
I’m very honored to be featured with my good friend Wlodek (US7IGN) in a short radio documentary on BBC Radio 4 today.
Wlodek is long-time reader and subscriber here on QRPer.com and the SWLing Post. Wlodek lives in Kiev, Ukraine and we keep in touch these days over email. Like me, he is passionate about field radio work and before the Russian invasion, you’d often find him in nearby forests experimenting with some pretty impressive field antennas.
Sadly, when Russia invaded Ukraine earlier this year, it very quickly brought an end to all of that for Wlod. Not only were amateur radio operators not allowed to transmit under the state of emergency, but it’s no longer safe to venture into nearby forests.
Radio producer, Cicely Fell, learned about our love of all things field radio and put together an audio piece that airs today on BBC Radio 4:
From the forests of North Carolina, USA to the city of Kyiv, Ukraine – two ham radio enthusiasts seek each other out and a voice from the past prompts a dialogue on listening between a rabbi and a radio producer.
Many thanks to Cicely and her talented team at Falling Tree Productions for spending a little time with us in the forest and on the air! Truly an honor.
A SOTA road trip from Berlin to Tuscany via the Alps and back
On the summit of Kellerjoch OE/TI-311
by Leo (DL2COM)
Flashback March 2021: I am sitting on a couch in the countryside 2h north of Berlin, Germany. It’s a rainy day and my 1-year-old kid just fell asleep on my chest. I am watching Youtube and enjoying the feeling of just having maintained the chainsaw after a productive run preparing firewood.
Then suddenly something special got washed into my feed: Adam K6ARK activating a summit in CW somewhere on the U.S. West Coast. I thought: I have no idea what this wizardry is but this is exactly what I want to do. Right here, right now. Well I have a child to take care of, the next mountain with a prominence of >150m (~500 feet, min. requirement to be a valid SOTA summit) is 3h away, I don’t know what ham radio is, I have no license and what the heck is CW.
Complete SOTA kit incl. 6m mast
Jump to July 2022: I am sitting in my car commencing a vacation road trip to the south of Tuscany, Italy. Due to the chaotic luggage situation at EU airports and unreal prices for rental cars my family and I had decided that we would be better off if I drove down while my wife and kids took the plane without having to check in any bags (btw: best decision ever).
Innsbruck embedded in the Inn valley
Our schedule allowed for me to leave a few days early so I could make room to do a little bit of hiking and throw in a few casual SOTA activations because why not. On top I saw that there were a few never activated summits in close proximity to where we planned to stay. I could feel my heart pumping already followed by a strong reassuring feeling radiating from the well-thought-through contents of my backpack in the trunk. Am I ready? Who cares. I am on my own now. I had completed a quick 1-pointer activation in May and a few POTAs but what was planned now was a different level.
From Berlin to Cortona (Tuscany) via Brenner pass (Alps) (Source: Sotl.as)
Going into detail about every summit would go beyond the scope of this article so here are just a few highlights: The first leg down to the Garmisch-Partenkirchen area went by in a wink (7h drive). I passed most of the time rehearsing CW by singing license plates out loud. The fun peaked with plates along the lines of M-OT-9990 or E-SI-5545. It’s all about melody and timing, remember. I met up with my buddy Chris whom I hadn’t seen in a long time and who agreed to join me on the first hike up Zirbelkopf (8-points summit) to witness the cult activity I had tried and failed to explain to him beforehand.
Some activations are more challenging than others.
I think we had all hoped on our climb into Cycle 25 that we’d get some brilliant propagation, stable conditions, and the opportunity to use less power and yield more DX. Who doesn’t want that?
But we get what we get from our local star and the theme this year is that it is indeed showing some positive indicators, but at the same time–this summer, especially–it’s spitting stuff toward our pale blue dot that makes a mess of the ionosphere.
Photo by K4TLI
Lately, each time I head out the door to activate a park, I never know what to expect. It’s part of the fun. Will band conditions be in the dumps, or will the ionosphere provide the perfect platform for my QRP signals–?
On Thursday July 7, 2022 it was the former rather than the latter.
I checked the POTA Map and discovered a park we’d never visited in the past, so it looked like a good candidate for a POTA activation!
Digging deeper, I also discovered it was an ATNO (All-Time New One) and had never been activated for POTA before. Hard to believe given its location, but there you go!
I put my POTA backpack in the car and we hit the road!
Parc des Moulins (VE-5068)
After a little searching, we finally found a good parking spot at the park. There was a LOT of construction going on around the grounds.
Parc des Moulins, like many of the parks I’d recently activated in/around Québec City, is a proper urban park with manicured paths and gardens. It’s a beautiful little park!
We hams have a tendency to unbox our new radios, toss the manual to the side, and get on the air. We sort out radio functions by playing with the radio and using it.
By “we” I’m certainly including myself…
Typically, there’s no harm in doing this. Experienced ham radio operators know how to hook up their radios, and know what common functions and features they must identify. In fact, when I review a radio, I rarely read the manual for this very reason: I’m curious how intuitive the controls are.
With that said, I’ve had no less than three emails from readers this past week asking questions about their radios–questions that all could have easily be answered by even skimming over the manual.
Sure, I’ve had this happen to me before. Subscribers to my YouTube channel have watched my activation videos and pointed out shortcuts and features I hadn’t yet used on a radio. Many times, I was aware of the function/feature, but while on the air couldn’t remember how to engage it. (This is where a printed cheat sheet come in handy!)
Truth is, modern rigs are simply chock-full of features. Many of these features are incredibly useful, but not obvious on the front panel.
Case in point: MTR-3B Direct Frequency Entry
The venerable Mountain Topper MTR-3B
In the past, you may have heard me mention that that the MTR-3B “isn’t a good transceiver for hunting stations” because it has no rotary encoder to quickly move from frequency to frequency. There’s no number pad for direct frequency entry either.
Instead, the user has up and down arrow buttons that you push and hold until eventually you reach the desired frequency. If the frequency is 50 kHz away? Yeah, you’re going to be holding that button down for a while (there is a fast tune option, but it’s still slower than an encoder).
Early this year, I pulled out the MTR-3B manual to give it another thorough read-through–from cover to cover. It’s not a large manual. My goal was to refresh my memory about recording and playing back CW message memories. In the process, I also discovered that the MTR-3B has a clever (and quite unconventional) direct frequency entry method.
Via the DFE function, you simply enter four digits of the desired frequency, 0 to 9 via Morse Code, starting with the 100 kHz digit. It’s a little quirky, but it works quite well!
This doesn’t make band-scanning any easier, but it does help me while hunting since I can directly enter the frequency I find on the POTA or SOTA spots page.
This one function made my MTR-3B that much more usable. Somehow, I missed this part of the manual when I first purchased the MTR-3B–I’m so happy I took a deep dive later.
If it’s a rainy day, or you’re simply trying to stay awake during a mandatory remote meeting for work, or like today there’s a radio blackout, use that time to get to know your radio by taking a deep dive in its manual.
Read it from cover to cover: I guarantee you”ll learn something new about an old friend.
My fourth park was Boisé des Compagnons-de-Cartier which essentially adjoined the previous park I activated. As I mentioned in the previous field report, I could have simply walked through the trail system to this park from my previous site, but I needed to find a different parking spot for my car, so I simply drove to a large lot next to the secondary school I spotted on Google Maps.
Turns out even though that lot was nearly empty, it was a paid parking, so I reserved a parking spot for one hour.
Boisé des Compagnons-de-Cartier (VE-0958)
When I first parked, I wasn’t entirely sure where the park entrance was until I spotted a bench and park sign at the far corner of the lot.
This park, much like the previous one, seemed to be an urban park with trails for walking and running.
I walked the main path into the park and looked for a park bench like I found at the park entrance (above). I thought it might be nice to set up along the path and do a park bench activation much like I did at another urban park in Québec City.
I walked for a decent distance and couldn’t see a bench in sight. The path was fairly busy with walkers and runners, so I was very pleased when I found a side trail cutting through the middle of the park.
I could tell that this path–while very well-worn and obvious–was not one maintained by the park admin. It looked more like a simple foot trail that local children have probably used in the past (I spotted a little wooden fort/lean-to in the woods.)
Keep in mind that this was my fourth park activation of the day and by this time, I was running behind–no surprise there. After the activation, I had two errands to run in QC before heading back to our condo and enjoying dinner and a movie with the family.
I’m very grateful to Canada for taking me a little outside my comfort zone in terms of park activations.
You see, by and large, I activate large national and state parks in rural areas of the US. I’m used to having lots of space and loads of activation site options. Even on a busy day, if I choose, I can pretty much disappear in some far-flung corner of a park. No one would ever know I’m there.
Urban parks are still rather novel to me.
On July 4, 2022, I plotted a little multiple park POTA run that included four urban parks all clustered in the Sainte-Foy region of Québec City.
The third park I scheduled for the day was Boisé de Marly Provincial Park. I could find very little information about this park online and even Google Maps satellite view didn’t give me an idea of what to expect once I arrived.
I could tell, though, that it was an urban park nestled between neighborhoods, roads, and commercial buildings. I could also tell that it had trees, so I planned to use the same transceiver-antenna pairing I used at the previous park: the Elecraft KX2 and Tufteln 9:1 random wire antenna.
Boisé de Marly was basically across the road from Parc Cartier-Roberval, but I needed to find a pedestrian access point and a parking spot, so I drove around the southern perimeter of the park until I found a side road with an access point and what appeared to be free parking on the road.
In truth, I wasn’t entirely sure if I needed a permit to park on the street, but I felt it was likely okay based on lack of signage. In any case, the street was quiet and I parked with a couple of other cars. I hoped that if I was mistaken, the person planning to write me a parking ticket would see my North Carolina plates and the RAC sticker and decide to give me a break. 🙂
Besides, at this point I was on a tight schedule if I wished to hit all four scheduled parks that afternoon, so I didn’t plan to hang around long enough for a ticket anyway.
Boisé de Marly (VE-0956)
At the neighborhood street entrance, I found the sign above that gave me a quick overview of the park. From what I could tell, this park primarily consisted of a trail network meant for walking and running.
I didn’t see any signs of picnic tables or even benches, at least at this end of the park.
I walked into the park maybe 100 meters or so and looked for a spot to operate.
 Each time our family spends the summer in Québec, we make time to visit the Saguenay region which is just a couple hours north of Québec City.
 The first day in Saguenay was all about walking on the river, and hitting some of our favorite spots when the rain finally moved on; I didn’t attempt a park activation. I decided instead to do an early morning activation the following day (July 22, 2022).
 You may have noticed that quite a lot of my activations in Québec have been ATNOs (All-Time New Ones). I didn’t specifically set out to activate ATNOs–in fact, they were hard to avoid because there were so many.


