Tag Archives: QRP

The Arizona 10-Point Madness Summit-to-Summit Event

The Arizona 10-Point Madness Summit-to-Summit Event

by Charlie Brown (NJ7V)

“How can I accumulate a bunch of summit-to-summit points all at once, for Summits on the Air?”  This was a question Pete Scola WA7JTM had been pondering for years.  He initially thought it might be fun to choose several 10-point summits that were near each other, have a person operate on each summit, and then rotate to a new summit every so often.  Eventually, this idea gave way to the Arizona 10-Point Madness Summit to Summit event.  With an invitation from Pete, all willing SOTA participants gathered on a 10-point summit on September 19th, 2018, and 10-Point Madness was born!

The Arizona 10-Point Madness Summit to Summit event is a casual on-air gathering, where Summits on the Air participants set up their ham radio station on the top of summit . . .  at approximately the same time.  Operators are on simultaneously so that there is an overwhelming availability of summit-to-summit contacts to be made.  This event occurs every year on the first Saturday of October.

Fred (N7PN) 2023 10-Point Madness

There was a focus on 2-meter contacts the first year we did this.  We learned quickly during the 2018 inaugural event that it was true madness for 31 ham radio stations to contact 26 nearby summits all at the same time, especially on 2 meters.  We tried alternate 2-meter frequencies and even considered a net control operator.  However, in the end, we learned to just wait patiently for our turn to call for contacts on 2-meters, or if it was extra busy, we just moved off to HF for a while and returned later.  As a courtesy, we now monitor 2 meters and return to it throughout the event to give the operators a chance to come and go.

Adam (K6ARK) 2022 10-Point Madness

That first year was amazing.

We collectively made 1104 contacts, 354 of which were VHF.  And yes, we scored a lot of summit-to-summit points.  We averaged 140 points each, with a grand total of 4324 s2s points for all the Arizona stations.  We announced the event to several online platforms and invited others to participate, and had a few people join us from outside of Arizona. All of them had fun and saw good results as well.

Our 6th annual event concluded a few weeks ago.  Participation has been steady in Arizona but we have seen an increase outside of Arizona.  We had about the same number of Arizona participants as years past, but total contacts increased to 1403.  The average s2s points per participant increased to 169, with a grand total of 4906 s2s points.  I was amazed that Keith KR7RK earned 400 s2s points this year for this event – a new record, I think.  These are only numbers for Arizona participants.

I read on social media that Josh WU7H, who was participating from Washington state, had 55 total s2s contacts and only a fourth of them were from Arizona.  We received some statistics from stations in Georgia, South Carolina, Wisconsin, Texas, Nevada, Washington, Oregon and more.  It is a lot of effort to compile the statistics but it would be interesting to include people outside of Arizona in the future.

Joe (KE9AJ) 2022 10-Point Madness

Here are a few things that have stood out to me over the past 5 years for this event:

In 2019, Josh WU7H and DJ WW7D participated from Washington.  They won the award for most challenging activation in my opinion, operating from a snow packed summit in below freezing temperatures.  But that didn’t deter them!  They continue to come back year after year.  They are tough!

In 2022 my friend Adam K6ARK was participating on a summit in California.  I was able to make a 2-meter CW and SSB contact with him from my summit, 327 miles away.

Several others in Arizona also made contact with him.  While not record breaking, this is long haul for 2-meters.  And this year, I was able to make 19 DX contacts with one summit-to-summit into Germany.  It seems like there are a lot of DX contacts to be made every year, but this was a record for me.

Finally, this year Pete WA7JTM made a contact on every single band from 1296 MHz down to 1.8 MHz.  That’s 16 different bands.  How amazing is that?

The point is, you can make this event into whatever you want.  Experiment and try new things because there are people listening.  And of course, you do get a ton of summit-to-summit points.

WW7D on High Rock 2019 10-Point Madness
Josh WU7H and DJ WW7D operated from High Rock

Dave AE9Q sent an email out to the Arizona participants and inquired about the radios, antennas, and power sources used for the event and as you can probably guess, the list was very diverse.  I’m not exaggerating.  Just about every QRP HF radio, VHF/UHF handheld, Antenna, and power source you can think of was used – Log periodicals, mono-band double-bazookas, double zepps, whips, Yagi’s, end-feds, QRP and QRO HF radios of all types, HT’s with microwave capabilities, mobile vhf radios, amplifiers, lipo and lifepo batteries.  The list is long.

Sandy (W7NRS) 2023 10-Point Madness
Ray (W7USA) 2023 10-Point Madness

We recognize that other SOTA associations do similar events, like the Colorado 14er event and the Pacific Northwest Not Quite Fourteener event, to name a couple.  These are all great opportunities to get on the air and have fun with QRP radio in the field.

I’m sure you have heard about how amazing the SOTA community is.  If you get out on the summits or frequently chase, your call sign becomes familiar to others.  So much so that you feel a personal connection and sense of comradery every time you make contact with them.  During these events you see many of your good on-air radio friends.  It’s like a reunion.

The Arizona SOTA association thanks the many chasers and participants outside of Arizona who make this event more and more exciting every year.  We hope to see even more participate next year.  Just pick a summit, put your alert on the sotawatch.sota.org.uk web page, get on top of the summit and have a blast!

Readers: Do yourself a favor and subscribe to Charlie’s YouTube channel Red Summit RF. It’s chock-full of SOTA radio goodness. I’m also a fan of the All Portable Discussion Zone podcast–subscribe if you haven’t already!
Field Radio Kit Gallery: W7UDT’s QRP Labs QDX Digital Mode Field Kit

Many thanks to Rand (W7UDT) who shares the following article about his portable field radio kit which will be featured on our Field Kit Gallery page. If you would like to share your field kit with the QRPer community, check out this post.

Rand writes:


My Digital HF Field Kit…

by Rand (W7UDT)

Thomas & the gang… this is (de) Rand W7UDT

The QRP Labs QDX is yet another, brilliant creation from genius Hans Summers. Hans has created a cult following, with an assortment of kits, and assembled bargains of fun!

Many of you know this, and have his gear. And as sexy and alluring my Elecraft KX2 may be, it’s often, as a minimalist, that I reach for my QCX Mini(s), or my QDX (Hi & LoBanders).

I guess it’s a touch of OCD that compels me to minimize and simplify my field kits. (Yes, I need help!) And yet, if you too, upon reading this confession, find it all too interesting and read on.

Here’s the QDX field deployment in a nutshell…

Deploy the antenna, a LNR Precision Trail Friendly End Fed Wire. With a toss and some luck, the weight clears the chosen branch and the antenna is hoisted aloft.

Often I operate along the Boise River Greenbelt, just off the path near the river. I find that perfect spot to operate.

The flow of water, doesn’t make too much noise, and doesn’t matter with this mode, FT8. Only that it has a sunny view, and it’s comfortable and dry.

The QDX transciever & DC Pack is velcro’d to a clipboard, and once secured, I attach a 6′ section of RG316 and an inline 1:1 balun. The BNC coax is then connected. A trusted prussick knot, attachs the coax and clipboard, and provides the strain relief and work surface needed to operate.

8″ USB c/b cable connects the QDX with my Samsung Galaxy S20 Ultra, to the QDX. The transiever is powered by a 3aH 12v DC Pack of (3) 18650 LiFePo4 batteries. With the swich thrown, it archs to life. I then open the FT8CN app on my Samsung, select the Comm Port, and Wow! What fun!

The software does all the work, and even logs the contacts automatically. An occasional touch to the screen, can have you operating at will. It’s a free app on GitHub, that will pleasantly surprise and surpass any low estimations of ‘Free Chinese Stuff.’

All this can be viewed on YouTube, watch Linas LY2H.

Here’s my assembled field kit for my QDX (LoBander). I absolutely love this thing!

It’s a very tight kit. As simple as Hans ‘the Man!’ can make it. What a capable marvel of creative genius. Here’s a pic…

These modes offer error correction, and incredible Dx. The software function flawlessly, and automatically logs the contacts. Hang it high, and the antenna is happy! Easy, cheap and fun! 72 de W7UDT Rand
Notes ~ FT8, JS8 Call & RTTY Only, using the amazing & free FT8CN software.

Field Radio Kit Gallery: K6ARK’s Ultra Lightweight QRP Field Kit

Many thanks to Adam (K6ARK) who shares the following article about his portable field radio kit which will be featured on our Field Kit Gallery page. If you would like to share your field kit with the QRPer community, check out this post.


by Adam (K6ARK)

To me, the pinnacle of portable amateur radio involves Summits On The Air (SOTA) activations in particularly remote and hard-to-reach areas.  Many require long approaches, difficult climbs, and high-altitude travel to get there, so minimizing the size and weight of my portable radio kit is of utmost importance.  To that end, I’ve managed to refine my smallest fully functional kit down to quite a compact and light-weight package.

An MTR2B which operates on 20 m and 40 m.  It has been repackaged into a custom-designed 3d printed case is the core of the system.  It has been repackaged into a 3d printed case which cuts the weight of the radio by about 60% from the original aluminum and steel case, and shrinks it in thickness by about 50%.

The key is built-in to the rig – a capacitive touch design I adapted from the M0UKD design.

Brass cap nuts installed on the corner of the case provide the capacitive sense touch points for the left and right paddles.

A 9v form-factor rechargeable lithium-ion battery with a USB-C charge port powers the system.  The lower voltage reduces my transmit power to 2.5 or 3 watts, but also provides a bit more protection for the final amplifier transistors when my antenna setup is less than ideal.  It has sufficient capacity to run this power-efficient little rig for a few hours from a summit.

The antenna is a 40m End Fed Half-wave with a matching unit built from an FT50-43 size toroid directly onto an RCA connector and protected with heat shrink tubing.  28 ga PTFE insulated stranded copper wire forms the radiating element, and it’s stored on a down-sized 3d printed winder of my own design.

The primary components of the kit weigh in at just 4.8 oz (136 g), and the padded camera case adds another 1.8 oz (51 g).   Although the case isn’t particularly light, it provides excellent protection to the rig.

And because most of the summits I bring this rig to are void of trees, a compact telescopic pole is an essential addition.  The one I typically bring packs small and weighs in at just 5.5 oz (156 g) but provides about 10 ft of elevation above the ground.  The cap is leashed so I can’t lose it, and the tube is coated in heat shrink for protection when I cram it into the rocks for support.

In the end, it’s quite a capable kit for just 12.1 oz (343 g) of pack weight.

Check out my ‘Sierra Solitude’ video series as a prime example of a trip where this setup is perfect for my needs.

73 DE K6ARK

Readers, do yourself a favor and bookmark Adam’s YouTube channel which is chock-full of SOTA and ultralight radio goodness!

Testing the Ionosphere: A 100 milliwatt to 1 watt POTA Activation During a CME? Why not!?

Sometimes, I like the odd “exercise in futility.”

I enjoy shaking up routine and since POTA and SOTA activations are my routine, they end up being the shakers.

On Monday, September 18, 2023, I found out that our planet was rotating into a large CME (Coronal Mass Ejection). This CME made all of the space weather news and we planned for either some potential radio blackouts or at least very unstable conditions.

As I’ve said many times before, I never let the potential for poor propagation stop me from hitting the field. Don’t let it stop you either.

Lake Norman State Park (K-2740)

I had a full afternoon to play radio, so I made my way to Lake Norman State Park.

En route, I tried to think of a way to shake up the activation a bit. I planned to activate at the same spot I had during my last visit because I knew the park’s main trail system was still closed and, frankly, I wanted to take advantage of the EV charger at the visitor’s center again!

I’d packed MW0SAW’s End-Fed Half-Wave (the gift that keeps on giving, Steve) and I did have one new radio toy (more on that later).

I also had a lot of time–at least, more than I normally do during a POTA activation–so I thought it might be fun taking my KX2 down to the lowest power setting it has: 100 milliwatts.

I’ve activated parks with 100mw before, but never intentionally on a day when I knew propagation would be poor.

I figured with enough time, maybe I would get the ten contacts needed for a valid POTA activation.

If not, it would be fun trying!

Why Milliwatting?

At the end of the day, I think taking our radios and antennas to their low-power extremes gives us a taste of what we can actually do with so little signal.

I remember shortly after I bought my first Elecraft KX1 in 2008, I was speaking with a local ham and he told me that a maximum output of three watts was pretty useless and that I really needed a minimum of five watts if I expected to make any contacts.

Part of me did feel like perhaps I’d bought something more akin to a toy–fun to look at and hold, but not terribly practical.

Then I started using that KX1 to make contacts and even carry on extended rag chews. Turns out, three watts gets a lot done!

Today, I’ll often run my MTR-3B with three watts or even less when activating a summit and the results are simply outstanding–fabulous DX and contacts galore.

I know 100mw is a proper compromise, but I like knowing what I can achieve with so little. Tinkering with it in the field and listening to signal reports (also reading RBN stats) gives me a good idea.

In an emergency situation? If I could only push 100mw into a decent antenna, I know it wouldn’t be ideal, but I know it wouldn’t be futile either.

Begali Adventure Dual

Another activation motivation was the opportunity to test my new-to-me Begali Adventure Dual paddles. Continue reading Testing the Ionosphere: A 100 milliwatt to 1 watt POTA Activation During a CME? Why not!?

Guest Post: The Full Moon, Eels, and /P Operation on Mount Peyton, NL, Canada

VO1DR on top of Mount Peyton

Guest Post: The Full Moon, Eels, and /P Operation on Mount Peyton, NL, Canada

by Scott (VO1DR)

Introduction

I have been eyeing Mount Peyton in central Newfoundland for years as an attractive spot for /P HF operation.  Even before my radio adventure to Mount Sylvester (reported earlier in QRPer.com), I have been seeking a way to get up Mount Peyton.  Like Mount Sylvester, Mount Peyton is an inselberg of granite protruding above the glacial plain of central Newfoundland.  However, Mount Peyton is even larger and higher; an elongated ridge about 800 m long reaching up to 487 m (1,599 ft) above sea level.  For SOTA enthusiasts, it is designated VO1-CE-005, multiplier 4.

Figures 1 and 2 show the location local topography around Mount Peyton.

Figure 1 – Highway map of central Newfoundland showing Mount Peyton and landmarks
Figure 2 – 1:50,000 scale map I used during trip showing topography near Mount Peyton and our hiking route.  Each block is 1 km on a side.

Mount Peyton is a case of “so near and yet so far”.  Just west of Gander, this ridge is visible in the distance south of the Trans-Canada Highway (the main arterial highway traversing the island of Newfoundland).  However, in summer there is no trail directly to the top, and access to its base is only via rough ATV tracks and wet bogs.  One must get to the base of the mountain, then hike overland to the south side and climb a long inclined cleft in the hillside to the top.  This cleft is the surface trace of a fault in the underlying granite (see route on Figure 2).  By contrast in winter, Mount Peyton is a popular and readily accessible snowmobile destination with dozens of machines roaring up this same cleft on a thick blanket of snow.

The Full Moon and Eels

Looking at maps and Google Earth, an approach on foot would entail a three-day hiking trip.  While this sounds delightful, my current living situation would not permit this, and in addition I have no hiking buddies able and willing to make such a commitment.  So, it became clear I needed all-terrain vehicles (ATVs) to get quickly to the base, so we could do the entire trip in one long day.

I don’t own an ATV and after multiple attempts over this summer to find any ATVers interested in such an adventure, there were no takers.  Apparently ATVers like to ride, but don’t like to get off their machines ?. I finally found a local outfitter (Paul) who not only could supply ATVs, but had hiked multiple times to the top of Mount Peyton – a perfect fit.  For safety, I needed at least one extra person to go to the top.  All other potential radio or hiking companions fell by the wayside for various reasons, so it became just me and Paul.

As is common in rural Newfoundland, Paul is a Jack of all trades and is also a commercial eel fisherman.  American Eels (Anguilla rostrata) have a fascinating life history (https://en.wikipedia.org/wiki/American_eel) and inhabit freshwater rivers and streams in Newfoundland.  Paul harvests them in conical net traps anchored to the stream bottom (Figure 3).

Figure 3 – An eel trap in place in a local stream.  Eels move into the large mouth and get trapped in the bottom cage.

He told me that eels run during the new moon and stay put near the full moon.  Now doesn’t that ring deep bass notes of evolutionary biology!?  Since eel fishing is an important part of Paul’s income, we agreed to fit in my radio around his eel-catching.  He would be available around the full moon when the eels were sluggish; toward the end of September, the moon was full on the 29th.  Given the local weather, we settled on Tuesday, September 26 as our day.  Isn’t life fascinating – the moon controls eel movement, which controls human movement, which controls our /P radio expedition!

Getting There was Half the Fun

I drove from St. John’s to Paul’s cabin west of Glenwood, NL on the afternoon of Sep 25, on the beautiful shores of Indian Arm Pond (Figures 4 and 5).

Figure 4 – Paul’s cabin on Indian Arm Pond
Figure 5 – Shoreline of Indian Arm Pond

We planned an early departure on the ATVs.  Sun-up was around 7 am and sun-down was about 7 pm, so we had 12 hrs of daylight to work with.  September 26 dawned bright and clear (Figure 6) and we were soon packed and underway on two ATVs (Figure 7).  We drove for over 2 hrs on a wide range of roads, tracks, and rough trails to a point where we dropped the ATVs and started hiking (one way distance 26.7 km or 16.6 mi).

Figure 6 – Dawn over Indian Arm Pond on September 26.  Time to get moving!
Figure 7 – Scott on Polaris 450 ATV ready to go.  Black lumbar pack on right.  Blue survival bag on left.  Pole strapped on my left.  Radio and spare water in elbow compartments.
Figure 8 – Turtles are huge in Newfoundland
Figure 9 – Passing over beautiful Neyles Brook.  This is quintessential central Newfoundland scenery.
Figure 10 – Magnificent Mount Peyton looms in the distance.  This view is toward the nearly-vertical NW face.  We are about half-way there.  After dropping the ATVs, we will hike around the right end and climb up the far (SE) side.

This trip reinforced that I am not a motor sports guy.  The ATV ride was long, bone-jarring, and noisy.  Buying an ATV at great expense and doing this for “fun” is a mystery to me; and forget about seeing any wildlife.  But, hey, the ATVs got us there; we couldn’t have done this trip without them! Continue reading Guest Post: The Full Moon, Eels, and /P Operation on Mount Peyton, NL, Canada

Field Radio Kit Gallery: KD7DUG’s mcHF Field Kit

Many thanks to Dugbo (KD7DUG) who shares the following article about his portable field radio kit which will be featured on our Field Kit Gallery page.

If you would like to share your field kit with the QRPer community, read this post. Check out Dugbo’s field kit below:


Heli Pro Backcountry pack with portable field kit

Dugbo’s MCHF compact field kit

by Dugbo (KD7DUG)

Intro

My field radio kit is not so different or unique that it stands out from the many other experienced ham radio operators that have assembled and shared their field kits with the ham radio community. I am new in this game and by no means an expert. However, my field radio kit was designed as a fit for purpose and tailored to my CW operating needs and especially the bank account. I wanted my portable field kit to be nimble and easy to deploy at a minute’s notice. With many of the popular QRP radios backordered and even not available at this time, I chose a different route with my choice of radio.

Radio

Currently my preferred radio is the very capable SDR mcHF-QRP HF transceiver created by Chris, M0NKA. The mcHF is a smaller designed portable radio that simultaneously packs a left hook, upper hook punch, it’s a real contender. The radio is standalone, and its compact design is in comparison to other transceiver competitors with transmit and receive on 60-10 meter amateur bands with 5W output power on CW and SSB.

Currently the mcHF by M0NKA is very difficult to obtain and currently the kits are not available to purchase. However, there are multiple clones of the radio being offered by Chinese manufacturers.

Radio Equipment

Radio Equipment Kit

Priority was to protect the radio while traveling in the field. Securing the radio in a case to prevent damage from the motions of backpacking up a summit while also protecting the rig from environmental factors, dreaded dust, dirt, and water.

The Evergreen 57 waterproof dry box was a perfect match with the mcHF and additional operating equipment. The radio slides perfectly into the rubber molding of the evergreen case and prevents the radio from moving around in the case during transport.

To power the radio, I need an efficient battery for my needs. Batteries are heavy and weight was one of my concerns. Also on my mind was which battery would provide enough amp hours for an activation? To minimize the weight and provide enough power for one to two POTA|SOTA activations, I finalized my decision on a 3Ah BioEnno LIPO4 battery to supply power the mcHF. To link the battery to the radio, I am using a 5.5 x 2.1mm with an Anderson Pole connectors.

For audio I am using an Anker IPX5 speaker for GoPro sound recording along with 3.5mm Ugreen Headphone splitter for an old pair of Iphone headphones. I prefer headphones for copying incoming callsigns, RST and QTH from hunters and chasers. The headphone splitter, headphones and two additional 3.5mm connectors for speaker connection and key are packed into the rubber mesh located in the upper lid of the Evergreen case.

I am using two highly regarded and engineered portable keys. The CW morse N0SA and the BaMaKeY TP-III, are very rugged and ultra-compact twin paddle keys for CW operations.  For the BaMaKeY TP-III protection against the elements, it resides in a small waterproof case lined with foam. The N0SA paddle fits snuggly into the Evergreen case.  I use a Sea to Summit bag to carry a smaller travel case that contains the Rite in the Rain pad with pens for logging, the Anker speaker, NY4G EFHW antenna, ABR316 coaxial cable and two 10’ pieces of paracord with two tent stakes for antenna deployment.

Radio setup on Summit W6/CS-445

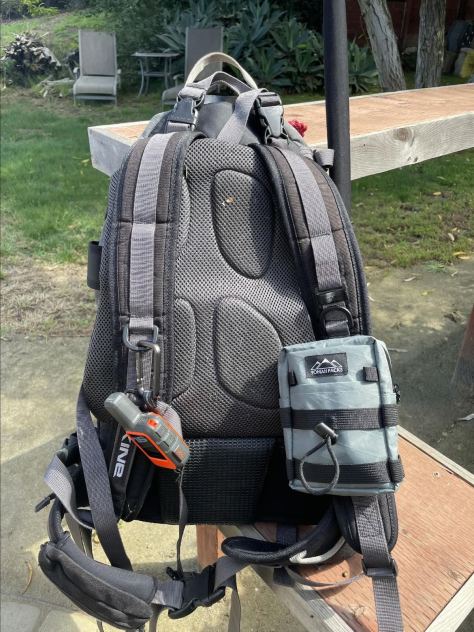
Once on the summit, I set up my radio equipment onto the Sea to Summit bag for additional protection from the ground. For a backup HF radio, I carry the very reliable Venus SW-3B 5W CW radio in small fly fishing Yonah Pack attached to my backpack. A perfect fit and well protected.

Antenna

I am using a NY4G 64:1 balun EFHW QRP 40,20 and 15m with additional 17 and 30m bands with a maximum of 15W on CW.

To deploy the antenna in the field in an inverted V configuration, I am using a modified 4.5m light weight expandable carbon fiber fishing pole (99g).

25-inch Valkyrie archery carbon shaft

To keep the antenna and mast vertical, I modified a 25-inch Valkyrie archery carbon shaft at one end with a 200g target tip and the other end with a center pin sleeve. No need to carry a small hammer to pound in the arrow shaft into the ground, mother nature has me covered with plenty of small size rocks in the field. I am using 15ft of ABR316 coaxial cable.

25-inch Valkyrie archery carbon shaft supporting the 4.5m expandable fishing pole

SOTA Activation W6/CS-323 EFHW antenna in an inverted V configuration
SOTA Activation W6/CS-445 EFHW antenna in an inverted V configuration

Navigation

I am using onX Off-Road GPS app on my mobile phone to download maps of selected activations. I also carry an inReach Mini Messenger satellite tracker and communicator for safe insurance. Unexpected situations can occur without warning, so I always like to be prepared than not to be.

Wrap Up

Heli Pro Backcountry pack with portable field kit

I am using a 20-year-old Dakine Heli Pro Backcountry pack to carry my compact field kit.

I used this pack for backcountry snowboarding in my early years. This pack is fantastic because of the extra compartments for carrying gear. It is also fitted with an ice axe strap that is perfect for carrying the expandable carbon fiber pole. The total weight of my portable field kit is 2.2 Kg or 4.9lbs. It might not be the lightest portable field kit setup, but it is definitely not the heaviest.

Yonahs Pack and the SW-3B

Overall, I am very satisfied with how my portable field kit came together as well as its performance in the field.

72 – DUGBO KD7DUG

Field Kit Gear

A Trailside, Low-Impact, Knee Board POTA activation at the Carl Sandburg National Historic Site!

On Friday, September 15, 2023, my wife and I had a few hours midday to enjoy the gorgeous pre-fall weather, so we decided to go on a hike with Hazel.

My wife was the one that suggested I pick out a hike that would open the door to a short POTA activation (isn’t she the best–?).

Carl Sandburg National Historic Site (K-0804)

Earlier that week, I made a note to activate the Carl Sandburg National Historic Site in the village of Flat Rock, North Carolina. I passed this idea by my wife and she agreed that it’d make for a perfect outing.

The mission of the Carl Sandburg National Historic Site is to preserve Connemara, the home of Pulitzer Prize-winning poet and writer Carl Sandburg.

The park has a wonderful trail network and I hadn’t visited it since 2016, during the National Parks On The Air (NPOTA) ARRL event.

Technically, I could go back into my NPOTA logs and upload my Sandburg activations to the POTA site because previous activations do count, but I’m not actually motivated by my park count so much as I am just having fun working new-to-me sites under the new POTA program.

That said, my somewhat flexible, non-committal goal of having at least 100 unique parks activated for POTA before the end of 2023 was also on my mind; a small motivator to expand my POTA footprint.

Admittedly, there really aren’t many parks that are within two hours of my QTH that I haven’t already activated for POTA. The ones left, like Sandburg, are just outside the corridors I normally travel.

The Sandburg site is a beautiful one, and I think Hazel may have even remembered this spot from so many years ago. My wife and I got a kick out of how giddy she was to hit the trails, smell the smells, and meet all of the other hikers.

Hazel: “Enough talking, Dad! More hiking!”

Time to hit the trails and find an activation spot!

Knee Board Portable!

Back in 2016, I got permission from a Sandburg park ranger to place a wire in a tree in order to perform my NPOTA activation. She only asked that I perform my activation on the trail network (not at the house and goat farm).

Wow…I just checked and I had forgotten that I made a short field report of that activation over on (my other blog) the SWLing Postcheck it out here.  Back then, my KX2 was still very new and shiny!

Not even a scratch on the KX2 back then! Today, Hedy looks a little more field battered! 🙂

And here we are seven years later and I’m still activating the Carl Sandburg site from my lap. This time, however, I don’t have my radio on a clip board, I’m using a folding knee board:

This is my Tufteln/N0RNM folding knee board and you’ve seen me use it in numerous activation videos.

Instead of just placing my logs and radio on the knee board, like I did back in 2016, I wanted to place my entire antenna system on it, too.

You see, although I’m sure the staff at the Sandburg home wouldn’t mind me putting a wire in their trees along the hiking trail, I couldn’t find a staff member to ask, so I used this as an excuse to try something I’ve always wanted to do: mount my AX1 on the knee board as well!

We found a park bench a mile up the trail and decided to set up there. Continue reading A Trailside, Low-Impact, Knee Board POTA activation at the Carl Sandburg National Historic Site!

Field Radio Kit Gallery: W2AEW’s Comprehensive Elecraft KX2 Field Kit

Many thanks to Alan (W2AEW) who shares the following article about his portable field radio kit which will be featured on our Field Kit Gallery page. If you would like to share your field kit with the QRPer community, read this post. Check out Alan’s field kit:


W2AEW Field Radio Kit

I’ve only been active with POTA for a little over a year, but have put together a kit that gives me lots of options for antenna deployments.

The main kit is in an old camera bag that I picked up at a hamfest for $5:

One of the outside side pockets houses a small tripod and some little ground stakes for securing support ropes, etc.

The other outside side pocket houses a small digital recorder and a cellular hot spot:

The front outside pocket houses some rubber coated twist ties that I use for securing a portable lightweight pole, as well as a few POTA brochures, QSL cards and eyeball cards:

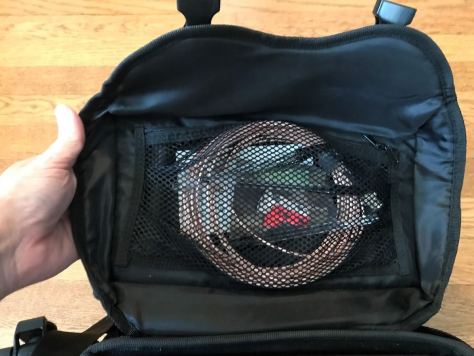
The pouch on the inside of the lid contains a 25’ length of coax, a few extra pens and other accessories:

The main chamber houses the KX2 Shack a Box bag, a Maxpedition accessory bag, the AX1 antenna kit and my iPad:

The KX2 bag is the main bit of the kit.  Sometimes, this is the only thing I carry with me (and will often put the AX1 kit inside also):

The rightmost pouch contains the 40m EFHW antenna, which is one of my two workhorses for my activations.

The middle section holds the logging pad, writing utensils, spare wire bits for antenna and counterpoise use, lightweight clips, etc.

The main section of the bag holds the KX2 which includes the internal battery and tuner. Continue reading Field Radio Kit Gallery: W2AEW’s Comprehensive Elecraft KX2 Field Kit

Getting To Know You Series: The Elecraft KX3–My thoughts, notes, and one extreme QRPp contact!

I’m very fortunate in that in the past few years I’ve accumulated a number of QRP radios that I use in rotation when I do park and summit activations.

I’m often asked for advice on choosing radios, and as I’ve mentioned in the past, I feel like the decision is a very personal one–everything is based on an operator’s own particular preferences.

Over the years, I’ve written formal reviews about most of the field radios in my collection. In those reviews, I try to take a wide angle view of a radio–to see how it might appeal to a number of types of operators. I highlight the pros and cons, but I don’t focus on my own particular take because, again, my style of operating might not match that of readers. I try to present the full picture as clearly as I can and let the reader decide.

The Getting To Know You series gives me an opportunity to highlight one radio at a time and showcase what I love about it and why it’s a part of my permanent radio collection. After we spend a bit of time talking about the radio, we’ll do a park or summit activation with it!

The Elecraft KX3

I was originally introduced to the Elecraft KX3 at the 2011 Dayton Hamvention–over a decade ago at time of posting!

I was commissioned to write a review of the KX3 for the Monitoring Times Magazine and Elecraft was kind enough to lend me a brand new KX3.

At the time, there was nothing like the KX3 on the market and I felt like I’d just received a radio from the future.

The KX3 offered 160-6 meter general coverage with an optional 2 meter module, ATU, internal AA battery compartment, and roofing filters. The controls were top mounted and current draw in receive was as little as 150 mA. At the time, there was no other radio on the market that could compare with the KX3’s field prowess.

But it wasn’t just its field design that was impressive.

In fact, when Rob Sherwood tested the KX3, it placed at the top of his list which is sorted by Third-Order Dynamic Range Narrow Spaced.

This field radio sported a bullet-proof front end and true contest chops, displacing $10,000+ high-end rigs.

Today, the KX3 (at time of posting) is still number 12 on Rob’s list. An impressive feat!

Herein lies the danger of doing reviews…

I didn’t have the KX3 in my grubby little hands for more than a few hours when I decided I had to buy one. I sold some gear to free up money and I bought the KX3 Elecraft sent me on loan for the full price.

I’ve taken this KX3 on numerous activations and on international travels. It’s a brilliant QRP companion.

These days, it’s in the shack more than in the field because I keep it hooked up to my KXPA100 amplifier. I feel like the KX3/KXPA100 combo is like having a poor man’s K3. As a huge bonus, the KX3 takes up little space on my table and the KXPA100 sits on a shelf–the overall footprint is much smaller than a K3 or K3s. It’s like having a remote head on my desk and works perfectly for my limited space shack.

The KX3 is a stellar, benchmark field radio, so it was great fun to feature it in this video.

Zebulon B. Vance Birthplace (K-6856)

For this Getting To Know You report and video, I decided to activate one of my favorite local parks on September 12, 2023: the Vance Birthplace. Continue reading Getting To Know You Series: The Elecraft KX3–My thoughts, notes, and one extreme QRPp contact!

POTA at Lake Norman: Beautiful day for a TR-45L trailside activation (and hunting VE6LK)!

I’m getting used to having an electric vehicle for my weekly travels including POTA and SOTA excursions.

My Volvo C40 has a published range of about 226 miles on a 90% charge, but I find that I actually get more than that. I almost never need to recharge from a public charger–I just plug it in at home.

At least once a week, I visit my parents in Hickory, NC and that round trip (including errand running in town) logs a good +/- 200 miles. By the time I return to the QTH, I typically have a comfortable 20% charge left on the battery.

Many of the parks I activate in that travel corridor are 20-30 minute detours off of Interstate 40 (for example: Lake James SP, South Mountains SP, Tuttle Educational SF). They have no negative impact on my ability to make it back to the QTH with battery capacity to spare.

Parks, however, that are still close to Hickory, but in the opposite direction of home, may necessitate a quick charge at one of the many public charging stations along the road. Not a big deal, but it’s kind of fun when I can do a full trip on one charge.

Flag at half staff in memory of September 11, 2021

On Monday, September 11, 2023, I had a full afternoon open and really wanted to fit in a proper hike. One of my favorite easy six mile loop trails–the Lakeshore Trail– is at Lake Norman State Park.

Lake Norman, however, is in the opposite direction of the QTH and is about an 80 minute round trip. I fit in errands along the way, but going there means I’ll need a bit of a charge to get back home the following day.

After a little research, though, I discovered that Lake Norman (much like Lake James) has free EV charging at their visitor’s center! Woo hoo!

Lake Norman State Park (K-2740)

I arrived at the park in the early afternoon and–whew!–both of the EV charging stations were free. In fact, the visitors’ center parking lot was almost empty–I would have expected a few more cars. I found that curious.

I plugged in my car, put on my hiking boots, grabbed my hiking sticks, then made my way to the spur trail that connects the visitors’ center parking lot to the Lakeshore loop.

Only, when I reached the trailhead, there was a notice stating that all of the trails were temporarily closed. Wait…what?

This may explain the lack of visitors.

I was bummed to say the least. My backup plan would be to hike the road at Lake Norman, but that’s not nearly as fun as a proper trail.

I then walked to the visitors’ center and asked the staff inside about the trail closures. They pointed out that there was one small loop trail–next to the visitors’ center–that was still open.

I was pleased to hear that and decided that instead of hiking one long loop, I could simply hike the same small loop several times.

I thanked them then gave them a donation (which I was going to do anyway) especially since I was getting free EV charge!

I walked out the side entrance of the building and onto the Alder Trail.It was a very nice little loop trail and long enough that I didn’t feel like I was walking in circles. Continue reading POTA at Lake Norman: Beautiful day for a TR-45L trailside activation (and hunting VE6LK)!