
I woke up on the morning of June 19, 2025, expecting to see rain when I opened the door to our balcony at the condo in St-Ferréol-les-Neiges, Québec.
 Instead, it was a bit overcast, but quite dry. I checked my weather app and saw that the forecast had pushed the rain—which I expected to begin around 6:00—to 9:00.
The forecast then showed rain throughout the rest of the day and the next. Being the POTA fellow I am, I wanted to squeeze in an activation before nearly two days of wet weather properly moved in.
Fortunately, one of my favorite POTA spots local to our condo is Cap Tourmente National Wildlife Area (Réserve nationale de faune)—a site I’ve activated during our past stays in the area.
I double-checked my field radio backpack, grabbed a bite of breakfast, then hit the road!
Bumps in the road

My plan that morning was to activate CA-0012 from a spot outside of their main grounds in a marshy area with a wildlife viewing blind.

I activated this very spot back in 2022 and loved it—[click here to read that report]—it was peaceful and easy to deploy a wire antenna there. It’s also a couple of minutes closer than the main reserve and I wouldn’t have to pay an admission fee to use it.
In truth, though, my main motivation was knowing that I would be under a heavy canopy of trees, so if it rained, I might get a bit of cover for a while.
I was fully aware, though, that the price I would pay for activating there was going to be mosquitoes. This site is surrounded by marsh areas, and that morning the air was still, warm, and humid. The perfect recipe for mosquitoes.
En route to the site, it dawned on me that I’d left the microSD card for my camera in my laptop back at the condo. As my buddy Vince (VE6LK) says, “Potty mouth made an appearance”—indeed, quite spontaneously!
I knew if I took the time to turn back and fetch the card from the condo, it would likely start raining by the time I set up my station. Then I remembered that I packed my old OSMO camera in my pack as a spare—of course! I could use the spare camera’s SD card. That problem was solved.
I parked my car in the little parking area across from the wildlife viewing area, grabbed my pack, and walked across the road.
The first thing I noticed was that the area under the trees had not been mowed. There was a path to walk, but all around it was tall grass flanked by trees. Did I mention that mosquitoes love tall grass?
I walked into the site and passed a wildlife photographer. He was the only person on-site, and I figured he also knew rain was incoming. I found a spot where I could deploy my antenna with ease and mostly stay off of the path.
Then I made the mistake of looking down at my legs.
Despite the fact I had Permethrin-treated trousers and had even applied a bit of DEET repellent, there was a swarm—likely 50+ mosquitoes—around my legs. There was no way in the world I could cope with that many mosquitoes sitting so close to the ground during my activation.
Time to “pivot,” as folks like to say these days.
I wasn’t going to give up, so I headed to the main park area and paid my entry fee at the gate.
Réserve nationale de faune du Cap-Tourmente (CA-0012)
 Since I didn’t want to hunt for a location, I picked one I knew well—again, one I had previously activated [click here to read that report].
The site is basically a large, open parking area close to the front gate and the “petite ferme” portion of the site.
The mosquitoes weren’t bad at all in this open area, so I backed the car up to some trees I could use to support my antenna.
Turns out, I discovered later on, that this particular part of the site is also a twofer with The Trans Canada Trail National Scenic Trail (CA-5082), since the entry to the parkway is actually a part of the trail system.
 I was in a bit of a hurry to beat the rain and actually almost forgot to start my video rolling. I made one throw line attempt and wasn’t pleased with the branch I snagged. It was only when I started my second attempt that I realized I’d forgotten to start the camera!
I decided to deploy my MW0SAW homebrew end-fed half-wave, knowing/hoping that either 20 or 40 meters should carry me through the activation.
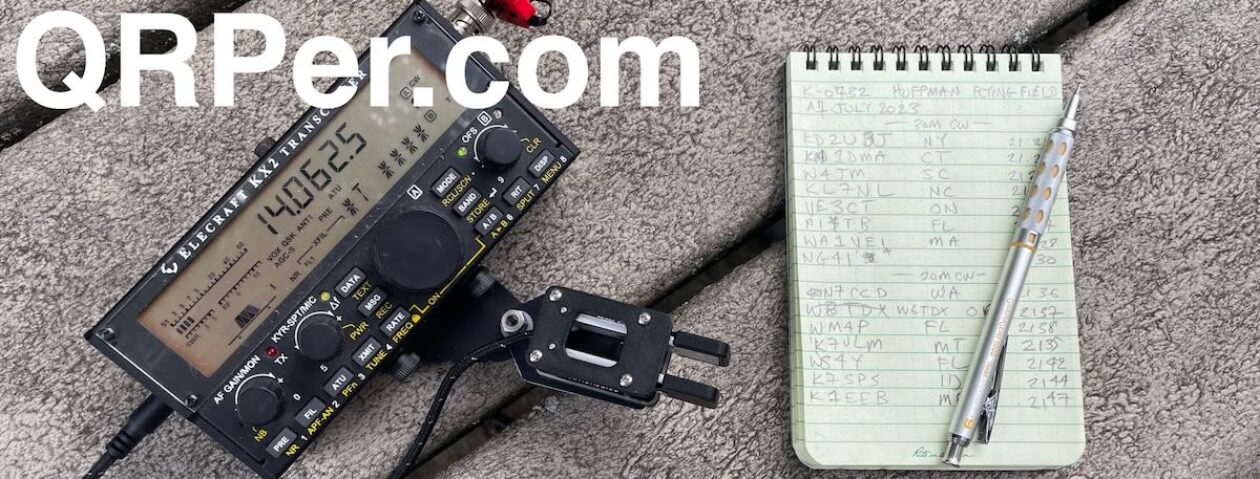
 I set up my Helinox chair and the KX2 on my Tufteln/N0RNM kneeboard.
Gear
 Note: All Amazon, CW Morse, ABR, Chelegance, eBay, and Radioddity links are affiliate links that support QRPer.com at no cost to you.
Radio
Antenna & Supports
- MW0SAW Homebrew 40m EFHW
Cable Assembly
Throw Line and Accessories
- Mini Arborist throw line kit: Tom Bihn Small Travel Tray, Marlow KF1050 Excel 2mm Throwline, andWeaver 8 or 10oz weight
Other Field Gear and Accessories
Packs & Cases
- LowePro CS60 Hard Side Case
- GoRuck GR1 USA (21L)
- HEROCLIP Carabiner Clip (attached to my backpack)
Logging Supplies
- GraphGear 0.9mm 1000 Automatic Drafting Pencil
- Rite In The Rain Top Spiral Notebook (small 3×5 size)
Camera/Audio Gear
- DJI OSMO 4action camera withJoby Telepod Sport Tripod
- DJI Wireless Microphones
On The Air
 I started calling CQ POTA on 20 meters—with my Canadian callsign, VY2SW—and was rewarded with seven hunters logged in about nine minutes. Continue reading Portable Radio Perseverance at Réserve nationale de faune du Cap-Tourmente


