I’ve been receiving a lot of comments lately from readers and viewers asking to see more Hazel in my reports and videos.
Hazel, if you’re not familiar, is my brown, white, and freckled canine shadow.
Hazel requires absolutely no prep time to go on a hike and summit/park activation. She’ll go from a deep, dreamy sleep where she’s chasing squirrels and her paws are twitching, to wide awake, tail wagging and nose pointed at the door in 2 seconds flat.
All it takes is the sound of me putting on my hiking boots (which must be louder that I imagined).
On Monday (May, 24, 2021) the weather was beautiful and I decided to finally add Bearwallow Mountain to my list of SOTA activations. Hazel was ready for a short hike!
Bearwallow Mountain (W4C/CM-068)
Bearwallow is one of the most popular summits to activate in the Asheville/Hendersonville area of western North Carolina. Any semi-seasoned local SOTA activator probably has Bearwallow in the logs. Why?
The Bearwallow antenna farm is extensive!
For one thing, Bearwallow is a ham-friendly site. A number of local repeaters are on this mountain and some of our local clubs have access to the summit. Once–I can’t remember the year–I even spent time with a club (I believe it was the Roadshow ARC) on Bearwallow for the ARRL Field Day. It was a blast!
Bearwallow is also a very accessible summit.
The trailhead to the summit (Google Map) is tucked away in the Upper Hickory Nut Gorge area–and there’s ample paved parking unless you happen to pick a very busy day (basically, any weekend with good weather will be busy!). Hazel and I were hiking on a Monday morning, thus there was very little activity and loads of parking spaces.
Some years ago, Conserving Carolina acquired the summit and much of the land on Bearwallow Mountain. Their conservation easement protects this area from future development and opens it for the public to enjoy.
Conserving Carolina maintains the trail system to the summit and all of the hiker information and blazing.They do a brilliant job!
There are two options for hiking to the summit: a proper foot trail, or you can take the Fire Tower Road which is the best choice for hikers who need a more gentle incline and flat gravel hiking surface.
Hazel and I found a nice spot to set up the station well within the activation zone. On summits like Bearwallow where there are clusters of communications towers, I prefer not to set up next to them. This is where that 25 meter SOTA activation zone (AZ) comes in handy.
I had actually planned to use my Elecraft KX3 on this activation, but after setting it up, I realized quickly that my power cord had developed a fault.
Fortunately, I packed a spare radio.
Knowing in advance that this would be a short hike–before leaving the QTH–I also packed the KX2 kit in my backpack as a backup. I don’t always have the luxury of packing a second radio, but wow! Am I glad I did that Monday!
Setting up the Chameleon CHA MPAS Lite vertical, of course, was super easy.
On the Air
I started the activation on 20 meters and spotted myself to the SOTA network via the SOTA Goat app. Of course, before leaving home, I had also set up an alert on SOTAwatch so that the spots page would auto-spot me via the Reverse Beacon Network (RBN) if I didn’t have mobile phone coverage.
In short? The contacts started rolling in. I was very surprised to have this sort of response on a Monday morning.
In 22 minutes, I worked a total of 19 stations including one summit to summit (S2S)–thanks for that, Eric (VA2EO)!
I was very pleased with the number of contacts logged in such short order because I only had a max of 25-30 minutes to be on the air before I needed to pack up and head back to the QTH.
Here’s the full log:
Activations like this one remind me of what one can do with QRP power and a modest antenna.
Sure, at one point–after I had worked at least my first four to achieve a valid QRP SOTA activation–I increased the power from 5 watts to a cloud-scorching 10 watts!
I must apologize for the audio in this one–it’s a little weak due to how the camera was set up.
Hazel at it again
So I brought along a retractable leash/lead for Hazel for this particular outing.
This leash allows her to roam more freely during our actual hike. On the summit, I locked the leash and attached it to my pack so it would keep her within 4 feet or so of where I was sitting which was cow patty-free.
At one point, near the end of the activation, when I was trying to manage a few calls, off-camera Hazel discovered that the leash unlocked, allowing her more flexibility to roam.
I looked up to discover that she found a semi-moist cow patty I somehow missed and was preparing to “enjoy” it. While sending CW and trying to keep from knocking down the camera, I used my left foot to put the brakes on her leash. She knew I was struggling, though, and tugged more.
I managed to stop her before even one paw plopped in the patty. Somehow. It was a very close call, though.
If you’ve watched my activation videos before, you’ve no doubt gathered that I’m not a multitasker. This little event really tested my ability to hold it all together on and off camera!
After packing up the station, Hazel and I took the Fire Tower Road back to the car. It was a very pleasant stroll and cow patty free.
Thank you for coming along with me on this SOTA activation and making it to the end of the report. You deserve an award! Please treat yourself to a local summit or park soon!
It seems folks are now finding out about the new Xiegu X6100 HF & 6 meter portable transceiver.
There have been a few rumors about it, so I thought I’d share some of the few details that have been confirmed.
What is the X6100?
If the Xiegu X5105 and Xiegu GSOC had a baby, it would look like the X6100.
The X6100 is a completely self-contained SDR QRP transceiver much like the X5105. The X6100 sports a 4″ high-resolution color capacitive touch screen and is built on on a quad-core processor, 4G ROM, and 512MB RAM. I assume this will run on a similar Linux version/distro as the GSOC.
The X6100 will include an internal automatic antenna tuner (ATU) and a 3500 mAh internal rechargeable Lithium Ion battery pack.
Power output will be 5 watts when using the internal battery pack and 10 watts when connected to an external power source.
Key features:
Modes: USB/LSB (J3E), CW (A1A), FM (F3E), RTTY (F1B), AM (A3E)
Pricing and availability have not been determined at time of posting. I will post an update when that information can be confirmed.
I can only assume bringing this new radio to fruition will take time. Most radio manufacturers are struggling to keep up inventory levels as we work our way out of the C-19 pandemic supply chain issues. Parts availability has become a real issue.
Many thanks to a number of QRPer readers who note that WA3RNC has recently introduced the TR-25 CW Transceiver Kit and announced the upcoming TR-45L QRP Transceiver Kit.
Here is a compact but powerful 2-band CW transceiver kit that uses no tiny pushbuttons, and without those seemingly endless and hard-to-remember back menus. There is a knob or a switch for every function!
Size 5 ½ X 3 ¼ X 1 ½ less protrusions, weight 10.6 Oz
Full band coverage of 40 and 20 meters
About 10 watts output with a 14 volt power supply
5 Watts minimum output with a 10 volt supply
4 Watts output with an 9 volt supply
Optimized for operation from 3 series-connected 18650 Lithium cells
RIT tunes + and – 5KHz
Blue OLED display reads frequency to 10 Hz and RIT offset
Built in Iambic keyer is adjustable 5 to 35 WPM with front panel control
Separate jacks for straight key and paddles; Always ready for SKCC contacts
Operates on 9 to 14 volts, < 90ma receive, about 1 Amp Xmitt at 10 volts
Selectable tuning resolution steps of 10, 100, and 1000Hz
Low battery indicator with internal adjustment 9 to 12 volts
Front panel adjustable RF gain control
Front panel TX power control; Adjustable from 0 to 10 watts (@14V)
Rugged TO-220 FET RF amp can deliver 5 Watts key down for 5 minutes
Signal quality blue LED, RIT warning orange LED, Low battery red LED
More than enough audio to fill any room with an external speaker
Excellent receiver sensitivity with MDS of -132dBm (0.06 microvolt)
Very effective receive AGC prevents ear damage with strong signals
Transmitter harmonics and spurs -58dB, meets FCC specs
CW sidetone is the actual transmitter signal as heard by receiver
Match the received signal tone to the sidetone for perfect zero beating
Sharp IF filter; Better than 300 Hz at the -6dB point, plus 700 Hz audio filter
Over 200 machine placed SMT parts, and about 55 user installed parts
All critical circuits are factory pre-aligned and calibrated
No endless “back menus”; There is a control or switch for every function
Options include pre-wound toroid coils, precision optical tuning encoder, and complete factory assembly
Price is $250 or you can add pre-wound toroids for $18, a precision optical encoder for $30, or for $310 you can purchase this kit fully assembled and tested. Click here to check it out.
TR-45L is a 4-band 5-watt CW transceiver covering the 80-75, 40, 30, and 20 meter bands.
Full band coverage is provided, with the transmitter optimized for the CW band portions.
The receiver is provided with both narrow and wide band IF filters, and CW and SSB detectors.
An illuminated front panel meter shows “S” units on receive, and power output (forward or reverse) while transmitting. The meter also will display the battery state of charge.
A “High SWR” warning indicator will illuminate if the antenna SWR exceeds about 2:1.
The transmitter power output is adjustable from less than ½ watt to 5 watts with a front panel control.
RIT is provided to adjust the receive frequency up to + or – 5 KHz from the transmit frequency.
Two VFOs for each band are provided with recallable memories.
A built-in keyer is adjustable from about 5 wpm to 35 wpm with a front panel speed control.
Separate straight key and keyer paddle inputs are provided on the front panel.
A front panel adjustable sharp notch filter is provided to null out interference.
A front panel receiver RF gain control is provided.
Operates from a 12 volt nominal power source requiring up to 1.3 amperes on transmit, and about 130 ma on receive. A front panel power on – off switch is provided.
Tuning speed is easily settable from 1 Hz to 1 KHz per step.
A selectable dial lock is available to prevent inadvertent frequency changes.
There is a knob or switch for every function – no confusing back menus!
Size 8-1/2” wide, 5” high, 3” deep Weight about 2.8 lb with Internal Batteries
Beta testing is continuing…73 de WA3RNC
No pricing or availability has been noted yet.
I life the look of both of these kits. I love the fact that you can buy pre-wound toroids as this is often one of the more complicated parts when building radios. Also, I’m pleased to see that all SMD components are pre-installed and that all critical circuits are factory pre-aligned and calibrated. That will make this kit accessible to a much larger kit building audience.
If you live here in the States and like to play radio in the field, I highly recommend one of the DeLorme Atlas & Gazetteer issues.
Although I use electronic devices like smart phones and dedicated GPS, it’s always nice to have a paper map. I always have one of these Gazetteers in my car. You should never be without a paper map, I say.
I love the Gazetteer because it shows lines of elevation and every/any possible road and trail. It’s incredibly useful for finding summit road and trail access points and also for finding game land entry areas.
Funny, but I opened my new Gazetteer while still in the parking lot of the camping store and almost instantly spotted a brilliant new access point for the Overland Victory trail in Morganton. It’s an even better activation spot than I’ve used in the past.
Last year, I wanted to purchase the latest edition for North Carolina but I’m sure due to the pandemic, they were as rare as hens teeth!
The other week, I found one in a local camping store and grabbed it! The store owner told me he’d only gotten a handful in recently and had been out for months. Check for one at your local camping store, book store or outdoor center. If you can’t find one there, check Amazom.com (affiliate link).
I’m a huge map geek. Although I don’t recall them including topographic information, when I lived in the UK, I was a massive fan of A to Z road maps for their design. I’d love to know if there’s a topo map equivalent.
If you live outside the US, I’d love to know what maps you use for your field activities! Please comment!
Last time I visited Table Rock Fish Hatchery–this activation–it was a struggle to get the ten contacts I needed for a valid activation. Propagation was horrible that day, making it a proper struggle.
On Thursday, May 20, 2021, I thought I’d go back to the fish hatchery for another try! I really like the site: it’s open, has lots of trees, and the staff (and neighborhood dogs) are all very friendly.
My not-so-QRP diesel truck!
Thing is, as I drove to Table Rock, my buddy Mike informed me that propagation took a nose dive. Earlier in the day, it had been reasonably stable, but he noted that POTA activators were struggling in the afternoon and the propagation numbers were in the dumps.
There’s a beautiful little creek next to the picnic area.
My secret weapon: The Chameleon CHA LEFS
Shortly after I posted my “unboxing” video of the lab599 Discovery TX-500, Carl at Chameleon Antenna made a comment on my YouTube channel that he was going to send me their CHA LEFS (Lightweight End Fed Sloper) wire antenna since it’s resonant on 40, 20, 17, 15, 12 and 10 meters. In many ways, it’s ideally suited to pair with the TX-500 since this transceiver lacks an internal ATU. Side note: there is a cool project in the works called the DIY599 that adds a 60 watt amp and ATU to the TX-500 .
I had only recently received the CHA LEFS and had not yet taken it to the field. Table Rock was the perfect opportunity.
When I know in advance that propagation is poor, I try to make my portable set up as efficient as possible, so that’s when I 1.) make sure I pull out a resonant wire antenna and 2.) use a wire antenna with longer radiators. The CHA LEFS fits both of these bills.
The CHA LEFS has a 63 foot radiator made of 20 gauge PTFE antenna KEVLAR wire. The winder has a large efficient transformer to match impedance, and there is an inline coil to make the most of the 63′ radiator. They also include 50′ of Micro 90 paracord.
Like all Chameleon antennas I’ve used, it’s built to military specs.
Table Rock Fish Hatchery (K-8012)
Table Rock is ideally-suited for a long-ish sloping wire antenna, too. The site has tall trees and open spaces that make stretching out the sloping radiator quite easy. Just watch those power lines!
The CHA LEFS takes longer to deploy that end-fed antennas with a feedpoint near the ground. I find it quicker to deploy, however, than dipoles.
I deployed the LEFS by first stretching out its radiator wire in the direction I planned to deploy it.
Next, I connected the coax feedline to the SO-239 on the LEFS winder and stretched it in the opposite direction of the radiator. Why do this? It helps keep the radiator and coax from twisting together as I raise the winder/feedpoint into the tree.
This is not a difficult antenna to deploy as one person. Of course, if you have a helper, it’ll go even faster (I’ve yet to convince Hazel to help me with antenna deployment).
I had launched the arborist line quite high into a tree at the picnic table where I planned to operate. I was able to elevate the LEFS feedpoint/winder about 47′ into the tree.
I used the supplied paracord to attach the radiator to a nearby branch. The end of the sloper was perhaps 6 feet off the ground (if memory serves).
Knowing how poor conditions were from real-life K8RAT observations, I didn’t expect to actually validate my activation by logging the required 10 contacts. As I stated in my activation video, I was fully prepared to walk away with three or four contacts–I didn’t have a few hours to burn on an activation. I was simply happy to play with a new antenna, the TX-500, hang with the local canine welcome committee and enjoy the fine weather.
First, I hopped on 40 meters and discovered the LEFS provided a perfect 1:1 match on 7063 kHz. Very promising!
Next, I started calling CQ and the Reverse Beacon Network functionality of the POTA spots page must have quickly auto-spotted me.
Within 13 minutes, I logged six contacts! I was impressed. Mike (K8RAT) was in that first six contacts and he later told me it was one of the strongest signals he’d ever heard from me at a POTA activation. He asked what I was using as an antenna that day and said, “it was working!”
Next, I moved to the 30 meter band and worked K8RAT again (a rarity on 30 meters!) along with four other stations.
I ran out of time, so called it quits with 11 stations logged.
I did not expect to not only walk away with a valid activation, but to have completed it in such short order.
QSO Map
Here’s the QSO Map of my contacts all made with 5 watts of power:
As Carl suggested, I’m going to keep the CHA LEFS tucked away along with my PackTenna EFHW in the Discovery TX-500 pack.
When conditions are poor, I’ll spend the modest amount of extra time deploying this fine antenna.
The only CHA LEFS criticism I noted–and it’s a minor one–is that the in-line trap/coil isn’t very low-profile and takes a little attention to make it fall in the right spot when reeling the antenna up post-activation. Seriously. A minor criticism and I’m guessing Chameleon has a reason for it being on the large size–likely for power handling reasons.
Field Day is coming up, and I think I’m going to make the CHA LEFS one of Team Baklava‘s main antennas (Team Baklava = my buddy N3CZ and me!).
I would like to thank everyone for their positive and kind comments from my first part of the SOTA adventure with NK8Q. I have a slight correction to make, Cole Mountain was the first summit we did on Day 2. As you can see below in the pictures, there were no trees to hang our EFHW antennas, so we brought along our fishing poles. This generated a lot of interest from the A.T. thru hikers asking what we were doing. On particular hiker told us he’s seen others doing SOTA at summits throughout his journey from Georgia until that day. This was a fairly steep climb to get to, but the scenery was fantastic and well worth the walk. We offered trail magic to several of the hikers and we had very good conversation with them all.
Heading back down from the summit are a couple of other views we saw. There were some trees outside of the activation zone.
We packed up and started heading down the mountain to the parking lot around noon with the next destination Rocky Mountain (W4V/BR-001).
We drove almost 3 hours to get to this drive-up summit. The “S” turns and elevation changes were worth it though as there was so many spectacular views of the mountains. The last 4 or 5 miles was up a very steep gravel road that had me white knuckling until we got to the top. This was a site with several towers for different things and not a lot of view. I was able to get 10 QSO’s at the summit. I recall it was getting very warm that afternoon and I was not looking forward to the drive back down the mountain on the access road. I figured out how to do the manual shifting in my Tucson and Mark followed me down the hill. It was a non-issue and then we had a long drive to where we thought we would be able to camp on Skyline Drive.
I got my 4 SOTA QSO’s, time to relax.
When we finally got back onto paved roads and eventually into cell phone coverage briefly; we were hoping to find a place to get ice for the coolers and maybe a place to eat. Well, we found a gas station in the middle of nowhere with ice and a little store and they happened to be selling their own fried chicken and fries. When we got to the south end of Skyline Drive entrance, the sign showed all of the campgrounds were full. Since it was already getting dark, we made the decision to get on I-81 and head north and found a Super 8 Motel in Newmarket, VA for the night with the plan to get back to Skyline Drive at the Thornton Gap entrance. We got up early and looked for a gas station and a place to eat. Conveniently, Dunkin Donuts has a gas station as well (we didn’t realize that until after we got gas) but had a good breakfast sandwich each and I got a large coffee. I believe Mark is only the second person I’ve ever known who does not drink coffee. I believe my large cup was consumed before we got to Skyline Drive that morning, which I believe was about 18 miles.
First Summit of the day was Hazeltop Mountain (W4V/SH-004), which was south on Skyline Drive. The scenic outlooks were beautiful on the way to the summit.
Once we reached the summit, there was not much to see. I set up a few yards off the A.T. and made 15 contacts. The band conditions were pretty decent. This was my set up at this location.
Next stop – Hawksbill Mountain (W4V/SH-001). It was just after 12 noon when we got to the parking area, and there was a good mile or so of steep uphill climbing. The reward at the top was worth the climb! I got another 20 QSO’s in the logbook at this summit.
This dial pointed to the many summits within view of Upper Hawksbill.
Final summit for the day was Stony Man Mountain (W4V/SH-002). This was another steep climb, but the reward was also a beautiful view. I made 8 QSO’s and Mark and I shared the antenna and radio due to the limited space and all the people walking around at the summit.
I will continue with Part 3 of our journey to the Summits in Virginia in the next post. I hope I have half the writing skills that Tom Witherspoon has and that I was able to hold your interest in the SOTA journey that Mark and I did. I will wrap up the story with a Part 3. Thank you for taking the time to read this.
Scott Lithgow
KN3A
Scott Lithgow (KN3A) is a contributor on QRPer.com. Click here to check out his previous posts.
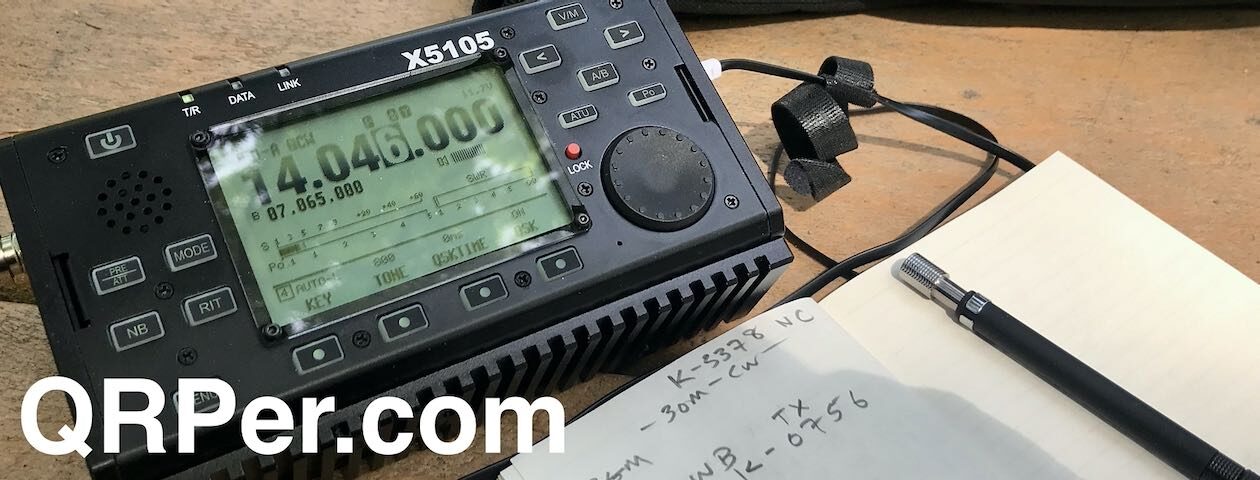
I just got back from an activation at Lake Jame State Park where I used the Xiegu X5105. Radioddity sent this radio on loan at my request for an upcoming review in The Spectrum Monitor magazine.
I must say that I underestimated this little radio…
Impressive play on the internal battery
I’ve now completed 3 activations with the X5105 on one battery charge made three weeks ago!
This weekend, I used the X5105 in the shack for perhaps 30-40 minutes chasing a few parks and summits on that same charge. During that weekend time it was mostly in receive mode, unlike when I’m activating (and working stations or constantly calling CW).
I decided to see how long it would continue to play off of the internal battery, so I didn’t re-charge it. Instead, today (June 7), I took it to Lake Norman State Park and had an external battery at the ready if it failed mid-activation.
It didn’t fail, though, even after 1.5 hours on the air. The voltage, when I finally gave up, was about 10.2 volts. I ran out of time, not the battery.
I’m impressed.
Internal Microphone
Once I’ve uploaded the video and written the field report (in a week or two), you’ll see that at one point today, I switched to SSB operation. Thing is: I didn’t bring the X5105 hand mic with me–it was 2 hours away at the QTH!
I remembered that the X5105 has a built-in mic–meaning, built into the body–so I decided to give it a go. I mean why not–?
Turns out, it was very easy to operate: simply press the PTT button as you would a mic button and speak. I worked a few SSB contacts this way.
The only other radio I own with an internal mic is the Elecraft KX2.
This X5105 might become permanent
Herein lies the trouble with doing radio reviews: sometimes you get attached. I need to talk with Radioddity.
I’ve been hesitant to take this unit on a SOTA activation because the chances of it getting scratched, etc. increases.
I believe I’m going to add the X5105 to my HF radio arsenal. It’s a fun little radio and it would make the short list for SOTA runs along with the Elecraft KX2 and Discovery TX-500.
Ed operated as FP0AR–one of his favorite family DXpeditions– more than four decades ago.
This past week has been a crazy one.
I set the week aside to catch up on a number of projects and to fit in at least one activation. I did manage that activation on Tuesday–Hazel and I hit the trails and I activated Mount Pisgah.
Wednesday, however, was a different story…
At midday, I received a call from the daughter of a dear ham radio friend telling me that her father–and my friend–was unresponsive and now under hospice care. She didn’t expect him to live much longer, and wanted to know if Vlado (N3CZ) and I could come over to spend a little time at his bedside. A quick call to Vlado, and we instantly dropped everything we were doing; I picked up Vlado at his QTH and we drove the two hours to be with Ed (W2HTI), his wife Eileen (KO4DI), and their children and grandchildren.
It was sad, of course, but Ed indicated that he recognized us and even attempted to communicate as best he could. Needless to say, we were deeply touched and so glad we’d made the trip, even on the long drive home.
Ed (W2HTI) SK
Early Friday morning, only 32 hours later, Ed went silent key.
The good news: Ed was pushing 91 and had led a very rich, full life. I’m not sure I’ve ever known anyone with the energy level, love of life, and amazing talent to make everyone laugh. This Brooklyn “boy” and his wife, Eileen, were/are also some of the most generous people I’ve known, and have gone out of their way to treat me and Vlado and our families–and indeed, many DXers over the years– like their own family.
Ed lived at least five full lifetimes, all of them full of adventure with an amazing family.
And did I mention, he was an avid DXer…?
A small request
Ed (W2HTI) on the left and Vlado (N3CZ) on the right during one of our visits in 2019.
You might have guessed that ham radio played a central role in Ed’s life–and still does, for his wife Eileen. It’s no exaggeration to say, Ed was one of the top radio DXers in the world. Ed also collected QSLs, and his family counts these among his precious possessions, and are making sure they are carefully archived.
Our special request: For this QSL collecter, there’s no better memorial than QSL cards. If you have a moment, please consider sending his wife, Eileen a QSL card in memory of this incredible member of the radio community. Even if you didn’t know Ed, it would mean a lot, coming from the ham radio world that was such an inspiration to him and his family, to be acknowledged. Vlado and I are asking this of all the hams we know. Thank you, friends.
Eileen’s contact information can be found on her QRZ.com page. If you don’t have access to QRZ.com and need her address, simply email me and I’d be happy to provide it.
Besides Lane Pinnacle, there’s been one SOTA summit, in particular, I was eager to activate this year: Bakers Mountain (W4C/WP-007).
I practically grew up in the shadow of this little outlier mountain in Catawba County, North Carolina–my home was only a couple miles away as the crow flies and it has always been a bit of a landmark in my childhood stomping grounds.
Growing up, the land in/around Bakers Mountain was basically off-limits and privately owned. In the late 1980s, one of the land owners gave a large tract of land to the county to protect it from development (which started booming in the area around that time).
In June, 2002, while I was living in the UK, Catawba County open up the 189 acre park and its 6 miles of trails to the public.
I love Bakers Mountain park. Even though the mountain isn’t terribly tall (1780 feet/543 meters ASL) parts of the trail system are fairly strenuous. When I want to escape and clear my head, the Bakers Mountain trails are the perfect medicine.
Bakers Mountain: What’s in a name?
An interesting tidbit about Bakers Mountain that I learned from one of the park rangers: it was originally called “McBride Mountain“ in the late 1700s, but as more German settlers moved into the area, German family names became predominant.
The Baker family had large tracts of land in/around the mountain and, locally, people started referring to it as “Baker’s Mountain” sometime in the 1800s and the name stuck.
Officially, the name of the mountain is “Bakers Mountain” although, I suppose, it should have been called “Baker’s Mountain” or maybe “Bakers’ Mountain.” An apostrophe was never added, though.
It’s a source of confusion for those who make maps and refer to the mountain. In the SOTA database, it’s referred to as “Baker Mountain.” That is incorrect, of course, but the SOTA database is likely built upon one of the topographic map databases where it’s incorrectly labeled.
So there you go. Tuck away this bit of trivia and sound like a local next time you’re in Catawba County!
Now where was I? Oh yes…
So on Wednesday, May 19, 2021, I packed my Elecraft KX2 and PackTenna 9:1 UNUN antenna in the GoRuck GR1, and hit the Bakers Mountain trail system.
The weather was perfect, although the humidity was incredibly thick that day.
Mountain Laurels were in bloom and flanked portions of the trail.
I took the main red-blazed loop trail.
The trail is very well-marked and maintained with maps posted throughout.
At one point, you’ll happen upon the old home site.
The trail has a few steep sections, but overall is pretty moderate.
There’s no missing the summit trail.
Following the orange mountain top trail will take you to a gazebo and observation deck near the summit.
Keep in mind, though, that this is not the true summit of Bakers Mountain and isn’t close to the 25M SOTA activation zone. Still, the views are fantastic here, so take a breather and soak up the Catawba valley.
Click the pano image below to enlarge in a new window.
To find the trail to the real summit, you must follow the path crossing under the power lines near the observation area–you can’t miss it. While the public isn’t encouraged to take this path–and it is not a part of the Bakers Mountain trail network–a park ranger told me that the current owners don’t mind the odd SOTA activator following the trail to the summit.
The path–since it’s not a part of the public trail–is a bit overgrown. Follow this path until you intersect an overgrown narrow access road. At the intersection take a left and this will lead you to the true summit. The ring road around the summit is well within the AZ.
I found a little spot to set up among the trees on the summit. No views, but it was the perfect space to deploy the PackTenna 9:1 UNUN!
This being my first time activating Bakers Mountain, of course I made a real-time, real-life, no-edit video (see link below). Sorting out a way to set up the camera position took me longer than deploying the antenna and unpacking the radio! It can be a real challenge on a stony mountain summit.
The KX2 paired beautifully with the PackTenna 9:1 UNUN. I got a great match on 20 meters.
I started calling “CQ SOTA” and spotted myself on the SOTA network using the SOTA Goat app.
My first contact was SA4BLM in Sweden–I almost fell off of my rock!
Next, I worked KR7RK in Arizona, AE0XI in South Dakota, and HA9RE in Hungary! All in eight minutes.
Wow!
Next, I moved up to the 17 meter band where I logged AC1Z in New Hampshire, F4WBN in France, and KT5X in New Mexico.
Finally, I moved down to 40 meters where I worked K3TCU in Pennsylvania, K8RAT in Ohio, W4KRN in Virginia, and K4MF in Florida.
My total activation time was about 25 minutes.
QSO Map
Here’s the QSO Map plotting out my QRP contacts. I must say, that modest PackTenna did a lot with my 5 watts! That and some good Bakers Mountain mojo!
Video
Here’s my real-time, real-life, unedited video of the entire activation from start to finish:
When I hike at Bakers Mountain, I add spur trails and connectors to make it as long as can in the time frame I have. The trip back to the car was actually a longer hike than it was to the summit.
But I had a spring in my step.
I was absolutely chuffed that my first activation of this particular summit was so exciting and fun. It still blows my mind what can be accomplished with 5 watts and a modest wire. I can’t wait to go back again.
Connecting an international community through low-power field radio adventures.
Please support QRPer by adding us to your whitelist in your ad blocker. Ads are what helps us stay online. All of our ads are ham radio related--no junk, we promise! Thank you!
 Many thanks to Thomas (KC5KCT) who shares a link to this video demoing a 3D-printed Li-Ion TX-500 battery pack from Brewer 3D Design:


