Tag Archives: Armoloq TPA-817

Field Radio Kit Gallery: VA7EKA’s Yaesu FT-857D Field Kit

Many thanks to Andrew (VA7EKA) who shares the following article about his portable field radio kit which will be featured on our Field Kit Gallery page.

You may note that this isn’t a QRP radio, but the FT-857D will run QRP power! If you would like to share your field kit with the QRPer community, read this post. Check out Andrew’s field kit below:


Yaesu FT-857D off-grid portable kit

Andrew (VA7EKA)

As part of my amateur radio operations, I’ve quickly seen the advantage of having a small, portable radio I can operate anywhere and deploy quickly. Especially as I don’t have a permanent HF antenna installation at home, being able to set up in the yard (or even indoors) in a pinch is pretty high on the list of requirements for me.

I started reading online and watching videos about this topic, and found an excellent video from KT7RUN “The Tech Prepper” (and an earlier one) which showed a super-slick portable radio setup featuring the Yaesu FT-857D. Prior to finding those videos, I had already acquired an FT-857D due to its all-band, all-mode operation and compact size, and Gaston KT7RUN’s kit seemed like a very compelling setup for this radio.

Here’s what I’ve ended up with for my off-grid-capable “grab’n’go” radio station:

Inventory

Currently this is the inventory for this kit:

Antenna options:

and for charging this station in the field…

Details

Of course, the core of this kit is the radio. It’s popular for a reason. All-band, all-mode “shack in a box” in a truly portable form factor. Capable of 100w operation, it’s more than enough to make whatever contacts you need. In my case, because the battery has a max 20A continuous-discharge specification, I wouldn’t actually transmit at a full 100w with this exact configuration. Not a problem – I’m not expecting to transmit at those levels with a pack of this size.

The pack frame is truly solid, though it adds a good amount of weight (1.364lbs with all options). It’s absolutely worth it though. Not only does it provide rigidity and protection, it also provides convenient mount points for attachments, like the relocated antenna connections and Digirig holster. I could securely attach additional items if needed.

The battery just fits into the MOLLE pouch which is pretty lucky. I got a small PowerPole distribution block so I can not only connect the radio to the battery, but also the Genasun solar charge controller and whatever other power-related accessories I might use (e.g. Dakota Lithium’s 5v USB charger which I’ve adapted to PowerPole). Solar-wise, the charge controller I went with has a little more capacity than what I’m using currently with the 75w panel. I figured I should bump up to the 10amp charge controller to allow for a larger solar panel later on.

For CW operation I’ve relocated the jack with a basic 3.5mm audio extension cable going up through the bag and looped through the PALS webbing on the High Ground Gear PRC-117G bag. For a key I’m usually packing a basic 3d-printed iambic paddle I got at a swap meet for $20. I’d love a N0SA SP4 paddle but… $$$ :‘D

In the following photos you can see how I’ve laid out the relocation cables. I specifically took photos of these to show people who want to re-create this kit, because it was pretty tedious to get it all in there. Hopefully these will save someone a bit of time. 😉

All in all, this kit weighs in at 11 pounds. It’s a bit heavy to carry for a SOTA activation, but for POTA it’s no problem at all. I have indeed carried it up to a SOTA summit, but HF propagation conditions were poor and I was really struggling to make any contacts. Ended up resorting to activating on 2m with a tape measure Yagi. 😉

Because of the PALS webbing on the PRC-117G bag, this portable kit could be strapped to a larger backpack as needed, though typically I have just carried the kit inside my backpack, to keep the weight closer to my body. Perhaps more notably, additional accessory pouches could be attached, like a pouch for logbook/pencil/antennas/CW key etc.

Conclusion

So how is this kit to actually use? In a word, awesome. Drop it on the ground or on a table, deploy and attach an antenna, turn on the power. If I’m expecting to be on air for a long time, I can attach the solar charge controller and solar panel to keep the station running (though I have yet to do this while operating, since I completed this kit very recently). I can go out into the field and use this setup indefinitely, regardless of available electrical infrastructure.

For digital operations, I have a ToughBook CF-31 which is fully configured with all relevant software I’d typically use. This is great for tossing in the vehicle for a POTA activation, and even feasible for SOTA if you’re in great shape or willing to carry the extra weight. An alternative for digital ops could be a lightweight single-board-computer, tablet, or netbook, of course.

Just for fun, here’s a map of most of the QSOs I’ve made with this rig since putting it together. It’s not exhaustive, but what I could quickly gather up for this post. 133 contacts across 11 countries. The furthest contact thus far is with VK2WN on 30m FT8, at a nice 11965km (7435mi) distance, with just 5watts of output power on my side. Nice!

If you have any questions about this kit or would like additional details, please feel free to reach out. I’d also be curious to hear from anyone who follows this build and creates their own variation!

73 de VA7EKA
Pairing the Yaesu FT-817ND and Chelegance MC-750 at South Mountains State Park

After completing a lively little POTA activation at Lake James State Park (K-2723) and then Table Rock Fish Hatchery (K-8012) on the morning of Monday, July 31, 2023, I decided to squeeze in one more POTA adventure on what became a mini rove.

Since nearby Tuttle Educational State Forest is closed on Mondays in the summer, I chose to visit South Mountains State Park (K-2753) instead–it was only a few minutes further afield than Tuttle.

After leaving Table Rock, I picked up a quick lunch in Morganton and drove to the main entrance of South Mountains and set up at the equestrian picnic area.

South Mountains State Park (K-2753)


The weather that day was beautiful and so was the drive.

I decided to deploy my Chelegance MC-750 this time, just to shake things up a bit. If you know me, when I do little roves like this, I typically like to use different radios and/or antennas at each site.

I paired the MC-750 with my Yaesu FT-817ND. My reasoning for picking the ‘817 was because I could use the SO-239 connection on the back of the radio. The new cable assembly/feedline I was using had PL-259s on each end.

Speaking of the new assembly, at the Dayton Hamvention this year, I popped by the ABR Industries booth and Chuck gave me (full disclosure–at no cost to me) a new product to test in the field: a 20 foot PL-259 to PL-259 assembly made with their ABR240-UF cable and with 5 in-line ferrites. What makes this cable unique is that it sports a bright orange flexible webbed jacketing which makes it very easy to see on the ground.

They’ve been informally calling it their “POTA cable.” I immediately knew why this would appeal to POTA ops: one of my constant fears is that someone will unknowingly trip on my feedline while I’m in the middle of an activation. Black coax cable on the ground is very difficult to see (I’ve even tripped on my own lines)–this high visibility jacketing makes cable very conspicuous. Just check out the photos above. Continue reading Pairing the Yaesu FT-817ND and Chelegance MC-750 at South Mountains State Park

POTA Field Report: Pairing the Yaesu FT-817 and a 40M EFHW at Table Rock!

After a fun little activation of Lake James State Park (K-2723) on the morning of Monday, July 31, 2023, I decided to fit in at least one more POTA adventure on a mini rove.

The logical choice was Table Rock Fish Hatchery since it’s such a short drive from Lake James and I always enjoy activating that particular site.

The weather that morning was beautiful and so was the drive.

Table Rock Fish Hatchery (K-8012)

I pulled into the driveway of the picnic area and–no surprise here–I had the place to myself.

In fact, according to the POTA website, I’ve activated this site 12 times and I’ve never seen another soul in the picnic area save my canine friends, park staff, and one guy who was hunting muskrats in the creek. That’s about it. Never anyone actually hanging around the picnic area.

On the drive over, I hadn’t considered what antenna or radio to use–I had a few in the back of my car.

I thought about using my Elecraft KX1, but then realized I didn’t have an extra shielded audio cable to connect to my Anker Soundcore Mini speaker nor did I have my in-line digital audio recorder. Without those things, I wouldn’t be able to make a video of the activation.

My next choice was the Yaesu FT-817ND and, in fact, it would be ideal. I was looking forward to putting the ‘817 on the air again–it’d been a couple of months!

First, though, an antenna. I pulled out the 40 M End-Fed Half-Wave Steve (MW0SAW) made for me some time ago.

This antenna has been in heavy rotation lately because it’s been in my main radio backpack as I’ve been traveling around the region.

I deployed the EFHW in short order, then hooked it up to the ‘817. Continue reading POTA Field Report: Pairing the Yaesu FT-817 and a 40M EFHW at Table Rock!

POTA Field Report: Testing my CP Gear Tactical Aircrew/Pubs Bag with FT-817ND and Armoloq TPA-817 Pack Frame

Last year, during a Black Friday sale, I took a calculated risk and purchased a bag I hoped would accommodate my Yaesu FT-817ND that has been outfitted with an Armoloq TPA-817 Pack Frame.

CP Gear Tactical Aircrew/Pubs Bag

Rod (VA3ON) first introduced me to CP Gear Tactical–a  military pack manufacturer based in New Brunswick, Canada.

I’d had their their Aircrew/Pubs Bag with Padded Tablet Pocket on my wish list since the Ham Radio Workbench podcast episode where we talked about backpacks and pouches. CP Gear Tactical manufactures a wide variety of gear primarily for the Canadian military market. Everything is made either in Canada or the US (or both).

I contacted CP Gear Tactical shortly after outfitting my FT-817 with the TPA-817 pack frame. I measured the frame carefully and asked if the interior padded pocket (which is actually designed to hold a tablet–might fit my radio.

I never heard back from them. I could have called them, but on Black Friday, when it was on sale for 20% off and free shipping, I decided to throw caution to the wind and simply purchase it. My total price in USD was something like $62 shipped.

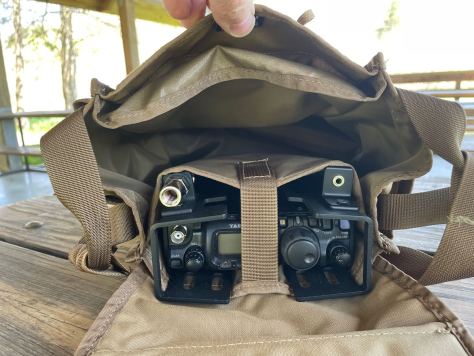
As soon as I opened the CP Gear pack, the first thing I did was check to see if the FT-817 with pack frame would fit in the interior pocket.

Much to my surprise, it fit it perfectly!

Indeed, it’s as if the pocket were specifically designed to accommodate the FT-817ND/TPA-817 combo.

Even the middle Velcro strap fits precisely in the middle of the radio between the pack frame side extensions. The strap holds the rig securely; once, I accidentally fumbled while holding the bag and even though it was upside down, the FT-817 remained securely inside. The strap held it in place.

The bag has loads of room inside. In fact, you can very easily transform it into a fully self-contained field radio kit.

I actually give a small tour of this pack in my activation video below, so if you’d like to see some of the exterior pockets, I would encourage you to check it out!

Zebulon B. Vance Birthplace (K-6856)

On Tuesday, April 11, 2023, I once again popped by the Vance Birthplace for a leisurely POTA activation–I thought this activation, in particular, would be a good one to test my new Aircrew/Pubs bag! Continue reading POTA Field Report: Testing my CP Gear Tactical Aircrew/Pubs Bag with FT-817ND and Armoloq TPA-817 Pack Frame

New Year’s Day POTA: New VK3IL Pressure Paddle, New FT-817/818 Narrow Filter, and New TPA-817 Pack Frame!

I try to start each year by doing a POTA or SOTA activation on New Year’s Day.

POTA actually issues a certificate for completing an activation on New Year’s Day so there are typically loads of activators and hunters working the bands. It’s an ideal time to play radio.

This year, we had a number of family activities on New Year’s Day, but I made a little time to fit in an activation during the late afternoon at my most accessible spot on the Blue Ridge Parkway: the Southern Highland Folk Art Center.

As with my last activation, I suspected I would be operating in the dark, so I brought my LED lantern along for the ride.

Although not intentional, this New Year activation had a lot of new-to-me stuff involved!

New VK3IL Pressure Paddle

The prior evening–on New Year’s Eve–while my wife and daughters were watching a classic movie movie marathon, I used the time to heat up the soldering iron and work through a few kits and projects that had been sitting on my desk.

One of those projects was a Pressure Paddle designed by David (VK3IL).

Michael (G0POT) sent me the Pressure Paddle circuit board and heat shrink via Andy (G7UHN) several months prior. [Thank you so much, fellas!]

To my knowledge, the VK3IL Pressure Paddle isn’t available in complete kit package, but it’s quite easy to source everything yourself.

On his website, David provides the Gerber files you’ll need in order to purchase the circuit boards from your favorite manufacturer (I’m a huge fan of OshPark here in the States).

Next, you simply need to order the components. Here’s the list assuming you’re using DigiKey:

  • Quantity of 2: 732-7579-1-ND (CAP CER 10000PF 10V C0G/NP0 0805)
  • Quantity of 2: BSS806NH6327XTSA1CT-ND (MOSFET N-CH 20V 2.3A SOT23-3)
  • Quantity of 2: 311-470KCRCT-ND (RES 470K OHM 1% 1/8W 0805)
  • Quantity of 2: 1738-SEN0294-ND (RP-C18.3-ST THIN FILM PRESSURE S)
  • Quanity of 1: Three conductor wire with a (typically) 3.5mm plug (note that I had one of these in my junk drawer)

Keep in mind: the components are surface-mount. If you’re not used to working with SMD components (ahem…that would be me) I suggest buying a few spares of each in case you lose or damage one or more during the build.

It also helps to cover the finished board in heat shrink not only to protect the board and make it easier to grip, but most importantly (if you’re me) hide your electrically-sound yet unsightly surface mount soldering job.

The build might have taken me 20 minutes.

New FT-817ND Narrow CW Filter

Some time ago, I purchased a second FT-817ND with the idea of doing full-duplex satellite work. I later realized I could be taking the second FT-817ND out to the field more often if I simply had another narrow CW filter installed, so I built one.

This New Year’s Day activation was actually the first time I’d taken this particular FT-817ND and its new narrow filter out to the field!

New Armoloq TPA-817 Pack Frame

Earlier this year, I also decided that I wanted to outfit my 2nd Yaesu FT-817ND with an Armoloq TPA-817 pack frame. The idea was to experiment with building a rapid-deployment field kit around it.

This is actually one of the big projects I’m working on in 2023. I’ve yet to sort out the antenna mount I’d like to use with this frame based on how I plan to deploy it. Continue reading New Year’s Day POTA: New VK3IL Pressure Paddle, New FT-817/818 Narrow Filter, and New TPA-817 Pack Frame!

QRP radios, product announcements, reviews, news and more. Low power amateur radio fun!