Many thanks to Paul (W0RW) who shares the following guest post:
Can you See Me Now? Portable Operation From a Web Cam.
by Paul (W0RW)
There are now thousands of web cams operating around the world and they make great portable operating locations.
By watching a webcam stream, the stations who works you can watch you live as you talk to and log them.
When I am activating a site with a live webcam, I post the web cam link on my QRZ.com page and then stations who contact me can then go to QRZ, click and watch. I usually have a big sign that shows up on the web cam with my call and my frequency. Even DX guys who can’t hear me can watch me operate.
Many web cams are now live streaming; they give you fast refresh rates and real time video. Other bandwidth limited cams refresh at slower rates and may give only 1 frame every minute.
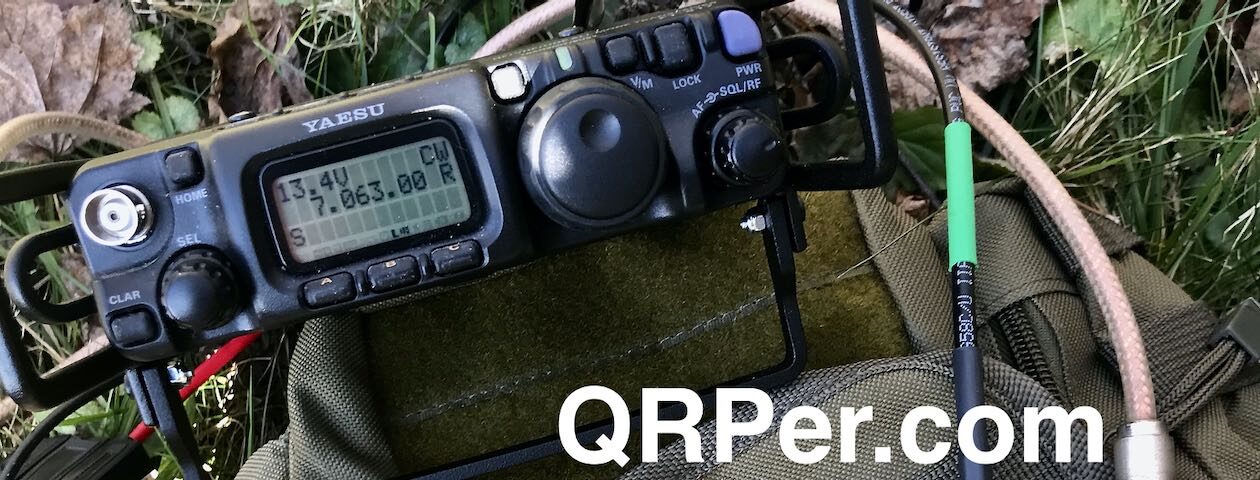
I was at the ‘Teller 1 Web Cam’ on 8 June 2022 (see photos above) and made 10 Q’s on CW and 10’Q’s on SSB. It has an almost real time video but with a delay of about 10 seconds. It is at 10,000 feet.
The remote Independence Pass, Colorado, Web Camera is a solar powered wireless camera with a 1 minute refresh rate. I am standing just to the left of the tree.
This camera is down now and won’t be back on line until July.
Paul w0rw
Colorado
That makes for a fun dimension in playing SOTA, Paul! Thank you for sharing. So far, I haven’t activated a summit with a webcam, but it looks like there are numerous ones in Colorado. I’ll have to keep this in mind before heading out there!
I’ve a friend who works with a number of radio manufacturers including Xiegu. He recently took delivery of the new Xiegu G106 QRP transceiver and a Xiegu D90 USB-Radio Interface.
Based on the photo above, the G106 is even more compact than I originally assumed.
These are the accessories included in his G106 box:
Looks like the same cables and mic included in other Xiegu radio packages.
He also took delivery of the new Xiegu D90 expansion card:
Note that these units are very much early prototypes and don’t even have serial numbers. Nonetheless, he plans to take the G106 to Field Day today–I’m looking forward to hearing his report.
I took the family on a multi-day camping trip at New River State Park in April 2022. During that trip, I made an activation of New River each day and also fit in a quick SOTA activation (click here to read an overview). I didn’t film all of my on-the-air because some of that radio time was spent sitting around chatting with my family and even some neighbors at the campground.
Since I’ve already posted a summary of that fine trip, and since I’m traveling today, I’ll keep this field report brief(er).
Morning POTA
One thing I love about POTA while camping is how effortless it is to do morning activations. You simply roll out of bed and get on the air. That easy.
The following field report was for an activation session on the morning of April 29, 2022.
I spent the early morning that day brewing a couple cups of coffee and catching up on my QRP Quarterly and QST, then I took Hazel on a short hike.
Many thanks to Scott (VO1DR) who shares the following guest post:
Cheap and Bomb-Proof Field Package for the IC-705
By Scott Schillereff (VO1DR)
St. John’s, NL, Canada
Since getting my novice ticket in 1970 (WB9CXN) under the watchful direction of Charles “Rock” Rockey, W9SCH (SK), I have been a dyed-in-the-cloth homebrewer and QRPer. My one and only commercial rig before this year was a Ten Tec PM-3 I bought with paper-route money in 1971 (still have it). Fast-forward to today. I now live in Newfoundland, and Europe is as close as Georgia. I continue to build my station components and antennas. A recent sea-change though – I inherited some money and decided to splash out on a for-life rig that would serve well in the shack and on the road (RV or hiking). After researching options, I settled on the ICOM IC-705. A fantastic performer; a receiver like I’ve never heard before; more bells and whistles than I could dream of, and a form-factor like a….. delicate, expensive brick!
The 705 is not a sleek, trail-friendly radio. It’s on the heavy side and, well…awkward to pick up! But, man, what a radio! So, my first step was to buy a Windcamp ARK-705 exoskeleton. This protects the rig on all sides and gives you something to grab onto. I don’t mind the weight and size; I want this rig to be working in 25 years.
My operating interests are home use, mobile in my 25 ft motor home, and portable on day hikes. I’m new to POTA and SOTA but maybe that’s next, thanks to you, Thomas!
I’m genetically wired not to buy the luxury ICOM backpack; I prefer to build my own and integrate with my hiking gear. With that in mind, I would like to share my field package system to move the 705 around safely with little risk of damage. Also some other homebrew portable gear. Continue reading VO1DR’s Cheap and Bomb-Proof Field Package for the Icom IC-705→
The weather in/around Québec City has been amazing lately; nice cool mornings and warm, clear days. I know this probably won’t last, so we’ve been taking advantage of it as much as possible (il faut en profiter, as francophones like to say).
Yesterday, we had a few errands to run in town: we needed to pick up some groceries, order a tarte au citron for my birthday (today!) from our favorite patisserie Pralines & Chocolatin Château-Richer, and yes, enjoy the great outdoors.
I wasn’t entirely sure if I’d be able to fit in an activation, but I tucked my KX2 radio pack in the car just in case. I didn’t take the camera because it was family time and if I managed an activation, I didn’t want to film it this time. That, and I have a huge backlog of activation videos I need to publish; I sidelined a lot of my field reports while studying for the Canadian Basic exam over the past month.
Le Domaine Maizerets (VE-5020)
We decided to hit one of our favorite little parks conveniently located on the east end of Québec City (Beauport): Le Domaine Maizerets.
We’ve been to this park a few times in the past to attend a Celtic festival and to meet with friends.
The grounds are beautiful and there are loads of foot paths.
I was a bit surprised it had never been activated because this is a very popular park and even has free entry with free parking.
Keeping it Stealthy
I decided I wanted to stay fairly low-profile while doing this activation. I wasn’t worried about permissions (families, friends and groups meet here for all sorts of activities) but I wanted to see just how stealthy I could be while operating from a park bench in a city park. I don’t get this opportunity a lot because, back home, I’m usually operating from rural state/national parka and in remote game lands.
We found a couple of benches at the edge of the park that very conveniently had perfect antenna trees behind them.
While no one was watching, I deployed the PackTenna 9:1 random wire antenna; the jacket on its radiator is black and simply disappears with trees and flora in the background.
The wire is next to impossible to see from even 5 meters away
The more conspicuous parts of the antenna–the feed point and RG-316–were tucked away behind the park bench.
My high-visibility arborist throw line was hidden behind the tree and out of sight from those walking on the footpath.
From the footpath, you couldn’t see the antenna, coax, nor the throw line unless you were looking for it.
From behind the bench, you could though; in the very unlikely event someone would have walked behind us, it was pretty conspicuous (always avoid antenna tripping points). That and my family would have warned anyone coming near.
The Elecraft KX2 was a natural choice for this activation: it’s all-in-one and incredibly compact. I can also operate it and log using the knee board Carolanne (N0RNM) kindly made for me last year. No picnic table needed.
Operating CW with earphones is insanely stealthy. A CW op makes almost no noise whatsoever.
One of my daughters (K4TLI) was kind enough to log for me on my Microsoft Surface Go (using N3FJP’s AC Log).
Here’s what I looked like to anyone passing by:
Click to enlarge – Photo courtesy of K4TLI
My wife (K4MOI) and other daughter (K4GRL) were on the bench next to us sketching and painting. We looked like any other family at the park simply enjoying the amazing weather.
On the air
This was only my third activation here in Canada using my new Canadian callsign: VY2SW.
I’m still getting use to sending the new call; it flows well for me, but my muscle memory keeps kicking in and I find myself accidentally sending K4SWL.
Since I’m in Québec but have a Prince Edward Island callsign, I do intermittently add a /VE2 to the end of my call. It’s a fistful (VY2SW/VE2) so I don’t use it with every exchange or CQ.
Conditions lately have been absolutely in the dumps and yesterday was no exception.
When a propagation path opened, it was great, but conditions were very unstable with severe QSB.
I spent the better part of an hour hopping between 30, 40, and 20 meters to scrape together enough contacts for a valid park activation.
40 meters was absolutely dead due to flaring. I tried hunting a few CW and SSB stations there, but if I could hear them, they were barely audible.
20 and 30 meters served me better, but the QSB was so deep and frequent, I had to repeat my exchange on a number of occasions. Some stations would call me with a 599+ signal and after my reply with signal report, they were then barely audible.
Still, I managed to snag my ten with a couple to spare.
Many thanks to all of you who waded through the ether to reach me on the other end.
QSO Map
It’s interesting looking at the QSO map post-activation. My best DX (EA4B) was easily the strongest station I worked with my 5 watts.
Click to enlarge the map:
This activation was so much fun.
Sure, contacts weren’t frequent but they were all meaningful and, frankly, none of us minded spending time outdoors on such a gorgeous day! It added an extra dimension keeping things very stealthy, too.
Thank you
Thanks for reading this field report. Now that my Canadian exam is in the books, I’ll have time to catch up on the numerous activation videos in the backlog!
Of course, I’d also like to send a special thanks to those of you who have been supporting the site and channel through Patreon and the Coffee Fund. While certainly not a requirement as my content will always be free, I really appreciate the support which allows me to open up my work life to write more field reports and film more activation videos.
I hope you get a chance this week to play radio outdoors or chase/hint some park, island, or summit activators!
Many thanks to Scott (KK4Z) who shares the following project from his blog KK4Z.com:
Paddle Mount for the IC-705
I kinda like the idea of being able to mount your paddle to your radio when operating portable. You can use the weight of the radio to help prevent the paddles from moving around and it frees your off hand for other tasks. We see examples of this with the Elecraft KX series of radios and there are some adapters for radios such as the Yaesu Ft-817/818.
I really like my IC-705. It is probably my best radio for POTA/potable operation. I think the only time I would leave it home is if weight became a problem or I needed to exercise one of my other radios. Recently, Begali came out with a mount to attach their Adventure paddle to the IC-705. It is a sweet set-up; however, the approx. $400 USD price tag got me looking for other alternatives. I have nothing against Begali, I own three of their paddles, and they are superb instruments. I think I wanted to tinker, and this gave me a good excuse.
For paddles, I have a set of Larry’s (N0SA) SOTA paddles. I love these paddles. When I go on an activation/Portable Operation, I bring these and my Begali Travelers. If I was going to do a SOTA activation, I would just bring Larry’s Paddles. Next was a trip to Tractor Supply Company (TSC) for a sheet of 16 ga. Steel. That set me back $16. I cut it to 3″ by 3 1/2″ using a cutoff wheel on my grinder.
I already have a stand I made out of 1″ x 1″ angle aluminum so I cut this to fit behind it.
The blue on the metal is Dykem Blue which is a layout fluid. In creating this project, I am only using hand tools. Power tools consisted of a grinder with a cut-off wheel. a hand drill, and my trusty Dremel tool. Here is a picture of me giving the mount a rough finish with a file. Continue reading Scott Builds a clever Icom IC-705 Paddle Mount→
I mentioned in a previous post that I’ve been studying for my Canadian Basic license exam.
I’ve been working on this in my very limited spare time for a few weeks now, balancing study from the book above and HamStudy.org–both brilliant resources.
Now that I’m actually on Canadian soil, I scheduled an online exam with my friend, the amazing Vince (VE6LK).
Vince must be one of the busiest remote examiners in all of Canada. He’s professional and has the process down to a science which makes the whole experience very fluid and low stress. His website has a load of resources!
Although I’d been on the road most of the day yesterday and was a bit tired, I was ready to write the exam. I gave Vince my schedule and told him I would even be willing to schedule as early as 9:00PM last night or anytime this weekend.
The 9:00 time worked for Vince, so he sent me a Zoom link and I did a bit of last-minute study before meeting him online for the exam.
The Canadian Basic is a 100 question test, so it takes some time to get through it all.
I was absolutely chuffed to pass with 94% which meant passing Basic with Honours.
Vince started the online process which allowed me to create an account on the ISED website.
Getting a call
I’d been giving my callsign a little thought.
Since my mailing address is in Prince Edward Island, I knew the prefix would be VY2.
Every new call issued in Canada is essentially a vanity callsign and you’re allowed to choose from available suffixes (and even purchase additional callsigns in the future).
PEI is one of the few provinces that also allows Basic licensees to claim a 2×3 or even a 2×2 call. If I were in Ontario, for example, I could only request a 2×3 as a Basic with Honors license.
This morning, with my first cup of coffee in hand, I finished setting up my ISED account and requested my callsign.
VY2SW
I decided that I wanted my Canadian call to reflect the suffix in my US call, so I requested VY2SW.
As soon as I hit the SUBMIT button on the ISED website, it confirmed that the call had been assigned to me. A couple hours later and I’m showing up in the callsign database.
The Canadian licensing system is incredibly efficient and effortless to use.
POTA and SOTA in Canada
Now that I’m VY2SW, I cannot use my US callsign as K4SWL/VE3 or K4SWL/VE2 while on the air.
I’ve already added VY2SW in the POTA system as my second callsign, so I believe it’ll compile all of my park activations under one account. I suppose there’s a way to do this in the SOTA system too.
Sometime within the next two days, I will be doing my first activation as VY2SW here–a park somewhere in the Ottawa region. I can’t wait and I certainly hope to work you!
A few weeks ago, Mike (N2HTT), reached out and asked if I could test his prototype Xiegu X6100 3D-printed frame/cage. Mike is the same fellow who sent my daughter (K4TLI) side rails for her LnR Precision LD-11.
When his package arrived, I was very pleased to find out that the frame fits around the X6100 chassis. There’s no need to replace any of the X6100’s chassis screws; the side rails snap snuggly on the sides of the radio and when the components are screwed together, it holds them tightly.
The build quality is excellent and the PLA2 material feels very strong. The package came with all hardware (click here to download the PDF assembly manual). It might have taken me 10 minutes to assemble it.
I think it’s brilliant.
As with many rig frames, the side rails can make access to the encoder and knobs slightly more difficult. It doesn’t bother me, however especially since my X6100 encoder has a fair amount of brake by default (I mention this in my X6100 review).
The frame fully protects all sides of the radio and (especially) the protruding encoder and knobs which I believe are the most vulnerable parts of the radio.
I also love the flip-down screen protector which can serve as both a sun shade or as a tray to hold your phone in the field.
If you’re looking for a frame for your X6100, I believe this is a great option.
Mike is selling the complete frame kit for $65 US. He will customize the screen cover with your callsign and he has a number of color options available.
If you have never requested books before then you have to send me an email so I can approve your name and address, (Send email to w0rw1@msn.com).
After you get approved, you can double click on a book from the scrolling banner or add a key word in the search block to find one (like QRP, Spy, or ARRL).
If you want that book, and it shows as ‘Available’, Click “Check Out” button, then type in the password ‘paraset’. Then select your name to check it out.
That’s it! I will pack it up and mail it to you.
Some Rules
It is all free but there are rules to keep everything moving:
Only 2 books at a time maybe ordered out at a time.
This is a no smoking library.
Return books after 1 month. You only pay return postage.
I can only ship to USA addresses.
Use the ‘TinyCat’ Web page to request books.
I don’t need to know when you received the book(s) or when you sent them off.
Procedure: I send the books to you, you read them and return them to me.
Paul Signorelli w0rw
905 Zodiac Dr.
Colorado Springs, CO 80905
Wow–very generous of you to make your books available to search and borrow online. Thank you for sharing this, Paul!
Many thanks to Barry (KU3X) for sharing the following guest post originally posted on his website:
ATU-10 from Banggood.com
by Barry (KU3X)
There are times I find myself in need of an ATU. One example is when I use my half wave end fed 40. I can not always erect this antenna in the clear. I did purchase the LDG Z100 Plus 705 with interfacing cable. The unit does as advertised but I am not impressed with its performance. My biggest complaint is, when interfaced and the IC-705 tells the LDG to tune and it does not know the antenna is matched and resonant, the LDG adds capacitance and inductance which actually raises the SWR. It’s too dumb to go into bypass. I resolved this by not using the interface cable. Now I only tell the LDG to tune where needed. Most of the time I turn the LDG off by toggling between bypass and tune using the button of the front of the unit.
Size matters to me and the LDG ATU is too big. Another downside is it uses SO-239 connectors instead of BNC connectors. Everything I have relating to QRP operating uses all BNC connectors, including my home brew two position antenna switch. I do want to get my hands on an Elecraft T1 ATU but Elecraft can’t get the parts from the manufactures to make them. So the hunt was on for a small ATU with internal batteries and BNC’s instead of the dreaded SO-239 connectors. Here is what I came up with.
I ordered the above pictured ATU-10 from Banggood.com. I have also seen them posted on Amazon.com. They can be found on eBay as well. I did not provide a link for ebay because some ebay adds are dated. There is a very good demo posted on YouTube. Here is an overview of the ATU-10 [PDF].
My ATU-10 arrived 11 June 2022. Here are my findings:
The package contained an Allen wrench and a USB cable for charging the battery as well as for updating the firmware. The package DID NOT include the interface cable for the Icom 705 nor did it included any paperwork…….no manual! My battery showed about half charged and firmware version 1.4 was installed. If you forget to charge the battery and go on site with a dead battery, you can supply power to the ATU-10 via the USB charging cable. You may have to give it a few minutes for the batteries to take a little charge, but from that point on just leave keep the ATU-10 connected to the USB cable.
The needed interface cable is nothing more than a stereo audio cable with 1/8″ male plugs on both ends. But, the ATU works without the interface cable, it’s just not controllable from the radio. As for the matching, I can say it works as good as or as bad as my LDG Z-100 Plus. Where ever the LDG provided a match, so did the ATU-10. On 80 meters where the LDG did not do so well, neither did the ATU-10.
I first tried the ATU-10 without the interface cable. I just sent a carrier from the radio and the tuner went into the tune mode. It’s that simple. It takes anywhere from 2 to 5 seconds to find a reasonable match.
To use the ATU-10 with the interface cable, there is the setup procedure. Hook up all of the cables, including the interface cable to the IC-705. Now turn the ATU-10 on. Once booted, turn on the IC-705. Go into the, “Function” screen and tap the, “tuner” icon. You are ready to go. You do not have to change modes to have the ATU-10 go into the tune mode. In any mode on the radio, like SSB, just key the mic and the tuner will tune. Give it a second or two and you are ready to go. Change bands and key the mic, same results. I lost communication between the radio and the ATU-10 when I went to 80 meters. I have no idea why? I just turned the radio off, then back on and everything was reset…ready to go.
When I received my ATU-10, I noticed all of the hardware was not that tight. I retightened each nut and Allen screw.
Size…the ATU-10 is small enough to carry in your shirt pocket ( 5″ x 2-3/4″ x 1″ )
Antenna connections… BNC. All of my cables used when I set up portable use BNC connectors.
Power source ….the ATU-10 has two internal rechargeable batteries so no external power source is needed. Since the ATU-10 uses latching relays, the only power that is needed is for the display. The display has a time out timer and the ATU will turn off after 30 minutes on non use. The ATU will last you for months on end before needing to be recharged.
Display… the display shows SWR, power out and the state of charge for the internal batteries. It also shows what firmware is installed. The display will fall asleep after 5 minutes of non use. If power is applied, the display will wake up. The entire ATU will turn off after 30 minutes of non use.
Bypass mode (simply turn the ATU-10 off)
Construction…..the ATU-10 is built inside of a solid metal enclosure.
Cons:
Loss of communication….more than once communication was lost between the radio and the tuner. Easy fix by turning the radio off and then back on but this is very inconvenient.
No manual…..not even a little sheet of paper showing the specs. Whatever you need to know can be found on this site: ATU-10 info at GitHub.
Final notes:
For the price, it think this is a great buy. It does exactly what I want it to do and provides a reasonable match to make the radio happy. You can use the ATU-10 with any radio at power level of 10 watts or less. It’s a perfect size for backpackers. I don’t think the interfacing between the radio and the ATU-10 is all that importable. I myself choose not to use the interface cable. Since the tuner will go into a tune mode if the SWR is too high, that’s all that is really needed.
Connecting an international community through low-power field radio adventures.
Please support QRPer by adding us to your whitelist in your ad blocker. Ads are what helps us stay online. All of our ads are ham radio related--no junk, we promise! Thank you!