Many thanks to Vitor Morais who asked the following question in the comments section of my YouTube video:
Hi,
Greetings from UK. I recently learned that POTA [is now in the] UK so I am really looking forward to it.
I also recently put an order for [the Discovery TX-500] so I am really excited as well.
I would like to create a very compact setup pouch for field use to pair with this radio; one that I could take to summits or parks and also travel abroad.
What battery and antenna would recommend?
Would you recommend an ATU?
Or would you compromise to fewer bands or pack a secondary antenna?
I love to know your opinion. Thanks
Great questions, Vitor! In truth, these sorts of questions are easy to ask but quite complicated to answer due of the insane number of options and possibilities available. It’s impossible to cover them all so I’ll try to give you some suggestions based on what I tend to use in the field. Continue reading “What battery, antenna, and ATU should I pair with the Discovery TX-500?”→
When I head out the door to activate a summit, if it involves a long hike, I reach for one of my super compact QRP transceivers like the Mountain Topper MTR-3B, Elecraft KX1, or KX2. If you’re carrying your entire station and all of your hiking provisions in your backpack, it’s best to keep the load as light and compact as possible.
I purchased the single-band QRP Labs QCX-Mini last year specifically with Summits On The Air (SOTA) in mind. My QCX-Mini is built for 20 meters which tends to be my most productive SOTA band.
The QCX Mini has a rugged, utilitarian feel: basic controls, two line backlit LCD display, and a sturdy aluminum enclosure. It’s super compact.
One of the first things I did was build a dedicated field kit around the QCX-Mini. Everything–save my throw line–fits in my Spec-Ops Op Orders pouch:
I’ve had the Xiegu X6100 on loan from Radioddity since December 23rd, 2021. In that time, I’ve used it heavily in the shack and I’ve taken it on three field activations using a variety of antennas.
Overall, I think it’s a great little field radio.
I’ll be producing an in-depth review of the X6100 for The Spectrum Monitor magazine, but in the meantime I’m trying to bring up any points in advance that might help others make a purchase decision.
On that note?
Receiver overloading
Let’s face it: receiver strong signal handling and overload performance are important factors when you choose a radio.
No one buys a new radio and says, “I really hope it overloads easily!”
As the title of this post implies, the biggest negative with the Xiegu X6100–in my humble opinion–is that it is prone to overload when in the presence of a strong signal. It’s a shame the front end isn’t more robust.
I’ve noticed this from my QTH, especially when tuning the X6100 outside of the ham radio bands. Indeed, I recently made a post about this on the SWLing Post. In truth, though, all bets are off when we move into the broadcast portions of the HF spectrum. Transceiver manufacturers usually don’t guarantee performance outside the ham bands. It makes sense as the focus is placed on ham band filtering.
But I have noticed overloading on the ham radio bands as well.
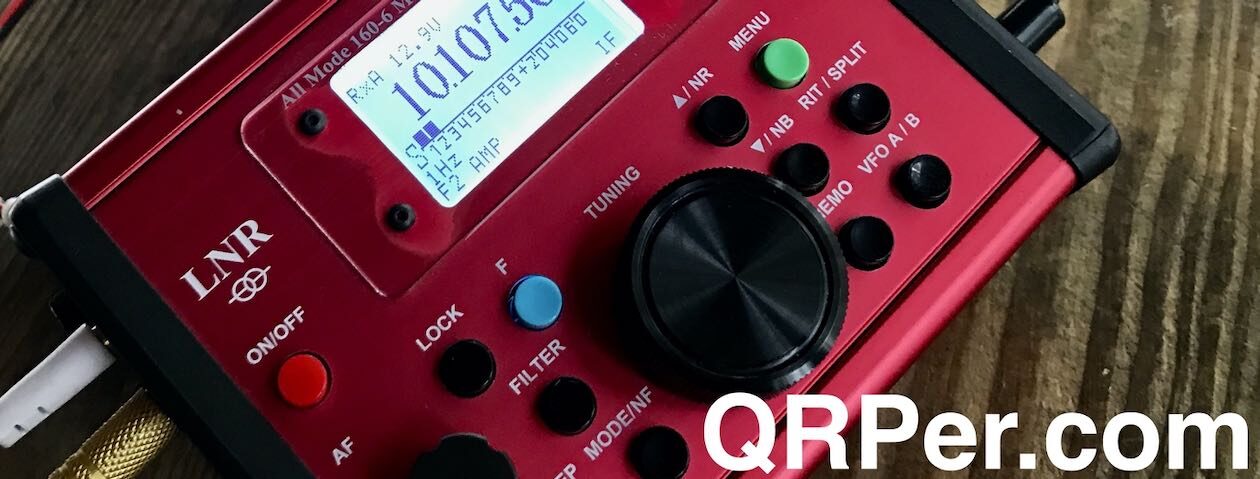
Earlier today, I did a park activation in Pisgah National Forest with the X6100. Before my activation started, I could hear a local AM broadcaster punching through the X6100’s front end all over the 40M band. I think it was a station on 1010 kHz which is only about 4-5 miles away from the site as the crow flies.
Many thanks to Dave (N9EWO) who notes that Ray Novak with Icom America recently announced price increases we’ve already started seeing in 2022. Dave shares the following video from DX Engineering queued up to the point where Ray makes the announcement:
Of course, this price increase likely applies to the entire Icom range, not just the IC-705 and probably applies internationally since all Icom products are produced at the same facilities. It appears the increase is roughly 5 to 6 %.
A few Discovery TX-500s in stock
Speaking of Ham Radio Outlet, I received a message from Owen (KB2QQM) with HRO who notes:
If you know anyone that wants a TX-500 we have 4 ready to ship.
Just a heads up. I’m enjoying your videos of POTA and the website.
73
Thank you for the heads-up, Owen. As I post the link this morning, I see that HRO may already have sold these units (that was fast!). If interested in one of these units, you may wish to call HRO and confirm if you’re interested.
POTA this morning!
As a side note, Hazel and I are hitting the trail in a few minutes and plan to activate both Pisgah Forest (K-4510) and Pisgah Game Lands (K-6937) as a two-fer.
We’ll be taking the new Xiegu X6100.
It may be too late by the time you read this (it’s 12:30 UTC, January 6, 2022 now), but readers have asked me to announce when I might be doing part of an activation in SSB and since I was making a QRPer Notes post, I thought I’d add this.
I plan to include some SSB time this morning,if I can get spotted. The area where I plan to set up has no Internet coverage whatsoever–it’s in a very deep valley–but I hope to send a text via my Garmin In-Reach Mini to have friends spot me.
Listen for me in/around 7188 kHz (+/- 5 kHz depending on available frequencies) around 14:15 UTC (+/- 30 minutes). I’ll start the activation on 40 meters CW.
This past weekend, my good friend Vlado (N3CZ) and his wife came over to the QTH for the afternoon. It’s been a while since our families got together, so it was fantastic to hang with them.
I’ve been trying to tempt Vlado to do more field activations–we’ve done a number together in the past and it has always been loads of fun. Thing is, both of us have pretty active family/work lives, so it’s challenging to make schedules work out.
Nonetheless, our 2022 goal is to do at least one activation per month as a team!
MK-911
If you recall, a couple months ago, I posted an activation report and video using my buddy Eric’s 40-10 meter doublet. I called it a “stolen” antenna because it had been on loan to me for so long, I think Eric forgot it even existed.
Exhibit A: The stolen antenna.
Eric’s doublet was build around a Hughes Aircraft MK-911 Dipole Fixture that was designed and manufactured for the US Military and appears to have been part of the PRC-74 manpack radio-set.
I had assumed Eric found this as a one-off at a military surplus sale. Turns out Eric (and a few readers) made me aware that it was available at Fair Radio Sales in Ohio for $10.
Image of the MK-911 from Fair Radio’s product catalog.
I decided to buy two of them: one for me, and one for Vlado. The temptation was strong to purchase a few more just for the 30 feet of 72-ohm military-surplus twinlead, however I understand that there’s a limited inventory and wanted others to be able to purchase this gem.
I was also thinking this antenna fixture would pair beautifully with Vlado’s Yugoslavian RUP-15/PD-8 manpack or even his IC-703 Plus.
Doublet time!
While our wives were catching up, Vlado and I made our way to the storage shed and opened my antenna parts boxes.
I did a little digging and found what I was looking for: some wire I purchased at a thrift store many years ago.
This wire has a black jacket that’s quite slick. Guessing it might be 20 gauge and might even be teflon coated. It was ideal for antennas and eyeing it, I thought there might be enough for two doublets.
For a Norcal-inspired doublet–which covers 40-10–we would need two 22′ legs. I decided (prior to cutting) that I wanted our doublets to go as low as 60 meters (5,332 kHz) and cover everything above. 60 meters is such a useful band. Thing is, I hadn’t done research into suggested leg lengths in advance.
We decided to pick a longer non-resonant length and just give it a go. If it worked, great–if not, we’d cut them down to 22 feet and be happy with 40M and up.
We cut the legs to 31 feet, so there’d be a total of 62 feet of wire in each doublet. Many thanks to my daughter Geneva (K4TLI) for helping stretch, measure, and cut the antenna wire with us!
Assembling the antennas was incredibly simple as there are built-in binding posts attached to the twin lead on the winding fixture.
Vlado and I both decided to use the winder as the center-insulator of the antenna. This is actually how this military fixture was designed to be used. The negative, of course, is that the center insulator is relatively heavy. This isn’t a problem for me at all since I use super strong arborists throw lines to deploy my antennas.
From WD8RIF’s website.
Eric (WD8RIF), by the way, actually detached the twin lead from the fixture and posts on his unit and built a new center-insulator from a discarded 35mm film canister (see photo above). He wanted to keep the weight down so he could support the center of the doublet on his fiberglass masts.
Testing QRV!
I had planned to hook up the doublets to my RigExpert antenna analyzer, then I realized it was essentially an unnecessary step.
The big question for me was, “Will my Elecraft KX2 find impedance matches on 60M and above?”
Vlado and I connected the doublet to the KX2 and tuned to 5,332 kHz. After confirming the frequency was clear, I pressed the ATU button. The KX2’s internal ATU churned for a couple of seconds and confirmed a 1.4:1 match.
Score!
We checked all of the bands above 60M and the matches were even better.
Standing in the middle of my driveway, I asked Vlado to load the POTA.app website and look for CW spots.
I couldn’t put the antenna away without chasing some parks!
We then proceeded to work about three stations on the air in CW with 5 watts. All of them gave us 599 reports!
Vlado chasing a POTA activator.
It was serious fun.
As I mentioned to Vlado, it might have been the first time I’ve ever used an HF “Handy Talky” with a doublet antenna!
In the end, we both walked away with two effective military-grade field doublets. A perfect antenna for our monthly “Team Baklava” activations.
2022 Activation Challenge
Last year, my personal challenge was to validate all of my park and summit activations with 5 watts or less.
Since I’m very much a QRPer and primarily a CW op these days, this turned out to be low-hanging fruit; lower than I would have guessed in this part of the solar cycle.
For 2022, I plan to continue the 2021 five watt challenge and add another layer…
This year, my challenge will be to build a new antenna each month and deploy it at least once during that month during a field activation.
The MK-911 doublet will count as January’s antenna.
I’m going to allow myself to build these antennas from anything and everything. I might even cannibalize a few of my broken/worn-out antennas.
You might recall that I’ve been testing a new backpack that I plan to use primarily for SOTA activations. It’s the Spec-Ops Brand T.H.E. Pack EDC.
I’ve now taken it on a few activations, but the very first outing was on Monday, December 7, 2021.
That afternoon, my daughters attended an afternoon art class that was only four miles from our QTH as the crow flies, but took 45+ minutes to drive. Gotta love the mountains!
I had no complaints whatsoever about the drive, though, because it was within five minutes of the Zebulon Vance Historic Birthplace; one of my favorite local POTA spots!
Zebulon B. Vance Birthplace (K-6856)
After dropping off the girls, I drove to Vance and was happy to see that no one was occupying their one picnic shelter. Even though the Vance site is relatively spacious and they’ve numerous trees along the periphery of the property, it’s a historic/archaeological site and as a rule of thumb I only set up at picnic areas in parks like these.
It was a breezy day and temps were hovering around 44F/7C. These are ideal conditions in my world.
I grabbed the Discovery TX-500 for this activation. I had been using it quite a bit in the shack, but realized I hadn’t taken it to the field in a few weeks. I decided to pair it with the Chameleon MPAS Lite vertical antenna since I had already loaded the Lite in my pack, using the pack’s built-in antenna port. Continue reading Field Report: Pairing the Discovery TX-500, Elecraft T1, and CHA MPAS Lite→
Many thanks to Jon (KA6TVX) who shares the following field report from K-1186.
Jon writes:
Activation of park K-1186 Pt. Mugu State Park the hard way
I thought you might be interested in my activating K-1186.
Within the park is Mugu peak that’s 1200 ft above sea level. This is not the highest or most prominent in the park but to get to it you follow an old Chumash Indian trail that goes up the mountain making it a much rougher hike than usual.
The round trip is about 3 miles but took 2 hours to reach the peak. After we got there I set up the Ic-705 and the Wolf River Coil Silver Bullet and tuned it for 40 meters CW.
I noticed that the battery on iPhone was almost dead so was logging on paper. No contacts on 40 after 30 minutes of calling so switched to 20 and retuning my antenna. Got 13 contacts (after I got home and entered them in HAMRS I noticed that each contact was from a different state which I have not had before).
My son came with me; that was really nice.
Thank you for the mini field report and photos, Jon! What a beautiful location. Sorry that 40 meters wasn’t more productive for you, but it looks like 20 meters certainly made up for it. Well done!
Like you, I believe it’s fun to pack in a radio at a park and go on a long hike. It gives me a bit of that “SOTA” feeling, but there’s no particular summit I have to hit and the activation zone is basically anything within the park boundary!
Thank you again for sharing your experience on Mugu peak.
I’ve been so busy these past few weeks, it only hit me yesterday afternoon (Dec 30, 2021) that if I wanted to activate another park or summit in 2021, I needed to do it that same afternoon. I knew that we had plans for today and would visit with friends.
Looking back at 2021
As I’ve mentioned before, I really don’t follow my park and summit statistics with any regularity. For me, each activation and opportunity to play radio is a reward in and of itself.
I’m not a competitive fellow but I’ll admit that I’m in awe of those activators who are! Some have truly mind-blowing activation numbers. I’d encourage you to check out the POTA and SOTA leaderboards!
For SOTA, I set a vague goal of activating 12 summits in 2021–roughly one summit per month.
Yes, Scott will freely admit that his sticker is tongue-in-cheek!
Many thanks to Scott (KN3A) who recently commented with his thoughts and impressions of the Xiegu X6100. Scott writes:
When you published your X6100 [field] report, I could not wait to see the video! You tipped me off when we had our QSO that you were using it! As you said in your YouTube comment, a X6100 to X6100 was accomplished at your activation!
I am an avid POTA/SOTA QRP operator and mostly use my Icom IC-705 on activations. It is a superb radio and no intention of ever selling it. The reason I was attracted to my X6100 was the fact it’s an SDR, has a very nice display screen and has a built in ATU. I use many different antennas on activations, and some require a ATU, like my Sotabeams Bandhopper 3. I like using it when I go backpacking and activating due to how easy it is to deploy and lightweight.
To those who attempt to compare the X6100 to the IC 705 is like comparing a Ford F-150 to a Toyota Tacoma. I had an X5105 for a few months and went on a few activations with it. I would mostly compare the X6100 to the X5105 and call it a big upgrade to the X5105.
I got familiar with the X6100 in my hamshack the past 3 weeks, and although I know of it’s shortcomings, which I did share with Thomas prior to it’s arrival at his QTH, I am very pleased with the radio even with the features that are not enabled yet.
On Christmas eve, I went hiking and afterwards did a quick POTA activation inside my car using my IC 7100 and 50 watts. The temperature was getting warmer and warmer out, so I made a hasty decision to go home and get the x6100 and take it to another local park and sit outside on a picnic table. I decided to use my spark plug antenna and use my 17 ft. Shakespeare fishing pole. I had almost 1:1 SWR on 40 and 20 meters and had to use the ATU as I was having about a 3:1 on 30. The ATU kicked in and had a perfect match in seconds, which is also the same response as the G90 and x5105. Continue reading Xiegu X6100: Scott’s thoughts and impressions→
Connecting an international community through low-power field radio adventures.
Please support QRPer by adding us to your whitelist in your ad blocker. Ads are what helps us stay online. All of our ads are ham radio related--no junk, we promise! Thank you!
 Many thanks to Vitor Morais who asked the following question in the comments section of my YouTube video:


