QRPer.com readers know that I’m a big fan of the venerable Yaesu FT-817 and FT-818 series transceiver. So much so, I own two FT-817NDs–I purchased a second unit last year primarily for full duplex satellite work.
As I mentioned in a previous post, the one gotcha with the FT-817 and FT-818 is narrow CW filter availability. The YF-122C 500 Hz and YF-122CF 300 Hz Collins filter boards are no longer produced. Neither are the Inrad equivalents.
With the renaissance of CW we’re experiencing along with the growth of POTA, WWFF and SOTA, narrow CW filters for the FT-817/818 are very difficult to find and come at a premium when you do find them. I saw one sell recently for $250 US–over double what I paid two years ago.
In addition, this same filter not only fits the FT-817/818, but I believe it also fits the popular FT-857 and FT-897 series transceivers (please correct me if I’m wrong about this).
The Problem: I wanted another narrow CW filter
One of my FT-817NDs is loaded with a Collins 500 Hz mechanical filter that I purchased from my buddy Steve (WG0AT) nearly two years ago.
The second FT-817ND had a narrow Inrad 2 kHz SSB filter that came with the radio when I purchased it used (see image above). Initially, I had no intention of buying yet another narrow CW filter because I’d only planned to use the second unit for FM and SSB satellite work.
Then, during field day this year, I decided it might be fun to build a quick-to-deploy portable HF station with something like an Armoloq TPA-817 pack frame. That thought experiment made me realize that I should simply bite the bullet and get a narrow CW filter for the second FT-817ND.
I started searching in late June and was simply not willing to pay the price for the very few filters that have shown up on the the used market.
The Solution? Assemble one!
I owe QRPer reader, Petr (OK1RP), for this tip. Thank you, Petr!
The process of assembling your own narrow filter is actually quite simple and affordable. If you have even the most basic soldering skills, you’ll be able to manage this easy project. If interested, keep reading and I’ll show you how you can assemble your own…
We hams have a tendency to unbox our new radios, toss the manual to the side, and get on the air. We sort out radio functions by playing with the radio and using it.
By “we” I’m certainly including myself…
Typically, there’s no harm in doing this. Experienced ham radio operators know how to hook up their radios, and know what common functions and features they must identify. In fact, when I review a radio, I rarely read the manual for this very reason: I’m curious how intuitive the controls are.
With that said, I’ve had no less than three emails from readers this past week asking questions about their radios–questions that all could have easily be answered by even skimming over the manual.
Sure, I’ve had this happen to me before. Subscribers to my YouTube channel have watched my activation videos and pointed out shortcuts and features I hadn’t yet used on a radio. Many times, I was aware of the function/feature, but while on the air couldn’t remember how to engage it. (This is where a printed cheat sheet come in handy!)
Truth is, modern rigs are simply chock-full of features. Many of these features are incredibly useful, but not obvious on the front panel.
Case in point: MTR-3B Direct Frequency Entry
The venerable Mountain Topper MTR-3B
In the past, you may have heard me mention that that the MTR-3B “isn’t a good transceiver for hunting stations” because it has no rotary encoder to quickly move from frequency to frequency. There’s no number pad for direct frequency entry either.
Instead, the user has up and down arrow buttons that you push and hold until eventually you reach the desired frequency. If the frequency is 50 kHz away? Yeah, you’re going to be holding that button down for a while (there is a fast tune option, but it’s still slower than an encoder).
Early this year, I pulled out the MTR-3B manual to give it another thorough read-through–from cover to cover. It’s not a large manual. My goal was to refresh my memory about recording and playing back CW message memories. In the process, I also discovered that the MTR-3B has a clever (and quite unconventional) direct frequency entry method.
Via the DFE function, you simply enter four digits of the desired frequency, 0 to 9 via Morse Code, starting with the 100 kHz digit. It’s a little quirky, but it works quite well!
This doesn’t make band-scanning any easier, but it does help me while hunting since I can directly enter the frequency I find on the POTA or SOTA spots page.
This one function made my MTR-3B that much more usable. Somehow, I missed this part of the manual when I first purchased the MTR-3B–I’m so happy I took a deep dive later.
If it’s a rainy day, or you’re simply trying to stay awake during a mandatory remote meeting for work, or like today there’s a radio blackout, use that time to get to know your radio by taking a deep dive in its manual.
Read it from cover to cover: I guarantee you”ll learn something new about an old friend.
Many thanks to Steve (KM4FLF/VA3FLF) for sharing the following guest post:
A Great Homebrew Vertical Antenna
by Steve (KM4FLF/VA3FLF)
Last spring, I was going through my many boxes of ham “stuff” looking for items to sell at our club tail gate sale. I came across a couple of Hustler SM Series Resonators (20 /40 Meters) that I had acquired. I am not sure where I obtained them, but I decided they were keepers. That decision turned out to be the first step in a year long process that has given me an awesome homebrew vertical antenna.
After doing a little research I found the resonators and accessories at most of the online ham dealers. They are used primarily as mobile and marine antennas. I had seen where a ham had used these on a ground stake as a portable antenna as well. I ordered a Hustler MO1 mast which is 54 inches tall and thought I would attempt to make a portable POTA antenna.
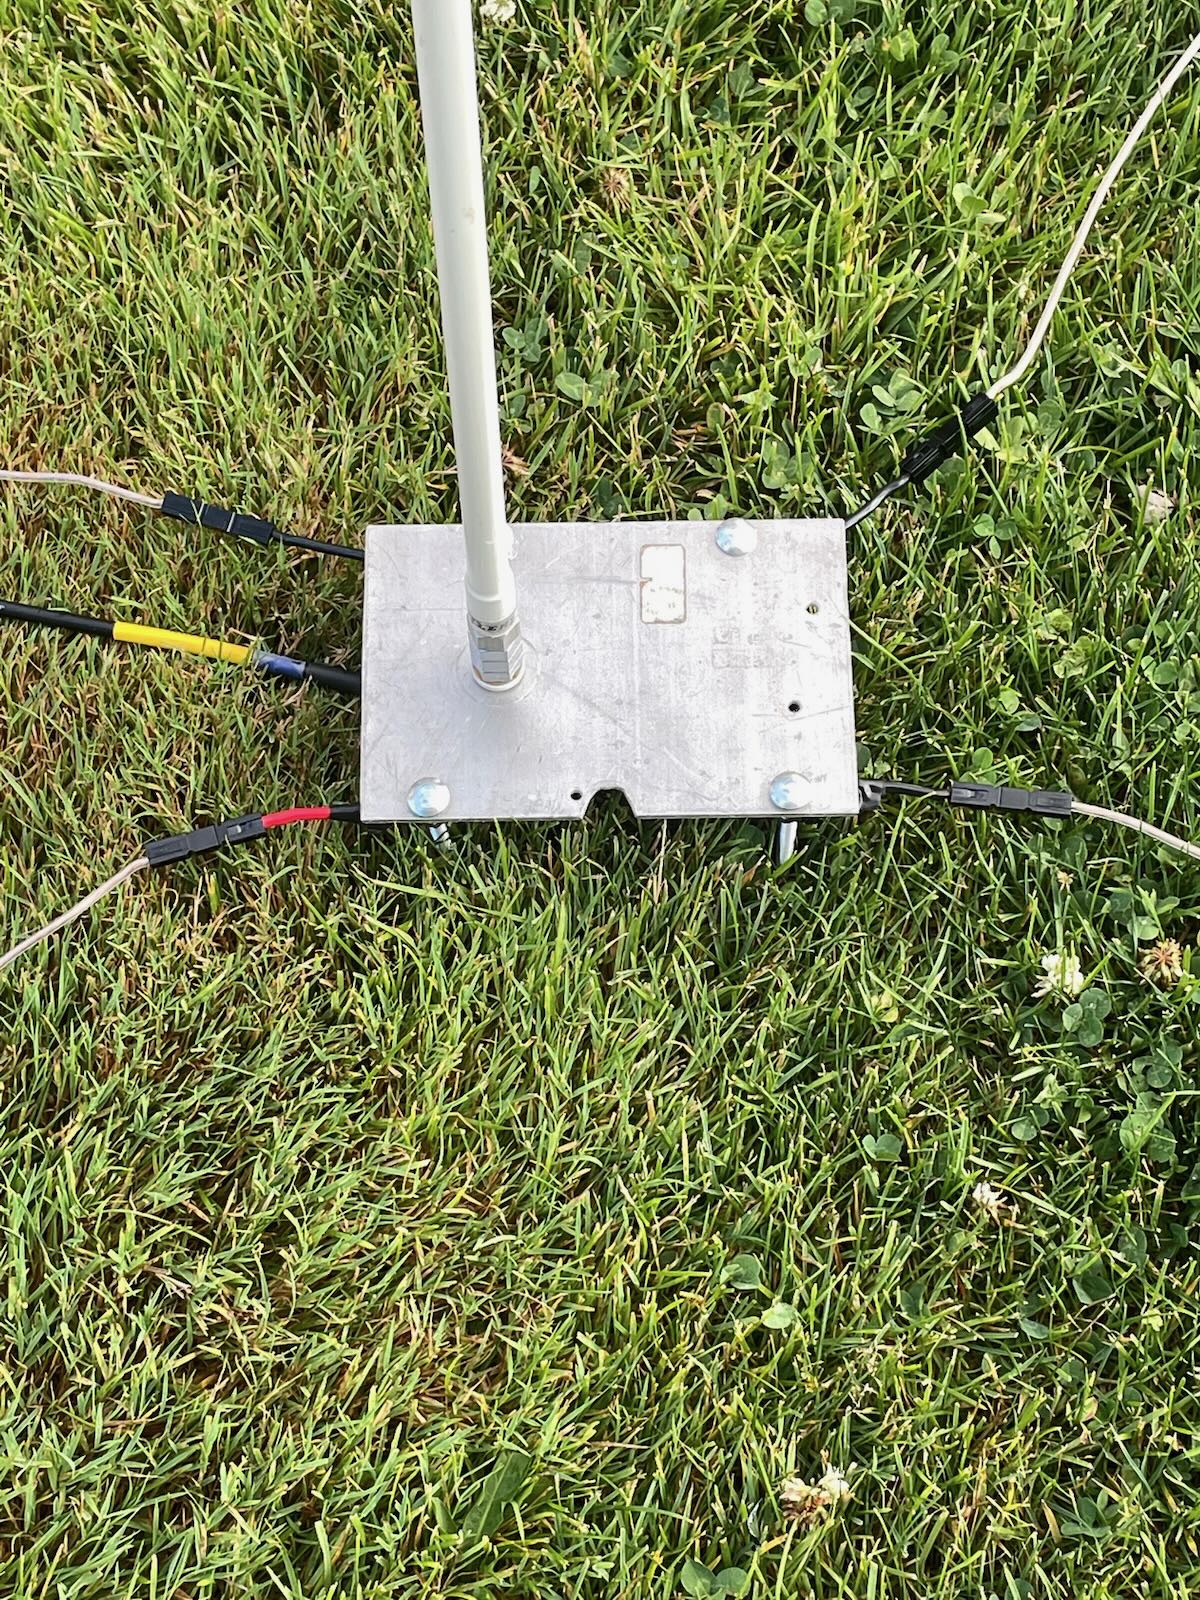
Antenna base
I had a couple of small aluminum plates that I drilled out a few holes. I cut out a notch to put a SO-239 Stud Mount on the plate as my antenna base. I now had a ground plate, connector, and antenna with resonator. By putting a stake in the bottom of the plate, I was able to get the antenna to stand up. The Hustler resonators have a hex screw for tuning that can be loosened. The antenna can be adjusted for resonance by lengthening or shortening the radiator length. After adjusting the radiator my SWR was still horrible on the two bands.
Antenna base close-up
I had some 14-gauge wire laying around and attached it to the plate using carriage bolts and nuts for my ground radials. I didn’t think about the length of the wires at this point but went with three or four lines around 20 to 30 ft. I was able to use my vertical a few times with moderate success. My SWR on 20 and 40 Meters was around 2:0 to 1 at best. It was bulky and very delicate. Sometimes screwing in or unscrewing the MO1 the SO239 would slide off the edge of the aluminum plate. I put away my contraption for the winter and decided to move on to something else.
Many thanks to Joshua (KO4AWH) who shares the following guest post:
Unun Insertion Loss (Efficiency) Testing
by Joshua (KO4AWH)
A simple “side-by-side’ method can be deployed with the use of a Calibrated NanoVNA to read back “S21 Gain” which is, in this case, signal loss from the output of S11 back into S21 through the identical windings. The gain (loss) reading in negative dB gives us the total signal loss through the windings. We can then divide by 2 to get the loss through one winding and then convert with a bit of math to an efficiency number.
p = 10^(x/10) * 100 where p = percentage 0-100% and x = loss in dB
Example: -2dB reading on “S21 Gain” on the NanoVNA divide by 2 for a loss of -1dB on each winding would be 10^(-1/10) * 100 = 79.4%
We have a 50 ohm signal coming out on S11 of the NanoVNA through the first winding to some unknown exact impedance but that is then converted back through the second unun into the S21 port where the signal is measured. It is therefore necessary to use identical windings for each test to ideally match the impedance change.
I like to run the signal test with the top and bottom of each band, take the average of the two, and then convert to efficiency, 100% being perfect. I record these values to then chart each band’s efficiency for the winding pairs. The goal here is to compare the different windings. For example, with a 9:1 used for a long/random wire, compare toroid sizes, number of toroids and in some cases the number of windings. One nice advantage to a 9:1 Trifilar winding is that you can increase or decrease the winding count in multiples of 3 while maintaining a 3:1 winding ratio. Take the square of the windings ratio (3) to find the impedance ratio of 9:1.
Here is one example of two different windings compared. Both are Trifilar but one with a single T80-2 toroid and 9 sets of turns and the second with a Double T80-2 and 12 sets of turns. 100% would be zero signal loss through the windings, 0% would be full signal loss. -3dB (loss) per winding would equate to a 50% efficiency in either single winding.
The difference between these two windings across the Amature Bands was quite surprising to me. I assume typical, often used windings will be decent across the bands. Here we saw a large improvement in access to the bands by adding several extra turns.
When each component of the station induces loss to the radiated signal, or the ability to receive, you have to improve each area for the best transmit and receive capability. This test is not foolproof, it is not the most accurate way to measure efficiency and maybe not the easiest but it gives me a comparative analysis of various windings with the tools available to me. If I can increase the performance of my windings, I can increase the performance of my station. Time to wind some more transformers!
To date, I believe I’ve activated 11 parks (1 in Ontario, 10 in Québec) during our extended family vacation. Instead of hitting the same parks over and over, I’m trying to activate new parks during each outing because it’s giving us an opportunity to explore some really amazing spots that we might not otherwise discover.
Camping on the North Coast of the St. Lawrence in Bon Désir.
Before we leave La Belle Province, I’ve at least two SOTA summits in mind and 3-4 more parks, family time permitting. Indeed, as I mention below, I hope to activate another park sometime today.
Ham Radio Workbench Podcast
Once again the fine crew of the Ham Radio Workbench Podcast made the mistake of inviting me on another episode of the podcast.
In truth, it’s a proper honor to join them each time (don’t let them know I said that!). Seriously, they’re an amazing group of friends.
This episode was dedicated to our Field Day activities. For many of us, it was an unconventional Field Day and perhaps that’s what made the event so much fun.
John (W7DBO) was invited back to the show and it was great hearing how he integrated his whole family in his Field Day activities.
George had to operate from home, I operated from our condo/chalet here in Québec, and Vince from his very unique club setup in Alberta. Rob had a project that took priority on Field Day, and it’s worth listening to the podcast just to hear Smitty’s tale of life as a Field Day RVer (hint: not for the faint of heart).
I did finally choose that one extra radio: the Discovery TX-500.
I chose the TX-500 because 1.) it would be a great “bad weather” radio, 2.) it could operate from my KX2 battery packs, 3.) it’s multimode and also covers 6 meters, and 4.) it has such a slim profile. I could easily the TX-500 in my Tom Bihn Synapse 25 backpack with the Elecraft KX2 and it didn’t make the pack feel any bulkier.
I came very close to choosing the IC-705, but it was just a bit too bulky for the way I had my pack configured.
Back to the hypocrite part…
The day before leaving North Carolina, I removed everything from our Subaru and gave it a deep cleaning.
When I pulled up the floor panel in the trunk/boot area to check the first aid kit, spare tire, and emergency gear I discovered that there was a fairly large unused area under there–a spot where I might be able to sneak a few extra radio supplies.
After a little finagling, I discovered that I could fit spare batteries, two folding PowerFilm panels, the Buddipole PowerMini 2, and two more radios: the MTR-3B field kit, and my Elecraft KX1.
This essentially amounted to contraband since I tend to be the guy who enforces “one bag per person” policy during our family travels.
I got some serious eye rolls from the family when they discovered the hidden radios after we reached our destination. I might not ever live this down.
If I had even a shred of dignity upon our arrival here in Canada, I can confirm it’s gone now.
Elecraft KX2 getting heavy use
Other than Field Day where I primarily used the TX-500, the Elecraft KX2 has been getting a heavy workout on this trip.
The reason why is because I’ve been activating a number of urban parks where an all-in one radio paired with a random wire or the AX1 vertical has been very useful.
Conditions have been very rough during some of these activations as well, so it’s nice to have both CW and SSB modes available and a full 5 watts (the KX1 and MTR-3B are CW-only hover around 3 watts). I’ve snagged some excellent QRP DX at times, but everything has been so unstable.
I didn’t bring the KX2 hand mic on this trip, so all of my SSB contacts have utilized the KX2’s built-in mic. It’s actually worked brilliantly!
I’ve recorded a number of activations here in Canada and will likely post a couple of these out of chronological order while I’m still on this side of the border.
Uploading from our chalet hasn’t been possible–the upload speeds are about as dismal as they are at my QTH. Download isn’t too bad, though.
Hôtel Le Manoir, Baie-Comeau
While at the hotel in Baie-Comeau a few days ago, I uploaded at least four videos with their high-speed internet, so I’ll soon post a couple of them.
In short: the activations here have been amazingly fun. Some of the sites have been truly spectacular in terms of scenery and others are in urban settings taking me well outside my comfort zone.
In short: I’ve loved every minute of it!
Travels
Photo by K4TLI
We have had an amazing time here in Québec as always.
Our flavor of travel is the opposite of many: we tend to rent a home or apartment for a few weeks or couple of months and use it as a base for exploring the region. We do this as opposed to traveling long distances and only spending relatively short periods of time at multiple stops.
Activation today
I plan to activate a park while in Québec City today. I’ve no clue which one it’ll be yet, but I’ll announce it on the POTA site once I’ve got a plan together. If you have the time, look for me on the POTA spots page (as VY2SW) or via the RBN! I’d love to put you in the logs.
Here’s wishing all of you a week full of radio and fun!
Many thanks to Paul (W0RW) who shares the following guest post:
Operating in St. Elmo Ghost Town, Colorado
by Paul (W0RW)
I have operated in St Elmo (Ghost Town) several times with my PRC319 Pedestrian Mobile. St. Elmo is at 11,000 feet in a deep canyon so it was hard to make contacts.
My PRC319 runs 50 Watts and I use a 10 foot whip so I had some success to the East on CW. I use a Whiterook MK-33 for a hand held single lever paddle.
OLYMPUS DIGITAL CAMERA
Right after my last visit, July 2015, members of St. Elmo and Chalk Creek Canyon Historical group cleaned out the outhouse behind the Home Comfort Hotel in St. Elmo, they found a potentially explosive surprise. On the floor of the outhouse, they found what they believed to be dynamite. Later in the day the bomb squad found blasting caps rather than dynamite.
St Elmo Outhouse
[Per the Historical Society] there were only 6 Blasting Caps found at St Elmo’s. They called Ft. Carson US Army EOD and they blew them up right there in the center of town.
While the electric blasting caps are usually shorted and would not be effected by a QRP radio, my 50W radio was at a dangerously high level to be transmitting near a box of blasting caps.
It would be a smart idea to avoid operating in any old mining areas where unexploded dynamite might exist.
At least ninety percentof all of my radio operations happen in the field. Whether I’m in a park, on a summit activation, or I’m out camping, I’ve always thoroughly enjoyed “playing radio” outdoors. In fact, it was the joy of field radio––and the accompanying challenge of low-power operations––which launched my labor of love in the world of ham radio.
I’ve been running QRPer.com now for fourteen years, and during that time, the questions I’m asked most deal with selecting a field radio. Turns out, it’s an incredibly difficult question to answer, and we’ll touch on why that is before we dive into the reasons one radio might hold appeal over another for you.
Instead of offering up a list of field radios on the market, and reviewing each one—and, to be fair, there are so many these days—I’ll share with you a series of questions you might ask yourself before making a radio purchase, and follow up with a few bits of advice based on my own experience.These deceptively simple questions will help hone your decision-making. Finally, I’ll note a few of my favorite general coverage field radios and share what I love about each.
But, first…
Spoiler alert: It’s all about the operator, less about the specs
When searching for a new radio, we hams tend to take deep dives into feature and specification comparisons between various models of radios. We’ll reference Rob Sherwood’s superb receiver test data table, we’ll pour over user reviews, and we’ll download full radio manuals before we choose.
While this is valuable information—especially since radios can be quite a costly “investment”—I would argue that this process shouldn’t be your first step.
I’ve found that enjoyment of any particular radio—whether field radio or not—has everything to do with the operator and less to do with the radio’s actual performance.
A realistic assessment of yourself
The first step in choosing a field radio is to ask yourself a few questions, and answer them as honestly as you can. Here are some basic questions to get you started in your search of a field radio:
Question 1: Where do I plan to operate?
If you plan to operate mostly at the QTH or indoors with only the occasional foray outdoors, you may want a field-capable radio that best suits you indoors—one with robust audio, a larger encoder, a larger display, and more front panel real estate.
On the other hand, if you plan to take your radio on backpacking adventures, then portability, battery efficiency and durability are king
Of course, most of us may be somewhere in between, having park activations or camping trips in mind, but overall size may be less important as we may be driving or taking only a short walk to the activation site. When your shack is a picnic table not too far from a parking lot or even an RV, you have a lot more options than when you have to hike up a mountain with your radio gear in tow.
Question 2: What modes will I operate the most?
Are you a single mode operator? If your intention is to only use digital modes, then you’ll want a radio designed with easy digital mode operation in mind.
If you plan to focus on single sideband, power output may be more important and features like voice-memory keying.
If you plan to primarily operate CW, then the radio world is your oyster because it even opens the door to numerous inexpensive CW-only field radios.
If you plan to primarily operate CW, I would strongly suggest going low power or QRP. I’ve often heard that 5 watts CW is roughly equivalent to 80 watts single sideband. I tend to agree with this. CW field operators hardly need more than 5 watts, in my experience.
Many thanks to Scott (KK4Z) who shares the following post from his blog KK4Z.com:
QRO SCHMURO
There is always a lot of talk about QRP vs QRO, 5 watts vs 10, ad nauseam. So today I thought I would run the numbers and see what the real deal is. First we need a few definitions. An S-unit in general terms is the minimum change in signal strength to be just noticeable (k3wwp.com). In more technical terms it equates to approximately 6 db in change. The decibel (dB) is a logarithmic number. Each 10 dB represents a factor of 10 difference. This may be a little out there for some so we will cut right to the shortcut. There are two types of logarithms. For calculating dB, use the common logarithm which is base 10. To see if your calculator uses the right one. Punch in 100 and then log. The answer should be 2 which equates to 10 to the second power which equals 100. This is not a technical paper but an entry way to see how changing the power levels affect the signal level of your transmitting signal. As you guessed, it is not linear.
Let me introduce an equation:
Where Power P1 is the power you wish to evaluate and reference power P2 is your starting power. Let’s take going from 5 watts to 10 watts. The equation would look like this:
We take 10 and divide it by 5 which give us 2. Then we hit the log function on our calculator which gives us 0.301. Multiply that by 10 and you have about 3 dB in gain or about one half of an S-unit (remember 1 S-unit is equal to 6 dB). Let’s do one more by hand and tackle the QRP/QRO debate. How many S-units will increasing power from 5 watts to 100 watts give you? The equation looks like this:
Take the 100 and divide by 5 to give you 20 and then hit the log function to give you 1.301. Multiply by 10 for 13.01 dB. Divide 13.01 by 6 dB and you have 2.17 S-units. Going back to our definition that one S-unit is the minimum change in signal strength to be just noticeable shows that going from 5 watts to 100 watts is not that great of a change.
Let’s let the other shoe drop. What about going from 5 watts to 1500 watt? That will give you 4.13 S-units of gain vs 1.96 S-units going from 100 watts to 1500 watts?
This gives you a fairly easy equation to help you evaluate your needs based upon empirical data. Running 20 watts over 5 gives you 1 S-Unit. Using less power means less drain on the battery for longer operation. This is only part of the equation. Propagation, antenna, mode used, and station efficiency all play a part. Have fun and maybe don’t toss the QRP radio yet.
Many thanks to Scott (KK4Z) who shares the following project from his blog KK4Z.com:
Paddle Mount for the IC-705
I kinda like the idea of being able to mount your paddle to your radio when operating portable. You can use the weight of the radio to help prevent the paddles from moving around and it frees your off hand for other tasks. We see examples of this with the Elecraft KX series of radios and there are some adapters for radios such as the Yaesu Ft-817/818.
I really like my IC-705. It is probably my best radio for POTA/potable operation. I think the only time I would leave it home is if weight became a problem or I needed to exercise one of my other radios. Recently, Begali came out with a mount to attach their Adventure paddle to the IC-705. It is a sweet set-up; however, the approx. $400 USD price tag got me looking for other alternatives. I have nothing against Begali, I own three of their paddles, and they are superb instruments. I think I wanted to tinker, and this gave me a good excuse.
For paddles, I have a set of Larry’s (N0SA) SOTA paddles. I love these paddles. When I go on an activation/Portable Operation, I bring these and my Begali Travelers. If I was going to do a SOTA activation, I would just bring Larry’s Paddles. Next was a trip to Tractor Supply Company (TSC) for a sheet of 16 ga. Steel. That set me back $16. I cut it to 3″ by 3 1/2″ using a cutoff wheel on my grinder.
I already have a stand I made out of 1″ x 1″ angle aluminum so I cut this to fit behind it.
The blue on the metal is Dykem Blue which is a layout fluid. In creating this project, I am only using hand tools. Power tools consisted of a grinder with a cut-off wheel. a hand drill, and my trusty Dremel tool. Here is a picture of me giving the mount a rough finish with a file. Continue reading Scott Builds a clever Icom IC-705 Paddle Mount→
“Look at this, Tom! Only the stuff I need and nothing more,” cheerfully noted my good friend and Elmer, Mike (K8RAT). It was Field Day two decades ago, and Mike was gazing at his TEN-TEC Scout. I glanced over, and agreed. “So simple and so effective,” Mike added.
I’ve never forgotten Mike’s sage words. That Scout (Model 555) was about as simple as a then-modern HF transceiver could be: it had a total of three knobs––one for AF gain and IF bandwidth, one for RIT and Mic gain, and an encoder. It also had three mechanical switches on the front: one for power, one for TUNE and NB, and one for CW speed and RIT. It also had an analog SWR/power meter. The Scout used plug-in band modules for each HF band and featured a large segmented bright green LED frequency display that was characteristic of so many TEN-TEC rigs of the day.
And Mike was right. For those of us who appreciate radios with a simple, uncluttered, and an almost utilitarian interface, the Scout was, in vintage parlance, “the bee’s knees.” And that the Scout also performed beautifully was just icing on that cake.
When the Scout first appeared in 1994, embedded menu options and spectrum displays were not yet commonplace among amateur transceivers. Embedded menu items can open the door to near granular level control of your radio’s functionality and features. Then again, if those embedded menus aren’t well thought out, it can lead to awkward operation practices in the field, during a contest, or even during casual operation.
As a radio reviewer, I spend a great deal of time sorting out embedded menu functionality and design. Perhaps it’s for this reason that I so enjoyed reviewing a radio that bucks this trend and reminds me of a time that was simpler, not to mention, easier.
All of his transceiver kits are available at his website WA3RNC.com.
I was first drawn to the TR-35 after reading the opening paragraph of the product description:
“Compact but powerful 4-band, 5-watt CW transceiver kit that uses no tiny push buttons, and without those seemingly endless and hard-to-remember back menus. There is a knob or a switch for every function!”
Sold!
I considered buying and building the TR-35 kit, but I wanted my eventual review––this one!––to focus on the radio’s functionality and performance. So a factory-assembled and tested unit was right for this purpose, just so that any performance issues wouldn’t be a result of any shortcomings in my kit building skills.
Connecting an international community through low-power field radio adventures.
Please support QRPer by adding us to your whitelist in your ad blocker. Ads are what helps us stay online. All of our ads are ham radio related--no junk, we promise! Thank you!
 QRPer.com readers know that I’m a big fan of the venerable Yaesu FT-817 and FT-818 series transceiver. So much so, I own two FT-817NDs–I purchased a second unit last year primarily for full duplex satellite work.
 The second FT-817ND had a narrow Inrad 2 kHz SSB filter that came with the radio when I purchased it used (see image above). Initially, I had no intention of buying yet another narrow CW filter because I’d only planned to use the second unit for FM and SSB satellite work.