Tag Archives: FT8

Conrad Field-Tests the Buddistick Pro at Silver Sands State Park (US-1716)

Many thanks to Conrad (N2YCH), who shares the following field report:


Testing a new Buddistick Pro at the Silver Sands State Park “Antenna Test Range.”

by  Conrad (N2YCH)

Silver Sands State Park in Connecticut borders the Northern shoreline of Long Island Sound and is located in Milford, a town on the Western side of New Haven County. There is a field between the parking lot and the sound that is a perfect “parks on the air” activation location. There are no power lines nearby. It’s very flat with no trees, so there is nothing to block the signal. It’s very easy to access and has a spectacular view.

POTA Map showing the location of Silver Sands State Park in Connecticut

Local hams visit to do POTA frequently, and we often run into each other there. One of those hams likes to build and test antennas and dubbed the park the unofficial “antenna testing grounds.” I’ve also used the park to test a number of different antennas myself, and today’s post details the maiden voyage of a brand new Buddipole Buddistick Pro antenna that I received as a holiday gift.

After using a Buddipole vertical as my primary antenna for years for POTA activations, I was interested to see if the Buddistick Pro measured up. What makes the Buddistick desirable is how compact it is. It breaks down and fits into the zippered case it comes with, but when put together, stands tall.

Buddistick Pro case in the passenger seat with the instructions
The Buddistick Pro set up at the Silver Sands “antenna test range.”

There are many videos and reviews of this antenna online, so I don’t want to re-hash what’s already been reviewed many times before. However, I did want to share how this worked for me.

Setting this up was a breeze; it took just a few minutes. I did bring along my RigExpert antenna analyzer to adjust it for resonance. I followed the instructions on where to tap the coil and how much counterpoise to let out. Everything is clearly marked, and the instructions tell you where to begin. However, the instructions are just the starting point. I had to move the coil tap a few turns to get the reading where I wanted it. Using the coil does narrow up the bandwidth somewhat, so it’s important to test it to see if you have it tuned for minimum reflected at the frequency you want to operate at. Once you have it tuned, you can leave the taps in place so you don’t have to do this each time.

Setting the coil tap for 20 meters
1.16:1 SWR at 14.074 Mhz

One thing I wasn’t prepared for was frozen ground at the park. The temperature here in Connecticut has been below freezing for a few weeks, and the ground at the park was frozen solid, preventing me from using my electric fencepost to support the counterpoise. I improvised and used my Jeep bumper to hold it up.

The Jeep bumper counterpoise mount

Once I was all set up, I connected the RF cable to my Elecraft KX2 to operate QRP using FT8 on 20 meters. I hit the ATU button on the KX-2, and it quickly found a 1.0:1 match.

1.0:1 SWR

Next, I connected the computer, synched the clock, and called CQ. I had a pile-up right away.

WSJT-X and JTAlert screenshot showing stations calling
Pskreporter map showing spots during the activation

I use the pskreporter.info map to get an idea of how well my antenna is performing. Considering that I was running QRP, I was happy to see I was reaching the West Coast.

View from inside the Jeep at Silver Sands State Park

So, how did I do? In one hour, I completed 32 QSO’s with three of those being park to park contacts. I maintained a steady stream of callers throughout the activation. The coverage exceeded my expectations.

US-1716 POTA activation QSO map on 12-27-2024, FT8 and FT4 on 20 meters

Equipment List 

The Buddistick Pro, when packed neatly in its case, slides right into a normal-sized backpack with ease, along with the radio, computer, and a spare battery. For me, it will be a good, light companion antenna for the KX2 while doing POTA or SOTA.
Conrad has a sunny and beautiful activation at Silver Sands State Park

Editor note – Please enjoy this guest post from Conrad Troutmann N2YCH.

Thank you “deputy” Vince, VE6LK, for assisting in managing some guest contributor posts for QRPer.com. I’m so happy to hear Thomas and his family rode the storm out safely and send him my best wishes and hope things return to normal soon. Here’s my contribution to help keep QRPer.com going while Thomas gets his house back in order. 73, Conrad, N2YCH


September 22, 2024

Lately, the high frequency bands (15/12/10 meters) have been hit or miss, largely due to recent space weather events. Today, taking a look at WSPR beacon reception at my QTH on the Top Spotters web site, I noticed that 10 meters was open and I was spotting quite a few stations on the band.

Top Spotters Ranker – https://wspr.rocks/topspotters/

The weather here was sunny and beautiful and my batteries were all charged up, so it seemed like all signs were pointing to a POTA activation at Silver Sands State Park, US-1716. I usually activate on 20 meters, however with 10 open, I thought I’d try for some DX and give hunters that don’t normally hear me on 20 a chance to get the park. When I was trying for my Worked All States POTA award, I appreciated it when the Hawaii and Alaska activators activated on the higher bands so I had a chance to get them all the way from the East Coast. I like to return the favor when I can.

I decided to give my Elecraft KX2 a workout as well. Paired with my Buddipole vertical up 10’, I figured I would do well.

Buddipole Vertical with Elevated Counterpoise using Electric Fence Post
KX3, Samsung Computer and Bioenno Battery with a view looking towards Long Island Sound at Silver Sands State Park in Connecticut

I got set up, checked and adjusted my computer time using JTSync and started calling CQ POTA on FT8. I called and called and no one answered. I checked PSKReporter and I was being spotted, but still, no answers. I was receiving well, in fact, I was picking up stations as far away as South Africa. “Hello, is this thing working? Can you hear me now?”

Just to be sure my equipment was working, I shifted to “hunt and pounce” mode. Rather than call CQ, I started answering stations who were calling CQ. It’s not my preferred way to get the QSO’s needed to officially activate the park, but sometimes that’s what you need to do. I have JTAlert set to sort received stations from strongest received signals to weakest. I’ve found based on prior experience that my chances of completing a QSO are much higher with stations that I’m receiving with strong signals. So, I answered a CQ for a station in Texas coming in at +19 and he answered right away. One in the log.

I did this for the next 30 minutes or so and managed to get six stations, about half I called and the other half answered my CQ. I moved around the waterfall looking for openings, but it was busy and challenging. Just for grins, I decided to see if FT4 was active. Sure enough, I was receiving many stations there as well. I called CQ and immediately had stations answering. I did the rest of the activation on FT4 and had a steady stream of callers. I completed the activation with 17 total QSO’s, my map is below.  I make these maps using the Adventure Radio log analyzer. You can import the same log you upload to the POTA page and put the grid square in and it generates the map.

Activation QSO Map made with the Adventure Radio Log analyzer

Interestingly, all of the USA contacts were on FT8 and when I moved to FT4, I picked up all of the EU ones. I was happy to see after I uploaded my log to the POTA site that almost all of the hunters who got me were active POTA hunters and had accounts at the POTA web site. In fact, one was actually a park-to-park QSO. PA4PA was at the Sluiswaai Nature Reserve, NL-0219 in the Netherlands.

Equipment I used for this activation included:


Mission accomplished!

73 de N2YCH

Navigating Quetico: Rod’s POTA Adventure with the (tr)uSDX

Many thanks to Rod (VA3MZD) for sharing the following guest post:


Operating POTA from the interior of Quetico Provincial Park CA-0359 with a (tr)uSDX

By Rod Murray (VA3MZD)

In a previous guest post here on QRPer I gave a brief history of my introduction to Ham radio and specifically POTA and my experiences activating local parks by bicycle. My initial excitement about POTA was inspired by the YouTube channels of some noteworthy field operators, Tracy VE3TWM, Julian OH8STN, Adam K6ARK, Stuart VE9CF, and Thomas K4SWL of course, just to name a few.

Tracy VE3TWM’s experiences on a canoe trip to Algonquin Provincial Park, Ontario, a place he and I know well (although we’ve never met) were particularly inspirational. In this video from 2021 Tracey activated Algonquin Provincial Park CA-0138 from a lake that I’d previously paddled to on a canoe trip. I wanted to do that too! But it would take quite a while. Let me tell you.

In 2022, with my regular paddling buddy Tom, we planned to take our wives to one of the premier canoe tripping parks in North America that we’d never visited.  We’ve been paddling together since we were teenagers at an Ontario summer camp and had been taking our partners along on canoe trips for over 30 years.

Quetico Provincial Park in North Western Ontario, Canada, one of the province’s crown jewels, stands as a legendary wilderness area that can only be accessed by canoe or kayak in summer and ski or snowshoe in winter, with one exception. There is one road accessible campground and visitor centre in the park’s northeast corner. The Park, which is over 4700 square kilometres, is also surrounded by thousands more square kilometres of wilderness public land, known in Canada as “Crown land.” Numerous First Nation communities are also adjacent to the Park.

To the south is the equally famous Boundary Waters Canoe Area in Minnesota, USA. Indeed, one can start a canoe trip in one country and finish in another, or paddle a route along the International Boundary (hence the name!), crossing the border numerous times as you go, with the required documentation of course.

Location of Quetico Park, Ontario,The Boundary Waters, MN, and Algonquin Park, Ontario in North America from ottertooth.com

We had a successful trip to Quetico in 2022 and I vowed to return when the opportunity arose. Meanwhile, I’d since become very active in POTA, and was more determined to complete a POTA activation from a wilderness park while on a canoe trip.

Quetico Park close up map from the Ontario Parks Master Plan

That determination was finally put in motion in early 2024 when another Quetico canoe trip was planned for August. But the challenge would be to put together a radio, an antenna and battery light enough and compact enough to pack in a canoe trip barrel.

Canoe Trip Barrels and Waterproof Eureka Pack ready to go!

Our plan was to enter the Park at one of the north east access points, travel south across immense Pickerel Lake, then paddle and portage our way as far as Fern or Olifaunt Lakes, depending on our progress and the weather, and return via the same route. Or, if we were feeling adventurous, to complete the circle route made possible by the historic Deux Rivière and Pine Portages. See Map below:

Canoe Route across Pickerel Lake into Bud and Fern Lakes with Start, Campsites and Portages marked and possible Circle Route

Either way would require 8 portages totalling more than 7 km. Everything has to be small and light because a portage is a rugged trail between lakes where you must carry everything on your back.

Because my wife and I have four packs in total for a 10 day trip, plus the canoe, each portage must be walked 3 or more times, back and forth, until all the gear is carried over. Incoming History lesson: From my university days as a researcher for the Kanawa Canoe Museum, now the Canadian Canoe Museum in Peterborough, Ontario, I learned that “portager” is a French verb that translates “to carry” and has its origins with the French Voyageurs who paddled the continent trading furs. Therefore “portage” should always be pronounced in French.

At 67 years young, I now own a Swift Kevlar canoe that weighs under 14 kg, about 30 pounds. The food and equipment barrels are about 20kg each. I wasn’t about to pack or portage much more in the form of radio equipment. It had to be light!

It so happened that a new member of my club, the Elmira Radio Club of Ontario, Hagen VE3QVY, had recently built a (tr)uSDX radio. The radio is a masterpiece of miniature hardware and brilliant software thanks to Manuel DL2MAN and Guido PE1NNZ.

Hagen is an electronics whiz, to say the least, and he knew of my interest in this radio (I was on the original list for the Canada group kit build). He lent me his (tr)uSDX back in April and after making an easy trans-Atlantic QSO with it on 5W, I immediately ordered a Classic band kit. I was already thinking about activating Quetico from the park’s interior when I started my build.

My (tr)uSDX build in progress

Hagen offered considerable help with my (tr)uSDX since the last time I built a kit was in 1970 when I worked on a Heathkit SW receiver I got for Christmas. Hagen installed some improved MOSFETS, precisely rewound all the toroids, tested and improved the radio’s performance and measured all the specifications, to the point where the radio was transmitting a minimum 5W on all bands with very high efficiency. And it only weighed 150 grams, perfect for my needs!

It was time to gather the necessary accessories to complete this rig keeping it lightweight and portable. I added a short length of thin RJ-316 BNC coax to my kit and included the high performance Tim Ortiz N9SAB Nano QRP 20m dipole that I’d been using for POTA with my FT-818. At only 100 grams and a reliable performer, it would fit the bill, but limit my operation to 20m.

I already had a small Bioenno 3Ah battery that could power the radio through more than a few activations, which added another 400 grams. With a few extra accessories and cables and a N6ARA mini paddle, just in case (I’ve never made a CW contact but might try if needed) my lightweight kit was well under 1 kg and complete. The rig and accessories easily fit inside the soft pouch with my fishing reels, so no extra space was required.

I started to think about how I could get spotted while in the wilderness far away from any cell towers. Perhaps, I thought, if I could add a few FT8 contacts while in the Park I could surely make 10 QSOs to confirm an activation without a spot on POTA.app. I solved the spotting quandary for an SSB activation after much deliberation.

I also tested a number of mobile phone apps that run FT8. I tried both iOS and Android apps and settled on FT8CN for Android. After updating the (tr)uSDX firmware to run CAT and audio through a single USB cable to an Android phone, I gathered a few of the USB micro to USB-C cables needed to connect the radio to a phone running the FT8CN App. Eventually, after considerable trial and error, it all worked! To be clear, the FT8CN software has a bit of a learning curve, but that is another story. It works well with some practice.

In early August, the barrels were packed and ready to go. After two full days of driving north and west 1500 km on the Trans-Canada Highway from our QTH in South Western Ontario, we arrived at Quetico Provincial Park. Yes, the province of Ontario is that big!

Map of Ontario showing the 1500 km driving route to Quetico from SW Ontario

We camped overnight at the Park’s Dawson Trail campground and set off on our canoe trip the following morning crossing the expanse of Pickerel Lake in breezy, warm, pleasant summer weather. A few open stretches of the lake required that we paddle behind islands to avoid the bigger waves. But all that would change, dramatically.

Continue reading Navigating Quetico: Rod’s POTA Adventure with the (tr)uSDX

Code, Contacts, and a Stunning View: A POTA First-Timer’s Experience at the Devil’s Punch Bowl

Many thanks to Anthony (M7TAW) who shares the following guest post:


A first timer’s POTA activation at the Devil’s Punch Bowl!

Anthony (M7TAW)

Introduction

Let me start with the confession that I am an amateur radio operator born out of the Covid lockdown. With the switch to remote examinations by the RSGB in 2020, and a lot of free time on my hands, I thought why not get myself on the air! However, it wasn’t until this year, and a nice birthday gift from the fiancée, that I finally managed to reach into the HF bands with a (tr)uSDX.

This 5W QRP multiband and multi(ish) mode transceiver was going to be my first serious foray into what I deemed “proper radio”. So, I endeavoured to try and learn and maximise every bit of usage I could out of it. Like many newcomers to radio, I started with getting an EFHW strung out my window and got onto digital modes with FT8 on 20m just to confirm that I could in fact be heard. I also managed to SSB over to Italy at one point, though the in-built microphone gave me a 337 RST. At this point though, I was buzzing to be heard!

That’s USB covered, but what is this CW mode I can select?

As a graduate in history, there’s something about “old timey” technology and methods that intrigue me. Don’t get me wrong, I’m a technophile at heart (you kind of have to be a data scientist), but there’s something about post-industrial mechanical and electrical advancements that amazes me still!

Of course, morse code was going to be next on the list of things to explore then it seemed!

I ordered a cheap but decent key from our favourite Chinese marketplace, and started cramming LCWO, Morse Mania, and Morsle as much as I could, and getting that muscle memory rhythm with practicing sending the alphabet and my name. Luckily, the (tr)uSDX has a practice mode and a decent decoder in-built so I can just power the radio from a USB connection and practice away!

No better setup than practicing on the sofa in your pyjamas.

Naturally, the YouTube algorithm decided that if you’re learning about CW, you might also be interested in this POTA thing. A few K4SWL videos, a dash of K2EJT, and a splash of newcomer-encouraging KI7QCF, I was hooked. I could combine what I’d started learning, with equipment in the field, and also a slight competitive (I’m eyeing that top spot) and award-based activity.

I started obsessively watching POTA spots on Gridtracker to make sure I could hunt FT8 contacts, and also kept my eye on the spots for any CW contacts that I thought I’d be able to hear. Finally I did it; about 25 days after I seriously started learning CW, and with a bit of a crutch with the morse decoder on the radio, I finally made a POTA hunter CW QSO – DC5LY (pota.app) thank you very much.

As fun as hunting is, I had to follow the YouTubers I’d been watching and actually get out there for an activation. However, actually getting out there – shudders – in public and getting my antenna up seemed a daunting task. Add in the fact that I was determined to not rely on digital only to get an activation, but also CW.

I started to plan…

Firstly, I looked for sites that had decent parking, but were also probably big enough that I could tuck away uninterrupted (something to take the nerves away). Luckily for me, about 20 minutes up the road is a large stunning National Trust area known as The Devil’s Punch Bowl – the legend has it that the Devil scooped up a handful of earth and hurled it at Thor, God of Thunder, the depression that remained is the Devil’s Punch Bowl. Also, unluckily for me, I had to take a day off work to visit the dentist, so why not mitigate that by trying out my first activation!

Wealden Heaths SPA – Devil’s Punch Bowl Site of Significant Scientific Interest (GB-0243)

Devil’s Punch bowl – Surrey Hills National Landscape
GB-0243 Wealden Heaths SPA – Devil’s Punch Bowl Site of Significant Scientific Interest (pota.app)

Gear

When planning for this little adventure, I thought to myself that I’d likely panic if I had to combine putting up a mast for an EFHW or trying to throw a wire in the tree for the first time. Coupled with the fact that the (tr)uSDX doesn’t come with an ATU, I thought why not invest in a quick and easy vertical. After a bit of research, and another visit to our favourite Chinese marketplace, I opted for a JPC-12 vertical antenna along with an investment in a NanoVNA.

The (tr)uSDX comes with an inbuilt SWR meter but I wasn’t sure how reliable it was, and I’d have a hard time tuning with it. I grabbed some 18650 batteries and the stage was set! Helpfully, the JPC-12 antenna comes with a nice little carry case with supplementary space, and the compact size of the (tr)uSDX means I could just throw everything in there.

Full gear list and links below:

Setting up

I was up bright and early on a Friday morning, and headed over to the park slightly nervous, but also excited!

As a nervy POTA first timer, my original plan was to maybe just activate from the car park and hide my antenna behind my car. However, when I got there, it became very clear that there was nowhere to hide, and frankly there weren’t many great spots to plant a vertical in the ground.

I’d have to suck it up, and venture deeper into the park! After grabbing my backpack, and trotting down a marked route, I chose to go left onto a track that bikes weren’t allowed in the hope that it’d be quieter. Albeit the path was quite dense with overgrown bushes and plants. I was beginning to think I’d not have a clearing to even sit in, let alone mount the antenna.

What a view.

However, a couple of minutes later I chanced up a bench and table that was nestled slightly into the trees with a bit of a clearing! It was like the POTA gods had answered my calls for a perfect location. I quickly plonked my backpack on the table, claimed the spot, and started unpacking the gear. You can see below how efficient I’d been in packing, and I was surprised myself how I could get this antenna and all the equipment I’d need neatly into my bag.

Can’t recommend this antenna enough (with my limited experience)

A few minutes later, the vertical was up, and I’d got it tuned to 40m like I’d practiced at home. Helpfully, the loading coil has marked points which correspond to the bands, and all I had to do was slightly adjust the length of the whip whilst keeping an eye on the NanoVNA. I got it down to 1:1.18 around the CW bands for 40m in Europe (7000-7040MHz) – couldn’t be happier!

What a find for a first-time location!

On The Air

Part 1 – A job half done

Now came the exciting part! Finally getting on the air portable for the first time and POTA for the first time! I thought I’d settle my nerves by starting with the familiar FT8. I booted up FT8CN, and plugged the (tr)uSDX into the phone. A few firmware updates ago, the (tr)uSDX got audio over USB, and being able to plug it directly into the phone with a single cable and receive and send FT8 seems like magic to me. Continue reading Code, Contacts, and a Stunning View: A POTA First-Timer’s Experience at the Devil’s Punch Bowl

Karl Heinz’s Pocket-Sized Digital HF Station

Many thanks to Karl (K5KHK) for sharing this guest post, which originally appeared on his blog, Karl Heinz Kremer’s Ramblings:


A Digital Station in Your Pocket

by Karl Heinz (K5KHK)

How small can a complete station to work FT4/8 be? With the QRP-Labs QMX, we have a transceiver that certainly fits the bill for a small station. By itself it can only be used for CW, to use the digital modes, one has to combine it with a computer. Even the smallest laptop is too big the fit into the pockets of my cargo pants – we are trying a pocket sized station after all 😉

In this article, I will describe how to use a QMX transceiver and an iPhone to activate a POTA park with FT8.

The Components

My QMX is the original that was released at FDIM 2023, so it covers 80m to 20m. Mine is serial number #20.

My iPhone is small enough, but unlike Android based phones, the QMX cannot be connected directly to the phone. Apple sells a “camera adapter”, which plugs into the phones Lightning port on one side and provides a USB connection on the other end. $29 for the original Apple part was a bit hard to swallow, so I opted for something cheaper straight from China’s “we clone everything” factories: https://amzn.to/3WDSfUc

[Please note: All Amazon links are affiliate that support QRPer.com.]


The picture shows both a USB and a lightning port on the adapter. This should allow the phone to be powered/charged while the adapter is being used – more about that later.

Another limitation is the antenna: The QMX does not have a built-in antenna tuner, and even my QRP sized ZM-2 would have to live in a different pocket 🙂 My plan is to use a resonant antenna so that I would not need a tuner.

The easiest antenna with a good match is a dipole, but that is a bit more challenging to deploy in the field, so I opted for an end-fed halfway (or EFHW) antenna with a 49:1 transformer. I 3D printed a winder that allowed a BNC connector and the transformer to be mounted on the wire winder:

The design came from Thingiverse: https://www.thingiverse.com/thing:2871679

Because I am using a different toroid for the transformer, I had to remove the “bump” that is holding the toroid in place. Going forward, I may change the design a bit more to have so that I can fit more wire on the winder.

For those familiar with the transformers usually used for EFHW antennas, the picture shows two things that are different: As I’ve already mentioned, I am using a different toroid (the Fair-Rite 2661102002 core, which is a type 61), and a different winding pattern. More about that in a future post.

To power my station, I am using a TalentCell rechargeable 12V power bank:  https://amzn.to/3snTyr8

First Test

With everything in place, I tried to make a quick FT8 contact from home with this setup, but with my “big” EFHW antenna in my backyard. Because it was just a quick test, I did not even bother to hook up the charging cable for my phone (more on that later).

The software I am using is iFTx, which supports both FT4 and FT8.

I connected the phone to the adapter from above, connected the adapter via a USB cable to the QMX, and connected the QMX to a 12V power supply (unlike anywhere else in ham radio, 12V here means 12.0V and not the usual 13.8V), and hooked up the antenna to an antenna tuner and then to the EFHW in my back yard.

I answered an FT8 CQ call and successfully completed the FT8 exchange. The software does the automatic sequencing of the different messages, so it is very straight forward to use. With this first contact, I verified that the iPhone/adapter/QMX setup does work.

The Real Test

The next attempt was while camping at Hamlin Beach State Park (US-2068). I set up everything just like at home, but because I was planning on being on the air for a while. I also hooked up the cable to charge my phone while I was operating.

I was able to receive stations, but could not transmit. What made the troubleshooting more complex is that during setup, I created some sparks (that is why I do not like the barrel connector for power). I was pretty sure that the QMX was not involved, but not being able to transmit kind of suggested that I killed the finals. So I put everything away and used my KX2 instead.

Back home, I did some troubleshooting and hooked up a straight key to the QMX and it worked: I was able to finish a few CW QSOS without a problem, so the finals were definitely OK. I then set up the system again for FT8, and sure enough, I was able to make a contact. Because it was a quick test, I did not bother to use the power cable for the phone. By now, most of you probably know what the culprit was, but because I did not spell things out like this, I was still in the dark.

Success At Last

Fast forward a few more days… We went back to Hamlin Beach State Park – but this time to the picnic area – and I set up my station again. And sure enough, once everything was set up, the QMX did not transmit. This is when I took a step back and reviewed everything I had done so far, and slowly I came to the realization that when I provide power through the adapter to the phone, the QMX would not transmit.

I was able to finish my FT8 activation with my pocket sized digital station. I did run into one problem however: iFTx allows to automatically determine one’s grid square – which of course is important for FT8. When I enabled that, it correctly put me into FT13 at first, but a few QSOs later it switched me to JJ00aa – I reported this as a bug to the developer.

Using iFTx with the iPhone

The connection from the phone to the QMX is audio only. iOS does not allow an application to open a serial port connection (unlike Android). This means that the QMX will not receive any frequency information from the phone, and also no PTT signal. For this setup to work, the operator has to make sure that the QMX is tuned to the correct frequency that the correct band is selected in iFTx, and that the QMX is set to VOX mode (this is in the Digi Interface menu).

When configuring iFTx, it is possible to select a “Special Interest Activity” like POTA. This is then added to the CQ call as in “CQ POTA K5KHK FN13”.

As I’ve mentioned before, the application will automatically sequence the correct messages when a station answers the call.
Once the QSO is completed, it will be logged to the iFTx internal log, which can be exported via the usual “send to” methods available in iOS (e.g. email the log, save as a file, …).

When exporting the log, there is a choice of exporting everything, or only the new QSOs since the last export. This will create an ADIF file, which can be submitted to the POTA program, or imported into any other logging program.

At the end, I was successful in building a “pocket sized” digital station based on the QMX, I just need a fully charged phone and cannot depend on charging it while operating.


Click here to check out more articles from Karl on his blog!

KK4Z: Achieving Another Kilo Despite Solar Interference

Many thanks to Scott (KK4Z) who shares the following post from his blog KK4Z.com:


By the Hand of God at US-2173

by Scott (KK4Z)

I book my campsites often months in advance to ensure I get a good campsite. This particular trip was postponed twice due to typical life events that take precedence over having a little fun. Even this trip was not without its own issues. My wife and I forgot that this weekend was also Mother’s Day and unknown to us at the time of the booking was that there was going to be a 4 major Coronal Mass Ejections (CME) making an earth strike during the trip.

The last time I witnessed solar storms of this magnatude, I was in Gulfport MS doing EmComm for my Church in the aftermath of Hurricane Katrina. It was a humbling experience and it shaped my EmComm Philosophy.

I use the same gear for EmComm and FunComm. The equipment gets tested and exercised, and I remain proficient in its use. I also have an understanding of its strengths and weaknesses.

Most trips I take my go box.

It stays packed and contains everthing except a battery or generator to operate. I do keep a small switching power supply for mains power when it is available. Here is a look at the inside.

I have built rack mount or shelf type go boxes and in general, I do not like them. I have deployed to real disasters and found what I have here works the best for me. I do this enough that I am up and running in minutes. One thing I like is the versatility of being able to adapt my radio to the space I have to set up in. Your Milage May Vary, but for me and my 26 years in EmComm; this works best for me.

This weekend was spent at F.D. Roosevelt State Park (US-2173) near Warm Springs GA. The park was named after Franklin Delano Roosevelt. He suffered from Polio and often would travel to Warm Springs GA for hydrotherapy. He built a residence there often referred to as “The Little White Hose”. During his presidency, he established the Civilian Conservation Core (CCC) during the Great Depression. This provided jobs to young single men to help families who had difficulty finding jobs. The CCC built much of the park.

The park contains 9,049 acres (largest in GA) and is built along the Pine Mountain Ridge. It is the southern most moutain range east of the Mississippi River. The highest point is Dowdell’s Knob at 1,395 ft and is a popular POTA and SOTA (W4G/CE-004) site. I took the Radio Flyer and stayed at the campgrounds near Lake Delano.

I arrived there right at 1300 hrs eastern (check-in time) and quickly got myself settled and ready to go. I knew the solar storms were coming and that my time maybe short. I wanted to finish my kilo here (#6) and needed 310 QSO’s. I had already postponed this trip twice so I was a little edgy. My gear for the trip was my 28.5′ Random Wire Antenna with the Peter my IC-7300. I had my Lenovo Thinkpad T-14 laptop and used mains power. The nice part about the antenna besides it performance, is I get zero complaints from park employees. No wires in the trees nor holes in the ground.

Friday’s band conditions were okay. There was lots pof QSB and I stuck with FT8 (35 watts). CW in these more rural parks can be iffy and this go I needed quantity. I started at 1430 hrs eastern and by oooo hrs Saturday (Friday Night) I had 134 QSO’s and when I quit at 2315 hrs I had a total of 230.

Saturday morning, after a quick breakfast I started up again at 0730 hrs. I operated until 1140 hrs when the bottom dropped. Luckily, I ended up with 338 QSO’s including 3 that were mader after the CME hit.

I decided my time would be best spent at home to spend Mother’s Day with my Lovely Bride so I packed up and headed for the house. My stats refelected band conditions and even though I made quite a few contacts, I only had three DX entities: Alaska, Canada and Mexico. I made contacts in 40 of the 50 states.

Operating this weekend reminded me that as reliable as HF commnications can be, it does have its Achilles Heel. For those in EmComm, never stop practicing, refining your techniques, or keeping your gear in order. For everyone else, it’s just another day in paradise.

73 de Scott

Video:

Activating Silver Sands State Park by pairing the QRP Labs QDX and the FT8CN Android App!

FT8CN Field Report

By: Conrad Trautmann (N2YCH)

February 24, 2024

I successfully activated Silver Sands State Park, K-1716, for Parks on the Air using the FT8CN Android app and a QRP Labs QDX transceiver.  Here’s my field report.

Thinking about ways to further shrink down my mobile kit, I wondered if WSJT-X would run on a mobile phone. After some internet searching and reading various groups.io messages, I discovered that FT8CN is a digital modes app that runs on an Android device. It is also single wire compatible with the QRP Labs QDX transceiver carrying both the CAT control and audio. My goal was to see just how light and compact I could make my digital mode kit. Here’s a look…

Lenovo Android Tablet, QRP Labs QDX transceiver and a Bioenno BLF-1203AB 12V Battery

The Android device is a Lenovo Tab M8 (4th Gen), which can be found on Amazon [affiliate link]for about $80. It has an 8” screen, which is slightly larger than my mobile phone. I was happy to have the extra screen real estate since there’s a lot going on in the app and the size made it easy to see it all.

The FT8CN software can be found at N0BOY’s github site, https://github.com/N0BOY/FT8CN/releases. The most recent revision as of this writing is version 0.92. It’s an .apk file, which to install, you need to give your Android device permission to download via the browser. This is a direct download to the device and not going through the Google Play store, so it hasn’t gone through any security checks or validations. As with any of the software we use in ham radio, caveat emptor, or buyer beware. I would carefully consider this before downloading it to your primary mobile phone.

With that said, if you Google FT8CN, you’ll find plenty of videos and online resources to guide you on how to install it and set it up, so I won’t go into those details here. It’s fairly intuitive and each configurable field has an information button you can click for in-app instructions or explanations of what each does.

The Lenovo tablet has a single USB C port used for charging and connecting external devices, so I used a USB C to USB Type A adapter to connect to the QDX cable. Since this setup only requires a single wire, I plan to use a USB C to USB Type B cable so no adapter will be needed. For the first outing, it worked just fine this way.

The QDX’s on-board audio card and the transceiver control are all integrated into the application. It supports a number of popular transceivers including the QDX. When I connected the USB cable to the tablet, it automatically launched the application and presented a screen to click with the USB port. Once selected, the app displays a message saying the connection was successful.

I brought my Bioenno BLF-1203AB 12 volt battery to power the radio, which is actually larger than the QDX. That’s another opportunity for me to downsize the kit, finding a smaller LiFePo battery. I know some QDX owners use a standard  9 volt battery, that would certainly lighten the load. My QDX is built for 12 volts but it is possible to build it configured for 9 volts and still get full power out.

As pictured above, the entire setup was the 8” tablet, a USB cable connection to the QDX, a power cable from the battery to the QDX and an antenna cable. For the test, I used my Buddipole with a 17’ whip and counterpoise, which I knew would be resonant on 20 meters. I wanted to avoid needing to use a tuner. There is a compact tuner available which is about the same size as the QDX called the ATU-10, which works well if you need one and is about the same size as the QDX. I think it would be great to pair this kit with a Packtenna EFHW 20 meter wire antenna, which is also resonant and tiny enough to pack in a small bag with the rest of the kit.

Equipment List

Extra Items I brought for the test

I did a quick test of my antenna using the RigExpert antenna analyzer and at 14.074 MHz, I had 1.5:1 SWR, so I didn’t need to worry about damaging the final power amplifier on the QDX.

A windy day bending my vertical to one side at K-1716, Silver Sands State Park, Connecticut
AntScope shows a decent match at FT8 frequency.

Once everything was connected, I immediately started receiving stations. Here’s a screen shot of the decodes screen (below). The waterfall is on the left and decode list is on the right.  Odd and even cycles are easy to see with light and dark shading behind them. They are also labeled “0” and “1”.

I think one of the coolest features of this application is the labeling of the stations in the waterfall.

Here’s the same screenshot rotated to see the waterfall more easily.

You can see that the text of the stations calling CQ are a different color than the others. You can also see KS4YT calling CQ POTA. I always try to call other POTA activators when I see them to get the park to park QSO. When a station is calling you, the text is pink. Continue reading Activating Silver Sands State Park by pairing the QRP Labs QDX and the FT8CN Android App!

QRPer Notes: One CW Question, CW Haptic Device, and Easy Elecraft KX2 FT8 & FT4

Because I receive so many tips from readers here on QRPer, I wanted way to share them in a concise newsletter format.  To that end, welcome to another QRPer Notes, a collection of links to interesting stories and tips making waves in the world of radio!


VE6LK’s “One CW Question” YouTube Series

My good friend, Vince (VE6LK), came up with a great idea a few weeks ago: reach out to CW ops and ask one question that might help newcomers to Morse Code. Each video is 2-3 minutes long and features a number of ham radio operators who operate CW (I’m chuffed to be one of them).  I’ve learned something from each of these videos. Click here for the full playlist, or start watching via the embedded player below:


LICWC CW Haptic Device

Many thanks to Perry (N5PJ) who shares this video from Kyle (AA0Z):


Simple FT8/FT4 via a KX2 and iPhone

Many thanks to Jason (KD9ZHF) who shares the following video from Mark (KD7DTS):

N2YCH: January POTA Travel in Frozen Alaska!

Many thanks to Conrad (N2YCH) who shares the following field report:


Conrad’s January Alaska Activation

By: Conrad Trautmann, N2YCH

Why would you go to Alaska in January?” is what everyone asked me.

I’ve wanted to see the Northern Lights for as long as I can remember. The best time to see the aurora borealis is between late August to late April in Fairbanks, Alaska. Days are short in January, sunrise is at 10:24am local time and sunset is at 3:38pm. It’s twilight before the sun comes up and after it sets so it’s not pitch dark, but it’s mostly dark for about 19 hours a day in Fairbanks at this time of year. Once I began researching, I learned that peak viewing times for the aurora are between 10p and 2a local time even with the extended darkness. Check aurorasaurus.org for more information.

So, the answer to the question is, “The odds are better to catch the Northern Lights in the winter.”

Cold weather and snow doesn’t bother me having lived in Syracuse, New York for ten years. I have experience with winter weather and driving. Fairbanks is one of the best places in the state to see the aurora since it is directly below the “Aurora Oval” and it has over 100 days a year when the aurora is visible. Except for January 12th through the 15th, 2024, when the sky had 98% cloud cover and it was snowing. Aurora viewing was not happening during my visit.

However, this trip was not a total loss by any means. There are things to see and do here, including activating parks! I activated three parks in three days, Denali National Park (K-0022), Chena River State Recreation Area (K-7228) and Creamer’s Field Wildlife Refuge (K-9697). I’ve heard stories from hams in Alaska that propagation can be spotty, that there can be total radio blackouts from solar flares and that bands we don’t usually worry about in the lower 48, like 20 meters, can be useless at times. I packed enough equipment and antennas to activate on any band from 40 meters to 6 meters, up to 100 watts using my Elecraft KX3 with the Elecraft KXPA100 amplifier. On the first day at Denali, I used the amp for the entire activation, but I realized at the end of the day that Thomas, K4SWL, who runs “QRPer.com” wouldn’t be too happy with a field report from “QROer.com” Conrad, N2YCH. To remedy that, I activated my second park using just my KX3, no amp. At K-7228, my first 11 QSO’s were QRP and the park was officially activated using only QRP power. I activated my third park QRO, read on and I’ll explain why.

[Thomas here: For the record, readers, I gave Conrad a Special Use Permit to mention QRO on QRPer! Ha ha! Of course there’s no problem going QRO from time to time!]

Back to propagation, I emailed one of the most active POTA activators in the area prior to my trip to get a sense of what to expect. I highly recommend doing this for anyone planning to travel somewhere and activate. Look at the POTA pages for the parks you want to activate and you’ll surely see a repeat activator with a Kilo award or many visits to those parks. They know the parks the best and also what to expect for propagation. They also share your passion for POTA and are usually very happy to help. The advice I received was that it would be difficult to make contacts on 20 meters and that watching the MUF (maximum usable frequency) charts would serve me well. (Check out hf.dxview.org) The activator said 10 meters would probably be the best band during daylight hours. He was exactly right. Even with QRO power, 20 meter reception in Alaska was noisy and my signal did not get out very far on FT8 watching the pskreporter.com spot map. I moved to 10 meters and quickly had a steady pile up. I stayed on the air until I depleted a 9ah and a 3ah battery I brought. What fun!

Okay, so for the QRP activation, I was at a trailhead parking area out near the Chena Hot Springs resort. Before the activation, I stopped and did the tour of the Aurora Ice Museum and took a dip in the natural hot springs. I do recommend the hot springs if you ever go to Fairbanks. It was -10F degrees when I was there, quite an experience.

Chena Hot Springs

I intentionally wanted to delay my activation from early morning to closer to sunset to see if operating during the evening gray line passing over would help improve the number of contacts I could get. The short answer is that it was worse…way worse. I went back to activating closer to sunrise on my third day and had similar results as I did the first day, much better. Sunrise wins.

The map above shows my initial ten QRP QSO’s from K-7228.

What really continues to amaze me is just how far my signal can reach with the portable equipment I was using. I brought the Buddipole so I could configure it as a vertical or a dipole. I tried it as a vertical on 20 meters on my first day and as I said, the reception was poor. The beauty of the Buddipole is that I could quickly reconfigure it to a 10 meter dipole. With the tripod, it’s roughly 10’ off the ground. There was no wind to speak of, so I didn’t need to guy it. If there was, I would have used a bungee cord to secure it to the car bumper or side mirror.

It breaks down and fits in the bag I bought with the Buddipole tripod and I tossed it into my checked bag on the plane. With the tripod and mast, it’s just a little too long for the carry-on bag. I could have brought a fiberglass push up mast and wire antennas in my carry-on, but I decided on the checked bag and brought the Buddipole to have as many options as possible. After all, I was traveling all the way to Alaska. Continue reading N2YCH: January POTA Travel in Frozen Alaska!

BG6LH Designs a Board for Integrated Yaesu FT-817/818 FT8 Operation

Many thanks to Cao (BG6LH) who writes:

Hi, Thomas!

I would like to share my QRP FT8 kit for Field Operation.

A long time ago, I was seeking the most lightweight QRP kits for FT8 field operation. My goal was to have just one radio, one antenna, one phone, without too many cables, boxes, etc.

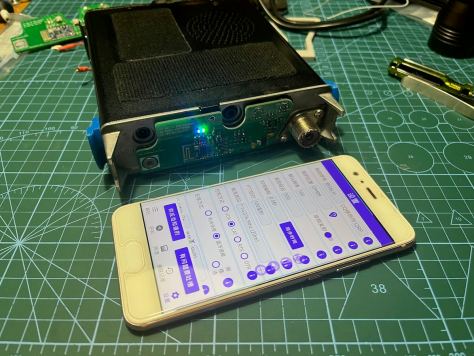
Finally, I designed a PCB. It is a Bluetooth DIGI Adapter and can be mounted on the rear panel of my FT-818.

Just plug it to the DATA and ACC jacks. It can be powered by ACC jack’s 13.8V Pin.

It works well with FT8CN, an android FT8 app.

Now, my dream has come true!

My Antenna was a so-called GAWANT, designed by JF1QHZ, I guess it’s a simple Vertical EFHW. I built it with a 1.2 meter rod.

It’s working on 7~28MHz bands, not very efficient, but so small and portable.

For FT8 QRP POTA, field operation, all of these components can be put in a small bag, and deployed in minutes.

I shared my PCB design on Github. If anyone wants to modify it, you are welcome to do so!

https://github.com/BG6LH/FT-81x-BT-DIGI-Adaptor

Thank you for sharing this, Cao. This is absolutely amazing and an incredibly clever design! I suspect a lot of FT-818/817 enthusiasts will make this same build via your design!

Thank you for reaching out and for sharing your work with the QRP community!