Category Archives: QRP

Livestream: We’re talking portable radio on Ham Radio Crash Course

Josh (KI6NAZ), with Ham Radio Crash Course, has invited me to join him in a livestream tomorrow, February 26, 2022 at 20:00 EST/17:00 PST (01:00 UTC Feb 27, 2022).

We’ll be talking Morse Code, QRP, Field Radio and who knows what else! I’m looking forward to it.

Click here to view on YouTube and set a reminder.

POTA RaDAR Run Activation #3: Table Rock Fish Hatchery

On January 26, 2022, I decided to fit in multiple park activations in one day as a RaDAR (Rapid Deployment Amateur Radio) run. My hope was to activate four or five sites between 14:00 – 21:30 UTC.

Here are the field reports and videos of my first two activations from this run:

The next park in my run (#3) was Table Rock Fish Hatchery, a good 40 minute drive from the spot where I operated at activation #2.

The drive to Table Rock was most pleasant and I stopped a couple times to take in views along the forest service road leading down the mountain.

I was pointing my finger and saying, “I’m going to activate your summit soon, Table Rock!”

I mentioned in a previous post that I made this RaDAR run unnecessarily more complicated by deploying a different antenna and radio combo at each site.

On the drive to the fish hatchery, I decided to use the PackTenna 9:1 UNUN random wire antenna and pair it with my Yaesu FT-817ND.

It had been a while since I used the FT-817ND in the field, so I was very much looking forward to putting it on the air! Continue reading POTA RaDAR Run Activation #3: Table Rock Fish Hatchery

Check out John’s review of the Penntek TR-35

If you haven’t already, hop over to John’s (AE5X) blog and read his review of the Penntek TR-35 transceiver kit.

John reviews both the build and performance. He even put the TR-35 on his workbench and measured a number of parameters.

In short, the little TR-35 does exactly what it sets out to do and packs a surprising amount of performance.

John and I actually had a TR-35 to TR-35 exchange a few days ago (if not mistaken, the photo above was taken after that exchange). I was lucky enough to catch him as he activated a POTA site in Texas. From this end, his TR-35 sounded fantastic.

Click here to read John’s report.

I’m putting together a review of the TR-35 which will likely appear in the May or June issue of The Spectrum Monitor magazine.  I’ll eventually send this little TR-35 back to WA3RNC (it was very kindly sent to me on loan) but I do plan to purchase his TR-45 Lite kit when it hits the market later this year. Why? Because I don’t have enough QRP radios, that’s why.

POTA RaDAR Run Activation #2: Pisgah National Forest & Pisgah Game Land

As mentioned in my last field report, on January 26, 2022, I decided to fit in multiple park activations in one day as a RaDAR (Rapid Deployment Amateur Radio) run. My hope was to activate four or five sites between 14:00 – 21:30 UTC.

The first activation at Lake James State Park went so well, it started me out a little ahead of schedule.

After packing up my gear at Lake James, I began a 40 minute drive to the second site–Dogback Mountain–where I hoped to do a POTA two-fer along with a Summits On The Air activation.

The drive was beautiful. Only twenty minutes into the trip, I came to the forest service road that lead to Dogback Mountain. For a six mile drive, Google Maps was telling me it would take about 20 minutes, so I knew the dirt road would require slow driving.

The road was actually in pretty good shape, but there are rocky and rough spots that pretty much require good vehicle ground clearance. My Subaru had no issues at all–in fact, I love driving on back roads like this!

Three or four miles into the forest service road I reached an impasse.

While there hadn’t been snow in the area for at least a week, the north slope portions of the road were quite icy. The thaw and night time freezing pretty much meant that there was no snow to navigate–only ice, and I’m not a big fan of ice.

I already passed through two sections of ice where I could still manage a little traction on the side of the road (at least half the car had traction). At one point, though, I saw a large section of icy road ahead, so I parked the car to investigate what it looked like over the crest of the hill.

It was so icy, I struggled to find a spot to walk on to peek over the hill and almost slipped once. That hill was pretty steep and I could see no spots for the car to get traction. Remembering what my wife said that morning (“Don’t do anything crazy, okay?“) and knowing that the worst thing for my RaDAR run would be getting stuck in a spot recovery vehicles might struggle with, I chose the option of forgoing the summit activation.

Frankly, if the summit activation was the only thing on the schedule that day, I would have likely parked, then hiked 3 miles to the summit along the forest service road. But my RaDAR run left no time for this.

Fortunately, where I parked was firmly in the two-fer zone of Pisgah National Forest and Pisgah Game Land!

Pisgah National Forest (K-4510) and Pisgah Game Land (K-6937)

I parked the car on one of the many roadside camping areas right there on the ridge line. It was an ideal spot for a field activation: good altitude, no obstructions, and lots of trees. Continue reading POTA RaDAR Run Activation #2: Pisgah National Forest & Pisgah Game Land

Brent builds the Penntek TR-35 transceiver kit

Many thanks to Brent (VA3YG) who writes:

Good morning Thomas, from wintry southwestern Ontario.

I thought I would send you a quick message to share my experiences, so far, with the little TR-35.

Yesterday, around 3pm, I took the above unassembled kit off the shelf and began to melt solder. The smoke test was successfully performed the next morning at 1:30am, after non-stop building (with the exception of a few hours for eating and catching up on a little tv). I measure twice and solder once hihi.

I ordered the kit a few weeks back from John Dillon, WA3RNC, and it arrived quickly by courier and all in one piece. John has super customer service and knows how to pack for delivery. Continue reading Brent builds the Penntek TR-35 transceiver kit

César’s field radio kit

Many thanks to César (CA7OKD) who shares the following photo (click to enlarge) and description of his field radio kit:

Hi Thomas,

I share my backpack to get away anywhere, to a hill, park or beach…

    • Backpack for photographic equipment
    • Mini EF Hfkits antenna (the Balun Hfkits is missing because I lost it on a beach)
    • Coaxial M&P Hyperflex 5 with M&P connectors
    • Bottom: MFJ1899T antenna
    • Xiegu X5105, Micro, Dry Bag
    • Xiegu X6100 (perhaps the first in Chile)
    • Folding tripod stool chair

I had a very good RS-188 (McHF clone) and a uSDR; I sold them because these equipments don’t have a tuner (I like to keep the minimum).

The X5105 is a very good transceiver, the integrated tuner is wonderful.

The X6100 that fails to convince me. At least in 40 meters it is acceptable.

Greetings,
César CA7OKD

Thank you for sharing this, César! Photography backpacks in many ways are absolutely ideal for radio gear. Many allow for a great amount of flexibility in terms of adjusting internal organization. In addition, they’re very well-padded.

Interesting what you say about the X6100 compared with the X5105. I’m hoping to do a video soon focusing on the differences between these two. 

Thanks again for sharing!

POTA RaDAR Run: Planning, Plotting, Packing, and Activating Park #1!

You may have noticed a common theme in my field reports: basically, it’s rare that I plan out an activation more than 24 hours in advance.

Indeed, due to my “dynamic” (I think that’s a good word for it?) family schedule, I often don’t plan an activation more than one to two hours in advance.

But last month, I saw an opportunity open on Wednesday, January 26, 2022. Basically, I had from early morning until late afternoon to play radio.

Making plans

At first, I thought about striking out early and hitting some of the parks that are a little further afield–parks I hadn’t visited in a couple years, or some new-to-me parks.

Then, I hatched an idea to activate two SOTA summits. Both would qualify for bonus winter points and both were technically doable in the time I had allotted. It would involve about 9-10 miles of hiking in addition to 3 hours of driving plus allotting for the time I’d actually spend on the air. It would equate to a very early departure and some steady hiking.

That Tuesday evening, I started putting the plan together, downloading all of the maps, preparing my SOTA alerts, and packing my SOTA pack. I spent the better part of an hour plotting and planning these activations.

Then the realization hit me: the trails I’d be hiking were likely covered in snow and ice which would slow me down considerably especially since my Yaktrax Traction Chains hadn’t yet been delivered. I realized the schedule was just a little too tight. There’s be no room for mishaps and if I made the trip I really wanted to hit both summits in the same day. So, I saved all of my maps, links, and notes to do this multiple SOTA run in the near future.

Back to the drawing board!

I decided that I did like the idea of doing multiple activations in a day, so why not fit in a RaDAR run?

RaDAR (Rapid Deployment Amateur Radio) is basically an activity that can be combined with summits and/or park activations and the idea is simple: you complete multiple rapid field deployments within 24 hours.

If you’d like more information about RaDAR, check out this webpage. Parks On The Air even has a few awards for RaDAR runs–it would be fun to apply for one of them (thanks, WD8RIF, for the heads-up!).

I so rarely have enough time to consider more than two or three activations in a day that the idea of fitting in four or possibly five activations was very appealing.

I looked at the POTA map and sorted out a route between park entities that were all in western North Carolina. I was familiar with all of the locations save one which had the potential to be both a POTA and SOTA activation. Continue reading POTA RaDAR Run: Planning, Plotting, Packing, and Activating Park #1!

Any experience using the FT-818/817 CQHAM TB-BOX?

Many thanks to Motters (M7TRS) who writes:

For some strange reason I stumbled across something on eBay for the FT-817/818 as I am still looking for my first HF setup.

Anyway, it’s a tuner and battery pack for a 817/818 and when I saw it I wondered if you knew about it.

https://ebay.us/vSiNwc (partner link)

YouTube video demonstration:

[Update] And this video:

Thanks for the tip, Motters. I was not at all familiar with this pack. I do like the simplicity of the setup. 

The price is certainly right at $179 US.

There are so many FT-817/818 owners out there, I’m very curious if anyone has any experience with this particular pack and if you can report on the overall quality. Please comment!

Field Activation Antenna Challenge #1: Military Fixture Homemade Multi-band Doublet!

I mentioned in a previous post that my personal “Activation Challenge” for 2022 was “to build a new antenna each month and deploy it at least once that month during a field activation.”

On Thursday, January 27, 2022 I took my first antenna–the military fixture doublet–to Lake Norman State Park for a Parks On The Air activation!

For more information about this doublet and how it was constructed, check out this post.

Lake Norman State Park (K-2740)

I picked Lake Norman knowing that it had numerous spots to set up a doublet.

Unlike an end-fed wire antenna, doublets need a little more clear space to deploy both legs; the idea is to avoid as many low tree branches and other obstacles as possible.

Many (if not most) of the operators I know who regularly deploy field doublets actually use a telescoping mast for the center support to make the whole process easier.  I didn’t take either of my fiberglass masts on this outing because, frankly, the winding fixture on this doublet acts as the center insulator, and is “heavy” compared to most of my field antennas. Continue reading Field Activation Antenna Challenge #1: Military Fixture Homemade Multi-band Doublet!

Recap of my first SOTA activation with the Venus SW-3B

I made a short post yesterday morning noting that I planned to take my Venus SW-3B and new field kit out on a maiden SOTA/POTA activation.

While I will be publishing a full activation report and video, it could be a good two weeks down the road.

I’ve gotten so many inquiries about the SW-3B, I thought I’d write up a short recap with some of my initial notes using the SW-3B in the field.

This isn’t a comprehensive review; just some beginning field notes I made for a full review I’ll write for The Spectrum Monitor magazine.

Dogback Mountain (W4C/EM-066)

I decided to activate Dogback Mountain knowing that it would easily fit in my travel plans. The views (see above) were extraordinary. Thank you for the tip, Dave (W4JL)!

This was also a shake-out for my Tom Bihn HTL2 field kit which will likely be shared with the SW-3B and Elecraft KX1. It includes everything I need to deploy the SW-3B in the field–including an arborist throw line!

I confirmed that everything in the kit worked and there were no missing components.

I paired the SW-3B with my PackTenna Mini 20 meter EFHW. This limited me to the 20 meter band, but I suspected it would yield enough contacts to validate my summit (4) and park activation (10).

I fed the Venus SW-3B with a 3 Ah 12V Bioenno LiFePo4 battery pack–my output power would’ve been about 5 watts.

Results

In short? It really couldn’t have gone better.

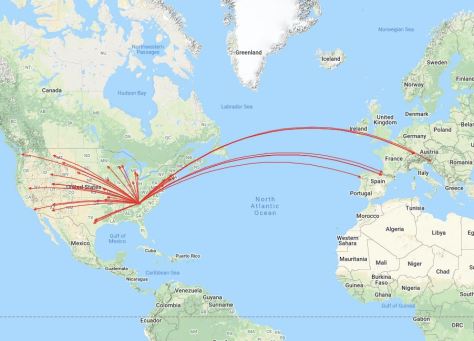
I worked a total of 43 stations in 44 minutes on the air. Here’s what my contacts look like on a QSO Map (click image to enlarge):
Venus SW-3B Field Notes

Overall, the experience of using the SW-3B was brilliant.

Since this little rig doesn’t have an internal speaker, I recorded the audio with an in-line Sony digital recorder. Later, when I produce the activation video, hopefully I can blend the separate audio channel with the video successfully. (Any YouTuber worth their salt can do this, but keep in mind I’m not really a YouTuber!)

SW-3B Pros:

  • Excellent receiver for field activations. I noticed no overloading and it handled the pileups very well.
  • Very pleased with CW filtering.
  • I was able to successfully program the “CQ” button with the following message: “BK TU 72 DE K4SWL” This is huge. At one point, the SW-3B could only handle a simple CW + callsign message. I’m very pleased its only message memory slot can hold the end of my exchange. Also, it is very easy to program.
  • The SW-3B is incredibly compact; only slightly bulkier than the MTR-3B if you include the encoder and AF/RF gain pot protrusions.
  • I am loving the dedicated AF and RF gain pots.
  • Display is very easy to read in the field.

SW-3B Cons:

  • Changing the CW keying sped on the fly is really not an option. It’s an awkward process.
  • The sidetone isn’t adjustable without modifying an internal component. If I could, I’d lower it just a notch or two. As-is, it’s perfectly fine, but adjustable sidetone would be a nice feature.

SW-3B Quirks:

  • When switching bands, the SW-3B defaults to saved memory allocations (not the last used frequency). If you forget and switch bands, then turn the encoder, it cycles through saves memory allocations instead of up/down tuning.

Summary

Keep in mind: this is my first activation with the SW-3B. I don’t typically form strong opinions until I’ve taken a radio on at least three or four activations and used it at the QTH extensively. With that said, first impressions are great. This radio offers much more than I would ever expect for $188.

I see why it has has become so incredibly popular among CW field activators. Now that the Mountain Topper MTR-3B is no longer available, this is a viable alternative.

I’m sure some of you may be trying to decide between the MTR-4B and the SW-3B. I will be reviewing an MTR-4B soon, but based on my experience with the MTR-3B, I don’t think you could go wrong with either radio, frankly.

The MTR-4B does allow for a total of 3 CW message memories that are very easy to access and include beacon mode. You can also adjust the sidetone volume on the MTR-4B (requires opening the enclosure to make the adjustment). Obviously, the MTR-4B is a four band radio including 80 meters in addition to 40, 30, and 20.

The SW-3B, however, has an AF and RF gain control–the MTR series has no volume control at all. The SW-3B also has a rotary encoder which makes chasing contacts across the band much easier.

The MTR-4B receiver current is roughly 27 milliamps. The Venus SW-3B closer to 40 milliamps. (Yeah, splitting hairs here!)

Stay tuned!

In the coming weeks, I will be posting a number of activation reports and videos using the SW-3B. As I mentioned, I’ll also post a comprehensive review for The Spectrum Monitor magazine in the coming months.

I can say this: if you’re a CW op who is searching for a compact field radio?  The SW-3B is a no-brainer. Just grab one.

If you still can’t decide between the MTR-4B and the SW-3B, consider getting both. Why? You could easily kit out two independent fully self-contained field packs on the (relative) cheap!

This will give you two choices for grab-and-go field activations.

Thank you

As always, I’d like to send a special thanks to those of you who have been supporting the site and channel through Patreon and the Coffee Fund. While certainly not a requirement as my content will always be free, I truly appreciate the support.

Your support not only pays the bills at QRPer.com, but makes it possible for me to purchase radios like the SW-3B.

Thank you!

I hope you get an opportunity to play radio this week.  Stay healthy and safe out there!

Cheers & 72/73!

Thomas (K4SWL)