The 2 kW "Power Shade" is the right size to cover a full-size military tent.
Power Film Inc. is a developer and manufacturer of thin, flexible solar modules. The company designs, manufactures and retails their products in Ames, Iowa–a quality made-in-USA product.
Last year, at the Dayton Hamvention, PFI’s booth was very popular. Why? Their sale of small, rollable and foldable solar panels, absolutely perfect for field use, drew crowds of hams, DXers, campers, and/or frequent travelers. Needless to say, sales were brisk.
While browsing their website recently (just for fun), I came across their PowerShade™ Solar Field Shelters. They’re available in 1 kilowatt and 2 kilowatt versions at 15.4 V or 30.8 V. Wow…
This paneled tent is primarily focused at the military market. Perhaps exclusively. And I readily admit, it would be overkill for QRPers, even for a multi-op QRP Field Day. After all, aren’t we about “less is more”–?
But is it wrong for me to fantasize about this wonderful 2 kW creation? A tent-topper that sucks in Sol’s readily-available energy and, with the assistance of a battery bank, produces enough juice to fuel several QRP rigs?
My good friend, Vladimir (Vlado) Karamitrov (N3CZ/ZS6MG) is someone who likes to challenge himself. Perhaps this is why he’s such an accomplished DXer and contester.
Recently, at his QTH, he showed me one of his latest projects: a home brewed QRP transceiver. Vlado wasn’t content to simply build his own high-performance transceiver; no, he needed a built-in challenge.
Here is the story of his QRP radio, that he built mostly from junk parts, in his own words:
N3CZ's QRP rig front face
Challenge for all of us ….”Built your own radio”
By N3CZ / ZS6MG, Vladimir Karamitrov, 114 Russet Ln. Asheville, NC 28803 USA
Building your own radio is a challenge on its own. Using it to work DXCC is another challenge, probably less difficult. But combining the two brings a new spark and joy in our hobby. Isn’t ham radio about radios?
The purpose of this article is not to argue the need for building but to give ideas to those who have the time, like a new challenge and open up for ideas of building their own radios.
There are many different aspects to look into this. One is to build a radio from a kit. A search online will provide a list of manufacturers who offer these kits from basic thru intermediate to advanced designs.
The other approach is to build it your self. Yes, from scratch. Well, why not? Remember, time is what is needed most and of course some money and/or spare parts or junk parts. Time is not what I have available a lot, money is always on the agenda but having spare parts and stuff lying around your garage is another good resource.
N3CZ's workbench
So I decided to put something together. No time –means I can’t spend a lot on making this new rig look like a factory made, I have to use dead-bug design techniques and other easy methods to “glue” everything together. Available time is only after work and weekends and that is not much.
What kind a circuit and design to use? This was really the main question, because the answer will dictate what approach to take. First rule is check what parts and components you have available. There is something you have to remember here — when you go to a hamfest always bring some “junk” back home. You never know what you going to need. We all know this rule don’t we? Also don’t forget what your buddies have collected over the years, they will be able to help you with some of the missing parts if you need.
One of my passions is building my own equipment. Starting from antennas, to control boxes to switch them, pre-amps for the low bands and from time to time build a small QRP rig. Other interests are DX and Contesting, so while putting this radio together I cannot wait to hook it up to my antenna. This is where a little patience is required and I had almost none, hi. But I knew, bands are down for now, I have worked almost everything that was there to work, so will do this one little different and try to slow down a bit.
With my projects everything starts with the box. Few boxes I changed until the right one was in my hand. Next was to find a properly sized knob for the VFO. I then realized that it will take little more time to build all the components so I decided to use my $$ budget and get my self a nice DDS VFO. There are few different ones available online and for around $80. I got a nice programmable one with dual VFO’s and memories, with settable IF offset etc. This seemed to be the perfect fit for the project.
Transmitter
I thought I had all I need to start working on this project, but…..I wasn’t really sure about it yet. While looking for the “start” button and to actually take off with this project, I had yet to find that “trigger” that ignites the spark inside me, so I can say to myself, “yes I am ready, let’s just do this.”
You know the feeling – you feel a bit lazy at the beginning until that moment when that spark gets you. It’s like when you have to mow the lawn, and then you think, “no, it can wait another week, don’t feel like doing it now.” Well, I found my spark – it was not in the box, it was in the tuning knob that I got from a colleague also a ham and one who builds little QRP’s. I was actually explaining to him what I was planning to do, but not sure yet of the concept and how to handle certain parts of the circuit. While discussing all of this, he said he had some parts that he would bring for me and see if I could use some. He did not mention about any knobs, but when I saw them I knew I had what I was missing and now it iss the time to start working on this.
Transmitter PA
Now that I have the heart and the body, and the knob, I did some study of a number of different circuits published in ham radio literature including ARRL’s handbook and many online QRP resources. The goal was to build a simple radio easily reproducible, with reasonably good specifications so you can use it daily. Selection of IF frequency was the next and I decided on using 4MHz as I had access to a pile of some computer xtals of 4.032MHz.
Transmitter keying circuit and low pass filter
Junk stock provided the following:
Double balanced mixer SBL-1,
some 2N5109’s, J310 FET’s,
a few IF amps MC1350,
some toroids and
wire
I was ready to take on my own challenge – build it and work 100 countries with it!
Associated pictures with this article represent certain stages of the building process. As you can see I picked up an easy method for putting all together. I liked this approach for a simple reason that I can go step by step, keep adding components and test each stage as I move forward. There was no need for making PCB…who needs a PCB. In the old days, radios were built on a chassis and components hanging in the air and radio worked.
RX/TX antenna relay
On the other hand there was that perfection starring at me and making me feel a bit guilty, but I had no time to waste but hurry and build this radio in the short time I had available to me. Because you know what, the bands will just open up again, and then I had to do my other part – the DXing, hi so I may not be able to get this done.
I actually put the receiver in a working shape in one afternoon. I had the front end bandpass filter , double balanced mixed, post mixer amp, xtal filter, IF stage and audio section. All tested and worked first time. I spend the rest of the evening listening on 20m. Nothing much there but I found few stations up the band. There were few UA0’s as well. I managed to pick them up but signals were tiny. I decided to check my main radio and compare. I see now…signals were stronger, much stronger, S9 + on my TS850. So I checked few things and found few problems with my initial design: I had to amplify the input signal and my LO signal was too low to produce satisfactory mixing with SBL1. I used a J310 FET transistor for my front end pre-amp, and used single NPN transistor to boost the output of the DDS oscillator to appropriate level.
The receiver
I was ready to fire this thing and …wow, what a difference. I could still hear the UA0’s calling CQ and working others, and the signals were just incredible. Next obstacle was the Xtal filter. I had choose computer xtals that were somewhat matched in frequency, but the filter was way too narrow. I started experimenting with the capacitors around it and found a good medium that showed some good response on the signal quality and bandwidth.
Received signals now sounded “almost” like my ‘850. But I wasn’t happy yet. I was missing some “dynamics” in the signal. It was just a plain CW signal and nothing more to it. Next few days I experimented with an AGC circuit and variable bandwidth for the Xtal filter. After number of changes, I came up with a solid audio AGC circuit and S-Meter. That made a whole lot of difference. Everything was still sitting on the bench, loosely connected together and I was listening up and down the band. There were more stations now…hmm the bands must be opening up or something?
Receiver (left) & Transmitter (right)
For the xtals filter I ended up replacing the fixed caps with varicap diodes which I pulled out from an old TV tuner found at one of the local hamfests. You know that feeling when you can actually adjust xtal filter bandwidth. That is what was missing. I spend hours listening and trying to get into motion for my next step. I was simply amazed what I could pick up with the receiver and how I was able to select different signals, some of them very weak.
I went back and forth between my main radio and this little receiver that was sitting in front of me, still in pieces. “Not much difference is it?”–I was thinking to myself. I actually ended up spending hours in this year’s CQ WPX CW contest and only listening on my new receiver. I was able to pick every signal I wanted, even thru some heavy pile ups. It passed the test! Now I wanted to call these all these stations, so it was time for me to start thinking about the transmitter part.
Receiver front end and mixer
This was nother challenge. I tried one circuit and it worked. Straight forward a TX mixer, bandpass filter, couple stages amplification, low pass filter to the antenna. But I could not get the output power I wanted. I was getting something like 1 W barely making it to 2W. I figured out the reason. It was the transistors I used. Each stage must have enough gain to drive the next one. My final transistor was capable of producing an easy 10 watts out, but I was lacking drive power. I checked the complete circuit and components I had available on hand then decided to make few changes. Remember: the goal was to use what was available and not to go and spend any extra money. I ended up adding extra amplification after the TX mixer. Yep! That was it. That is what I was missing. I was now getting an easy 8W out. I couldn’t wait to hook up the antenna. I had no antenna switching circuit yet, so I hooked up my 3 element SteppIR on the little transmitter and used my vertical antenna on the main radio. Nothing easier than this. I was able to hear my transmitted signal and, at the same time, I could listen on frequency. First call and into UR land…559, “not bad,” I though. I then moved up the band and found a French station ending up a QSO, so I called him and worked him too. I got 579 for my signal. This was getting exciting. I ended up working 10 different countries that evening, mostly Europeans.
I spent the next week or so working on the box and figuring out how to implement the mechanical part of this project and get everything together. I tried using the little radio on 2 different bands (20 and 17M) with excellent results. These have been my main bands this year after they stabilized somewhat and we have them open after work until late. This is the perfect time for experimenting.
Receiver bandpass filter
Final touches can be seen on the rest of the pictures displayed here. I actually used this rig in the IARU CW contest for a while as well as in few QSO party’s on 20m, all with great success. The crown of everything was still to come.
It was getting close to the end of ST0R operation and I had them worked with my main station and KW into antenna on every possible band and mode I could hear them, but that one evening I was listening to their easy going pile-up on 20m working NA stations. The pile-up wasn’t that big and I was thinking,
“should I try this little rig and see if maybe somehow they will hear me?” I wasn’t sure this was going to work, but I hooked up my memory keyer and started pushing the button to send my callsign out. I did this for almost 2 hours. Yes, there was nothing else to do, while I was reading a magazine, I just used the preprogrammed call sign and kept sending it over and over.
Top view of N3CZ's QRP transceiver
Then I heard Lynn W4NL working ST0R with his QRP rig…NO WAY! What is he doing differently then me? And I am going crazy and about to give up, but….I was careful enough to check what frequency was W4NL transmitting so I tune up a little higher then he was. At the same time I received email from Lynn saying he worked ST0R QRP! Yes, I know I heard you Lynn…so I pressed few more time on the keyer. Guess what? It took couple more calls and there he was….smiling at me ST0R called me N3CZ 599 BK. There must have been another CZ I thought, so I send my call, then 599 and then my call again. Sure enough he came back with N3CZ TU. That was it! I did it! I just worked ST0R–a new country in a pile-up with my little homemade radio. I had them worked already on 20 CW , so what if it was a dupe? I knew I did it with my little radio and that was good enough for me. This is where I actually stopped and realized that I have accomplished my challenge. At least I have made it to a milestone, a major milestone. At that time I had well over 60 DXCC countries worked with the little radio, and it was barely 2 and a half months since I started working on this project.
I found this encouraging and I would challenge those readers who are thinking about a similar endeavor to not think twice–just do it! Order yourself a kit at least and put it together. The reward cannot be described here or told by anyone. You have to feel it on your own. Put a challenge for yourself. Make a goal to work 10 states maybe or 10 DXCC countries, or 100. It doesn’t really matter. What matters most is that you give this hobby of ours another chance. A chance that makes it different from any other hobby on this beautiful planet we live on. What better can it be than communicating with others over a the vast emptiness of the space around us and bounce few signals now and then of the ionosphere?
“DX RULES” as my good friend Bill N2WB from Florida say.
N3CZ's QRP rig front face
I say “HAM RADIO RULES!” nourish it with everyday ideas, build your own stuff, don’t just buy that new radio and antenna, ready assembled and waiting for you to simply push few buttons and “work that rare DX”. There are many aspects of this hobby and like with anything in life we have to find it on our own. Sometimes we get help from another ham, sometimes a complete stranger to us, but with the same ideas.
Thanks to Dave K4SV, Phil W9IXX, Lynn W4NL and Carl N4AA who insisted on getting this article done [originally for The DX Magazine]. And all the stations who logged N3CZ/QRP. That was me who called you with this little homebuilt-junk parts radio. Drop me a note if you find this interesting and inspiring, because that was my intention anyway. By the way, I am already gathering parts for my next project. This time it really started with a nice box, but we’ll see. I don’t see that spark yet. I will let you know how it goes.
Until then,
73 & CU on the bands.
TU de N3CZ / ZS6MG / Z35C
Vlado
And thank you, Vlado, for sharing this article for QRPer.com readers! To contact Vlado, grab his email from QRZ.com.
If you have a home-brew QRP project that you would like to share with QRPer.com readers, simply contact us or comment!
Ten-Tec's John Henry behind prototype of the Ten-Tec Model 539 QRP Transceiver at the 2011 Ten-Tec Hamfest
Several of you have written in asking me about updates on the status of the Model 539 and Model 418 from Ten-Tec. I asked Ten-Tec Software Engineer, John Henry, for an update. Here is his response:
Hi Tom,
We have ordered and are building what we think will be representative of the final production boards for the 539. We may have one more board spin for one or two boards, but hardware wise I believe we are in pretty good shape. Software, we are still in development of the firmware for the rig, but we are making real good progress. Timing, not sure yet, but it is in process along with several other new items.
Regarding the 418, we have two more tweaks to the firmware to make. The hardware is finished, and being released to production. We are ordering parts, and plan to be at least taking orders around mid May, if not shipping by then. We passed the testing for FCC, and are in the process of getting the paperwork through FCC. We had a lot of positive input on the 418 at Orlando Hamcation, so we expect the 418 to be a hit with QRPers that also want to use their QRP rig to go 100watts occasionally.
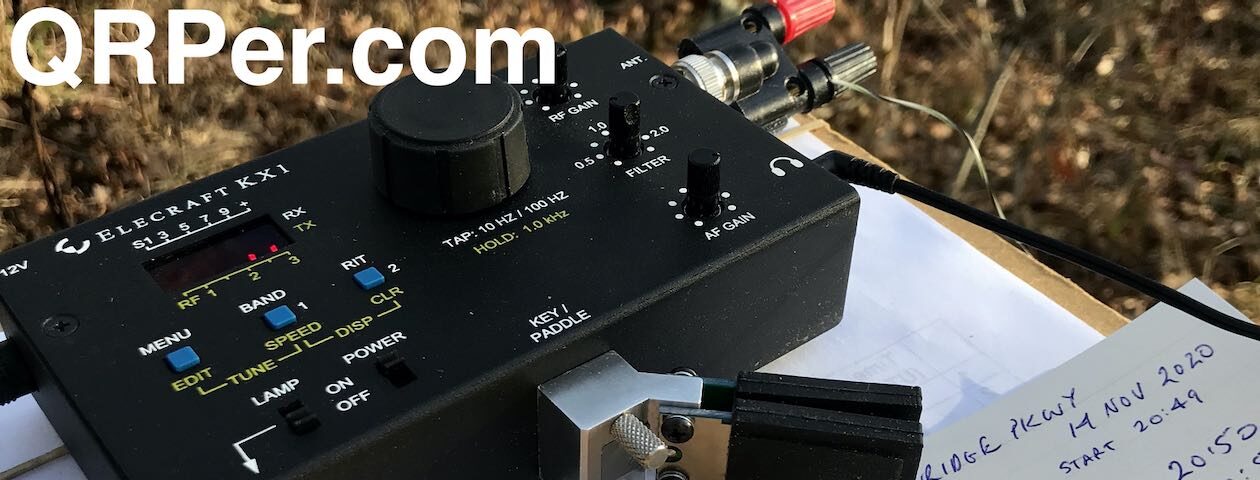
I’ve been meaning to write a post about my Elecraft KX1, because, of all of the rigs I own, it’s the most-often-used, thus the clear favorite in my stable. But: this morning, I read John Harper’s (AE5X) excellent assessment of the Elecraft KX1 vs. the Ten-Tec HB1B. He provides some significant numbers to consider when comparing these two lightweight CW-only QRP rigs, and makes a great case for elevating the newcomer HB1B over the KX1–at least, for some readers.
I’ve had my Elecraft KX1 for over three years, and, in all honesty, absolutely love it. But, let’s face it: if I didn’t have one, if I had never touched nor used one, I would be seriously tempted by the HB1B–for its price, for the fact that Ten-Tec sells it (I’m a long-time Sevierville radio fan), and for the fact that it’s not a kit. Oh, yeah: and because it works very well.
However, having used the KX1 for so long, I know that the HB1B (at least in its current state) could not replace my KX1. But before I explain why, I would like to make some strong points in favor of the HB1B.
The Ten-Tec HB1B
The Ten-Tec HB1B
At least on paper, the HB1B has better filtering, a better display, and generally speaking, more bells and whistles than the KX1. Best of all, it comes fully assembled.
Why is this last point an advantage–? For a number of talented QRPers reading this, building the kit is the best part! I know, I get it…And to tell the truth, I want to be like you kit-builders out there! But I am only now getting into kit building, and building my confidence in kit-building. I’m sure there are many others out there like me. For these QRPers, please note: the KX1 is not a beginner’s kit. I did not build mine. When I bought my KX1, I purchased it from a KX1 beta tester and professional engineer. The soldering and overall build quality are top-shelf.
Moreover, no matter how great an Elecraft radio is, it’s only as good as the person who built it. If the builder does sloppy work, your rig’s longevity and performance may suffer. Since you’ll likely be taking the KX1 with you everywhere, and it’ll experience a fair amount of movement (aka, hard knocks), this is especially important.
If, like me, you’re not prepared to take on building a KX1, fear not!–you should simply purchase from someone who knows their stuff: Elecraft can suggest some builders (including the amazing Don Wilhelm, W3FPR) or you can simply purchased a used KX1 fully-assembled. Or, you can simply purchase the fully-assembled HB1B.
So, why do I not find the HB1B enticing?
Yes, the Ten-Tec HB1B comes ready to roll. Still, could it replace my KX1? I don’t think so. Two HB1B deal-breakers for me:
As AE5X mentions, there is no internal antenna tuner option.
There is no way (at least, on this version) to attach paddles directly to the rig.
Portability + Simplicity = QRP Fun
Why are these features so important? Well, my KX1 has an ATU, four bands, and an attachable paddle. One of my favorite things to do with my KX1 is, while traveling, to pull it out of its Pelican case, toss a 28′ wire into a tree, and lay a ground wire. As I stand there, I can hold the KX1, tune the antenna (easily 40M and up, with the internal ATU) and work stations my favorite way: while standing up. I can also (if I like) sit for a moment, then jump up again, walk a bit, and generally move freely–just not possible with sit-on-a-table units.
My Elecraft KX1 fits nicely inside the Pelican 1060 case. There's even room to fit an external Whiterock paddle.
Additionally, everything I need fits inside a Pelican 1060 case. The Kx1 itself is an all-in-one unit–nothing external to attach, unless I want to. Oh, and I can also operate the KX1 with gloves on in below-zero conditions.
Anywhere QRP
Why would I want to operate standing up? Fact is, where I go, I’m only operating for thirty minutes or so, and in places where there’s no convenient spot to settle down or get too comfortable. In many cases, I’m operating on a whim–when I can grab a few minutes in a busy itinerary, or on a hike or day trip. With the Kx1, this is remarkably easy to do. I can have my KX1 on the air in four minutes or less, in most cases–and that includes the time to hang a wire–! Packing up is also quick. This kind of operation feels as free as flying a kite. Spontaneity at its best.
Part of that functional synergy comes from the fact that there are no additional components to hook up (i.e., no external tuner, external paddles). With the HB1B, I would be forced to either build a set-up, so that I could stand and hold the transceiver, tuner and paddles, or I’d have to…sit down.
Wayne’s inspiration for the KX1
Thinking back to a Dayton Hamvention several years ago, I seemed to remember that Wayne Burdick, N6KR (co-founder of Elecraft) was inspired by just this sort of off-the-cuff operation. To confirm this, I asked Wayne, just this morning, if I was on track with that. He offered this very thorough (and insightful) response:
I had been designing portable QRP gear for my own use for many years, including the “Safari 4″ (documented in three issues of QEX magazine in 1990). The Safari-4 was 3x5x7”, but it was fully self-contained, including an attached keyer paddle, internal 1-Ahr gel cell and manual antenna tuner, wattmeter, SWR bridge, and 4-band coverage. But it was too large for backpacking. Later, I designed some far smaller rigs with very good performance for NorCal and Wilderness Radio, including the SST, NC40A, and Sierra.
Then I started Elecraft with Eric, WA6HHQ. After we had success with the K2 and K1, I pitched the idea of a smaller version of the Safari-4 to Eric.
There were two inspirations for this. Back in the 70s, W7ZOI (Wes) created his “Mountaineer”, which was a crystal-controlled 40-m QRP rig that was very simple to use, very small, and self-contained, in that battery and paddles were built in. But it had no VFO, no ATU, a single band, and no frills. Taking what we’d learned in the K2 and K1 designs, I figured we could pack a great radio into this same size using updated technology. It had to cover at least 40 and 20 meters, and the idea was to use latching relays to minimize current drain and simplify band switching. We also used a DDS chip for the VFO–not quite as pure as crystal control, but just as stable, and totally adequate for a portable radio.
The other inspiration was my idea for an attached, but easily removable and mechanically reversible, keyer paddle. This became the KXPD1. I literally woke up at 5 AM with this idea. I realized immediately that this was the enabling technology for a hand-held radio, and I got busy with the design.
Having spent time camping and hiking with other rigs, I also knew that the ATU had to be built in. This allows the use of ad-hoc, wire-in-a-tree antennas, which is the secret to quick setup. It was a challenge creating an ATU that’s just 1 x 5″, but it worked. We spent weeks refining the rig and the ATU to work with typical field antennas, adjusting the component values to cover 40 and 20 meters. When we added the 30-m module, we found that it handled this well, too.
Most of my KX1 operation involves not even sitting down. I literally stop on the trail at a scenic overlook, pull the daypack around and extract the rig, toss a wire into one or two trees, and I’m on the air. I love this kind of operation. I’ve gone so far as to operate while sitting in a tree (an “inverted vertical”–a dangling wire–works amazingly well). Having to futz with add-ons can be fun, too, but it discourages “instant” operation. I like to quote Ade Weiss, W0RSP, from his book The Joy of QRP: “If there is a place, and you can get to it, you must operate from there.”
You can’t overlook performance and features, either. The KX1 is stable in all operating environments and draws only about 35 mA. It includes a variable-passband crystal filter that can be widened out to copy AM and SSB signals, and can even do cross-mode (transmitting in CW while receiving LSB or USB). It has a full set of frequency memories and CW message buffers. For blind hams (or when you’re too tired to keep your eyes open), the KX1 has a 100% Morse-audio-feedback system. I tested this firmware with my eyes closed, and the result was very well-received by the blind amateur community.
Thanks for the history, and your inspiration, Wayne. Love it!
The KX1's Tuning, RF, AF and Filter knobs are very easy to operate--even with gloves on!
When you hold and operate the KX1, this legacy is all too apparent. Thoroughly thought through–down to a built-in LED lamp for logging–and, without a doubt, the original inspiration for several radios that followed: the HB1B, the MFJ 92XX series, and the Hendricks PFR3.
My guess is that the next generation of HB1B will have some of these clever features.
In the meantime, if you’re in the market for an inexpensive, CW-only, very portable QRP rig, and you’ve no plans to embark upon impromptu operation, the HB1B could be your rig. Based on my experience with Ten-Tec, if they sell it, they’ll give you excellent customer service. That is the beauty of these two choices, both Elecraft and Ten-Tec are excellent companies to do business with.
I only think I’d give up my KX1 for…the new KX3, and I’m not even convinced I’d do that, yet. The KX1 has become my little travel buddy. Time will tell, though. Check back here–if I’m wooed by another QRP radio, I may eat my words.
By the way, as I mentioned at the beginning of this post, the inspiration to finally write down my thoughts on the KX1 came from John Harper (AE5X) who has an excellent QRP blog that you should certainly add to your favorites! And thanks, again, to Wayne, both for his response, and for his original ideas that continue to make QRP so liberating.
You might want to let your viewers of your nice web site know that on 10133.56kHz AA0RQ/b is on the air…30mw at night and 100mw during the day and solar powered.
Thanks for the suggestion, Bill!
I would also encourage you to visit the QRZ.com page of William (AA0RQ). There, he describes in good detail, the beacon, how to get a QSL and figure the miles per watt to your QTH. I also enjoyed reading his bio and how he fell in love with low power.
QRP radios, product announcements, reviews, news and more. Low power amateur radio fun!
Please support QRPer by adding us to your whitelist in your ad blocker. Ads are what helps us stay online. All of our ads are ham radio related--no junk, we promise! Thank you!