Many thanks to Jim Cluett (W1PID) who has kindly allowed me to share this recent post from his website:
Field Day – 200 QSOs with a Flashlight Battery
June 2021
by Jim Cluett (W1PID)
Field Day was an experiment this year. I operated for nine hours using a 5V 18650 battery and made 200 QSOs before calling it quits.
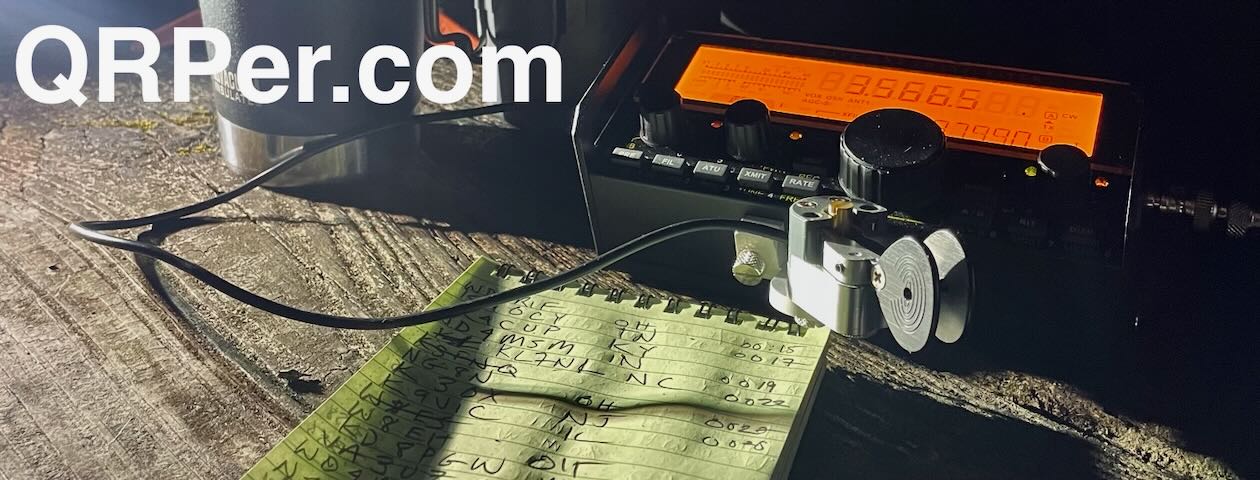
I operated on the deck with an MTR 4-B designed by KD1JV. The antenna was an 88 foot doublet up about 45 feet. I used the ZM-2 tuner. For power I used the PowerFilm LightSaver. This is a 5 watt roll-up solar panel that charges a 3.7V 18650 battery rated at 3.2 Ahr. The battery inside the Powerfilm product is commonly used in flashlights. The combination of the rig and the power supply is crucial.
The MTR rigs will operate from 6 to 12 volts. The Powerfilm puts out 5V to a USB socket. The secret ingredient required to bring the USB voltage up to the operating voltage of the rig is a Baofeng USB charging dongle. This device takes a 5V input and outputs 10.3 volts… perfect for the MTR transceiver. With this voltage the MTR puts out a little less than 3 watts.
The PowerFilm LightSaver is designed to charge cell phones for hikers and campers. It weighs only about 5 oz. and rolls up into a tiny package. Any USB 5V cell phone charging battery could be used with the Baofeng dongle.
This year my whole station operated on 5V. I used a Samsung tablet for logging.
In New Hampshire it was cloudy for most of Field Day, but fortunately the amorphous solar panel provides some charging even when it’s cloudy. I’m guessing that after 9 hours of operating the battery was down to about half capacity. The beauty of this system is that one could operate indefinitely with moderate sunshine.
I’ve been experimenting with this setup during hikes and bike rides for the last couple of months with a view to using it for Field Day. This year’s emergency exercise proves that it is viable for an extended grid-down power outage.
What a brilliant challenge and test for Field Day, Jim! Thank you for allowing me to share it here on QRPer. Also, a hat tip to Eric (WD8RIF) for bringing this article to my attention!
I told Thomas I would do my own field test of the Xiegu X5105 doing a couple of Parks on the Air activations and what I thought of the radio.
I have had several radios I’ve used on POTA and SOTA activations over the past year and without a doubt my favorite radio for out in the field is my ICOM IC-705. It has everything I want in a portable radio, however I’m also enjoying it alongside my ICOM IC-7300 in the shack. Therefore I’ve looked at other portable radios for field use.
My latest acquisition was a used Xiegu X5105 that I purchased used on QRZ. The radio works fine and for the most part the menu system with it is very easy to understand. As Thomas has pointed out, the CW memory is absolutely insane to use. It just makes no sense to me why with the 10 memory slots that it’s really impractical to use more than the memory in Slot 1, which for me is the CQ POTA. I would never even have known how to set it up in the first place without instructions to Tom that was shared in Tom’s post regarding the X5105.
I got the radio on June 3, played around with it in the shack to get familiar with it and programmed in the memories. I went to K-5481 (Wm. Penn State Forest), which has several parts scattered around eastern Pennsylvania. It has a very small 10 acre tract in the Cornwall mountains between Lancaster and Lebanon County, which is also at a SOTA summit. I used my Sotabeams EMCOMM III antenna and turned on the radio to start calling CQ POTA. For the life of me I could not get the CQ message to send, so I gave up on that and used my CW Morse paddle and did it the old fashioned way. I also spotted myself on the cluster and made 3 QSO’s on 40 meters fairly quickly. I had success on 30 and 17 meters as well. In total, there were 10 QSO’s made in about 45 minutes.
Other than my disappointment not being able to easily send the CQ from memory, overall I was pleased with the activation. When I got home I investigated again how to send CW. I also learned how to use the DSP to make it more narrow on CW, which I was thankful for. I then started to see if I could go hands free using my Heil headset that I was able to use when I had the G90. Unfortunately that did not work at all using the AD-1-iCM adapter as it would not transmit with the foot pedal. I did use the Heil headset in the side jack and put the radio in headset mode. I was disappointed to find that I had to increase the volume up the whole way to be able to hear CW loud enough for my old ears. When I unplugged the headset suddenly the radio RX was very loud. (If anyone can offer a solution, please let me know).
Today I took it to my local POTA park near my house, K-1418 (Samuel Lewis State Park). I used the same Sotabeams antenna and was on the air in no time. Band conditions were not so good and I ended up with 18 QSO in just over an hour. It was nice having the CQ function working, however I am used to the interval where it would automatically send every 7 seconds like the IC 705 does. Not a big deal, I just had to press the PTT button on the top.
I never tried using the radio on SSB before so I called unsuccessfully on 20 meters and went to 40 where KM4JEG called me and gave me a 55. Sadly, I had to take my headset off because when I keyed the mic I was hearing my distorted voice through the headset. So, headset was removed. I didn’t expect that was going to happen, so now on SSB, I’m not able to use the headset, at least on TX.
The Good:
I really like the internal battery in the radio. I did not have to bring the Bioenno 12v 3aH battery along. The internal battery works great!
It is very portable. I watched a YouTube video, and unfortunately I cannot find who it was, but they had an Osprey UltraLight Roll Organizer which I purchased on Amazon. This is perfect for storing the X5105 and the few accessories it needs, in my car so I’m always going to have a portable radio available when I travel.
The ATU is great on the radio. I can tune all the bands I want to work with the Sotabeams antenna. This also saves having an extra wire and external ATU like I would have to use on the IC 705 with this type of antenna.
The radio is nice and portable and will store nice in my car when not in use and will be ready to go.
The Bad:
The CW presets are almost worthless and not easy to get to. Once I found how to send from the memories, it only really makes sense to use one of the memory slots. I wouldn’t easily be able to switch to a 73 menu shortcut, then go back to the CQ memory.
With the headset plugged in, when I was transmitting CW, I could hear some distortion while it was sending, however it was not too bad, but something I’m not used to hearing.
The Ugly:
The headset for SSB could not be used at all due to the distorted noise it made. Also, the volume for the headset and the volume through the radio are night and day. As I mentioned before, when I unhooked the headset and the audio came out of the radio again, I had to quickly adjust the volume down.
My Opinion:
Overall, my opinion of the radio is this: For the price and the features it has, I would say it’s a good field radio, as it is easy to store in the car, it has the built in ATU if being used on a random wire antenna, and for 5 watts, people had no problems hearing me, even with poor band conditions and QSB. I hope this radio grows on me, and in the back of my mind don’t find myself thinking during the activation, gee I miss my IC-705 out here.
I know comparing the X5105 to the IC-705 is like comparing apples to oranges. Each radio has it’s good and bad. For the price difference, the Xiegu definitely is worth the price. I would never use it as a first HF radio in the hamshack if I were a new ham. This radio is also not going to be used by me on digital modes. If I want to do digital or work a contest while doing a POTA, then there is no doubt the 705 is coming along for the activation. The Xiegu will be used by me when I want to use a random wire antenna since it has the built in ATU, along with the fact it will be light in the backpack if I am hiking to a summit, and the IC 705 will be used with one of my end-fed half wave antennas or the Hustler vertical array so I don’t need the mAT-705 which I’ll use in the hamshack. I’m trying my best to get away from wires all over the place when I activate, so the laptop computer is staying home. I really like the HAMRS logging program, which I highly recommend, on my Android Samsung S-20.
If anyone who reads this who has some insight into some of the issues I mention, please reply so I have a better understanding of this radio.
73!
Scott KN3A
Scott Lithgow (KN3A) is a contributor on QRPer.com. Click here to check out his previous posts.
I would like to thank everyone for their positive and kind comments from my first part of the SOTA adventure with NK8Q. I have a slight correction to make, Cole Mountain was the first summit we did on Day 2. As you can see below in the pictures, there were no trees to hang our EFHW antennas, so we brought along our fishing poles. This generated a lot of interest from the A.T. thru hikers asking what we were doing. On particular hiker told us he’s seen others doing SOTA at summits throughout his journey from Georgia until that day. This was a fairly steep climb to get to, but the scenery was fantastic and well worth the walk. We offered trail magic to several of the hikers and we had very good conversation with them all.
Heading back down from the summit are a couple of other views we saw. There were some trees outside of the activation zone.
We packed up and started heading down the mountain to the parking lot around noon with the next destination Rocky Mountain (W4V/BR-001).
We drove almost 3 hours to get to this drive-up summit. The “S” turns and elevation changes were worth it though as there was so many spectacular views of the mountains. The last 4 or 5 miles was up a very steep gravel road that had me white knuckling until we got to the top. This was a site with several towers for different things and not a lot of view. I was able to get 10 QSO’s at the summit. I recall it was getting very warm that afternoon and I was not looking forward to the drive back down the mountain on the access road. I figured out how to do the manual shifting in my Tucson and Mark followed me down the hill. It was a non-issue and then we had a long drive to where we thought we would be able to camp on Skyline Drive.
I got my 4 SOTA QSO’s, time to relax.
When we finally got back onto paved roads and eventually into cell phone coverage briefly; we were hoping to find a place to get ice for the coolers and maybe a place to eat. Well, we found a gas station in the middle of nowhere with ice and a little store and they happened to be selling their own fried chicken and fries. When we got to the south end of Skyline Drive entrance, the sign showed all of the campgrounds were full. Since it was already getting dark, we made the decision to get on I-81 and head north and found a Super 8 Motel in Newmarket, VA for the night with the plan to get back to Skyline Drive at the Thornton Gap entrance. We got up early and looked for a gas station and a place to eat. Conveniently, Dunkin Donuts has a gas station as well (we didn’t realize that until after we got gas) but had a good breakfast sandwich each and I got a large coffee. I believe Mark is only the second person I’ve ever known who does not drink coffee. I believe my large cup was consumed before we got to Skyline Drive that morning, which I believe was about 18 miles.
First Summit of the day was Hazeltop Mountain (W4V/SH-004), which was south on Skyline Drive. The scenic outlooks were beautiful on the way to the summit.
Once we reached the summit, there was not much to see. I set up a few yards off the A.T. and made 15 contacts. The band conditions were pretty decent. This was my set up at this location.
Next stop – Hawksbill Mountain (W4V/SH-001). It was just after 12 noon when we got to the parking area, and there was a good mile or so of steep uphill climbing. The reward at the top was worth the climb! I got another 20 QSO’s in the logbook at this summit.
This dial pointed to the many summits within view of Upper Hawksbill.
Final summit for the day was Stony Man Mountain (W4V/SH-002). This was another steep climb, but the reward was also a beautiful view. I made 8 QSO’s and Mark and I shared the antenna and radio due to the limited space and all the people walking around at the summit.
I will continue with Part 3 of our journey to the Summits in Virginia in the next post. I hope I have half the writing skills that Tom Witherspoon has and that I was able to hold your interest in the SOTA journey that Mark and I did. I will wrap up the story with a Part 3. Thank you for taking the time to read this.
Scott Lithgow
KN3A
Scott Lithgow (KN3A) is a contributor on QRPer.com. Click here to check out his previous posts.
First of all, thank you so much Thomas Witherspoon (K4SWL) for allowing me the space to tell my recent story from my trip to Virginia. I hope you find it interesting. I certainly do not have Tom’s writing skills so I’ll do my best.
A quick introduction. I was licensed in 1983, call KA3LUW, as a Novice mostly a CW operator. I upgraded in 1992 to Extra with the 20 WPM code. I was mostly interested in DX and around 1996 went through some life changes and became inactive for several years until about 2003 when my Dad (N3FWI – now SK) gave me his Kenwood TS 450 to sell. I put up a temporary antenna and discovered PSK31. That actually got me back into ham radio as Dad let me keep the radio. At that point I changed my Extra call from WY3X to KN3A. Over the years my interest is still chasing DX and contesting. In 2015, I was chasing the W1AW year long event for the ARRL Centennial so I could confirm as many states on as many bands and modes as possible. When 2016 started, my ham friend, Mark, K3MRK told me I should get involved with NPOTA (National Parks on the Air) which was also celebrating their 100th anniversary. I was just so burned out from ARRL the prior year that I did not get involved. My interest in the hobby also started to wane as well, as I got into fitness due to health issues.
Fast forward to 2020. Mark continued to praise the now POTA program and all the fun he was having with it. It seemed to be something I would also enjoy as I could walk, hike and exercise as well as discover portable operations. On March 14, 2020, Mark convinced me to do a POTA activation with him at the local Sam Lewis State Park (K-1418) near my QTH. It was very cold and windy but we had a successful activation and I was hooked. Since then I’ve done 75 activations from 9 unique parks in 3 states. To say I am hooked is an understatement!
I have another good friend Mark, NK8Q, who is an avid Summits on the Air activator and chaser (SOTA). Mark lives about 2.5 hours west of me, and last summer we met and activated two Summits together. The first was a drive up summit and the second one required a little bit of hiking to reach the summit. I like the idea of walking, hiking and backpacking so SOTA is also something I enjoyed doing last year.
Two years in a row K3MRK and I have tried to get to Dayton, only to have them cancel due to the pandemic. I had scheduled a week off of work and decided to keep the time off and contacted Mark – NK8Q about possibly doing a backpacking SOTA adventure.
We talked about different places we could go to activate, and ultimately we decided to do several 10 point summits along the Blue Ridge Parkway, Skyline Drive and along the Appalachian Trail. For me, this was going to be not only a SOTA activation, but in some instances the activation also counts for POTA. We both left our homes early morning on May 20 and meet in Natural Bridge, VA and we would spend the next 4 days heading north, while activating different summits. We actually realized about 100 miles north of Natural Bridge that Mark and I were only about a mile apart heading south on I-81, so we took advantage of 146.52 simplex the rest of the way to our starting point and we used FM simplex driving from summit to summit.
We arrived at Natural Bridge just before 10:00 a.m. and Mark asked if I wanted to activate K-3972 (Natural Bridge National Park). Sure, why not, it would be fun to do a quick activation. We found a nice spot to set up the antenna and radio. My equipment for this journey was a Sotabeams Bandspringer Midi and my ICOM 705. I put 11 QSO’s into the log the short time we were there and was a nice warm-up for what was ahead.
After the quick POTA activation, we started heading to our first summit, which was Apple Orchard Mountain (W4V/RA-001). This was along the Blue Ridge Parkway and the views heading there were spectacular. Once at the summit we explored the area and then found our operating spots. I made 20 QSO’s and 3 S2S (summit to summit).
Second summit was Cole Mountain. The parking area was about 700 feet below the summit of 4,020 ft. Most of this climb was along a private road that goes up to several towers and they were cutting the grass. They waved as we walked up and were also very close to the Appalachian Trail (AT). Cole Mountain yielded 27 QSO’s in a very short period of time.
We hiked back to the parking lot and proceeded to our next summit of the day at Petites Gap Trailhead where we went to Highcock Knob (W4V/RA-014) where we hiked about 700 feet in just over a mile. This was a fairly rocky and difficult climb and being tired from other summits and the drive down first thing in the morning, it was nice to be the last summit of the day. The elevation at the peak is 3,073. Mark and I had some issues getting our antennas through the trees at this summit and wasted a lot of time. Once the issue was resolved, I made 8 QSO’s. Mark and I decided it was time to start heading back to the parking area and call it a day. Since we were on the Appalachian Trail, we met many thru hikers heading from Georgia to their final destinations in May. Every one of them were really nice and eager to find out what we were doing at the summits and we made sure we had “trail magic” as they call it on the A.T. We carried extra water and snacks, and they were always much appreciated by the hikers. Just before we got back to the car, we met up with a hiker from Minnesota who was hanging his bear bag in a tree and he was preparing to camp for the night. When Mark and I got back to the car I thought, here I am with a cooler full of ice cold beer, I bet this man would appreciate a beer or two. I went back and he couldn’t get to the car fast enough! If you are ever hiking on the A.T. make sure you bring some trail magic as well. In the picture below, Mark was using my rig and we were right at the summit.
We left and went looking for a place to camp for the night. There were no campsites available so we stayed in a very old motel that I was afraid was going to be full of bed bugs or something. We survived and day 2 of the SOTA adventure was ready to begin.
(Part 2 is next)
Scott Lithgow (KN3A) is a contributor on QRPer.com. Click here to check out his previous posts.
Many thanks to Mark Hirst, who shares the following guest post:
Pick and Pluck Foam
The old adage of ‘measure twice and cut once’ is very apt when using pick and pluck foam. The inserts are not cheap and mistakes are hard to rectify.
Whether you are preparing a large case with several items in a shared insert, or focussing around a single item, planning the layout is key.
Item weight is also a factor to consider, as this will affect decisions on wall thickness between items and the case.
Finally, how hostile is the environment likely to be? Is the case going in your backpack or car where you’re in careful control, or is going to be subject to careless handling by others?
Planning the layout
Once you’ve settled on a case size and how much padding you need, a non-destructive way of planning the layout is to use cocktail sticks.
These can be inserted into the corners of the foam segments to trace the outline of the radio and any items such as controls and ports that may extend from the body.
Since the size of the segments is in fixed increments, matching the exact dimensions of the radio is down to pure luck. I would go for a slight squeeze on the radio body if feasible to make sure it’s always in contact with the foam, but give some breathing room around the controls and ports.
The example below is a case I use for backpack transport. It has rather thin but adequate side walls for that purpose. I prioritised wall thickness facing the front and back of the radio, and also on the side opposite the carry handle. Note how the foam comes right up against the body of the radio, but leaves the front controls with some clearance.
Outlining using cocktail sticks
This has the benefit of keeping any sudden shocks away from the controls, and also reduces the number of places where foam is subject to tearing and compression when the radio is inserted and removed.
The completed insert
Separating the foam
The best place to start is along the planned route of a long side wall. Use your thumbs to separate the surface of two segments on one side from two segments on the other.
Once the surface tear has got going, you should be able push a finger down between the four segments, extending the tear till it reaches the bottom of the foam. At this point, you have a cut all the way through.
Separating the foam
Now you can peel the foam apart at the upper surface in each direction, using your forefinger to again push down between the segments to complete the separation down to the lower surface.
Work carefully around the cutouts and protrusions accommodating the controls. The protrusions are potential weak points at this stage, so be sure to proceed slowly.
If you need to practice, you can always start by separating segments deep within the section that will be removed till you get the hang of it.
Reinforcement
While pick and pluck means you don’t need special tools or templates to cut the foam, the remaining material in your insert is inherently weaker than a solid structure.
The solution I’ve used is to fill the residual cuts with a solvent free adhesive. Solvent free adhesives are often aimed at children for safety reasons, and while there are solvent based adhesives for foam, the one I used dries clear with a resilient flexible bond that is stronger than the foam itself.
I run a finger gently along the exposed walls, edges, and around the protrusions. This makes the potential weak points and stress areas immediately apparent as segments naturally separate along the pick and pluck cuts.
Armed with a tube of adhesive and a finger (usually a thumb), you can gently open the weak point and then run the nozzle of the tube down the cut, dispensing generous amounts of adhesive as you go. The two sections of foam close up as the nozzle passes by, with the adhesive soaking into both sides. As long as you don’t go overboard, the adhesive will stay within the join and you won’t have to wipe away any excess.
Reinforcing corners
Side walls are not subject to the same stress as protrusions, but you will probably still spot sections with deeper cuts that need attention, and you will definitely want to reinforce the corners.
Reinforcing sidewalls
I’ve allowed at least a day to be sure the adhesive has set. It’s worth going over the insert again to see if you missed anything the first time round.
The Adhesive
The Bostik solvent free adhesive resembles runny white toothpaste when dispensed from the tube, but dries clear when set.
Inevitably, when I tried to find more of it recently, I discovered that the easily recognisable colour and branding had made way to a confusingly generic scheme shared across a variety of different adhesive types from the manufacturer.
I found this old listing for Bostik 80518 on Amazon UK, and another here on Amazon US. Based on the product number, a modern equivalent seems to be here.
I’m sure there’s nothing unique about this particular product, other than I’ve found it to be foam friendly over the years. Aside from being solvent free, its ability to seep into the foam is a key asset.
Since the first step of creating an insert leaves you with a potentially discardable piece of foam anyway, you have plenty of raw material to experiment with if in doubt.
Additional Reinforcement
Even if you have been generous with the side walls of your foam insert, a heavy radio might demand some additional work to ensure the longevity of the foam.
While the example case shown above worked OK to start with, I noticed that the floor of the case and the side wall facing the back of the radio were taking a beating.
The problem was caused by the feet of the radio, cooling fins, power and antenna connectors. During transport, these were pushing into the foam with the full weight of the radio behind them. Subject to such concentrated point forces, I could see that the foam wasn’t going to last.
Using very thin and very cheap flexible plastic cutting boards from my local food market, I cut out panels which spread the point compression across a much wider area.
Additional Reinforcement
Now when I put the case into a backpack, I ensure that the radio is sitting on its tail with the cooling fins against the rear panel.
Conclusion
While it’s possible to create ad-hoc transport solutions for radios, there’s nothing quite as satisfying as a sturdy padded case that is made to measure. The cases are forever, but the foam needs care and attention, so I hope these tips help you build a lasting solution for safely transporting your pride and joy.
Many thanks to Mike (W6MVT) for sharing the following guest post:
Back to Ham Radio for a Year – A Brief Reminiscence
by Mike (W6MVT)
This story will sound like many I have heard over the past year, but I will write it nonetheless as a note of gratitude.
Last March COVID had just restricted our activities and I was wondering how to spend my time. I had received my licenses back in the 80’s. There was a code requirement, there was no internet, no QRZ, no spotting.
Though I enjoyed ham radio very much, family and work took precedence, and the equipment went into storage. I eventually sold it off (who is dumb enough to sell matching Drakes?).
Fast forward to the around 2010, when I knew I would be retiring and might want to get on the air again. I picked up some used equipment and stashed it away without really using it.
Then 2020 arrived and the world changed dramatically. One day, prompted by who-knows-what, I had the bright idea to dust off the gear and hook it up, mostly to see if it even still worked. A makeshift wire in the back yard and a quick listen and there it was – a CQ.
I was actually nervous to answer – it had been that long. It was KE8BKP, who it turns out, was activating a park. I hadn’t a clue what that meant, but I shakily answered. We exchanged reports and he went on the to the next one. I had two immediate reactions. First, I was reassured by that brief, painless interaction. The stuff worked and I could still “do this.” Second, things had changed a great deal since the “old days.” But I researched POTA and SOTA and DX Clusters and all the other magic that now exists.The point is that POTA gently reopened the door to an amazing hobby, one that still fascinates me. I went on to become an active hunter and now a prolific activator.
Since it has been a year now, I felt it important to acknowledge this moment, and to note one more thing. When an activator answers a call, we don’t know the other person’s circumstances. Maybe they are a new – or returning “old” ham. Maybe it took courage to key the mic or pound the key. I have appreciated the manner in which POTA hams enthusiastically help one another improve, learn and in turn help others. Thanks to Jeff, KE8BKP, and all the others since, and to come. And thanks to the many volunteers that keep the program running each day.
73, and be well,
Mike W6MVT
Mike, I couldn’t agree with you more. I think all POTA, WWFF, and SOTA activators are essentially ambassadors for ham radio. We never know what’s happening on the other end and I strongly believe in patience and understanding when answering calls and performing an exchange. It can have a huge positive impact for the person on the other end.
So glad you found Parks On The Air and that you’re enjoying playing radio once again!
Many thanks to Frank Lagaet (ON6UU) for sharing the following guest post:
The EGV+ Three Band Transceiver Kit
by Frank Lagaet (ON6UU)
Another EA3GCY kit has seen daylight. The EGV+ is ready for you all.
It was beginning 2021 I got word a new kit from EA3GCY was ready and distribution could start. After a successful build of the DB4020 I did not need much time to decide to buy this kit, a week later the kit arrived at my QTH. As weather was good I did not start immediately building but then winter kicked in, with snowfall and frost, perfect time for some quality time and building the kit.
What do you get ?
The kit has a general coverage receiver from 6 to 16MHz, it has a keyer built in, has RIT without limit, requires only 0.25A on RX and smaller than 2A on TX. Dimensions are 18x14cm and weight is 0.3Kg. It is CW only, able to produce 8W on 40 and some 5-6 on 30 and 20. The kit has an AB class amplifier. Spurious is below -50DBc. The receiver is a heterodyne type balanced mixer, sensitivity is 0.2µV minimum and the CW filter is some 700Hz wide, the AGC is on audio. Furthermore the transceiver is equipped with both output for loudspeaker as for a headset or earbuds.
The kit arrived in a brown envelope and in that envelope I found a well-packed packet of plastic bags and the printed board well packed in bubble wrap. Around that another layer of bubblewrap. Safe!!
All plastic bags were checked, all needed stuff was there, super, well done Javier.
All components were installed in about 10 hours “relax max style”, if you have built some kits already you can easily do this one, all elements are far enough out of each other, the board is not overcrowded at all. Some attention is needed when soldering the IC’s and display but even that is a piece of cake. Be careful when installing the SI5351 module.
Winding the toroids, just follow what is in the manual, it is not that hard to do, I don’t understand what many find so difficult. Just take your time and don’t rush into it.
I got the transceiver up and running quite quick. I didn’t install a speaker in the cabinet but decided to go for a transceiver where no speaker is in. If I want to use it on SOTA or GMA I don’t need the extra weight and can take earbuds with me. So I installed the speaker connector on the board.
I made connections towards the CW key and CMD push button with jumper cables which fit exactly on the headers Javier supplies, a little glue to keep them in place is also added afterward. For easy operation I mounted the CW key connector and CMD pushbutton on the front of the transceiver.
Do to be able to withstand high power nearby stations, I mounted the EGV+ in a homemade box which is made of printboard. The box should be a Faraday cage to keep all QRM out. If you buy a box, buy one in metal. I added a laminated front and back which make the transceiver look kinda cool. Now you can also buy a box from qrphamradiokits.
Alignment
The alignment is done on 40 meters: crank up the volume and start turning the 2 coils (L1 and L2)to maximum volume. Be careful to handle these with caution and don’t use metallic screwdrivers. Connect an antenna after you’ve done that and do the alignment of the coils again for maximum volume. Find a station on 40 and redo the alignment once more. You should already have good results now.
P1 Set sidetone level to your liking.
P2 Set the hangtime of the relay after you’ve been on air–fast fingers will need a quick release. Set this to your liking.
P3 Connect a power meter between a dummy load and the transceiver, set power on 40 to some 8 Watts. Measure on 30 and 20 meters, you should find some 6-7W there. Don’t set the power to full if you want a long life for the final in the transceiver. Mine is set for 6W on 20, resulting in some 7.5W on 30 and some 8.4W on 40. I think I will reduce even more.
P4 Set to max, it is the RX-attenuator.
P5 Don’t pay too much attention to the signal meter, mine is set at 6/8 of the potmeter’s range. It is only an indication. If you don’t want the S-meter then you can do a start-up sequence with the tuning knob.
These are in fact the alignments you need to do inside the transceiver. You should also check Xtal calibration and BFO, these are settings which you need to do in the set-up. Don’t forget to write all down when you have maximised these settings. If you do a reset, all these values are erased too so be carefull.
The complete CW 3 bander
Well, you get a 3 band transceiver which you build yourself, it has RIT and XIT, has 4 memories on the KB-2 keyer, speed of CW can be set between 0 and 50WPM and you can set the KB-2 as a beacon which can be handy too. The EGV+ provides you with 3 bands which are almost for certain insurance for QSOs when going on SOTA, GMA or POTA.
You may have noticed some resemblance with the DB4020. You are right as some parts are the same on the board. The designer worked on the same platform to make two completely different transceivers. The result is twice the fun for kit builders.
I made a box myself since, at the time of ordering, there were no boxes available, here’s the result.
The naked printboard transceiver.
After adding a laminated front to the trx, it looks now like this. You can see it is not made professionally but I like it.
The paper which is between the plastic was first cut out for the display before placing it in the plastics so giving an extra protection to the display.
I have also made a retractable stand for it, when folded back it is next to the bottom of the transceiver, when folded out the stand is under the front of the transceiver, the retractable stand is also made out of printboard.
It’s an easy-to-make stand–take some old printboard and solder it together. The pictures explain it all, I think.
Meanwhile, I already made a lot of QSOs with this small (16 X 20 X 6 cm) QRP transceiver. The power out is better than expected and even reduced so all bands are within QRP regulations.
Finally, I’d like to say that I’m not sponsored to make this kit, I don’t have any ties with the kit producer, nor do I gain money with building it. If people would like to have this QRP kit built for them I’m willing to help out in populating the board and aligning it. A ready made box is available with qrphamradiokits. This also stands for the DB4020 which I made earlier.
The kit comes for 125€ without shipping costs. Many European countries will have no shipping costs at all. The enclosure comes for 50€ all included. This means you have a complete 3 band radio for about 200€. In my eyes, this is a pretty good deal.
QRP radios, product announcements, reviews, news and more. Low power amateur radio fun!
Please support QRPer by adding us to your whitelist in your ad blocker. Ads are what helps us stay online. All of our ads are ham radio related--no junk, we promise! Thank you!