I love this pack, Scott! I’ve never owned a proper waxed canvas bag, but I’ve heard so many good comments about them in terms of comfort and longevity. Like Red Oxx, the Filson brand is well known for quality products.
I like how you mounted your N0SA SOTA paddles to the clipboard so that they can be easily pivoted for transport.
I also like those POTA/QRP cheat sheets. I have those in my KX1 kit, but none of the others. I need to make some with QRP calling frequencies and the 60M channels (which I always forget in the field). Thank you for the tip!
Cutting an exercise mat to make a padded seat for the field is incredibly practical. That would also serve to pad the back of the pack and, as you point out, make sitting on wet ground much more comfortable!
KK4Z’s Discovery TX-500 Pack List
At my request, Scott very kindly provided links to the gear in his field kit:
Would you like to share a video or photo tour of your field pack? Please contact me. I absolutely love seeing how others pack out their kits as I always learn a trick or two myself!
On Friday, September 10, 2021, I made a detour to the Table Rock Fish Hatchery (K-8012) on my way back to the QTH.
I love this site: it’s fairly remote, has tall trees, loads of space to set up antennas, convenient picnic tables, incredibly friendly park rangers and, most importantly, a welcoming party.
Welcoming party
These two greet me each time I’m at Table Rock. They’re incredibly friendly and now that they know I’m a complete and total sucker for dogs, they hang around and get attention for quite a while.
Shortly after acquiring a lab599 Discovery TX-500 earlier this year, I did what I always do: invest an insane amount of time in researching and configuring a dedicated field radio kit.
As I’ve mentioned numerous times, I’m a serious pack geek, so this is incredibly fun for me even though the choice is often difficult.
I like to buy packs and cases from manufacturers in the US and Canada when possible, so started searching through all of the options.
Requirements
The Discovery TX-500
I wanted a pack that was compact, versatile, and offered proper padding (even knowing the TX-500 is a rugged little transceiver). I don’t handle my packs with kid gloves, so I expect them to cope with sometimes rough field conditions and still protect the gear inside. I also like a certain level of organization inside the pack.
I wanted the kit to be relatively compact, but large enough to hold the transceiver, all accessories and connections, logging pad and pencil, paddles, a proper arborist throw line, portable ATU, and a 3Ah LiFePo4 battery. A the end of the day, I wanted this TX-500 field kit to be fully self-contained.
In the end, I adopted a pack with which I’m already very familiar…
The Red Oxx Micro Manager
Product image via Red Oxx
Red Oxx is my favorite pack company and if you’ve been a reader for any length of time, you’ve obviously seen a number of their bags and packs in my field reports.
Back in 2016, when they introduced the first iteration of the Micro Manager EDC bag, they actually reached out to me–as an existing customer–knowing that I had been looking for a good radio pack with proper padding (many packs don’t require side padding and internal padding). They sent me a prototype of the Micro Manager for my feedback and then incorporated some of my suggestions.
I also purchased a Micro Manager for my wife who quickly turned hers into a mobile art studio!
She chose a red Micro Manager!Her field-ready art kit
Much like my buddy Steve (AC5F)–whose XYL creates some amazing water color art in the field–my wife (K4MOI) is also an artist and loves to paint/draw during park and summit activations. Her art kit is always at the ready and she’s traveled with it extensively over the past five years.
The Micro Manager is a pack carried over the shoulder, much like a messenger or laptop bag. Those times when my field activations require a lengthy hike, I’ve simply pulled all of the items out of the Micro Manager (since I do modular packing, this is super easy), else I’ve even been known to stick the entire Micro Manager pack into a backpack!
Over the years, Red Oxx has made iterative upgrades to the Micro Manager including a pleated front pocket, slip-in external pocket, and they started lining the internal pocket with a more flexible and thinner dense foam padding. The new padding not only fits the TX-500 better than the first Micro Manager version did, but I believe it will have enough dimension to accommodate the TX-500 battery pack when that’s available next year.
Inside the Micro Manager I also use a Tom Bihn Large Travel Tray to hold all of the TX-500 accessories: key, microphone, ATU, battery, and cables.
I own a number of these large travel trays and highly recommend them. I especially like the ballistic nylon versions for radio kits as they open and close so smoothly.
Video tour
I made a short video tour of the TX-500 Micro Manager kit before a recent activation at Table Rock:
I’ve used this pack for a number of field activations and couldn’t be more pleased. Looking back at the contents, it’s funny: the pack and almost every single item inside (save the notepad and pencil) are made in the USA while the radio is made in Russia! A bit of international harmony going on here!
If you have a field pack for the TX-500 (or any radio), I’d love to know more about it. Please consider commenting with details or even submitting a guest post with photos!
This morning, I finally remembered to do a firmware upgrade on the lab599 Discovery TX-500. I’ve been in the terrible habit of only remembering to do a firmware upgrade when I’m in the field. Much like remembering to repair your roof while it’s raining!
New TX-500 Firmware
Fortunately, Lab599 just published their 1.10.10 firmware release this weekend, so my TX-500 will sport all of the latest upgrades including (in this upgrade) corrected AGC, improved receiver parameters, and (from previous upgrades) SWR analysis tool and message memory beacon mode.
I’ve been so incredibly impressed with the Lab599 team’s dedication to continuously upgrading and improving this already phenomenal little radio. It’s such a pleasure to take to the field.
UK TX-500 availability
I also understand that lab599’s UK distributors, Nevada Radio and Waters & Stanton, will soon have their first batch of Discovery TX-500s (first part of October 2021, if I recall). Waters & Stanton (and possible Nevada) may even have a handful of units unallocated yet. It’s best to call them to check status and possibly reserve one.
Upcoming RadCom Review
Speaking of the UK, my full review of the Discovery TX-500 will appear in the November 2021 issue of RadCom.
Lab599 has just announced that firmware v1.10.04 has been published for the Discovery TX-500 and is available for download on their website.
New: Audio modes
The new firmware adds two switchable audio modes: 1W “Normal” mode and 3W “Outdoor” mode. Although I’ve always felt the audio gain on the TX-500 was excellent, this will give even more granular control of volume levels.
New: Antenna SWR Monitor
Lab599 has also added an SWR monitor and display. They describe it on Twitter:
“This new function will provide you a graph to determine characteristics of the antenna (SWR) in the range of the selected band.”
They shared the image above of the TX-500 display and have already added this along with details in their downloadable user manual.
The Yaesu FT-817/818 (left) and lab599 Discovery TX-500 (right)
A reader asked this morning:
“[W]hat’s the toughest HF QRP transceiver on the market? I want a rig with good field performance and features, but I what I really want is something rugged…something that might survive falling off a rock or log while I’m doing a little SOTA.”
It was a no-brainer to me: either the lab599 Discovery TX-500 or Yaesu FT-818/817.
I feel lucky in that I’ve acquired a number of excellent QRP transceivers over the years. Most of my field-worthy radios are acceptably rugged, but the TX-500 and the FT-818/817 really stand out.
The Discovery TX-500
The Discovery TX-500 was designed from the ground up to be a rugged, weather-resistant portable radio that could operate in challenging environments (think the extremes of Russia where it’s manufactured).
If I’m heading outdoors and it could rain or snow? I’ll be grabbing the TX-500 for sure. It’s a brilliant portable radio
Yaesu FT-818 or FT-817
My Yaesu FT-817ND paired with the Elecraft T1 ATU
While the Yaesu FT-818/817 has no serious weather-proofing, it does have an incredible study chassis like the TX-500 and was obviously designed for outdoor use. Both of my FT-817NDs have side rails and with those in place, I really feel like it would easily survive falling off a rock or log. In addition, I’ve heard stories of the FT-817 surviving some hard falls–that goes a long way for me. No doubt, it’s a study little rig!
The X5105: A close runner up?
I’ll admit that the Xiegu X5105 feels like a very study radio as well. The chassis is made of an aluminum alloy and feels rigid. Mine has a polycarbonate screen protector. I also like the fact that its buttons and the main encoder are all low-profile. It’s still pretty new to me, but it’s obvious Xiegu designed the X5105 to be rugged. If it fell off a rock during a SOTA activation, I wouldn’t worry too much.
Admittedly, I feel like the X5105 wouldn’t be terribly weather-resistant–the buttons are somewhat recessed and the button openings are quite large, likely allowing water intrusion. Of course, I haven’t cracked mine open yet (it’s still under warranty and is sealed), so I’m assuming there’s no effort to stop water intrusion internally.
Do you need a “rugged” transceiver?
That’s up to you.
One of my favorite portable transceivers is the Elecraft KX2. I’ve taken it everywhere. I’ve dropped it, it’s rolled off my clipboard, I’ve got caught in the rain with it, and I’ve even slid and fallen on my backpack when it was stored inside. I wouldn’t classify the KX2 as a “rugged” transceiver, yet it’s survived all of this without even sporting side rails (like its bigger brother, the KX3).
You can add after-market side rails to the Elecraft KX3–and to most field radios–which will protect the encoder and front panel buttons/knobs.
At the end of the day, if you like to operate in extreme conditions, put ruggedness at the top of your priority list. Otherwise, simply protect your transceiver in transport with a good waterproof case or padded/waterproof pack. If you’re worried about rain or water, bring a rain jacket or portable fly/canopy to protect you and your rig during operation.
Did I miss something?
What radios do you consider to be some of the most rugged on the market? I’m certain I’m overlooking some. First hand experience would be most welcome! Please comment!
Of course, the benefit of camping at a state park is being able to play radio pretty much anytime while on the park grounds. For a few days, it’s like you’re living in a park activation and can actually set up an antenna and use it over the course of multiple days.
It’s such a big departure from my typically short (45-90 minute) park activations.
When we first arrived at the New River State Park campground, I deployed my PackTenna 9:1 UNUN random wire antenna.
I brought two transceivers with me: the Xeigu X5105 and the Discovery TX-500–I pretty much split my operating the time equally between the two radios.
New River State Park (K-2748)
Although I spent much more time on the air than I normally do, I didn’t make videos of each session. One reason is I wanted to operate with earphones–especially since some of my sessions were later in the evening or early in the morning. I didn’t want to disturb my neighbors at the campground.
That and, especially with the X5105, I wanted to see what it would be like to operate with earphones for extended sessions. Prior to making videos of my activations, I almost exclusively used earphones in the field. I appreciate the sound isolation earphones offer–I also find they help tremendously with weak signal work. When I make videos, however, I don’t want to go through the hassle of recording the line-out audio separately in order to use headphones, so I use an external speaker.
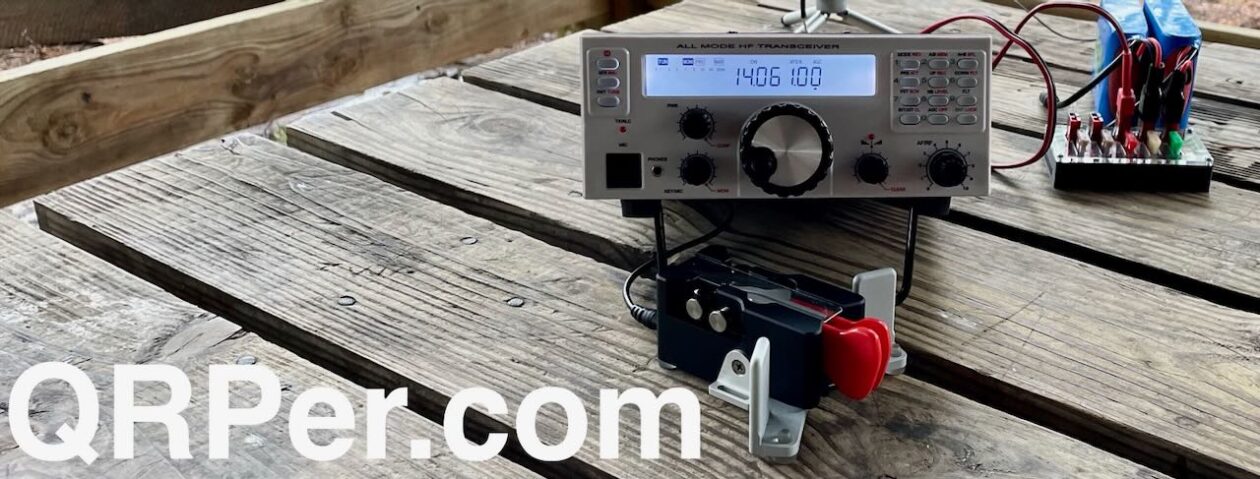
I decided to record my Wednesday, June 23, 2021 evening session with the Discovery TX-500.
This session started only a few minutes prior to the end of the UTC day which meant I had to watch the clock very carefully and clear my logs at the beginning of the UTC day (20:00 EDT).
In POTA and other field activities, if your activation straddles the UTC day change, you must keep in mind that any contacts made after 0:00 UTC can only be counted on the next day’s logs. This was not a problem for me because I had logged dozens of stations earlier in the day, but if you ever start an activation close to the UTC day change, you need to make sure you log your 10 contacts for a valid activation prior to 0:00 UTC.
Auto-spotting help
Another thing complicating my sessions at New River State Park was that I chose not to schedule my activation via the POTA website prior to our trip.
If you schedule your activation via the POTA website, anytime the Reverse Beacon Network picks up your CQ calls (in CW), the POTA spots website will scrape that information and auto-spot you. It’s an amazing convenience for those of us who operate CW.
I chose not to schedule my activation days at New River because I had also planned to operate at another nearby park during my stay and I didn’t want the system to spot me incorrectly. That, and I thought I would have mobile phone coverage to self-spot.
It turned out that–contrary to my mobile phone company’s coverage maps–I had no internet service at the park. None.
In order to get spotted, I relied on my Garmin InReach GPS/satellite device to send short text messages to my buddies Mike (K8RAT) and Eric (WD8RIF). My pre-formatted message would prompt them to check the RBN for my frequency, then spot me to the POTA site manually.
I’m incredibly grateful to have had them helping me in the background. Everyone should have a Mike and Eric as friends!
Video
I made a real-time, real-life, no-edit video of the entire activation. Note that it took a while to get spotted, so the first ten minutes are simply me talking (it’s alright to skip that bit…it won’t hurt my feelings!).
Also, here’s a QSO map of that day’s contacts. Note that this includes stations I logged later in the UTC day (i.e. the following morning/day.
Due to some unexpected conflicts, our camping trip was shorter than we would have liked. We plan to visit New River later this year and spend much more time there. It’s a beautiful park!
Thanks for reading this short field report and here’s hoping you get a chance to play radio in the field soon!
That’s what my grandpa used to say and he was right. It was certainly the theme on Tuesday, June 15, 2021, when I decided to activate Crowders Mountain (W4C/WP-011).
If memory serves, it was about 80F/27C that day–pretty reasonable for late spring in the Piedmont of North Carolina. But the humidity was quite high. I’m no meteorologist, but I’m guessing it was 7,400%. (That number may be a bit of an exaggeration.)
Still, I was eager to fit in a decent hike and I knew Crowders would be fun and easy in the sense that I wouldn’t need to carry a map or do bushwhacking to get to the summit. In fact, Crowders Mountain is possibly one of the busiest parks I ever visit; being so close to Shelby, Gastonia, and Charlotte, it can get crowded especially on weekends.
The amazing thing about Crowders Mountain State Park, to the amateur radio operator, is that it contains not one but two SOTA summits! And, of course, the park can be activated during the SOTA activation. Earlier this year, I activated The Pinnacle–it was amazing fun–and now I was ready to activate Crowders Mountain as well.
I arrived at the park visitor’s center around 11:30 AM local time and hit the trail.
I opted to take the longer trail to the summit which is about 6 miles round trip. There’s a shorter path to the summit via the Linwood Access, but I wanted a bit more trail time despite the humidity.
The hike was amazing and the trail very, very well-worn and marked.
The hike was overall what I would call moderate and very gentle. In fact, at about 2/3 into the trail, I was curious when I’d truly start gaining a bit of elevation. Turns out: all near the very end!
The final portion of the hike was pretty steep–mostly steps up to the summit. The humidity was thick enough, I took my time going up the steps.
In the end, you will put in a bit of effort to bag this one point SOTA summit if it’s hot and humid.
Crowders Mountain (W4C/WP-011)
Having been on the summit of The Pinnacle earlier this year, there was no mistaking the summit of Crowders Mountain, since it, too, has ominous warning signs!
I’m sure the sign is in response to people acting foolishly. Crowders Mountain is not a treacherous place, but like many summits, there’re ample opportunities to fall to your death, I reckon.
I’ve heard that even the summits of Crowders Mountain can get quite busy–this is why I chose a Tuesday to do the activation. Even then, I’m guessing there were anywhere from 8-12 other hikers on the summit with me at various times during the activation that day.
I was banking on the fact that Crowders Mountain had trees, so I only packed my short PackTenna random wire–no self-supporting vertical of any sort.
After a quick site search, I found an ideal spot to play radio just beneath the radio/TV towers on the summit.
Deploying the PackTenna was incredibly easy with my arborist throw line. I meant to make a video showing the antenna deployment, but was distracted by some curious hikers who asked a load of questions as I launched the line. Somehow, I managed to snag the perfect tree branch despite an audience and a mild case of performance anxiety!
Next, I set up the Discovery TX-500 transceiver and paired it with my Elecraft T1 ATU since random wire antennas require matching and the TX-500 has no internal ATU.
I’ll admit here that each time I use the Elecraft T1 it reinforces why I like this ATU so much: it’s incredibly compact, runs for ages on a 9V cell, pairs with all of my transceivers, and it has a very wide matching range (although, in this case, the 9:1 UNUN doesn’t need a wide range ATU). The T1 gets the job done each and every time.
As with many of my activations, I made a real-time, real-life video and didn’t edit out a thing. If I had any self-respect, I would have edited out all of my keying errors that day, because I made numerous ones. (For the record, I blame the humidity!)
Joking aside, I’m not ashamed of my keying mistakes. We all make them. No one is a perfect CW operator and, trust me, the op at the other end can sympathize. If I let my sloppy fist sessions prevent me from operating, I’d never get on the air.
On The Air
I hopped on the 20 meter band in CW and wow! I made 30 contacts in 39 minutes.
Since I had cell phone service, I also decided to spot myself to the SOTA network and do a little SSB on the 17 meter band. I made four contacts in four minutes.
Of course, this was not only a summit activation, but also a park activation (K-2726), so logs were submitted to both programs.
Here’s a QSO Map of my contacts (click to enlarge):
In truth, I would have liked to hang around on the summit a bit longer and work more stations, but I needed to start my hike back to the car. I had a number of errands in the afternoon and also needed to be back in time for a live stream interview with Red Summit RF (click here to watch the archive of that show).
As I was packing up my radio gear, two young women stopped by and one asked, “Was that Morse Code we wear hearing earlier?” I confirmed this and she looked at her friend and said, “Yes, I knew it was!” I asked them if it was the first time they’d heard Morse Code “in the wild,” and they both nodded their heads. They then asked a load of questions that I was happy to answer.
Meeting Max
One of our readers, Max (W4GZ), had asked that I contact him next time I activated Crowders Mountain State Park as it’s not too far from his QTH. I sent him a message earlier in the day and when I got back to the car, I found Max set up with his IC-705 and vertical antenna next to my parking spot.
Max had just started his own park activation.
It was great meeting you, Max!
Photos
Of course, I snapped a few photos on the summit and the trail, so here they are in no particular order:
Thank you reading this field report! I hope you have an opportunity to play a little radio in the great outdoors this week!
Lab599 have informed me that Nevada Radio will be the exclusive distributor of the TX-500 in the UK.
In addition, Waters and Stanton will be a TX-500 dealer and distrubutor.
The price will be £899 and both retailers are taking deposits (Nevada a £83.33 deposit, Waters and Stanton a £100 deposit) for the first delivery due in September 2021.
Connecting an international community through low-power field radio adventures.
Please support QRPer by adding us to your whitelist in your ad blocker. Ads are what helps us stay online. All of our ads are ham radio related--no junk, we promise! Thank you!