As I have mentioned in my two previous posts, I have visited my family on the other side of Germany. On the way back, I wanted to make a “tiny detour” and activate a summit in the Czech Republic. I like all kinds of numbers and statistics, and that includes my SOTA stats. My goal is not being number one or be in the top region somewhere, but seeing it progressing and developing satisfies me. Until July last year, the upper right pie chart was only light blue, i.e. I had only activated summits in region DM, Germany – Low Mountains. So I use every chance to push the light blue back.
sotl.as
After some concessions, my family agreed and the way back increased from 6 hours and 583 km / 362 mi to 8:30 hours and 732 km / 455 mi.
Route on Google Maps
On the drive to visit my family, I noticed that I forgot my wallet, so I had neither an ID card nor my driving license. In many regions of the world, it would be probably very difficult to cross an international border two times without papers. However, many countries in Europe have signed the so-called Schengen-Treaty, which led to the creation of Europe’s Schengen Area.
Camoka4, CC BY-SA 3.0, via Wikimedia Commons
The Schengen Area consists of 27 European countries with a population of over 400 million, who have abolished border checks. However, random inspections still happen. The worst case would be a control in the Czech Republic and the official requirement to go to the German embassy in Prague for new papers.
As expected, the border crossing was easy and it could easily been overseen.
If you missed that sign in the photo, you only note that the town names have changed to Czech, as Czech names are quite different. After the border crossing, the summit is just minutes away, and you can drive up to the very top – pretty convenient for a 10+3 points summit.
Derived from User:Rdc, Public domain, via Wikimedia Commons
The summit Klínovec (OK/KA-001), also known as Keilberg, is the highest mountain in the Ore Mountains, located on the border between the Czech Republic and Germany. With a peak reaching 1,244 me / 4,081 ft above sea level, Klínovec has been a popular destination for outdoor enthusiasts and tourists, and is the most important winter sports area in the region. The mountain has a rich history that includes mining activities for silver, lead, and tin in the dating back to 2500 BC, and it has evolved into a popular skiing and hiking destination in recent years, attracting visitors from both countries. According to reports, the peak has attracted people for hundreds of years, with the earliest observation tower erected in 1817. Continue reading SOTA in the Czech Republic – When everything goes wrong→
Many thanks to Scott (KK4Z) who shares the following post from his blog KK4Z.com:
Necessity is the mother of invention
by Scott (KK4Z)
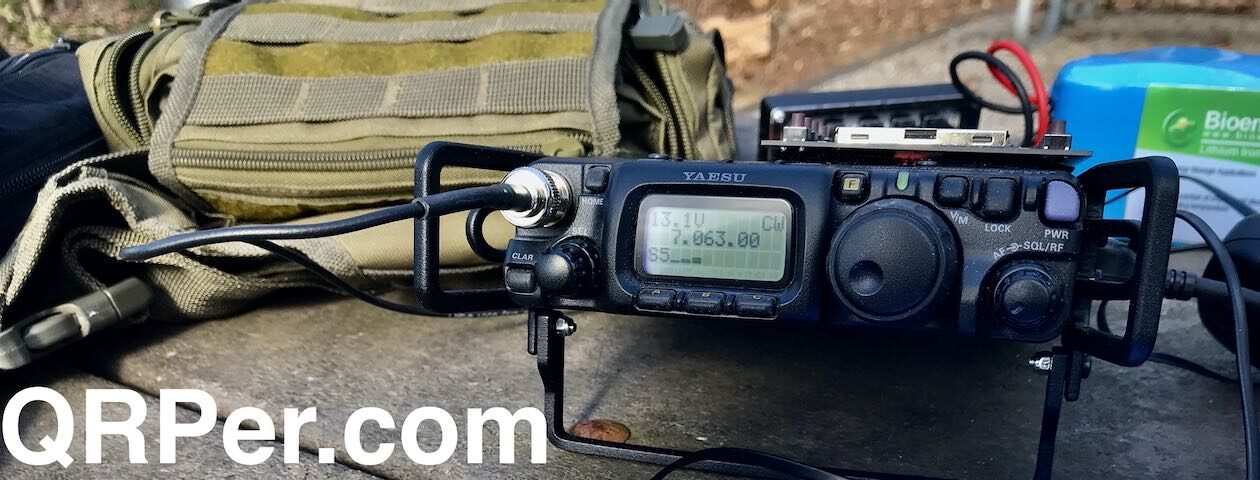
Plato’s Republic he said that *our need will be the real creator* or the proverb as we know it today *necessity is the mother of invention*. Recently, my friend Thomas K4SWL acquired a Yaesu FT-891. During his YouTube video, he expounded on how much fun he had with it. It did indeed look like fun. During this time I was pondering about doing more day activations instead of overnights. With the cost of everything still climbing, the need to conserve becomes apparent. I thought an FT-891 might really be a great radio for these day activations. Then reality set in.
I already have a number of projects I am working on and misc things like maybe having to replace my old 33′ push-up pole, it was not in the stars nor was there a twinkle in my wife’s eye when I mentioned it. In reality, the IC-7300 is a great radio and does everything I need to do especially in the field. I don’t need another radio, I have three 100 watt radios and three QRP radios. I still wanted an easy setup for these one-day activations. I want to drive to a park, set up in a few minutes, operate, tear-down in a couple of minutes, and head for home or another park. I also wanted to make my day activations park ranger friendly. To me, that means trying to be inconspicuous.
I have two projects planned. The first is a desk for my truck. I am making a desk to sit over the center console and front passenger seat big enough to hold my IC-7300, a laptop and a CW paddle. My plan is to secure the desk to the truck and the radio to the desk. I also wanted to make this as cheaply as possible. I used stuff I had on the property such as a half sheet of plywood and some construction lumber. The only things I had to buy were some screws and eye-bolts, about 14 dollars worth.
The plywood was cut to 24 x 38.5 inches. The length covers the center console and front seat while still allowing me to get to the heat/AC controls. I gave the corners a generous radius and I broke the edges with a router. On the underside, I used a 2 x 12 to make a spacer for the center console where the cup holder is and a leg for the other side over the passenger seat. The spacer is glued and screwed to the desktop but the leg is not attached. This is to make it easier to store. I made a socket for the leg using 2 x 2’s. It’s probably easier to look at a picture than me to try to explain. I added eye rings to the rear of the desk and use a bungee cord to secure the desk to the passenger seat. The only other thing I did, sprayed the top with polyurethane. Note. I am not a carpenter or cabinet maker. I use rough hand tools to get the job done and I am often making do with what’s on hand or what’s the cheapest way to do it.
The day after my activation of Park Babelsberg, I wanted to activate a second new POTA park. The new Park Sacrow is a picturesque park located on the River Havel in Potsdam, about which I have written a brief summary in the QRPer activation report for Park Babelsberg.
One of the prominent landmarks in the Park Sacrow is the Heilandskirche, also known as the Church of the Redeemer.
This neo-Romanesque church, completed in 1844, is a striking sight with its red brick façade, white stone accents, and tall tower. The Heilandskirche is overlooking the Havel River and offers panoramic views of the surrounding park and river.
During the time of the Berlin Wall, the Heilandskirche in Sacrow was located near the border between East and West Germany. The church was in the “No Man’s Land”, i.e. behind all East German border barricades – see photo from 1972 below with the Berlin Wall – preventing anyone from visiting.
Ulamm, CC BY 3.0, via Wikimedia Commons
After the years of decay, when the bad condition became too obvious from the West Berlin side, citizens of West Berlin tried to stop the further decay. After long negotiations between church authorities and the government of East Germany, the exterior of the church building was restored in 1984/85. Today, the church looks as beautiful inside as it looks outside.
With the border between East and West at the middle of the river, the whole area was a kind of border protection zone, only available to locals or those with a special permit.
The park is close to the Glienicker Bridge, also known as the “Bridge of Spies” from Steven Spielberg’s blockbuster, on the opposite of my position the day before.
Arne Krueger, CC BY-SA 2.0, via Wikimedia Commons
As mentioned in my previous report, I have grown up less than a mile away from this famous bridge, in Potsdam, i.e. Soviet controlled part of Germany.
In my opinion, Steven Spielberg told the wrong story. There is another, more interesting story related to this bridge. It is the story of the Military liaison missions. A few British, US and French army members were allowed to roam freely in the Soviet controlled part of Germany and, vice versa, a few Soviets in West-Germany. These members of the military liaison missions had immunity from all German authorities. Since East Germany was frontline to the western world, the Soviet army had their most advanced technology there and the mission members’ task was it to spy, for example with this US Military Liaison Mission vehicle – note the license plate.
US Army
The uniformed, but unarmed mission members drove military-green cars with a special license plates – here a British mission car on display in a museum. For me as a child, those cars looked like from another planet.
Von allen watkin from London, UK – flickr, CC BY-SA 2.0, via Wiki Commons
The Glienicker Bridge border crossing wasn’t open for public, but only for those mission members and diplomats. The French and British mission houses were close to this bridge in the Soviet controlled part, the one for the US was some miles away.
French Mission House today:
British Mission House today:
Just imagine these two buildings with a huge British and French flag on top, in proximity to Soviet military installations behind the Iron Curtain.
It did not always go as smoothly as it could. The image below shows the Soviets handing over the corpse of Major Arthur D. Nicholson to the US authorities on the Glienicker Bridge. Nicholson was shot down in 1985 by a Soviet sentry at a Soviet army base in East Germany.
Alliiertenmuseum /Allied Museum Berlin / USMLM
In 1984, Philippe Mariotti, a member of the French Mission Militaire Francaise de Liaison died after the East German Secret Service has set up a trap and rammed Mariotti’s car with an army truck.
The British BBC aired an interesting documentary about the British mission The British Commanders’-in-Chief Mission to the Soviet Forces in Germany (BRIXMIS) called “The Brixmis story”. If you find the topic interesting, there is a lot of stuff on YouTube when searching for Brixmis or USMLM.
Many thanks to Dave (KN4OK) who shares the following mini POTA field report:
POTA Activation K-3620 Florida Keys Overseas Heritage Trail State Park.
By Dave (KN4OK)
On April 8th, 2023, on our way to the Overseas trail near the 7 mile bridge, is a great place to activate with a picnic table and shade on the water.
I was smart enough to mention to the wife that we were going to activate a park and she was carrying my Elecraft KX2. Of course, in my hand was the antenna, the MFJ-1889T, and counterpoise wires that I borrowed from my WRC antenna.
After a mile hike on the trail, we stopped at the picnic table and I set the station up on 17 meters CW. The SWR was pretty good and I made 9 contacts with no problem. I then switched the radio and antenna to 20 meters and obtained a better SWR.
One thing that I noticed: extending the counter poise wire (33ft) all the way out for both bands helped a great deal. The jumper holes on the antenna were also changeable and helped as well. MFJ has a nice manual for band setups, but be sure to adjust for best SWR. Very easy to do and works great.
The 20 meter band was also a big success and I was very pleased with the performance of the MFJ 1899T antenna. Thanks for all the previous discussion of the similar antennas that inspired me to take out my antenna.
The end result was 19 contacts, all CW in about 45 minutes on a beautiful day!
The holidays seasons like Christmas or Easter provide an opportunity to return to the family. So I drove across Germany to Potsdam, where I have grown up, during the extended Easter weekend.
Potsdam is a historic city located in the state of Brandenburg, Germany, next to the capital Berlin. It has a rich history dating back to medieval times, when it was founded as a settlement on the banks of the Havel River. In the 18th century, Potsdam became the residence of the Prussian royal family and was transformed into a center of arts, architecture, and culture. The famous Sanssouci Palace, built by Frederick the Great, is one of the many palaces and gardens that reflect the city’s royal heritage.
piotr iłowiecki from POLAND, CC BY-SA 2.0, via Wikimedia Commons
Close to the Sanssouci Palace, the Neue Palais, a grand palace, is located. It is a magnificent example of Baroque architecture, with its grand façade, opulent interiors, and beautiful gardens, and it was used as a guest residence for the Prussian royal family. Later William II, German Emperor and King of Prussia, made it to its main seat.
Steffenheilfort, CC BY-SA 3.0, via Wikimedia Commons
Potsdam was also a significant location during World War II. During the last days of the war, the 12th German Army tried to break through the Soviet blockade around Berlin, which caused fierce fighting close to the city.
Less than a month before Germany’s final surrender, 1700 tones of bombs were dropped causing destruction of a large part of the city center. Still a lot of dangerous stuff from those times is found during construction works until today.
The city also served as the site of the Potsdam Conference in 1945, where leaders of the Allied powers met to discuss the future of post-war Europe – here with Winston Churchill, Harry S. Truman and Josef Stalin during July 1945.
U.S. National Archives and Records Administration
Before I started the trip, I checked which ham radio programs offer outdoor activations in the region. The whole area is more or less flat, so not SOTA summit within a radius of a one-hour drive. Also, no POTA park existed, so I thought suggesting two would be good, for me and POTA :).
One new park later accepted by POTA was the Babelsberg Park with its Babelsberg Palace. The palace was the summer residence of Prince William, later German Emperor William I and King of Prussia, and his wife.
Raimond Spekking & Superbass, CC BY-SA 4.0, via Wikimedia Commons
From the park, you have a good view to the Glienicke Bridge, probably better known from Steven Spielberg’s movie “Bridge of Spies”.
The Bridge of Spies connects Berlin (formerly West-Berlin part) with Potsdam, (formerly East Germany), hence formerly the Soviet and Western (US, UK & France) controlled parts of Germany. The bridge was used as an exchange for spies between Western and Eastern powers. Probably most prominent was the CIA pilot Gary Powers, who was shot down over the Soviet Union with a U-2 spy plane in 1960. Below is an image of the beginning of another spy exchange in 1986.
(As is Vince’s usual, this article is full of educational and fun links – click on as many as you wish)
Picture this .. you are getting a bit twitchy due to lack of POTA activation and you have run out of Potaxxia. Further, You publicly stated a New Year’s eve goal to make at least 200 POTA CW activation contacts per month for 2023 (there may have been beer involved), and now you must stay accountable to your goal and you are currently behind plan. It’s too early in the season to be lawn mowing while listening to podcasts such as QSO Today, Ham Radio Workbench, ICQ Podcast, AP/DZ or Soldersmoke. Thus, chasing contacts is [always] a good use of your time.
Lastly, if you are like me, the the solar indices are still an art form being learned and the numbers for today aren’t all in the green zone.
One of many charts that help decode the magic behind propagation values – click through for source webpage
So you begin to wonder just how much effort it’s worth to load up your gear and try to activate. You think to yourself that there won’t be much action on bands other than 20m which has been noisy lately, so why bother as it’s at least a 45 minute trip to the nearest POTA entity.
With this background, on Saturday I placed myself in the city at the nearest-to-home spot I could park in the south part of Calgary adjacent to VE-5082, the Trans-Canada Trail. I was trying to make the best of what I perceived to be a rough conditions day and had no real plan except a convenient location requiring minimal effort for a minimal return. My expectations were, sadly, met in this regard.
The author in a suburban and *very* RF noisy place that he won’t return to.
I was at the edge of suburbia with large homes on my left overlooking the ravine and pathway on my right. To say it was RF noisy would be a colossal understatement. I made 18 painful contacts in an hour and I’m sure people called me but I didn’t hear them given the S7 noise floor on 20m. At least I made one DX contact to Denmark along the way. Overall feeling frustrated, I went back home.
Sunday morning rolls around and again I wonder “is it worth it”?
Many thanks to Brain (K3ES) who shares the following guest post:
The Visitor Center at Kinzua Bridge State Park (K-1366) is well worth a visit. It provides an excellent overview of the history, use, and collapse of the railroad bridge that gave the park its name, and it provides an excellent view of the pedestrian skyway built on the portion of the bridge that remained standing after the tornado that caused the collapse.
Reflections on Activating a Not-so-New Park
by Brian (K3ES)
Monday, April 3 was one of those beautiful, warmish (60ºF or 16ºC) sunny days in northwest Pennsylvania that remind us that spring is really here. Only a week earlier, we had an unexpected snow fall that covered the ground (and it will likely not be our last snow of the season). So my wife, her father, and the dogs all looked forward to getting out of the house to enjoy the weather. We packed for a picnic, and drove through bright sunshine to Kinzua Bridge State Park.
After a picnic lunch, and while Becky and her dad explored the visitor center and walked the dogs, I set up for a Parks on the Air (POTA) activation of K-1366. This would be my first activation of the park, but not my first visit. I have been there several times before, including an excursion trip behind a steam engine that took me across the railroad bridge over Kinzua Creek and back.
A view from the visitor center of the pedestrian skyway. It was constructed on the structure that remained after the bridge was struck by a tornado in 2003, causing its partial collapse.
An Historic Park
Kinzua Bridge State Park has an interesting history. The railroad bridge that gives the park its name was originally built of wrought iron in 1882. At the time it was built, the 301 ft (92m) high and 2052 ft (625m) long railroad bridge was the highest in the world. It was rebuilt in place in 1900, replacing iron with steel, to strengthen it for the heavier trains that needed to cross. The bridge remained in commercial service until 1952, and was later sold to the Commonwealth of Pennsylvania for a State Park. The bridge continued to support excursion trains and pedestrian traffic until 2002, but was struck by a tornado in 2003, causing its partial collapse. Today, the remaining part of the bridge has been rebuilt as a pedestrian skyway, complete with a glass floor at its end to look down at the valley far below.
The visitor center provides an excellent multimedia overview of the economics, technology, and history of the structure. It is well worth a visit. Similarly, the skyway gives a spectacular view of the structure, the collapsed towers, and the surrounding Pennsylvania forest. The park has picnic facilities and hiking trails, and a trailhead for the rail trail that has repurposed the old railroad right-of-way.
This is a view of the picnic pavilion from my operating position. The picnic area also has a number of other open picnic tables and a playground area for the younger crowd.
The Setup for Activation
I stopped into the visitor center to let the staff know of my intention to activate. I found them to be friendly and accommodating, which always makes activating a pleasure. I do my best to be a good ambassador for amateur radio and the POTA program.
For activating, I set up at a remote picnic table. Three tosses got the throw line over a good branch to support my Tufteln 9:1 random wire antenna. A 15 ft RG-316 cable connected the antenna to my Elecraft KX2. Completing the station were a 3 Ah LiFePO4 battery, a set of generic earbuds, and VK3IL pressure paddles. I used a clipboard to keep my notepad from blowing around in the breeze, while I logged with a mechanical pencil.
The picnic table operating station used to activate K-1366. Included are the KX2, VK3IL pressure paddles, clipboard and log.
The Activation
As I finished getting the station ready to go, it occurred to me that I had a frequency-agile-antenna and rig, a bit more than an hour to operate, and no other operators in the area. So, I took the opportunity to try for contacts on as many bands as possible, inching my way toward the POTA N1CC Activator award for making contacts on 10 bands from 10 parks. The park has good cell coverage, so I was able to use my phone to spot myself. After that, I mostly left things to the Reverse Beacon Network and the POTA spotting gateway, but I was able to use the phone to confirm that my changes in frequency were picked up.
In 70 minutes of CW operation at 5 watts, I made total of 26 contacts, including at least one contact each on the 10, 12, 15, 17, 20, 30, and 40m bands. An apology to the hunters may be in order, because I was harder-than-usual to contact. After making a contact on each band, I would QSY to the next at the first significant lull in the action. I look forward to another trip back to K-1366 to try for contacts on the 3 additional bands needed to complete its activation toward my N1CC.
As you might guess, by using multiple bands, the contacts came from both far and near: as far as Spain to the east and Oregon to the west, and as near as New York, Pennsylvania, Ohio, and Michigan. Middling distances were also well represented in the log.
It was a good day in the park, and here is the contact map from a 7-band activation of K-1366.
Equipment
Note: Amazon links are affiliate links that support QRPer.com.
This outing made for a fun and productive afternoon that was all the more enjoyable for sharing it with my family.
It also made for a great opportunity to shake off the winter blahs, and it held the promise of beautiful spring and summer days for more park activations.
Best 73 de Brian – K3ES
Here is a bonus picture of another semi-famous bridge in northwestern Pennsylvania (it actually has its own Facebook page). This is Nebraska Bridge, which provides a convenient shortcut across Tionesta Creek. We knew we would have to take the long way around, but stopped for a look anyway. Unfortunately the bridge floods several times a year (sometimes becoming completely submerged), because it is located in the upstream end of the reservoir behind the Army Corps of Engineers’ Tionesta Creek Dam. We had over an inch of rain last week, so the bridge is partially under water. On the brighter side, 100 miles downstream, the City of Pittsburgh did not flood.
You may, or may not, know the situation when you are invited for the birthday of your mother-in-law and the whole day is just a chain of meals. As the SOTA activation of the Wasserberg the day before was rather short, I needed to escape and do something outdoors. An antenna test at a nice POTA location would be perfect.
When I started with amateur radio, many fellow hams told me that a real ham must build its own stuff. This is not easy when you have 10 thumbs like me. However, from time to time I try smaller projects. When I am operating portable, I usually have a 10 m / 33 ft mast with me. I have a 30/15-meter- and 12/17-meter band antenna, both with coils and shorter than my mast, and a homemade 10-meter band antenna which I can raise vertically on my mast. A mast with one of these wire antennas can be used on most of the locations I have visited.
However, I was missing something for the 20-meter band. I have a 10 – 80-meter 5 band antenna that covers 20-meters, but raising it as a sloper with a length of app. 24 m / 79 ft is tricky sometimes.
Building
So, I thought it would be a good project for me. As a half-wave for 20-meters is exactly the length of my mast, and I did not want the feed point at or too close to the ground, I wanted to add a short coil. I had a finished 1:49 mini-impedance transformer from K6ARK available from a project I’ve never finished. So, I just needed a screw, a cable and a piece of a PVC electrical conduit.
I have cut the PVC electrical conduit in three parts, one for the coil, one for the upper-end to allow easier mounting at the mast, and one for a simple strain-relief. My wife was a bit nervous when I used her best knife for cutting it, not sure if she worried about me or her knife. The dimension of the coil is based on pure guess. Bringing the whole antenna then into resonance was easy – just cutting step by step. After completing, the antenna still looks a bit makeshift.
Testing
So, I used an opportunity between two meals to leave my mother-in-law’s birthday and drove to the next POTA park, which is the Kaltes Feld (DA-0410). However, this time I did not go to the SOTA southern activation zone for Kaltes Feld (DM/BW-659), but to the opposite direction, where I have not been before.
The weather was nice, and the way was without any ascent. Behind me, a bit higher, was the SOTA summit Kaltes Feld and on the right the SOTA summit Bernhardus (DM/BW-848).
Many thanks to Scott (KK4Z) who shares the following post from his blog KK4Z.com:
Georgia Parks on the Air at FD Roosevelt SP K-2173
Friday evening, Mary K4SEZ and I traveled to FD Roosevelt State Park for a weekend in a very nice cabin. The cabin is located on Pine Mountain with some exceptional views. As you can guess, I brought some radios with me. I went QRV right before 1800 hrs. local to make sure all my equipment worked prior to the contest. Besides, the contest I had a regional HF net that I needed to check into Saturday morning. The contest starts at 0800 hrs local Saturday and the net was also at 0800 and lasted about 20 minutes.
Friday night was amazing! Twenty and forty meters was wide open. Using FT8, I made 223 contacts between 1800 hrs Friday and 0300 hrs Saturday morning. I worked stations as far west as Japan and Australia and as far east as Rwanda, Ukraine, and European Russia. Unfortunately, the rest of the weekend was not near as exciting. Between 0800 hrs Saturday morning and 1230 hrs Sunday, I made an additional 477 contacts. The bands were up and down and the pace was a little slower. I worked 48 States and 34 countries when it was all said and done. Sunday morning had an opening on 10 meters and I made 19 contacts many into Europe. In total, I had 700 contacts.
My antenna was my tried and true homebrew 28.5-foot random wire antenna which I named my K4SWL antenna as the original idea from Tom. It uses one 17-foot counterpoise. On this trip, the wire I used was 14 ga (I think), coated Flexweave I got from The Wireman many years ago. I was using some 20-something gauge I got from SOTABeams but because I use this antenna a lot, I worried about the thin wire breaking. I use a 9:1 UnUn with a 1:1 current BalUn to help with matching. The antenna is matched by an LDG RT/RC 100 matching unit. This is fairly new to and so far I like it. The tuning circuit out by the antenna helps keep stray RF out of the shack. It was also quite windy here Friday night and Saturday. The antenna held up well. The only issues I had were some of the sections on my MFJ push-up pole would collapse affecting the tuning. This pole is probably nearly 20 years old and should be replaced.
The radio was “The Rock” my IC-7300. I ran FT8 the whole time at 35-45 watts and the temperature gauge on the radio never moved past cool. Now that the FTDX10 has found a home in the shack, it’s nice to have my old friend back in the field with me.
The cabin is located on the ridge line of Pine Mountain, elevation ~1250′ ASL. Besides great views, it also gave my antenna a large aperture which may account for the many DX contacts I made.
I mainly worked FT8 as I also had to listen to a couple of conferences on the Internet and didn’t want to disturb my wife when she was doing things other than radio. We had a nice weekend away and of course, being able to bring radios is a huge bonus. When I get back home and settled, I may send the log to the GA POTA people. I don’t really contest anymore but they might find it useful for cross-checking.
Nearly a week has passed since my last activation and the AWS–the Activation Withdrawal Symptoms–started to kick in. Furthermore, I received an antenna during the week which I wanted to try. However, the weather was unsettled, and showers were forecasted over the whole weekend. This did not prevent me to try at least an activation with the new antenna.
So, I started to the Wasserberg (DM/BW-664) on an early Saturday morning. The summit has a height of 750 m / 2460 ft and a wooded peak. The parking place is already elevated, so there was only 1.6 km / 1 mi left to walk with an ascent of 166 m / 540 ft.
The peak is wooded, but you can enjoy the view at the beginning of your hike, just after parking.
The trail is well-developed and easy to walk, except for the high incline at the beginning.
You come along something that looks like an old wall, but it is probably a place where stones have been taken from in earlier times.
The forest still looks like winter, and you can see the landscape through the trees
But if you look close enough, you see that the spring is not too far anymore.
Although the way to the peak diverts from the well-developed trail half way, I followed the way to visit the Wasserberghaus (it basically means “house on the water hill”, with “water hill” being the name of the hill).
Connecting an international community through low-power field radio adventures.
Please support QRPer by adding us to your whitelist in your ad blocker. Ads are what helps us stay online. All of our ads are ham radio related--no junk, we promise! Thank you!