All posts by Thomas Witherspoon

Scott Builds a clever Icom IC-705 Paddle Mount

Many thanks to Scott (KK4Z) who shares the following project from his blog KK4Z.com:

Paddle Mount for the IC-705

I kinda like the idea of being able to mount your paddle to your radio when operating portable. You can use the weight of the radio to help prevent the paddles from moving around and it frees your off hand for other tasks. We see examples of this with the Elecraft KX series of radios and there are some adapters for radios such as the Yaesu Ft-817/818.

I really like my IC-705. It is probably my best radio for POTA/potable operation. I think the only time I would leave it home is if weight became a problem or I needed to exercise one of my other radios. Recently, Begali came out with a mount to attach their Adventure paddle to the IC-705. It is a sweet set-up; however, the approx. $400 USD price tag got me looking for other alternatives. I have nothing against Begali, I own three of their paddles, and they are superb instruments. I think I wanted to tinker, and this gave me a good excuse.

For paddles, I have a set of Larry’s (N0SA) SOTA paddles. I love these paddles. When I go on an activation/Portable Operation, I bring these and my Begali Travelers. If I was going to do a SOTA activation, I would just bring Larry’s Paddles. Next was a trip to Tractor Supply Company (TSC) for a sheet of 16 ga. Steel. That set me back $16. I cut it to 3″ by 3 1/2″ using a cutoff wheel on my grinder.

I already have a stand I made out of 1″ x 1″ angle aluminum so I cut this to fit behind it.

The blue on the metal is Dykem Blue which is a layout fluid. In creating this project, I am only using hand tools. Power tools consisted of a grinder with a cut-off wheel. a hand drill, and my trusty Dremel tool. Here is a picture of me giving the mount a rough finish with a file. Continue reading Scott Builds a clever Icom IC-705 Paddle Mount
VY2SW: Woo hoo! I passed!

I mentioned in a previous post that I’ve been studying for my Canadian Basic license exam.

I’ve been working on this in my very limited spare time for a few weeks now, balancing study from the book above and HamStudy.org–both brilliant resources.

Now that I’m actually on Canadian soil, I scheduled an online exam with my friend, the amazing Vince (VE6LK).

Vince must be one of the busiest remote examiners in all of Canada. He’s professional and has the process down to a science which makes the whole experience very fluid and low stress. His website has a load of resources!

Although I’d been on the road most of the day yesterday and was a bit tired, I was ready to write the exam. I gave Vince my schedule and told him I would even be willing to schedule as early as 9:00PM last night or anytime this weekend.

The 9:00 time worked for Vince, so he sent me a Zoom link and I did a bit of last-minute study before meeting him online for the exam.

The Canadian Basic is a 100 question test, so it takes some time to get through it all.

I was absolutely chuffed to pass with 94% which meant passing Basic with Honours.

Vince started the online process which allowed me to create an account on the ISED website.

Getting a call

I’d been giving my callsign a little thought.

Since my mailing address is in Prince Edward Island, I knew the prefix would be VY2.

Every new call issued in Canada is essentially a vanity callsign and  you’re allowed to choose from available suffixes (and even purchase additional callsigns in the future).

PEI is one of the few provinces that also allows Basic licensees to claim a 2×3 or even a 2×2 call. If I were in Ontario, for example, I could only request a 2×3 as a Basic with Honors license.

This morning, with my first cup of coffee in hand, I finished setting up my ISED account and requested my callsign.

VY2SW

I decided that I wanted my Canadian call to reflect the suffix in my US call, so I requested VY2SW.

As soon as I hit the SUBMIT button on the ISED website, it confirmed that the call had been assigned to me. A couple hours later and I’m showing up in the callsign database.

The Canadian licensing system is incredibly efficient and effortless to use.

POTA and SOTA in Canada

Now that I’m VY2SW, I cannot use my US callsign as K4SWL/VE3 or K4SWL/VE2 while on the air.

I’ve already added VY2SW in the POTA system as my second callsign, so I believe it’ll compile all of my park activations under one account. I suppose there’s a way to do this in the SOTA system too.

Sometime within the next two days, I will be doing my first activation as VY2SW here–a park somewhere in the Ottawa region. I can’t wait and I certainly hope to work you!

Xiegu X6100: N2HTT’s 3D printed frame and side rails

A few weeks ago, Mike (N2HTT), reached out and asked if I could test his prototype Xiegu X6100 3D-printed frame/cage. Mike is the same fellow who sent my daughter (K4TLI) side rails for her LnR Precision LD-11.

When his package arrived, I was very pleased to find out that the frame fits around the X6100 chassis. There’s no need to replace any of the X6100’s chassis screws; the side rails snap snuggly on the sides of the radio and when the components are screwed together, it holds them tightly.

The build quality is excellent and the PLA2 material feels very strong. The package came with all hardware (click here to download the PDF assembly manual). It might have taken me 10 minutes to assemble it.

I think it’s brilliant.

As with many rig frames, the side rails can make access to the encoder and knobs slightly more difficult. It doesn’t bother me, however especially since my X6100 encoder has a fair amount of brake by default (I mention this in my X6100 review).

The frame fully protects all sides of the radio and (especially) the protruding encoder and knobs which I believe are the most vulnerable parts of the radio.

I also love the flip-down screen protector which can serve as both a sun shade or as a tray to hold your phone in the field.

If you’re looking for a frame for your X6100, I believe this is a great option.

Mike is selling the complete frame kit for $65 US. He will customize the screen cover with your callsign and he has a number of color options available.

Photos:

Click here to check out the X6100 frame at N2HTT’s Etsy Shop.

Paul’s QRP lending library

Many thanks to Paul (W0RW) who writes with details about his personal lending library.

Paul notes:

Half of my lending library contains QRP Books. Now all the books are available for review at the ‘TinyCat’, (That is short for Tiny CATalog).

Go to: https://www.librarycat.org/lib/W0RW

If you have never requested books before then you have to send me an email so I can approve your name and address, (Send email to [email protected]).

After you get approved, you can double click on a book from the scrolling banner or add a key word in the search block to find one (like QRP, Spy, or ARRL).

If you want that book, and it shows as ‘Available’, Click “Check Out” button, then type in the password ‘paraset’. Then select your name to check it out.

That’s it! I will pack it up and mail it to you.

Some Rules

It is all free but there are rules to keep everything moving:

    • Only 2 books at a time maybe ordered out at a time.
    • This is a no smoking library.
    • Return books after 1 month. You only pay return postage.
    • I can only ship to USA addresses.

Use the ‘TinyCat’ Web page to request books.

I don’t need to know when you received the book(s) or when you sent them off.

Procedure: I send the books to you, you read them and return them to me.

Paul Signorelli w0rw

905 Zodiac Dr.

Colorado Springs, CO 80905

Wow–very generous of you to make your books available to search and borrow online. Thank you for sharing this, Paul!

Barry’ review of the ATU-10 QRP Antenna Tuner

Many thanks to Barry (KU3X) for sharing the following guest post originally posted on his website:


ATU-10 from Banggood.com

by Barry (KU3X)

There are times I find myself in need of an ATU. One example is when I use my half wave end fed 40. I can not always erect this antenna in the clear. I did purchase the LDG Z100 Plus 705 with interfacing cable. The unit does as advertised but I am not impressed with its performance. My biggest complaint is, when interfaced and the IC-705 tells the LDG to tune and it does not know the antenna is matched and resonant, the LDG adds capacitance and inductance which actually raises the SWR. It’s too dumb to go into bypass. I resolved this by not using the interface cable. Now I only tell the LDG to tune where needed. Most of the time I turn the LDG off by toggling between bypass and tune using the button of the front of the unit.

Size matters to me and the LDG ATU is too big. Another downside is it uses SO-239 connectors instead of BNC connectors. Everything I have relating to QRP operating uses all BNC connectors, including my home brew two position antenna switch. I do want to get my hands on an Elecraft T1 ATU but Elecraft can’t get the parts from the manufactures to make them. So the hunt was on for a small ATU with internal batteries and BNC’s instead of the dreaded SO-239 connectors. Here is what I came up with.

I ordered the above pictured ATU-10 from Banggood.com. I have also seen them posted on Amazon.com. They can be found on eBay as well. I did not provide a link for ebay because some ebay adds are dated. There is a very good demo posted on YouTube. Here is an overview of the ATU-10 [PDF].

My ATU-10 arrived 11 June 2022. Here are my findings:

The package contained an Allen wrench and a USB cable for charging the battery as well as for updating the firmware. The package DID NOT include the interface cable for the Icom 705 nor did it included any paperwork…….no manual! My battery showed about half charged and firmware version 1.4 was installed. If you forget to charge the battery and go on site with a dead battery, you can supply power to the ATU-10 via the USB charging cable. You may have to give it a few minutes for the batteries to take a little charge, but from that point on just leave keep the ATU-10 connected to the USB cable.

The needed interface cable is nothing more than a stereo audio cable with 1/8″ male plugs on both ends. But, the ATU works without the interface cable, it’s just not controllable from the radio. As for the matching, I can say it works as good as or as bad as my LDG Z-100 Plus. Where ever the LDG provided a match, so did the ATU-10. On 80 meters where the LDG did not do so well, neither did the ATU-10.

I first tried the ATU-10 without the interface cable. I just sent a carrier from the radio and the tuner went into the tune mode. It’s that simple. It takes anywhere from 2 to 5 seconds to find a reasonable match.

To use the ATU-10 with the interface cable, there is the setup procedure. Hook up all of the cables, including the interface cable to the IC-705. Now turn the ATU-10 on. Once booted, turn on the IC-705. Go into the, “Function” screen and tap the, “tuner” icon. You are ready to go. You do not have to change modes to have the ATU-10 go into the tune mode. In any mode on the radio, like SSB, just key the mic and the tuner will tune. Give it a second or two and you are ready to go. Change bands and key the mic, same results. I lost communication between the radio and the ATU-10 when I went to 80 meters. I have no idea why? I just turned the radio off, then back on and everything was reset…ready to go.

When I received my ATU-10, I noticed all of the hardware was not that tight. I retightened each nut and Allen screw.

User group for the ATU-10 and the ATU-100.

Pros:

  • Size…the ATU-10 is small enough to carry in your shirt pocket ( 5″ x 2-3/4″ x 1″ )
  • Antenna connections… BNC. All of my cables used when I set up portable use BNC connectors.
  • Power source ….the ATU-10 has two internal rechargeable batteries so no external power source is needed. Since the ATU-10 uses latching relays, the only power that is needed is for the display. The display has a time out timer and the ATU will turn off after 30 minutes on non use. The ATU will last you for months on end before needing to be recharged.
  • Display… the display shows SWR, power out and the state of charge for the internal batteries. It also shows what firmware is installed. The display will fall asleep after 5 minutes of non use. If power is applied, the display will wake up. The entire ATU will turn off after 30 minutes of non use.
  • Bypass mode (simply turn the ATU-10 off)
  • Construction…..the ATU-10 is built inside of a solid metal enclosure.

Cons:

  • Loss of communication….more than once communication was lost between the radio and the tuner. Easy fix by turning the radio off and then back on but this is very inconvenient.
  • No manual…..not even a little sheet of paper showing the specs. Whatever you need to know can be found on this site: ATU-10 info at GitHub.

Final notes:

For the price, it think this is a great buy. It does exactly what I want it to do and provides a reasonable match to make the radio happy. You can use the ATU-10 with any radio at power level of 10 watts or less. It’s a perfect size for backpackers. I don’t think the interfacing between the radio and the ATU-10 is all that importable. I myself choose not to use the interface cable. Since the tuner will go into a tune mode if the SWR is too high, that’s all that is really needed.

Rough conditions but serious QRP POTA fun at New River State Park

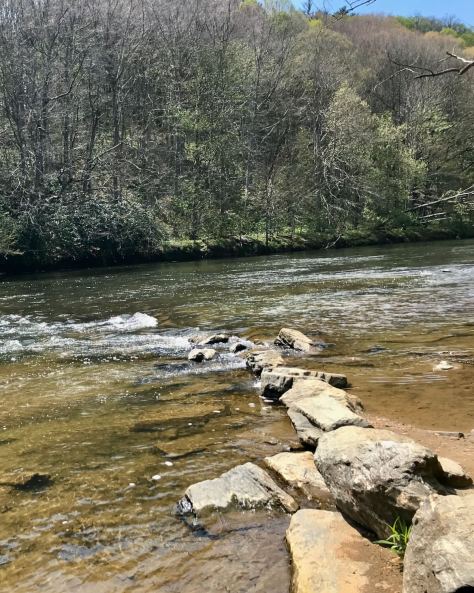
The New River (Photo by K4TLI)

You might recall from my previous field report that I took the family on a camping trip at New River State Park in April 2022.  During that trip, I made an activation of New River each day and also fit in a very fun SOTA activation (click here to read an overview).

Note that anytime you’re performing an activation over multiple days at any one park, you can only have one activation per UTC day.

The following brief field report is essentially my “Part 2” from April 28, 2022. Since I’d already worked well over my ten contacts in the previous activation session that UTC day, all of these contacts were simply icing on the cake!

Keeping this one brief(er)

I’ve an insanely busy day today, what with exam study, errands, splitting firewood, and prep for our summer travels.

That said, I wanted to squeeze in an activation video and field report because the rest of the week is even crazier. Continue reading Rough conditions but serious QRP POTA fun at New River State Park

A comprehensive review of the Penntek TR-35 four band QRP transceiver

The following article originally appeared in the April 2022 issue of The Spectrum Monitor magazine:


“Look at this, Tom! Only the stuff I need and nothing more,” cheerfully noted my good friend and Elmer, Mike (K8RAT).  It was Field Day two decades ago, and Mike was gazing at his TEN-TEC Scout. I glanced over, and agreed. “So simple and so effective,” Mike added.

I’ve never forgotten Mike’s sage words. That Scout (Model 555) was about as simple as a then-modern HF transceiver could be:  it had a total of three knobs––one for AF gain and IF bandwidth, one for RIT and Mic gain, and an encoder. It also had three mechanical switches on the front: one for power, one for TUNE and NB, and one for CW speed and RIT. It also had an analog SWR/power meter. The Scout used plug-in band modules for each HF band and featured a large segmented bright green LED frequency display that was characteristic of so many TEN-TEC rigs of the day.

And Mike was right. For those of us who appreciate radios with a simple, uncluttered, and an almost utilitarian interface, the Scout was, in vintage parlance, “the bee’s knees.”  And that the Scout also performed beautifully was just icing on that cake.

When the Scout first appeared in 1994, embedded menu options and spectrum displays were not yet commonplace among amateur transceivers. Embedded menu items can open the door to near granular level control of your radio’s functionality and features. Then again, if those embedded menus aren’t well thought out, it can lead to awkward operation practices in the field, during a contest, or even during casual operation.

As a radio reviewer, I spend a great deal of time sorting out embedded menu functionality and design. Perhaps it’s for this reason that I so enjoyed reviewing a radio that bucks this trend and reminds me of a time that was simpler, not to mention, easier.

Enter the Penntek TR-35

The new Penntek TR-35 is a four-band CW-only QRP transceiver that is available both as a kit ($279) and as a factory assembled and tested unit ($379). Penntek transceivers are designed and manufactured by John Dillon (WA3RNC).

All of his transceiver kits are available at his website WA3RNC.com.

I was first drawn to the TR-35 after reading the opening paragraph of the product description:

“Compact but powerful 4-band, 5-watt CW transceiver kit that uses no tiny push buttons, and without those seemingly endless and hard-to-remember back menus. There is a knob or a switch for every function!”

Sold!

I considered buying and building the TR-35 kit, but I wanted my eventual review––this one!––to focus on the radio’s functionality and performance. So a factory-assembled and tested unit was right for this purpose, just so that any performance issues wouldn’t be a result of any shortcomings in my kit building skills.

I decided to reach out to WA3RNC and ask for a loaner. John very kindly sent a factory built TR-35 to me along with return postage and a very flexible loan period (thank you, John!). Continue reading A comprehensive review of the Penntek TR-35 four band QRP transceiver

John’s trip and POTA field reports from Nova Scotia

Many thanks to John (VE3IPS) who shares the following guest post:


Nova Scotia POTA After-Action Report

by John VE3IPS

We had planned a vacation trip out to Nova Scotia to get our lobster fix. As I always do, I prep my radio with local repeaters, look up local radio clubs, museums and check the POTA and SOTA map for locations to operate from.

I noticed that several park locations had not been activated. Thus I had an opportunity to be first activator and to get some much needed Nova Scotia parks in the Hunters logs. I printed the map and noted the park identifiers. I decided to just activate the parks that were never activated. I could have worked more parks but you have sights to see and can’t be behind the mic all the time. My antenna was prepped to be rapidly deployed in a few minutes and torn down accordingly.

I also was able to attend the Halifax ARC Hamfest on June 4, 2022.

So a vacation with ham radio elements to keep me excited with some objectives in mind.

We did visit Peggy’s Cove, Burnt Coat Head to watch the tides in the Bay of Fundy, local wineries, Lunenburg (a movie shoot was underway), the Halifax Citadel and of course eat lobster every day. I spent over $200 in gas as we did a lot of driving around (gas is just over $8 a gallon CAD), retail tax at 15% and prices for food and restaurants up by 30%. Nova Scotia is a bit more expensive than other cities.

I decided to bring my Icom 705 with a LifePO4 battery to offer 10 watts instead of the FT-891 or FT-818. Why? Because it offered a voice memory for calling CQ Parks, built in SWR meter and better IF filters over the FT-818. I wanted to cover the Marine and VHF/UHF repeaters as well and that ruled out the FT-891.

Due to the Kleenex box form factor I ended up using a Lowe Pro Omni Trekker camera bag to use as a carry on. This included a Nikon V1 camera and Binoculars.

Continue reading John’s trip and POTA field reports from Nova Scotia

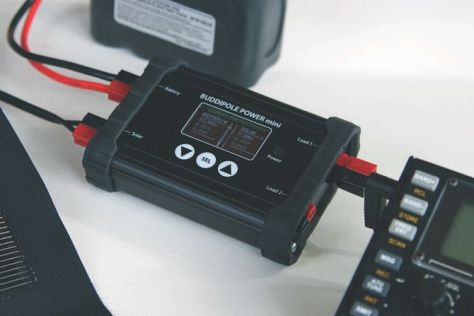
Solar POTA: Pairing the Buddipole PowerMini 2 with folding panels and the FT-817ND at New River State Park

Photo by K4TLI

I’m often asked if I ever charge my LiFePo4 batteries in the field via solar energy.

Truth is, I’m a big fan of solar, but I’m rarely in the field long enough to need to recharge my batteries via solar when performing SOTA and POTA field activations. It’s easier to charge them at home in advance (often via the solar system at our QTH).

In fact, one of my 3 Ah LiFePo4 Bioenno batteries can easily take me though 3-5 activations or possibly more, depending on the length of the activation and the rig I’m using.

Photo by K4TLI

For longer forays into the field, however, I love going solar.

Indeed, every few years, my family will stay in an off-grid cabin on Prince Edward Island (Canada) for up to 6 weeks at a time. Solar is the only practical way to stay on the air that length of time.

Of course, I also like having a solar option, when doing proper primitive/off-grid tent camping.

In the past, I’ve used a very simple portable solar charging system based on a variety of rigid and folding panels, a Micro M+ charge controller, and sealed lead acid batteries. The batteries are of course heavy, but they work brilliantly for fixed operations.

These days, I’m fully invested in LiFePo4 batteries and my Micro M+ charge controller is not really designed to pair with the BMS (battery management system) in my Bioenno packs.

Bioenno sells a number of affordable solar charge controllers, but most resemble units that are used in permanent installations.  I wanted something more portable and, ideally, something with Anderson PowerPole connections.

Late last year, I discovered the Buddipole PowerMini 2:

Photo by Buddipole

I contacted Buddipole with a few questions about the unit and to find out when they would be in stock again (at the time, they were on back-order and indeed they are at time posting this report).

Turns out, they were to be restocked the next day, so as soon as inventory was showing on the site, I ordered one. Continue reading Solar POTA: Pairing the Buddipole PowerMini 2 with folding panels and the FT-817ND at New River State Park

SOTA featured on BBC Countryfile

A number of readers and friends here and in the SOTA community are simply chuffed that Countryfile on the BBC recently featured a short segment about Flat Holm, its historical ties with Marconi, and modern portable amateur radio.

I tried my best to view this yesterday from the US, but shows like this on BBC One are geo-blocked via the BBC iPlayer…which is, evidently, clever enough to recognize VPNs.

However, I notice the segment has recently been posted on YouTube, so if like me you’re outside of the UK, I encourage you to watch it quickly before it gets pulled.

Enjoy!

Click here to view on YouTube.

The segment features our friend Fraser, MM0EFI (remember his brilliant field report chock-full of Land Rover nostalgia–?) and a number of other amateur radio operators.

Fraser posted his own video showing the other side of his contact with the Countryfile crew:

Click here to view on YouTube.

Fraser sat on top of that gusty summit for quite some time before the BBC crew were ready, but it looks like he had a lot of fun.

You did a brilliant job, Fraser! So glad the propagation worked in your favor.

What’s more, I love the fact that Countryfile crew looked at SOTA with both curiosity and excitement.

Bravo to all of the radio ops featured in this segment; you’re all proper ham radio ambassadors!