On Sunday, June 22, we spent the day in Québec City enjoying a local farmer’s market, visiting a café, catching up with friends, and taking a long walk in the woods. Somehow, we managed to return to our condo in St-Ferréol-les-Neiges, Québec, by 3:30 in the afternoon.
My wife and daughters decided to spend some quality time reading and doing art—and frankly, I was tempted to do the same. A friend had recently prompted me to dive into the world of Three Pines, so I was working on Louise Penny’s first book, Still Life [yes, QRPer affiliate link].
But then I looked outside, checked the time, and realized I just might have enough daylight to squeeze in a quick POTA activation! My only viable site nearby was Cap Tourmente, just a short 15-minute drive from the condo.
However, Cap Tourmente closes at 5:00 PM, and with propagation having been so poor lately, I knew I had to make haste.
Cap Tourmente Réserve Nationale de Faune (CA-0012)
In my last activation video at Cap Tourmente, I mentioned that park entry would be free under the Canada Strong Pass program. Unfortunately, I was mistaken—national wildlife refuges are not included in that program; it’s geared more toward national parks and historic sites.
No worries—I was still happy to pay the entry fee as I typically drop a donation at parks I frequent anyway.
By the time I reached the park entrance, it was about 3:45 PM. That left me just over an hour to deploy gear, hop on the air, and complete an activation.
It was a blustery Sunday afternoon. Looking out over the St. Lawrence River, I saw nothing but white caps. The upside to all that wind? Fewer mosquitoes!
I pulled into the same large parking area where I’d activated the previous day. I backed up to a tree line, which offered some wind protection and a natural spot to deploy my antenna.
For this activation, I wanted some frequency agility, so I opted to deploy my Tufteln end-fed random wire (EFRW) with a 31’ radiator and 17’ counterpoise.
I backed my car toward the sun so that the open hatch would provide some welcome shade. I then set up my Moonlander table and Helinox Chair Zero for a comfy operating position.
With everything deployed, it was time to get on the air!
Gear
Note: All Amazon and eBay links are affiliate links that support QRPer.com at no cost to you.
Sometimes life gets in the way of putting Parks on the Air (POTA). But sometimes, you just need to find a way to fit it in. In northwest Pennsylvania, spring and early summer have been damp, with April showers seeming to extend through May, June, and into July. The middle week of July seemed ready to bring more of the same, so when expected sunshine on Tuesday aligned with a break from other responsibilities, Molly the POTA dog and I took the opportunity to fit in a combined walk and activation.
Earlier in the day my Code Buddy, Al – KC4M, and I had cut short our periodic QSO as the 40m band took a dive. Molly and I would activate anyway. As we prepared to leave, the temperature was rising quickly through the upper 70s on its way toward 90F, and the humidity was high. Molly and I would activate anyway.
The Plan
It takes almost 100 miles of hiking on the North Country Trail to cross Allegheny National Forest. For this activation, Molly and I covered one mile in each direction, and our section of trail was located very close to where it enters the park from the west.
I held two things in mind as I considered my activation options. First, Molly likes her walks. Unless it is raining, we take a daily half-mile walk to, and around, our pond. That suits her well, but she does like longer walks. Recently we had done far too many parking lot activations, so that we had a quick out in case of rain. I, too, needed a some exercise, so this activation needed to include a longer walk. Second, I have set a goal to collect 1000 CW activator contacts from the North Country National Scenic Trail (NCT) to finish a POTA Kilo Award from US-4239. Since nearly all of my activations are done with QRP CW, getting 1000 contacts takes quite a while. To date, I had completed 27 activations of the NCT, taking me to 833 contacts. In pursuit of my goal, I wanted to increase my tally by again activating the NCT. So, the plan had to include a decent walk to a location where I could activate the NCT.
The NCT crosses through the northwest corner of Pennsylvania, and there are many good locations for activating that are also close to our home. This time I picked a spot in Allegheny National Forest (ANF, US-0619) with parking and access to a sedate stretch of the NCT. So, we would try for a modest walk along the trail, stopping for a 2-fer activation, before returning again to the truck.
Onward!
A 20 minute drive (well, 35 minutes if you count the detour for unexpected roadwork) took us to our starting point. I parked my truck in an ANF parking lot located about ¼ mile from the NCT. As I suited up (In deference to today’s sun and previous days’ rain, I pulled on a brimmed hat and my muck boots, while Molly went barefoot with a basic leash), collected our gear (more on that later), and prepared for our walk, I realized that I had not picked up my DEET insect repellent on the way out the door. I would just have to hope that my treated clothing (more on that later) would keep the mosquitoes at bay, so we left the parking lot by following a gated forest road that would join up with the NCT.
The forest road gave us the opportunity to ease into the afternoon’s walking experience. As we passed along its well-drained gravel surface, trees provided shade, but most foliage was kept back by the roadbed, and the mosquitoes and gnats were a bit tentative.
Once we turned off onto the narrow track of the NCT, vegetation closed in, the humidity spiked upward, and the flying insects came looking for an easy meal. Fortunately, despite my lack of DEET repellent, we were not defenseless. Molly wears a collar that keeps fleas and ticks at bay, and it also seems to discourage mosquitoes. I dressed in clothing from Insect Shield: their long-sleeved fishing shirt, cargo pants, and socks had been pre-treated with a long-lasting permethrin formula (advertised to be effective for 70 washings). I also wore a brimmed hat that I had sprayed with permethrin. Permethrin seemed to discourage mosquitoes and gnats from biting, but they still had an annoying tendency to fly around near my face.
I wore these articles of permethrin-treated clothing, which helped to keep mosquitoes and gnats (and hopefully ticks) at bay during the walk and activation. The shirt, pants, and socks came from Insect Shield. I treated my brimmed hat with permethrin spray.My KX2 kit is entirely contained in the canvas satchel. One of my water bottles and my padded seat were attached to anchor points on the outside. Overall I appreciated the light load for walking on a hot and humid day.Molly clearly does not appreciate my gear, she just wants to get walking…
The temperature and humidity made for a steamy walk. I was glad I had prepared by bringing the light-weight kit built around my Elecraft KX2. It allowed me to bring along plenty of water to keep both me and Molly hydrated (her collapsible travel bowl fit nicely in the side pocket of my cargo pants) for the walk and the activation. After about a mile of walking, I found a reasonable spot to set up my shack. This was to be a rustic affair, because I brought a seat cushion rather than a full chair. I found a flat rock, just to the side of the trail, that was a comfortable height for a seat. There were also several overhanging trees, with promising branches to support my wire antenna.
The Activation
Molly shows off her POTA form. She enjoyed her nap on the damp ground on this hot afternoon.
I attached Molly’s leash to a nearby sapling, and got busy with the setting up. Molly generally watches me for a bit, then takes a nap while I activate. This day was no exception. She particularly seemed to enjoy the damp ground as a refuge from the heat. Fortunately for both of us, she did not find it necessary to roll around and get muddy while enjoying the coolness. As a POTA dog, Molly is quite patient, but she is not shy about letting me know when it looks like we might stay beyond her dinner time. Continue reading K3ES: A Hot and Humid Walk with a No-Frills Activation→
I woke up on the morning of June 19, 2025, expecting to see rain when I opened the door to our balcony at the condo in St-Ferréol-les-Neiges, Québec.
Instead, it was a bit overcast, but quite dry. I checked my weather app and saw that the forecast had pushed the rain—which I expected to begin around 6:00—to 9:00.
The forecast then showed rain throughout the rest of the day and the next. Being the POTA fellow I am, I wanted to squeeze in an activation before nearly two days of wet weather properly moved in.
Fortunately, one of my favorite POTA spots local to our condo is Cap Tourmente National Wildlife Area (Réserve nationale de faune)—a site I’ve activated during our past stays in the area.
I double-checked my field radio backpack, grabbed a bite of breakfast, then hit the road!
Bumps in the road
Photo from August 2022
My plan that morning was to activate CA-0012 from a spot outside of their main grounds in a marshy area with a wildlife viewing blind.
Photo from August 2022
I activated this very spot back in 2022 and loved it—[click here to read that report]—it was peaceful and easy to deploy a wire antenna there. It’s also a couple of minutes closer than the main reserve and I wouldn’t have to pay an admission fee to use it.
In truth, though, my main motivation was knowing that I would be under a heavy canopy of trees, so if it rained, I might get a bit of cover for a while.
I was fully aware, though, that the price I would pay for activating there was going to be mosquitoes. This site is surrounded by marsh areas, and that morning the air was still, warm, and humid. The perfect recipe for mosquitoes.
En route to the site, it dawned on me that I’d left the microSD card for my camera in my laptop back at the condo. As my buddy Vince (VE6LK) says, “Potty mouth made an appearance”—indeed, quite spontaneously!
I knew if I took the time to turn back and fetch the card from the condo, it would likely start raining by the time I set up my station. Then I remembered that I packed my old OSMO camera in my pack as a spare—of course! I could use the spare camera’s SD card. That problem was solved.
I parked my car in the little parking area across from the wildlife viewing area, grabbed my pack, and walked across the road.
The first thing I noticed was that the area under the trees had not been mowed. There was a path to walk, but all around it was tall grass flanked by trees. Did I mention that mosquitoes love tall grass?
I walked into the site and passed a wildlife photographer. He was the only person on-site, and I figured he also knew rain was incoming. I found a spot where I could deploy my antenna with ease and mostly stay off of the path.
Then I made the mistake of looking down at my legs.
Despite the fact I had Permethrin-treated trousers and had even applied a bit of DEET repellent, there was a swarm—likely 50+ mosquitoes—around my legs. There was no way in the world I could cope with that many mosquitoes sitting so close to the ground during my activation.
Time to “pivot,” as folks like to say these days.
I wasn’t going to give up, so I headed to the main park area and paid my entry fee at the gate.
Réserve nationale de faune du Cap-Tourmente (CA-0012)
Since I didn’t want to hunt for a location, I picked one I knew well—again, one I had previously activated [click here to read that report].
The site is basically a large, open parking area close to the front gate and the “petite ferme” portion of the site.
The mosquitoes weren’t bad at all in this open area, so I backed the car up to some trees I could use to support my antenna.
Turns out, I discovered later on, that this particular part of the site is also a twofer with The Trans Canada Trail National Scenic Trail (CA-5082), since the entry to the parkway is actually a part of the trail system.
I was in a bit of a hurry to beat the rain and actually almost forgot to start my video rolling. I made one throw line attempt and wasn’t pleased with the branch I snagged. It was only when I started my second attempt that I realized I’d forgotten to start the camera!
I decided to deploy my MW0SAW homebrew end-fed half-wave, knowing/hoping that either 20 or 40 meters should carry me through the activation.
I set up my Helinox chair and the KX2 on my Tufteln/N0RNM kneeboard.
Gear
Note: All Amazon, CW Morse, ABR, Chelegance, eBay, and Radioddity links are affiliate links that support QRPer.com at no cost to you.
March 18th, 2025, I successfully activated the Oklahoma City National Memorial (US-8115). I typically get a few activation photos and post them to the POTA Facebook group, so that hunters get the chance to see the other side of the hobby. I have always enjoyed seeing other activators’ radio setups in the parks that I just hunted. So I was very surprised when I received some very negative comments/private messages from several different individuals about my activating this park. Growing up in southeast Missouri, I am very aware of the seriousness of this memorial to many people!
I often overnight in Oklahoma City for work trips. I have walked through this park without activating it on many occasions. On my last trip through OKC, I was up early out walking, and as per my habit, I had my Elecraft KH1 in my backpack. It was an early morning weekday, and it was still chilly out.
On one of my previous trips through OKC, I had already researched the park website to see if there was anything forbidding the use of radios in the park. The park’s website states that it is open 24 hours, and it did not list any rules different from any other national park/memorial. As you can see from my photos, I was the only “civilian” in the park during my activation. I was the 11th successful activator of this park.
Since the park website rules listed nothing that would forbid use of radios in the park, I decided to check out the park.
As a responsible operator, I understand the importance of using common sense and showing courtesy to those around me. I also recognize the importance as an activator to leave a good relationship with park authorities so that I do not ruin it for the activators that will come after me.
I was the only person in this park for the entire 59 minutes that I was on the air, except for three people who I will talk about in a moment.
Let me be clear: if there had been other visitors in this park, I would have been sensitive to the situation and probably not activated.
Even though I had researched the rules for activating this park, I still activate under the premise that it is better to ask forgiveness than permission. What that means is, if rules don’t specifically say I can’t, then I am not going to be going around asking for permission. I will, however, still use common sense and NOT be sticking stakes in the ground or trying to throw wires up in the trees.
I chose the pedestrian mobile configuration for my KH-1 because other than a short counterpoise wire and my notebook, all radio gear was held in my hands.
As always, I use earbuds so that I am not making any noise with my setup.
As the contacts started trickling in, I noticed a park ranger walk out to the reflection pool in front of me. He would glance over at me, then he would stare up at the sky. He would turn, look over at me again, then stare up at the sky a while longer. The park ranger was one of the three individuals I saw in the park during my activation.
After a few minutes, I noticed that the ranger had left, but I began to feel like someone was standing behind me just out of my field of view. Sure enough, it was the same ranger now standing behind me. I thought about saying something, but I was busy as the contacts slowly kept coming. Eventually, the park ranger broke the silence coming into my field of view saying, “Good morning sir, do you have any questions for me about the park?” I replied with a polite, “No thank you sir, I appreciate it!” He replied, “Okay, by the way, what are you doing?” I explained the basics of POTA/ham radio/Morse code, and also added that “If I was doing anything wrong, I would be glad to leave immediately.” The park ranger quickly said, “No, you’re fine. Looks like fun. Have a great morning.” After the park ranger left, I did not see him again.
A few minutes later… the second person came into my field of view. This person was a uniformed armed security guard. He was wearing a gray uniform shirt and black tactical-style pants, along with the usual duty belt load-out. I believe he came over from the federal courthouse just across the street. His approach was a lot more direct. “Hey bud, you’re not flying a drone here, right?” I assured him that I wasn’t and explained POTA to him. He was actually genuinely very interested in ham radio.
During this conversation, N7MEB was calling me. I was still a little flustered by the armed officer showing up. I had to ask Beth at least five repeats before I got her call sign correct. The security guard was impressed that I was currently working an operator in Utah with my tiny radio. I politely apologized to him that I was actively getting called at that moment and was busy. He responded with a friendly, “Good luck and have fun.”
Fourteen of my contacts were on the 20M band, but after a few minutes of no responses I moved to 17M. As soon as my first caller began transmitting on the 17M band, an Oklahoma City Police officer suddenly walked up to me and said, “Good! You’re not flying a drone! Have a good day!” He was gone as suddenly as he appeared. I never even had a chance to say anything. Haha
I am guessing that someone at the federal courthouse across the street was watching me on their security cameras, and they were the ones all concerned about me flying a drone.
There are signs posted on both sides of the park entrances forbidding the use of drones over this memorial. I genuinely believe if I had asked permission to do an activation, that I would have been flatly refused. The very sound of asking to set up a “radio station” inside a small memorial park sounds ridiculous, even to me.
Each authority figure who approached me was completely fine with what I was doing as long as I was not flying a drone. Now that I have been vetted by a federal park ranger, federal armed security guard, and city police, hopefully, after seeing my low-profile rig in action, the idea of a ham setting up a radio station in their park will no longer sound as crazy to them.
One good impression at a time with local authorities builds the goodwill for the next op. Let’s be respectful and get out there and activate. We don’t need big antennas/1000Qs in the log, and POTA banners blowing in the breeze for a successful activation.
Many thanks to Scott (VA3EKR) who shares the following guest post which was originally posted on his blog:
July 17—18, 2025. Lake Erie POTA Mini-vacation
by Scott (VA3EKR)
The Plan
I had the Monday and Tuesday off from work, as an extended July 4th. Unfortunately both my daughter and wife had to work, and we also have some animals that are in need of constant medical attention, so this was going to have to be a solo trip.
I have long been fascinated by the coastline near Long Point, but until this point I had only seen it in pictures and maps. I wanted to camp overnight, and do two activations from Long point, and book-end it with a POTA activation both before and after.
I booked at the last moment, and so there was only one site available, despite being on a Monday. I looked at a few online pictures of the site, and noticed it had trees, so I was hopeful. It was also near the beach. Site 335.
I left around 9:30 in the morning, and I was planning for about a 2 hour drive. The plan was to activate Turkey Point Provincial Park (CA-0417) at around 11:00, then have a nice lunch at 13:00, and drive to Long Point (CA-0279) for the 14:00 arrival-time check-in.
Turkey Point Provincial Park (CA-0417)
Arriving at Turkey Point, the staff were very helpful and, because I had a reservation for another provincial park later that afternoon, they did not charge me an admission fee. I drove to a picnic table that was right next to some trees, and had an easy setup.
I used a Packtenna Random Wire that has a 9:1 transformer neatly packaged onto the winder.
The bands were moderately active, and it did not take me long to activate on 20m CW with the KX2. 17 QSOs in about an hour. I brought a 30AH battery to allow me to operate for a long time, however in retrospect, I believe that the internal charger for the KX2 never engaged. I had a full charge on the KX2 beforehand, so I suspect that all three activations were done on its internal battery! I ended it on a fitting note with a park-to-park with Jim in Nebraska (WBØRLJ).
Date
Time
Call
State
Band
Mode
Park
2025/07/07
15:52
KO4USA
GA
20m
CW
2025/07/07
15:53
K2UPD
NY
20m
CW
2025/07/07
15:54
NAØF
MN
20m
CW
2025/07/07
15:55
KA5TXN
TX
20m
CW
2025/07/07
15:57
W3YJ
PA
20m
CW
2025/07/07
15:59
AA5XA
AR
20m
CW
2025/07/07
16:00
KO4ALY
AL
20m
CW
2025/07/07
16:03
W5KEB
AR
20m
CW
2025/07/07
16:05
KB3A
AL
20m
CW
2025/07/07
16:06
KM4QNA
AL
20m
CW
2025/07/07
16:14
KG4NXT
VA
20m
CW
2025/07/07
16:21
KAØLDG
ND
20m
CW
2025/07/07
16:33
KE2BKW
PA
40m
CW
US-8734
2025/07/07
16:39
W9MET
FL
20m
CW
US-3605
2025/07/07
16:42
AB9CA
IL
20m
CW
US-4104
2025/07/07
16:50
K1ATL
NH
20m
CW
2025/07/07
17:02
WBØRLJ
NE
20m
CW
US-4010
Following the activation I went to the Tipsy Pirate that had a nice outside deck overlooking the water.
I had a nice vegi-burrito and fries and an afternoon cocktail.
Long Point Provincial Park (CA-0279)
I arrived at Long Point and found the site. It was even nicer than I had hoped! It was perfect for POTA, it was fairly quiet, and close to the lake.
My plan was to activate in the early afternoon while the UV was at its worse, under the shade of the campsite trees, and then check out the lake, and have some supper. Continue reading Scott’s Lake Erie POTA Mini-Vacation→
On June 17, 2025—two days after we arrived at our condo in St-Ferréol-les-Neiges—we drove to Québec City to pick up a few provisions.
My wife loves exploring thrift stores and had mentioned on the way into town that she’d enjoy popping by one before we returned that day. My POTA brain immediately pinged because I remembered a thrift store she enjoyed visiting was very close to one of the first parks I ever activated in Québec City.
I pitched the idea of an activation to my wife and daughters, and they readily approved. Fortunately, I already had my Canada Field Radio Backpack loaded with the Elecraft KH1 in the back of the car!
Domaine de Maizerets (CA-5020)
I first activated this park on June 20, 2022—almost exactly three years earlier. Here’s the field report. (I didn’t film that activation.)
Back then, it was an ATNO (All Time New One)—the park had never been activated before.
It was also one of the very first proper urban parks I’d activated. By “urban,” I mean a park that’s located in the city, on the smaller side, and fairly busy with activities and locals who live nearby.
Having visited this park several times over the past few years, I already had a good idea of where I’d like to activate and how I’d like to do it.
New Field Gear!
As I mentioned earlier this week, my buddy Mike (KE8PTX) has been hard at work in his top-secret, underground laboratory developing accessories for the Elecraft KH1 and AX3 antenna. I knew this activation would give me a chance to test two of them.
The first is a new kneeboard designed specifically for the KH1. It’s super simple, lightweight, compact—and I love it.
It also includes a steel base that can magnetically lock your key in place.
The board secures the KH1 and paddle, and the adjustable elastic strap keeps the board firmly on your leg. It’s so secure, you can easily stand up and reposition without anything sliding off. That’s a big deal—because during longer activations, I tend to shift positions or stretch. This kneeboard lets me do that without worrying about my rig.
Some of you might be thinking, “But isn’t the KH1 meant to be a pedestrian mobile radio? Why not operate handheld?”
That’s a great point! Pedestrian mobile is absolutely the way to go if you’re using the included 4’ telescoping whip antenna. But if you want to use a different antenna—like the AX3 or a wire antenna—I prefer to sit and operate, since those options limit mobility.
AX3 Strap Mount
Speaking of the AX3, I planned to pair it with the KH1 for this activation—and I had a new secret weapon: a strap mount Mike designed.
It’s a brilliantly simple mount based on the ¼-20 threaded base on the AX3. Just a threaded adapter attached to a Velcro strap. That’s it.
So super simple.
Since the AX3 is so lightweight, this strap mount opens up a variety of mounting possibilities. For this activation, I planned to use it on a park bench.
At time of posting, Mike’s accessories aren’t yet available for purchase. Joshua (N5FY) at Tufteln will produce these for purchase in the coming weeks. When he does, I’ll announce it on QRPer.com.
Setting Up
I found a nice, albeit conspicuous, park bench next to the creek that runs through the middle of the park.
First, I mounted the AX3 to the top slat of the bench’s backrest. It worked brilliantly.
My daughter made a short video panning across the park–can you spot me?
From a distance, you can’t tell that the guy in the Tilley hat near the footbridge is a Morse Code and POTA nut!
Time to hit the airwaves!
Gear
Note: All Amazon links are affiliate links that support QRPer.com at no cost to you.
I suspected this would be a challenging activation—and I was right. Propagation had been in the dumps, and several friends had mentioned struggling with their activations that same day.
Normally, this isn’t when I’d choose to use a compromised antenna, but in this case:
I wanted to keep the setup very low-impact and respectful of other park guests, and
When we plotted our trip to Canada this year, I mentally set a goal for myself: to get better at Adaptive Urban Park Activating (AUPA).
Yeah, I just made that initiative up. Don’t laugh (too hard).
Let me explain…
Back home in North Carolina—and really, most of the parks I travel to in the eastern half of the U.S.—are large state and national parks. When I set up my field radio gear, I typically have a vast area with many choice sites to choose from. It’s easy to disappear into the void, and park staff have no issue with the antennas I deploy.
That said, I also activate quite a few small state historic sites, but in each case, I know the park staff and they know me. I always ask for permission before activating and describe the antenna I plan to deploy. We’ve built relationships over time, and they allow me to activate with essentially no restrictions. I can deploy wire antennas, verticals, loops—whatever I choose.
But the truth is, I have two conflicting interests when I’m in a park.
First, I enjoy being a public and (hopefully) positive impression of the amateur radio community when I’m approached by park guests and staff. POTA gives me an excuse to talk about the importance—and fun—of amateur radio. Since Hurricane Helene tore through western North Carolina, I’ve seen even more interest from locals who stop to ask what I’m doing because they heard that amateur radio played an important role in emergency communications during the aftermath.
That said, in general, I try to be as low-impact and inconspicuous as possible when operating in public spaces. I don’t want my antennas to be trip hazards or interfere with others’ enjoyment of the park. And if I’m being honest, I’m naturally introverted—I like to disappear and be left alone.
The balance I try to strike is deploying gear in a way that doesn’t interfere with others, while also not worrying too much if someone notices my setup. If I’m not bothering anyone but I’m visible enough to serve as a sort of radio ambassador, that’s the best of both worlds, right?
Right!
Adaptive Urban Park Activating
Which brings us back to this philosophy I made up five minutes ago…
When I packed for our trip to Canada, I knew most of the parks I’d be activating in and around Québec City would either be urban parks or national wildlife refuges. In both cases, I aim for field setups that are low-impact, sensitive to surroundings, and unlikely to attract negative attention.
I also had to pack compact and light—we maxed out our Subaru for this multi-week trip. So I brought my usual assortment of wire antennas (end-fed half-waves and random wires) and my self-supporting, low-impact verticals: the Elecraft AX1 and the new AX3.
I left behind the Chelegance MC-750, the Radioddity HF-009, and the Chameleon MPAS Lite self-supporting verticals.
The POTA20 mast
I did bring my POTA20 Explorer carbon fiber pole, which easily fits in my backpack. While the POTA20 Explorer mast is pretty conspicuous when deployed—no way around that, especially if I’m not backed up against a wooded area—I paired it with very short 4:1 and 9:1 EFRW antennas that are super easy to deploy, giving me a stealthier self-supporting vertical option.
In a sense, I chose my lightest, stealthiest antenna options.
When I feel comfortable hanging a wire in an urban park, I do it in a low-impact way: keeping the wire, throw line, and counterpoise all within view and away from high-traffic areas. I keep the footprint as small as possible.
The Propagation Factor
Of course, all of this depends on propagation…
In these urban activations, I’ve placed more emphasis on compromised antennas—either my 4-foot AX1 and AX3 verticals or 17-foot end-feds. And I knew before leaving that propagation’s been spotty these past few weeks (months?). I expected I’d need more time to activate parks with these setups.
Indeed, the first park I activated in Canada was Fort Wellington National Historic Site (here’s a link to the field report). That day, a festival brought a lot of foot traffic to the park, so I went very low-impact—not just out of respect for the historic site, but also the crowds.
I set up my KX2 and AX1, unsure if I’d manage to activate at all. Fortunately, I did.
Over the next few weeks, you’ll see a common thread in my Canadian field reports: stealth and the challenge of becoming a better, more adaptive urban activator. It’s been great practice.
A Few New Tools
I’ve also added some new tools to my kit.
My friend and mad-scientist 3D-print designer, Mike (KE8PTX), made clamp and strap mounts for the new Elecraft AX3 vertical in addition to a new KH1 knee board.
These have made it ridiculously easy to deploy that antenna pretty much anywhere. So far, I’ve mounted it to a park bench (you’ll see this in an upcoming field report) and clamped it to a picnic table in gusty winds.
In many of the Québec City parks I’ve activated, I rarely see staff—there’s no one to ask for permission. So if I’m using an AX1 or AX3 on a table, I feel like I’m having less impact than the average family picnic. If a park employee were to approach me, I’d like to think there’d be no grounds for complaint.
CW + Earphones = Super Stealthy
I’ve also been using earphones a lot more than usual. I actually enjoy using earphones for activations, but I typically rely on my speaker instead because, frankly, it makes for quicker and easier activation video setups.
But when you’re doing a CW activation with earphones, you’re super stealthy—no sound, no fuss. This is one major benefit of CW over voice modes: we can send without speaking out loud.
For this reason, I’ve been recording my audio directly from the radio for activation videos when I’m in an urban park setting.
To be clear, I actually think the sound of CW can be pleasant and even intriguing to many people. But I can’t assume everyone feels the same way—especially in urban parks, where visitors are often trying to escape noise. A quiet, discreet setup just feels more respectful in that context.
What About You?
The KH1 in Pedestrian Mobile mode is a very low-impact way to do urban POTA.
Do you activate urban parks or low-profile sites where you aim to remain low-impact? What’s your default setup?
I’d love to hear how you approach this—especially if you’re working with limited space, increased visibility, or extra constraints.
You’ll see more on this topic in my upcoming videos.
Many thanks to Ken (WR7D) for sharing the following field report and travelogue:
POTA in Hungary
by Ken (HA/WR7D)
I had the opportunity to take a short notice trip to Hungary the beginning of June. I was accompanying my daughter who was attending a class at the University of Debrecen as part of her PhD program at Montana State University. The class was only a week long and we would be in Debrecen for that time and then spend a couple of days in Budapest before heading home.
My wife couldn’t make the trip because of work and my daughter would be occupied with the course for the time in Debrecen so that meant I had all kinds of time to do ham radio stuff. POTA is relatively new in Hungary, but there were already some designated parks around Debrecen and Budapest. One of the POTA coordinators, Greg (HA4UC) even offered to add parks if I found any that I would like to activate that weren’t already designated.
I didn’t have a lot of time to get things organized so I decided to stick with my trusty Elecraft KX2. I thought seriously about taking the Elecraft KH1 also but decided against it in favor of taking extra antennas and support stuff. My plan was to activate using CW with FT8 as a backup. I had been using The KX2 with the iFTx app on my iPhone, a headphone adapter and splitter. That setup had worked well a couple of times already.
The other question was what was required to operate legally in Hungary? I noticed on the POTA website that Spencer, N4KPT, had activated a park in Budapest just a few days prior. Along with his help, I determined that all I needed was a copy of the CEPT agreement, an original copy of my license and my passport. I also needed to prefix my call sign with HA/. Everything was set.
Debrecen
My first activation attempt would be at HU-0010, Debreceni Nagyerő Nature Reserve. This was ideal because it was within easy walking distance of the hotel. The main challenge I had was determining the actual boundaries of the park. The park is generally known as the Great Forest.
From what I found, the Great Forest originally encompassed much more area, but parts were carved out of it for the University of Debrecen, a large city park, a sports stadium and other venues. What was left became the Nature Reserve. I finally found a good drawing that showed the actual boundaries of the reserve. The red circle in the picture below is where I activated from.
For this attempt, I used the EFRW 4:1 from Tufteln, with a 15ft radiator and a 7.5 foot counterpoise. I had contacted Joshua about getting one of his EFRW no transformer antennas that would work great with the KX2. He suggested this new 4:1 antenna with the much shorter elements. He shipped it as fast as he could but no guarantee that it would arrive in time. Considering that, I built a simpler version of his no transformer antenna just in case.
I deployed the EFRW 4:1 antenna on a POTA20 mast. I didn’t even need to use the full height of the antenna. The antenna tuned fine, but I wasn’t getting any answers to my CW calls. I tried a couple different bands with no luck after quite some time. I decided to switch to FT8 on 20m. I was receiving and decoding signals but was having quite a time getting successful transmissions. I decided to call it a day after that.
Second Attempt
A couple days later, I attempted an activation from the same location. I had done some troubleshooting back in the hotel after the first attempt and believe I had discovered the problem with FT8 on the first attempt.
This time I used the EFRW no transformer antenna that I had built. This antenna has a 28.5 foot radiator and counterpoise. The radiator was suspended from a tree with the counterpoise on the ground. Again, I received no answers to my CW calls. I again switched to FT8. This time I was successful and made 15 contacts all over Europe in about an hour and a half. That’s not great for FT8, but a successful activation.
Below is a picture of my CW setup and my backpack of goodies. I made the knee board based off Carolanne’s (N0RNM) design. Mine is a bit smaller and I added a metal plate on the lower section for attaching magnetic keys. In this case a BaMaKeY TP-III.
Here is a map of the QSO’s from that activation.
I was planning on activating another park near Debrecen but after looking at the logistics to get there, I had second thoughts. Then a big geomagnetic storm hit about that time, so I decided not to attempt it.
Even though the band conditions were bad, I decided to try HU-0010 a third time since it was so convenient. Again, I received no answers on CW. I didn’t hear any CW traffic at all on 40m and 20m. I tried FT8 again but had more technical difficulties. I think I’ve decided this was a mic bias issue. It seems that the setting doesn’t survive a power cycle in DATA mode. The radio will always start with the mic bias on. I think that resulted in damage to the USB-C to headphone adapter.
After more testing back at the hotel, I’m not sure about the mic bias setting. Sometimes the bias will remain off when the radio is power cycled in DATA mode. Regardless, the solution is to power up the KX2 and make sure the mic bias is off before connecting the headphone adapter and splitter cord. Fortunately, I did find a new headphone adapter in Debrecen that I could use in Budapest. Continue reading POTA in the Heart of Europe: Ken’s Travels in Hungary→
Besides radio, one thing I love to geek out about is bags, pouches, backpacks—and more specifically—how and what I pack.
In fact, some of my favorite YouTube videos are those where the host shows how they pack for, say, summer travels in Asia, a one-week business trip to Helsinki, or what’s in their Everyday Carry (EDC).
Although this is one of my favorite types of videos, I don’t make enough of them about my own philosophy of packing: what I take, how I pack it, and how it all works in the field.
My Canada Backpack
If you’ve been watching my videos for long, you’ve probably noticed that one of my favorite field backpacks is the one with a Canadian flag on the front:
It’s a 21L GoRuck GR1 USA. I’ve owned this backpack for the better part of a decade and use it for both field radio and travel. I’ve many other backpacks, but this one is just the right size for almost any of my radio adventures. It also meets the “personal carry-on” size restrictions for even low-cost carriers (at least, at the time of posting). I’ve packed this—with radio—for a week of air travel. I’ve also taken this pack on numerous SOTA hikes.
I have other backpacks I love, but this one strikes the right balance of being big enough without being too big. The main compartment is boxy, somewhat structured, and fits some of my longest field kit items: my Joby Tripod with action camera attached, hiking sticks, Helinox Chair, and carbon fiber telescoping mast.
Ready for Any Activation
While here in Canada, I’ll be activating parks I’ve never visited before, so I need to be prepared for just about any situation. I’m also activating a lot of urban parks in and around Québec City.
When I packed for this trip, I assumed that some of the parks wouldn’t have picnic tables—and some might not even have available park benches. That’s why I pack a collapsible hiking chair and folding knee board. With those, all I need is a flat spot on the ground and I can operate comfortably and complete an activation.
Somewhat Modular
In my pack, there are core items I don’t take out, like my:
Helinox Chair and Ground Sheet
Folding Knee Board
POTA20 Explorer Mast
Logging Pad and Pencil
Throw Line and Weight
A few antenna options
A LiPo battery and USB charger
Garmin InReach
Headlamp
Camera and Audio recording Gear
First Aid, Sunscreen, Nitrile Gloves (for picking up rubbish), etc.
I do, however, rotate the radio kit inside.
My KX2 Field Kit
For example, in this video, I feature my venerable Elecraft KX2 kit (see photos above).
My MTR-3B Kit
But I can take that one out and replace it with either my Elecraft KH1, CFT1, or MTR-3B field kits.
My KH1 Kit
They are all packed in small Pelican cases that easily fit in the center of my backpack.
Weight
When fully loaded, my backpack isn’t exactly lightweight. Besides all of my radio gear, I’m usually packing a bottle of water too. I haven’t weighed it, but it’s relatively heavy. That’s not an issue for POTA since I’m rarely walking more than 10 minutes (and often just 2 minutes) to find a site to set up.
For SOTA outings or hikes that are an hour or more, I shed any items I know I won’t need. That frees up space for more water and lightens the overall load.
For example, on SOTA hikes I plan to only take my Elecraft KH1 transceiver and a few accessories. That means I can leave behind cable assemblies, extra keys and key base, POTA20 mast, ground spike, and throw line and weight. (The KH1 kit includes a minimalist throw line/weight if needed.) It significantly reduces the pack weight.
In fact, I brought a second, smaller backpack for times when I want to go very minimalist with the KH1 or MTR-3B. Both have fully self-contained field kits in individual Pelican cases. This smaller backpack is perfect when I’m with family—say, spending the day in Vieux Québec visiting museums, shops, restaurants, and one or two urban parks where I can squeeze in activations.
Extras
Note that there are a few extras always in my car that I didn’t include in the video because they typically stay there: my portable table, HT, and a 2-liter water bladder.
Also, a bedroll that we use for family picnics. All of these items work for both field radio, family picnics, and lounging on the shores of the mighty St-Lawrence.
All of these items get heavy use since our family spends so much time outdoors.
Video
In the video tour of my field radio backpack from this trip to Canada, I take you through each individual item I packed. Below, you’ll find links to each item (when available), in the order they appear in the video.
This video didn’t take long to shoot because, as you know, I don’t edit my videos—they are what they are.
Putting together all of the links and video chapters, however, takes a long time. I do plan to make a video of my other, more minimalist backpack and my new Red Oxx Gator EDC bag I’m using for all of my extra supplies.
My Red Oxx Gator EDC Bag
I’d love to hear your comments about your own field packs—and I especially enjoy your Field Radio Kit posts for our Field Radio Kit Gallery!
Thank you
Thanks for reading this post—I hope you enjoyed the “What’s in my pack?” video. I certainly enjoyed the process. It was a fun excuse to nerd out about packing!
Of course, I’d also like to send a special thanks to those of you who have been supporting the site and channel through Patreon, and the Coffee Fund. While not a requirement, as my content will always be free, I really appreciate the support.
Note: This first field report from my 2025 trip to Canada happens to coincide with Canada Day (today, July 1, 2025). Happy Canada Day!
by Thomas (VY2SW / K4SWL)
In a previous post, I mentioned that my family was heading north into Canada for a few weeks this summer. This trip wasn’t easy to carve out of our schedule, but we were looking for a bit of escape from all of the Hurricane Helene clean-up—and, frankly, we were craving some family time.
We arrived in Canada (via the Thousand Islands Bridge) on Saturday, June 14, 2025, in the late afternoon. Had it not been such a tiring drive that day, I would have activated Thousand Islands National Park (CA-0099), but honestly? We were all ready to check into our hotel in Brockville, Ontario, take a stroll along the waterfront, and grab some dinner.
Brockville waterfront
The next morning (June 15, 2025), I took a look at the POTA map and determined that we had plenty of time for a park activation before heading into Québec. Several options lay along our route, but one, in particular, caught my attention:
Fort Wellington National Historic Site (CA-4868)
Fort Wellington is a Parks Canada site situated right along the St. Lawrence River, which we were traveling beside. Even better, it was only about a 15-minute drive from our hotel.
We arrived on-site around 10:15 AM local time and immediately noticed the parking area in front of Fort Wellington was barricaded for an event. I saw two Parks Canada rangers standing out front, so I asked them about the event and whether it was okay to park on the street in front of the property. They couldn’t have been kinder.
Turns out, the town was hosting an outdoor BBQ ribs event that Sunday. It’s as if they expected a ham from North Carolina to pick their site for POTA! It was a pretty big event for a town as small as Prescott—there were loads of entertainers, food trucks serving all forms of BBQ, and tours of Fort Wellington.
I asked the rangers if they were familiar with Parks On The Air (they were!) and if I could set up on the NHS property closer to the river and away from all the festivities. They gave me permission.
I should add here that I volunteered not to put any antennas in trees or place stakes in the ground to mount my telescoping carbon fiber pole. As a rule of thumb, I default to my lowest-impact setups when at archaeological or historic sites. I feel it’s not only respectful but also leaves a good impression of ham radio operators for park staff who may encounter activators after me.
My wife and daughters were encouraged to take a free trolley tour of Prescott—how could they resist? They told me later that it was a hoot.
I made my way down to a shady spot under a tree by the river.
To keep things low-impact, I set up my Nemo portable table and Helinox chair, then deployed my KX2/AX1 field kit.
I’ll be honest here…
Propagation had been very rough the previous day, and numbers were indicating challenging conditions during my activation as well. This wasn’t a day I’d normally opt for my most compromised antenna, but here we were. My hope was that I could call CQ on every band possible using the AX1 and somehow gather enough contacts (10 total) to validate the activation.
Backpocket strategy
So here’s the deal: most of us activators aim to get the minimum number of contacts in order to complete a valid activation (10 for POTA, 4 for SOTA).
When I’m activating a park I’ve done numerous times before? I honestly don’t care if I don’t reach 10. I’m just happy to get outdoors and play radio. I try not to let the threat of poor propagation stop me.
However, when I’m activating a new-to-me park, I really want to validate it. I want those 10 contacts—and I’m willing to spend more time on the air to get them.
Technically, since I’m traveling with three other licensed hams (my wife and daughters) and we have two dual-band HTs in the car, I really only need to make four HF contacts. I could make three FM contacts on 2 meters, then three more on 70 cm with my family. That gives me 10 total.
In fact, I also have multiple HF radios and dummy loads in the car, so I could get away with never deploying an antenna at all—I could just log 10 park-to-park contacts with my family.
But where’s the fun in that, right?
Actually, I say that, but it can be fun—in situations where you’re left with no other options—to do P2P contacts with your own crew, as my buddy Vince proves here.
Still, I was determined to log “my ten” all on the HF bands, using five watts into my 4’ AX1 antenna.
The only way to find out if I could? Hit the air!
Gear
Note: All Amazon and eBay links are affiliate links that support QRPer.com at no cost to you.
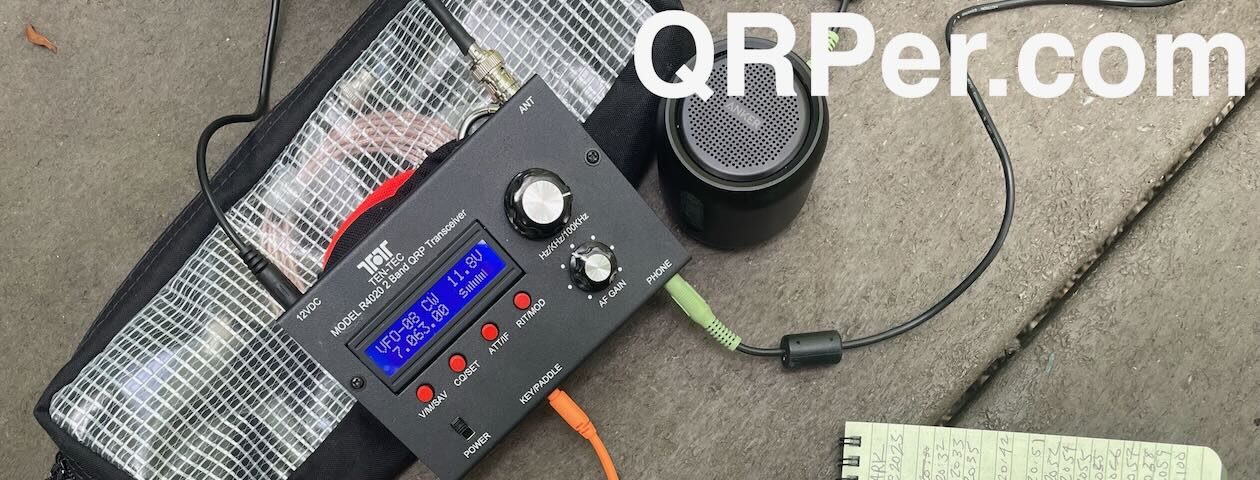

 In my last activation video at Cap Tourmente, I mentioned that park entry would be free under the Canada Strong Pass program. Unfortunately, I was mistaken—national wildlife refuges are not included in that program; it’s geared more toward national parks and historic sites.
 By the time I reached the park entrance, it was about 3:45 PM. That left me just over an hour to deploy gear, hop on the air, and complete an activation.
 For this activation, I wanted some frequency agility, so I opted to deploy my Tufteln end-fed random wire (EFRW) with a 31’ radiator and 17’ counterpoise.
 I backed my car toward the sun so that the open hatch would provide some welcome shade. I then set up my Moonlander table and Helinox Chair Zero for a comfy operating position.
 Note: All Amazon and eBay links are affiliate links that support QRPer.com at no cost to you.
 I started calling CQ POTA on 20 meters, hoping I could log at least ten stations in the ~40 minutes I had left before packing up. Continue reading Short on Time, Yet Loads of Fun: Gusty QRP POTA at Cap Tourmente!


