As many of you know who’ve been following my Post-Helene updates, I simply haven’t had time to do POTA or SOTA activations. And even if I wanted to, most of the POTA sites around me are temporarily closed due to damage from Helene.
Truthfully, I didn’t start my day expecting a POTA activation. I’d planned, if anything, to make a short field radio video somewhere on my property, chase some POTA/SOTA stations, and make any other random contacts.
However, my daughter’s Shakespeare class decided to meet in person, so after dropping her off at 12:30, I had about two hours of free time. Before leaving home, I packed a couple of radio bags just in case I could find a spot for a POTA activation, or at least visit a local park to play radio for a bit.
I realized I was only a 20-minute drive from the Sycamore Flats picnic site in Pisgah National Forest (US-4510), where I’ve activated many times before. This site is in Transylvania County, which wasn’t hit as hard by Helene.
Google Maps showed the site as open, so I decided to drive over. Thankfully, it was correct! When I arrived, the front gate was open and there were a few visitors around.
I could tell the site had some storm damage—some tree limbs down and evidence of flooding from the Davidson River, which wraps around the area. The park service recently upgraded the picnic table pads, but the gravel had washed away, and many tables had either shifted or washed away.
That said, this site fared well compared to parks in Buncombe County. (Chimney Rock State Park is still inaccessible due to major flooding in the town of Chimney Rock.)
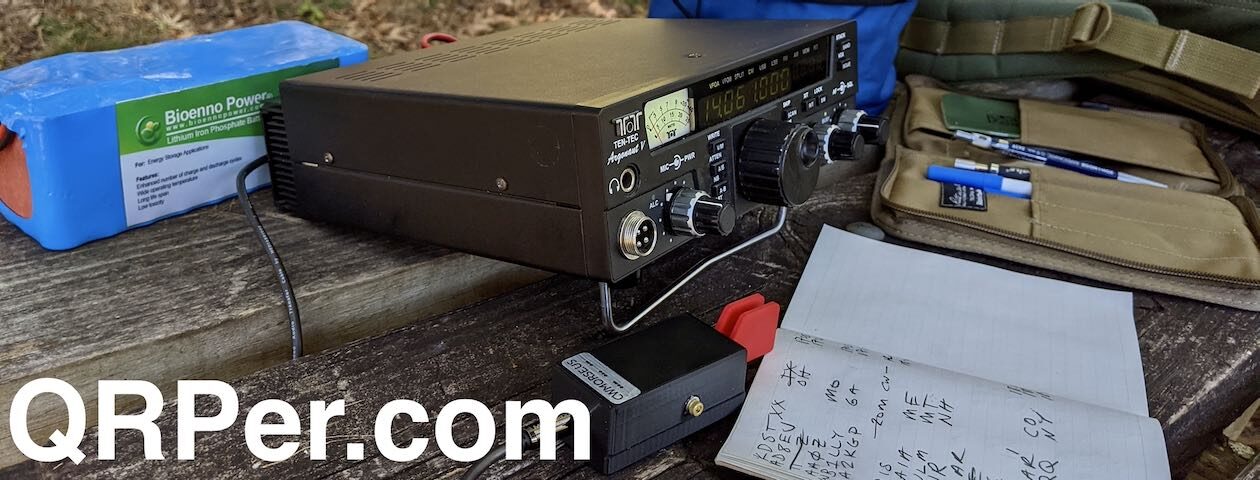
I hopped out, grabbed my backpack and TR-45L, and started recording my activation video.
Since no one was using the picnic shelter at the northeast end of the park (and it had no reservation sign), I set up there. I deployed my MM0OPX End-Fed Half-Wave antenna on a nearby tree, connected it to my TR-45L, and was ready to go!
Gear
Note: All Amazon, CW Morse, ABR, Chelegance, eBay, and Radioddity links are affiliate links that support QRPer.com at no cost to you.
Sometimes you need a break. My sweetie Glenn W4YES booked two Airbnbs, one in North Carolina and one in South Carolina, the second weekend in October as my son’s school was on break for four days. Anyone who knows me will tell you I am a planner. However, it was a nice surprise for me to NOT plan this trip. Glenn picked out the places to stay as well as scouted nearby potential POTA sites. My job was to show up and enjoy the surprise.
Our first two nights were at a property between Uwharrie and Troy, North Carolina. This property borders the Uwharrie National Forest (US-4511). All I had to do for a POTA activation was walk out our front door to the road on the mountain and continue a short distance uphill where the national forest property begins. The road continues past a locked gate to the Buck Mountain Fire Tower, the highest point in the area.
Saturday is my day off from everything including ham radio. However, Glenn and I took a leisurely paced walk to the fire tower just to check it out.
road up to the tower
The Buck Mountain Fire Tower was built in 1936 and is likely the work of the Civilian Conservation Corps. Given the narrowness of the stairs, it is obvious the structure was not built in modern times. The tower base is covered in chain-link fencing but the metal door into the tower base area to access the tower stairs, is not locked.
We returned to the tower at sunset to climb it . You cannot access the top floor as it is padlocked. But one can see for miles from the stair platform below the top floor. The sliver of color on the horizon as the sun dipped below was worth the climb to the top.
red oak acorns with my hand in the photo for comparisonnuts also covered the ground near the Airbnb
Not being one to squander an opportunity for POTA, the next morning I woke at 6 AM and was out the door at 6:45. Light was just beginning to show in the sky. The walk up to the fire tower was not that difficult despite having a backpack of POTA and camera gear and gaining 152 feet in elevation. This is why I walk the stairs at a local parking garage two days a week – so I am not unprepared for some elevation change.
I arrived at the fire tower right before sunrise and had the site to myself! As I figured out where to set up, I thought to myself no one was likely to hear me due to the tall, large metal structure with antennas in front me. In fact, I didn’t bother setting up any video equipment.
fire tower at first light
I chose a spot off to the side of the tower with my back to the woods so I could see anyone coming up the access road . (When you are a woman alone in the woods, you have to think of such stuff.) I opted for the Chelegance MC-750 as there was not much time to operate. I set the Chelegance for 40 meters. The sun was just beginning to rise (7:24 AM) so I figured 40 would be a better band given the early hour.
Chelegance MC-750woods behind me
I settled into my Helinox chair with a blanket wrapped around my legs (the temp was 49 degrees – cold for this Georgia girl), spotted myself (cell service at a POTA site is always a plus!), and steeled myself for a failed activation. If I encounter noise when I do POTA, it is almost always on 40 meters. I figured with the antennas on site and the large metal object in front of me, no one would hear my QRP signal and there would be too much noise for me to hear anyone who did happen to respond to my CQ. I couldn’t have been more wrong!
operating with blanket wrapped around my legs & wool shirt on for warmth
There was noise on the band but not nearly as bad as I anticipated, partially due to the great filters on the KX2. There was a pulsing noise at 7.056 and some sort of signal on 7.054, but 7.049 was clear. It wasn’t long after spotting myself that Ronny WB2MQQ answered my CQ. That began a steady stream of calls over the next hour. The signal I heard originally on 7.054 moved to 7.049 about 25 minutes into the activation so I switched to 7.054 when it vacated that frequency.
set-up
At 8:27 AM, I called QRT because Glenn and I had plans to meet old college friends in Charlotte later that morning. I had 39 contacts at a location I was certain would result in none! It just goes to show you never know what the bands or a location will give you. Better to set up and try than quit before you start, right?
QSO Map for Uwharrie National Forest (US-4511) 10-13-2024
We had a pleasant drive to Charlotte. Glenn met his friend Mike and I, my friend Jennifer. (I call her Jennaboo and she calls me Teridactl.) Afterwards, satiated from lunch, conversation, and laughter, we headed southward into South Carolina for my next activation. Where? Stay tuned…
Jennaboo & Teridactl!
P.S. Want to get to know Glenn and I a little better? Check out my video from our stay near Uwharrie National Forest on YouTube:
Equipment Used
[Note: All Amazon, CW Morse, ABR, Chelegance, eBay, and Radioddity links are affiliate links that support QRPer.com at no cost to you.]
For those who haven’t followed my previous posts, we live in a rural mountain community in Swannanoa, NC, and were hit hard by the unprecedented destruction caused by Hurricane (later Tropical Storm) Helene. I’ve been sharing regular updates to chronicle our recovery efforts and, naturally, to highlight the vital role amateur radio has played throughout.
Since things have stabilized on our road, we’ve shifted focus to the administrative side of disaster recovery—insurance, FEMA, and contractors for repairs. I’ll dive into that in a future post.
Community Radio Update
It’s been a busy week. As I mentioned in my last post, I’ve been evaluating options for the best off-grid communications network for our rural community. My VHF handy talkies were incredibly useful after the storm—when we had no other way to communicate between households—so much so that our neighbors want a permanent solution that everyone can access.
I truly appreciate all the helpful feedback from my last post.
Meshtastic
Some of you suggested Meshtastic as a great option, and I agree. Here’s why:
1. It requires no license.
2. It’s effective if enough nodes are deployed in the neighborhood.
3. It’s affordable.
Meshtastic is an off-grid, text-based communications network. I first experimented with it during Hamvention 2024, where hundreds of nodes were deployed across the Dayton, Ohio area. (Thanks again, N5FY, for the Meshtastic device!) I plan to introduce it to our community by setting up a few test nodes.
While Meshtastic is a great supplement to our off-grid communications, our neighbors prefer portable radios and voice communication. This allows us to run nets and pass traffic more easily while on the move.
Although Meshtastic is relatively simple for electronics hobbyists and makers, it’s still a bit quirky for the average person and not entirely user-friendly yet. I’m confident the system will evolve, but for now, I’ll hand-pick a few neighbors to experiment with it.
Other radio services
Many of you suggested MURS (Multi-Use Radio Service) as a good alternative, and I agree it’s better than FRS (Family Radio Service) for several reasons. However, our valley has significant elevation changes and is heavily forested. We need a system that supports higher-powered mobile/base units and external antennas, plus the option for a repeater, which MURS doesn’t allow.
CB Radio is also a great option except that the CB bands are a bit crowded and unruly here. I think it could be difficult finding a clear channel to run a neighborhood check-in net, for example. Still a good back-up comms option for any household.
Why Not Ham Radio?
Of course, many of you encouraged me to consider getting the neighborhood licensed with Technician class licenses. While I’d love for everyone to become ham radio operators, it’s a big ask, especially in the aftermath of Helene, when most people are focused on rebuilding their lives. That said, I’m thrilled that two neighbors have already expressed an interest in studying for their exams!
However, we need a more accessible radio solution that can be deployed immediately, and that’s where GMRS (General Mobile Radio Service) and PLMRS (Private Land Mobile Radio Services) come in.
The two contenders
I’ve been weighing the pros and cons of both GMRS (General Mobile Radio Service) and PLMRS (Private Land Mobile Radio Services). Both allow for a repeater, mobile/base stations, and external antennas with power levels up to 50 watts if needed. A well-placed repeater would ensure reliable communication throughout our valley, even with the 1,000-1,200 foot elevation changes, and allow us to expand the system to more households.
I was about to submit the paperwork for PLMRS frequency coordination when I realized I should consult with our local fire department first. If they had a strong preference, I needed to know before investing.
I put out a call on the Mount Mitchell (N2GE) repeater for Dennis (N4DIN) who is typically stationed at our main Swannanoa Fire Department. I couldn’t reach him, but I did get a call back from Dan (N2DMG) who just so happened to be in the Swannanoa area for the day.
Dan was the primary net control during the critical first 10 days after Helene, so you may recognize his voice if you listened to the Mitchell repeater on Broadcastify.
We arranged to meet at our mutual friend Ed’s (N4EDX) home. Ed has been a key figure in our community’s recovery efforts, and Dan also invited Randy (N2GE), the owner of the Mount Mitchell repeater.
Our community relied on all three of these fine hams post-Helene. It was pure serendipity that we were all able to meet on short notice yesterday morning.
A compelling case for GMRS
Here’s the funny part: Dan and I arrived at Ed’s house first and after catching up a bit, I asked for his advice about using either GMRS or PLMRS. He agreed that PLMRS might have a slight advantage over GMRS, but both were good options.
Then Randy arrived.
Dan asked him what he was up to that day and Randy said, “I’m going to install a new GMRS repeater on a summit here in Swannanoa.”
I asked Randy if the repeater would cover our valley and he replied, “Oh yeah. Easily. It’s an ideal location.”
Dan and I looked at each other and said, “Well, that settles it.”
I mean, what are the chances that I’d wake up yesterday morning and meet with the Mount Mitchell repeater owner, who just happens to be installing a new GMRS repeater to cover our community? Crazy, right?
From L to R: Thomas (K4SWL), Dan (K2DMG), Ed (N4EDX), and Randy (N2GE)
On top of that, Randy is the reason the Mount Mitchell repeater is so reliable and effective. If he’s installing a GMRS repeater, we know it’ll be done right.
So GMRS it is!
Randy mentioned the repeater would be up and running by Friday (!!!), and just like that, the burden of sourcing a repeater, a site, and licensing was lifted.
Thank you, Randy!
GMRS Radios
Now, here’s where I could use your help.
I’ve been researching GMRS radios, but the market is flooded with options, and reviews (websites and YouTube) are often unhelpful—many are just glorified product brochures based on free product. I’d love to hear from those of you who have actual experience with GMRS radios, especially handheld models that are:
• Easy to use and program (via USB or Bluetooth)
• USB-C rechargeable
• Rugged, possibly water-resistant or waterproof
• Have a standard antenna connector
• Well-reviewed by users
While I know some in our community already have GMRS radios, I’d like to standardize on a single model that I can recommend to neighbors. This way, I can program them consistently (via USB or Bluetooth), ensuring they all function the same. It will also make it much easier to teach everyone how to change channels and use the repeater effectively.
I’ve ordered a pair of Baofeng UV-5G Plus GMRS radios (this pair from Amazon–affiliate link) and plan to order a Tidradio TD-H8 based on Randy’s advice. I’d appreciate any additional suggestions!
Once I’ve selected a radio model, I’ll set up a series of community meetings/classes to teach everyone how to use the radios and how to participate in a community net.
Final thoughts…
As always, I’m deeply grateful for the kindness and support we’ve received. If I haven’t had a chance to reply to your emails or comments, please know it’s because I’ve been focused on helping my family and neighbors during this challenging time.
A huge thank you to Vince (VE6LK) and all the amazing contributors on QRPer.com! I’ve been enjoying all the guest field reports—it’s been a wonderful escape.
Thank you all for being such an incredible community and support network!
For those who haven’t followed my previous posts, we live in a rural mountain community in Swannanoa, NC, and were hit hard by the unprecedented destruction caused by Hurricane (later Tropical Storm) Helene. I’ve been sharing regular updates to chronicle our recovery efforts and, naturally, to highlight the vital role amateur radio has played throughout.
As I mentioned in my last update, now that we have a road open to all vehicular traffic and our community has been reconnected to the grid, we’re all looking toward the future—our new “normal”—focusing on returning to work (those of us who have work to return to), repairing our property, and helping those in our community who are still in need.
The Vast Impact of Helene in WNC
Over the past three days, we’ve ventured further from home, and we’ve seen the broader impact of the storm in our county.
Many local businesses we relied on are simply gone. Grocery stores are still struggling to replenish refrigerated and frozen items, which means we must drive 35-40 minutes (one way) to find these essentials. Due to damaged or wiped-out bridges and road closures, the trip is longer than it used to be. All traffic is now concentrated on the functional roads, so driving times are extended even more.
Two local grocery stores, our pharmacy, post office, hardware store, produce store, and numerous restaurants were all flooded. Some have announced they will not re-open.
A woodworking shop my wife and I visited the day before Helene—where they were making a sign for us—was completely washed away. Only part of their cinder block walls remain.
The tire shop where we bought tires the day before the storm was severely damaged by flooding, as were the dozens of shops and stores nearby, including two grocery stores. Even our local Lowe’s in east Asheville was severely damaged by floodwaters. See photos here.
On Friday, I took my car to the dealership for a safety inspection follow-up and alignment. They were also flooded by about two feet of water, but were able to continue most operations. Their building had been stripped from the floor up to two feet for future repairs.
Unfortunately, they couldn’t perform the alignment because that machine was damaged. Fortunately, the general manager moved their entire inventory of cars to higher ground.
While driving through north Asheville a few days ago, I saw numerous historic homes split in half by large, old-growth trees.
The storm was selective. Areas within a 500-year floodplain were devastated. Some communities, like ours, faced tornadoes and high winds that downed many trees. Yet just a few miles away, there might be little sign of wind damage. Isolated communities along rivers—Chimney Rock, for example—were completely wiped out. Simply erased from the face of the planet.
Everyone I know has friends or family who lost their homes or businesses. Some even know those who lost their lives. The stories are heartbreaking and hard to process.
Our Booth Fairy in downtown Swannanoa. She was located opposite our World Central Kitchen center and offering free advice, compliments, hugs, slow claps, thumb wars, and more!
Despite everything, the community here is strong and resilient. I haven’t spoken to anyone who plans to leave permanently. Frankly, there are few places where you can be sure you’ll never face a natural disaster. Meteorologists believe big storm systems like Helene will become more frequent.
Back to (Some) Normalcy
At home, my daughters will return to their community college classes (they’re dual-enrolled as high school seniors) next Monday. It will have been a full month since they’ve been in class. One of my daughters’ Shakespeare classes resumed rehearsals last Friday after ensuring everyone could travel to the venue safely.
A few friends have pointed out that I’m starting to relax a bit, noting that I wrote an email that was all about radio. A good sign.
POTA and SOTA Plans?
This weekend, I told my wife, “You know? Maybe I could fit in a POTA activation this week. I think I’m ready.”
Of course, she fully endorses the idea.
There’s a small issue, though: to activate a POTA park, I’ll need to drive at least an hour away.
I checked this weekend, and all my local POTA sites are temporarily closed. This includes national parks, state parks, and historic sites. Even some trails I often activate, like the Mountains to Sea Trail, are only accessible via the Blue Ridge Parkway, which is also closed.
Pisgah National Forest is vast—tens of thousands of acres—so I might be able to find an accessible spot that isn’t barricaded. But I’m hesitant to activate a site that’s technically closed due to Helene–no matter how accessible.
One possibility is to combine a POTA activation with visiting my father in Hickory, NC. Most of the parks east of Hickory are open, as storm damage was minimal in those areas.
Someone recently suggested I take this time for a little SOTA, but that’s even more complicated than POTA. Many of the local summits I enjoy activating are either accessed via the closed Blue Ridge Parkway or trailheads on rural roads that have been damaged.
Even if I could reach a trailhead, most trails are likely littered with blowdowns, making the trek slow. Later this year, I hope to help with trail clean-up crews once more trailheads are accessible and my right shoulder has fully-recovered.
That said, I can reach some of the smaller summits in the foothills of NC when visiting my father. While there will likely be some blowdowns, I expect fewer than in the high country. If timing works out, I might be able to hit one!
If all goes well, I plan to make a video this week regardless—perhaps something from my property as I hunt stations. Who knows?
One thing’s for sure: I could use some proper radio therapy. Although I’ve been using radio heavily these past three weeks, it’s been all about emcomm and community organization. It’ll be nice to play radio just for the fun of it again!
Four Words…
Thank you so much!
Last night, we met with some of our amazing neighbors and did a little astronomy. My daughter Neva (K4TLI) took this photo of Comet Tsuchinshan-ATLAS with my iPhone.
As always, we are deeply grateful for the kindness and support we’ve received. If I haven’t had a chance to respond to your emails or comments, please know it’s because I’ve been focused on helping my family and neighbors during this challenging time.
A huge thank you to Vince (VE6LK) and all the fantastic contributors on QRPer.com! I’ve read every comment and message, though I haven’t had the time to respond to each one.
I’ve been thoroughly enjoying all of the guest field reports! What a wonderful escape! Thank you!
You are an amazing community and support network. Thank you so much!
For those who haven’t followed my previous posts, we live in a rural mountain community in Swannanoa, NC, and were hit hard by the unprecedented destruction caused by Hurricane (later Tropical Storm) Helene. I’ve been sharing regular updates to chronicle our recovery efforts and, naturally, to highlight the vital role amateur radio has played throughout.
Let me say that it’s a comforting feeling to no longer have a tree leaning against and pinned to the roof of our home. It’s nice not to hear the creaking sounds of it rubbing against the metal roof every time the wind blows.
I’m incredibly grateful to the arborist crew that removed the trees from our vacation rental house and QTH. I mentioned that earlier this week the original arborist team we’d scheduled had informed us that they couldn’t remove the tree because they couldn’t bring a crane up our dodgy road.
Our new crew worked without a crane— which, of course, took more time— but they skillfully removed the tree using ropes, pulleys, and a solid understanding of physics. True pros!
We’re so thankful for their efforts.
This same crew ended up removing trees from several other homes on our road. They’re doing incredible work.
More Road Improvements
Our two-mile-long, steep, and curvy road has been getting a lot of attention from the Kentucky Department of Transportation this week. Even though Kentucky is two states away, crews from all over the country have come to help. This particular road crew has been amazing.
The road is now mostly two lanes again. While it’s not paved— and likely won’t be anytime soon— it’s passable by nearly any vehicle. We are all so grateful, and it looks like these improvements might even hold up against future weather challenges.
Improvements and Challenges
Now that our mountain community has electricity (and water), a stable and safer road, and access to every home (except one with a particularly long and mud slide-damaged driveway), life is beginning to normalize.
We’re feeling stable enough here to plan a visit to my father in Hickory this weekend. We’ve postponed visiting him for three weeks because of how unstable things were here, and we’ve kept all our travel within half an hour of the QTH.
After speaking with many neighbors, I feel like their experiences are reflective of everyone in WNC right now. Some are back to work, especially those who can work from home with satellite internet. Some want to work, but their employers— many in the tourism industry— were hit hard by Helene. One friend who works as a solar installer said that literally all of his company’s inventory was destroyed in the flooding along the Swannanoa River.
Tourism, the biggest industry in the mountains, has ground to a halt. A friend mentioned that many people he knows under 30 are now unemployed. For instance, the Grove Park Inn, one of our largest resorts, laid off all of its employees. They hope to reopen soon, but I imagine many guests have canceled for the rest of the year.
Helene couldn’t have come at a worse time, as the fall leaf-peeping season is upon us. Many businesses (including our vacation rental) make the bulk of their income during this period.
The counties shaded in red are discouraging tourism while the ones in green are welcoming them.
While some WNC counties are still open for business, others— like Buncombe County— are discouraging tourism. I can’t imagine tourists descending on the area right now, as they would only get in the way of recovery.
A Neighborhood Radio Network
In the background, I’ve been exploring the idea of creating a robust off-grid radio communications network for our rural, remote community.
As mentioned in previous posts, we’ve been using amateur radio (VHF) to communicate within our community. While most operators aren’t licensed amateurs, in times of emergency, that’s not an issue.
As things return to normal and our mobile phone network is fully restored, I want to find a long-term, off-grid communications solution.
I recently spoke with my friend George (KJ6VU), who has gone through this process in his own neighborhood. He provided insight based on experience and I’m most grateful.
While I’d love for everyone in my community to become licensed hams, I know that’s not realistic. That said, I think we’ll gain a couple of new hams after my evangelizing! For now, we need off-grid communication options that are more accessible and use something more akin to channelized radios. Here are some options I’m considering:
FRS (Family Radio Service): These radios are surprisingly effective but have low power output, and you can’t replace the built-in antenna. This won’t work across our entire two-mile road, especially with the 900-1,000 foot elevation change. This is really the option of last resort for us.
GMRS (General Mobile Radio Service): This is a more viable option. GMRS radios are more robust, you can replace the antennas, and there are even 50-watt mobile/base options. The downside is that each family would need to apply for an FCC license ($35) and use the same family callsign. There’s also a lot of GMRS traffic, so even if we standardize on tone and channel settings, interference could be an issue. We could install a repeater for better coverage.
PLMRS (Private Land Mobile Radio Service): This option would require more paperwork and upfront costs, but it has benefits. A frequency coordinator would find unused frequencies for our region, and if enough households sign up, the cost per household would drop. We could standardize on channelized DMR units, and interference from outside users would be minimal. Households wouldn’t need individual callsigns, and we could opt for a repeater if necessary.
I’ll be sorting through these options in the coming weeks and reaching out to neighbors to gauge interest. There are already enough people interested to make this a reality—it’s just a matter of deciding which service to use. At this point, I’m leaning toward PLMRS. If you have any experience or advice, feel free to comment!
Thank You
99.9 FM has been a local channel completely devoted to community information and news post-Helene. A part of my morning routine was to turn on this C.Crane radio and listen in the mornings.
As always, we are deeply grateful for the kindness and support we’ve received. If I haven’t had a chance to respond to your emails or comments, please know it’s because I’ve been focused on helping my family and neighbors during this challenging time.
A huge thank you to Vince (VE6LK) and all the fantastic contributors on QRPer.com! I’ve read every comment and message but haven’t had the time to respond to each one. My time on the internet is limited, as most of my energy is going into normalizing life.
You are an amazing community and support network. Thank you so much!
Because I receive so many tips from readers here on QRPer, I wanted way to share them in a concise newsletter format. To that end, welcome to QRPer Notes, a collection of links to interesting stories and tips making waves in the world of radio!
Foldable feet for small radios
Many thanks to Randall (K8UFM) who shares the following tip:
Thomas,
I found these on Amazon and they work great for small radios.
PONICOR 2PCS Zinc Alloy Mini Foldable Laptop Stand, Portable Computer Keyboard Riser with 2 Adjustable Angles, Self-Adhesive Invisible Notebook Stand and Keyboard Lift for Desk (Black)
This is Tom WW8D in Salem Va. I sure do enjoy your videos on youtube. I received a new KH1 yesterday and I just wanted to tell you that I have a clear waterproof case like the one you but its a slight bigger fromHarbor Freight. Its an Apache 550 and everything fits perfect in it.
I purchased the Apache 550 a few days prior to Helene hitting our area. I intend to make a post or video soon showing how this apache case compares size-wise with my Pelican cases. It is, in general, a much larger case than the M40 I currently use with the KH1. See photo below.
Video: Demystifying SWR
Many thanks to Vince (VE6LK) who writes:
Here is an EXCELLENT video explaining return loss, why lossy coax hides SWR issues and many other things:
For those who haven’t followed my previous posts, we live in a rural mountain community in Swannanoa, NC, and were hit hard by the unprecedented destruction caused by Hurricane (later Tropical Storm) Helene. I’ve been sharing regular updates to chronicle our recovery efforts and, naturally, to highlight the vital role amateur radio has played throughout.
Late Sunday afternoon, as my wife and I were reviewing our financials and plans on the porch, we suddenly heard a group of neighbors down the road cheer, “Woo hoo!”
We exchanged a knowing look.
Power had been restored to our road.
What a moment! A dedicated power line crew from Indiana had spent several long days installing new poles and running new lines along our two-mile stretch.
As I’ve mentioned before, we installed a solar power system with battery backup (read all the details here), so the only way I could confirm grid power had returned was by checking the app that monitors our system.
This news was a tremendous morale boost for everyone. With grid power restored, neighbors no longer need to worry about propane deliveries or managing generator runtimes. They can now fully rely on their refrigerators again.
Late Sunday evening, I stepped outside into the front yard, and for the first time in weeks, the valley was quiet—no more generator hum.
Simply amazing. We’re deeply grateful to the line crews who traveled from across the U.S. and Canada to restore service.
Estimates
While I doubt Duke Energy is reading my posts, I do plan to reach out and thank them for their hard work. I also want to offer a suggestion about providing power restoration estimates to customers, particularly after such a major event like Helene.
During smaller outages (the kind that happen when a tree falls on a line), Duke’s website and app typically provide an estimated restoration time. More often than not, power is restored a bit earlier than the estimate. I think this is a good practice, as it gives customers a realistic, “worst-case” time frame.
However, during this event, Duke understandably refrained from providing detailed estimates. We were told that 90% of the county would have power by Sunday, but there were no specific estimates for harder-to-reach areas like ours.
I assume that some Duke field engineers were instructed to err on the side of caution when giving estimates to customers they encountered. In our case, a Duke employee told us last Thursday that we should prepare to be without grid power until Christmas.
This information reached us just before our community meeting that day, leading many of us to adjust plans and purchase supplies for a long-term outage.
Then, on Saturday, we spoke with a power line worker contracted by Duke who had been dispatched to our neighborhood. He informed us that power would be restored in a matter of days and that new poles had already been set on the lower part of our road. He estimated we’d have power by Monday, maybe even Sunday.
Sure enough, by Sunday evening, the lights were back on.
While we were overjoyed, the earlier estimate of “Christmas” was more than a little stressful. Many of us made decisions and spent money based on that initial forecast. Perhaps the Duke employee felt he was managing our expectations, but the result was unnecessary stress and over-preparation.
I thought this might be an isolated incident, but a ham radio friend in Fairview shared a similar experience. His community was told to expect months without power, only to have it restored within days.
I’m not here to complain. My point is simply that being straightforward and realistic in assessments is far better than offering a doomsday scenario.
Disrupted Services
While power restoration is a huge victory, we’re still facing some longer-term challenges.
For one, unless people have recently signed up for Starlink (and I’m certain this disaster has led to a massive surge in subscriptions), there’s no internet on our road, and it’s unlikely to return anytime soon. AT&T is our only service provider, and their lines were in poor condition even before Helene hit. Earlier this year, we switched to HughesNet satellite internet because our AT&T DSL was unreliable and painfully slow.
There’s been talk that AT&T might replace the old copper line with fiber, but I have my doubts. Rural communities like ours often get overlooked because we don’t have the subscriber density of urban areas.
We’re also still without mobile phone data service. My 4G hotspot, which we rely on to supplement bandwidth for our daughters’ online classes, hasn’t worked since September 27th.
Our road, too, remains a challenge. The Kentucky DOT crew did an excellent job patching up two rough areas on flat parts of the road, but it’s still not easily passable by vehicles with low ground clearance. Our road will stay one-lane until the NC DOT can step in and fully repair it to their standards and add guard rails at some point int he future. NCDOT has never faced destruction on the scale of Helene before, so it’s going to take time to address all the damaged roads and bridges that were compromised or wiped out by flooding and debris flows.
Even simple things like grocery shopping take longer now. Ingles, the dominant grocery chain in western North Carolina, was hit hard by Helene.
I took this shot at our local Ingles two days post-Helene when a neighbor and I rode our mountain bikes into town. Note where the water line is on his white truck that was parked in the parking lot (where he thought it would be safe) during the storm.
Our local store was flooded (see photo above), and many locations remain closed. Their massive distribution center in Swannanoa/Black Mountain was also damaged. In the Asheville area, we have other options, but Ingles is the only grocery store in some of the rural towns in WNC. Hopefully, they’ll get back on their feet soon.
Our favorite local produce shop was almost certainly damaged beyond repair. The owner, Mr. Ledford, is a family friend and a valued member of the community. We always tried to shop locally and relied on his store for fresh produce.
It’s heartbreaking to see how many local businesses in Swannanoa were affected by the storm. This disaster is going to change the business landscape here for years to come.
Some school services are expected to resume by October 28, provided water restoration in Asheville stays on track. Our daughters will have missed a full month of their senior fall term. Since they’re dual-enrolled at the community college, all of their classes will go on their college transcripts. If there’s a silver lining, it’s that this break has given them time to focus on university applications and scholarship opportunities.
Proud Papa: I must say, I couldn’t be prouder of my daughters (K4GRL and K4TLI). They’ve been doing an incredible job helping both at home and within our community. Both have taken on net control duties for our local simplex frequency and have been passing traffic on the N2GE (Mount Mitchell) repeater. Their dedication and skill have been vital to our recovery efforts and the broader communications network in the area. Thank you, ladies!
Arborists Update
Yesterday morning, the arborists we hired to remove the trees from our property called to let us know they wouldn’t be able to bring their cranes up our tricky road. There are two sections that are too steep and rough.
That news was a bit of a blow, as we’d spent days finding an arborist with an opening in their schedule and who could make it to our area.
But within an hour, a neighbor called on the radio to tell us that a family friend from Ohio, who owns a tree service, was on the way to help—free of charge. They’d traveled overnight to Western North Carolina just to lend a hand.
When the arborist saw our rental house, he said, “You don’t need a crane if you can use mechanical advantage. Let’s get this done.” Using ropes and pulleys, he and his crew made quick work of the tree.
They’re coming back this morning to help with the tree our residence as well.
Their generosity has been overwhelming, and although they’ve offered to do this for free, we will pay them to help pay it forward—so they can continue helping others who might not be able to afford tree services and perhaps keep them in the community a bit longer.
As I’ve said before, this disaster has truly brought out the best in humanity, and we feel fortunate to be surrounded by such kindness.
In summary
Things are certainly improving, and we are incredibly grateful for all the progress made so far. Rather than expressing concerns, I hope this message offers a constructive perspective from those of us navigating life in a post-disaster environment, with the intention of highlighting opportunities for improving communication in the future.
Thank you
Once again, we are deeply grateful for the kindness and support we’ve received. If I haven’t had a chance to respond to your emails or comments, please know it’s because I’ve been focused on helping my family and neighbors through this challenging time.
A huge thank you to Vince (VE6LK) and all the fantastic contributors submitting articles on QRPer.com!
Vince has been an absolute lifesaver, stepping in to handle the formatting and posting of field reports and articles. It’s been such a pleasure to read all the incredible reports and witness QRPer.com truly flourishing while my attention is focused on recovery at home.
On that note, I’ve been reading every comment and message, but simply don’t have the time to reply back to everyone. My time on the internet is very limited these days because I’m still outside working most of the day.
What an amazing community you all are! Thank you, thank you, thank you!
Editor note – Please enjoy this guest post from Conrad Troutmann N2YCH.
Thank you “deputy” Vince, VE6LK, for assisting in managing some guest contributor posts for QRPer.com. I’m so happy to hear Thomas and his family rode the storm out safely and send him my best wishes and hope things return to normal soon. Here’s my contribution to help keep QRPer.com going while Thomas gets his house back in order. 73, Conrad, N2YCH
September 22, 2024
Lately, the high frequency bands (15/12/10 meters) have been hit or miss, largely due to recent space weather events. Today, taking a look at WSPR beacon reception at my QTH on the Top Spotters web site, I noticed that 10 meters was open and I was spotting quite a few stations on the band.
Top Spotters Ranker – https://wspr.rocks/topspotters/
The weather here was sunny and beautiful and my batteries were all charged up, so it seemed like all signs were pointing to a POTA activation at Silver Sands State Park, US-1716. I usually activate on 20 meters, however with 10 open, I thought I’d try for some DX and give hunters that don’t normally hear me on 20 a chance to get the park. When I was trying for my Worked All States POTA award, I appreciated it when the Hawaii and Alaska activators activated on the higher bands so I had a chance to get them all the way from the East Coast. I like to return the favor when I can.
I decided to give my Elecraft KX2 a workout as well. Paired with my Buddipole vertical up 10’, I figured I would do well.
Buddipole Vertical with Elevated Counterpoise using Electric Fence PostKX3, Samsung Computer and Bioenno Battery with a view looking towards Long Island Sound at Silver Sands State Park in Connecticut
I got set up, checked and adjusted my computer time using JTSync and started calling CQ POTA on FT8. I called and called and no one answered. I checked PSKReporter and I was being spotted, but still, no answers. I was receiving well, in fact, I was picking up stations as far away as South Africa. “Hello, is this thing working? Can you hear me now?”
Just to be sure my equipment was working, I shifted to “hunt and pounce” mode. Rather than call CQ, I started answering stations who were calling CQ. It’s not my preferred way to get the QSO’s needed to officially activate the park, but sometimes that’s what you need to do. I have JTAlert set to sort received stations from strongest received signals to weakest. I’ve found based on prior experience that my chances of completing a QSO are much higher with stations that I’m receiving with strong signals. So, I answered a CQ for a station in Texas coming in at +19 and he answered right away. One in the log.
I did this for the next 30 minutes or so and managed to get six stations, about half I called and the other half answered my CQ. I moved around the waterfall looking for openings, but it was busy and challenging. Just for grins, I decided to see if FT4 was active. Sure enough, I was receiving many stations there as well. I called CQ and immediately had stations answering. I did the rest of the activation on FT4 and had a steady stream of callers. I completed the activation with 17 total QSO’s, my map is below. I make these maps using the Adventure Radio log analyzer. You can import the same log you upload to the POTA page and put the grid square in and it generates the map.
Activation QSO Map made with the Adventure Radio Log analyzer
Interestingly, all of the USA contacts were on FT8 and when I moved to FT4, I picked up all of the EU ones. I was happy to see after I uploaded my log to the POTA site that almost all of the hunters who got me were active POTA hunters and had accounts at the POTA web site. In fact, one was actually a park-to-park QSO. PA4PA was at the Sluiswaai Nature Reserve, NL-0219 in the Netherlands.
If you haven’t read my previous posts, here’s the situation in a nutshell: we live in a rural mountain community in Swannanoa, NC, where the bridge connecting us to the outside world was swept away during the 1 in 1,000-year flood event caused by Tropical Storm Helene.
Recovery Period
Since my last update, I’ve had to take a break from chainsawing and heavy lifting due to an old mountain biking injury that flared up, causing significant pain in my right shoulder. I’m currently on medication prescribed by my doctor and focusing on giving that arm a rest.
Fortunately, one of our amazing neighbors is a physical therapist and gave me an evaluation on Friday. She has me on a treatment plan that seems to be working, and she taped my shoulder with therapeutic tape to help stabilize it. I’m incredibly grateful for her help.
In many ways, I’m my own worst enemy. Like my grandpa, I have a hard time stepping back when there’s work to be done or someone who needs help. If my mom were still around, I’m sure she’d be quick to point this out! But I realize I need to take it easy for now to heal properly so I can help later.
Amateur Radio’s Vital Role
Over the past 17 days, the N2GE (Mount Mitchell) repeater has shifted from being the primary source for gathering real-time information and conducting wellness checks to now serving as a liaison between aid groups and those needing assistance. If you’ve been monitoring, you’ll hear it’s as busy as ever.
This week, I’ve been focused on connecting aid groups with the parts of Western North Carolina most in need. I can’t overstate the importance of amateur radio in facilitating these connections.
Government resources and private aid groups often operate on different communication networks, making coordination challenging. This has led to some areas being overlooked while others are inundated with supplies they can’t manage. For example, one local church in north Asheville has become a relief hub due to social media posts but is now overwhelmed with donations and lacks the logistical infrastructure to manage them. It’s a bit crippling for an all-volunteer group.
I’ve been attempting to: 1) gather information on resource hubs, 2) compile a list of communities in need along with their specific requests, and 3) link the two and arrange deliveries. So far, I’ve made good progress, especially with some amazing resources here in central Buncombe County willing to drive supplies to more remote areas in Yancey, Mitchell, and Avery counties.
Aid Coordination
On that note, yesterday, my wife and I headed into town to connect with one of the largest aid resources in Swannanoa: a coalition of churches and private individuals from various states that have taken over a large facility near I-40. They’re as organized as a private aid agency can be.
We met with one of their logistics managers and set up direct communication, so I can provide them with specific community needs. We also informed them about a local church that needed heavy equipment like skid steers (with forks) to manage palletized donations.
Their site was buzzing with activity, with trucks coming and going, and volunteers lining up for tasks ranging from chainsaw work to laundry services. It was incredible to witness the coordination.
We also checked in with the Swannanoa Fire Department to relay the status of our community and see if they needed anything. They’ve been a critical hub for both government and private relief efforts.
On our way home, we couldn’t leave without accepting meals prepared by the Swannanoa First Baptist Church—such loving persistence! Their generosity was deeply appreciated.
Our mobile post office.
At the post office, we helped out a bit too.
Proudly displayed in the window of the mobile post office.
They were open on Saturday to accommodate those in the community collecting mail and packages
They’re based in a brilliant temporary mobile post office and have an additional shipping container (that lacks lighting) to manage larger packages and parcels.
Our amazing postal workers and friends were pretty busy, so Heather and I helped set up some battery-powered lanterns and headlamps they’d just acquired so they could locate packages more easily in that dark shipping container.
I may have mentioned that our local post office was flooded, so this mobile setup could be in place for a long while. We love our hardworking postal workers–they’re such valuable members of our community.
A Few Photos
Heather took some photos as we drove around town. Many of these appear blurry mainly because everything (and I do mean everything) is covered in fine silt that was left over from the flood. When the wind blows in town, it looks like a dust bowl. The town is even spraying down the roads with water just to keep it somewhat at bay.
The field next to the Swannanoa Harley Davidson shop has become a key helicopter distribution site. There’s a constant stream of helicopters taking off and landing.
Tree Removal
As I mentioned in the last post, we’ve contracted arborists to remove the trees from our houses. They’re scheduled to come today, but it’s unclear if they’ll make it. The crane they need may not be able to handle the dips and dodgy conditions on our patched-up road. The crane operator was supposed to assess the situation this weekend, but I haven’t heard back yet. Two other homes on our road are also awaiting tree removal, so we’ll see how things unfold.
One of many dump truck deliveries on our road yesterday.
In addition, the Kentucky DOT is continuing to patch our road. We’ve confirmed they’re bringing it up to DOT standards, just adding more stability. We certainly welcome any repairs. The road is still our biggest concern, aside from power restoration.
We’ll roll with the punches. Removing the trees is a priority, especially before the weather turns. While we’ve been blessed with dry days, our vacation rental has no protection from rain pouring through the ceiling where a tree came down.
Power Restoration?
One positive? We’re so fortunate to enjoy dark skies here at the QTH year-round, but lately it’s even been better because there’ve been no lights from neighboring towns.
I mentioned previously that a Duke Energy employee estimated we might not have power restored before Christmas. While our community accepted this as reality, a crew from Indiana working on our lines gave us more optimistic news yesterday. Barring any unforeseen complications, power could be restored this week. Possibly in a couple of days! This doesn’t mean everyone will get power immediately—some homes with slab-mounted transformers have additional damage—but it’s a positive development.
At our community meeting, though, we all agreed: “We’ll believe it when we see it.”
Again, we’ve been incredibly fortunate to have solar power throughout this ordeal. Still, restored power will be a huge relief for our neighbors, and we’re hopeful it’ll happen soon!
Thank You So Much!
Olive: one of our amazing neighborhood dogs.
Once again, we’re overwhelmed by the kindness and support we’ve received. I apologize if I haven’t been able to reply to emails and comments—I’ve been spending most of my energy helping my family and neighbors through this challenging time.
Also, a HUGE shout-out to the amazing Vince (VE6LK) and all of the contributors here on QRPer.com! THANK YOU!
Vince has completely taken over formatting and posting field reports and articles to QRPer.com. It’s been so fun reading through all of the brilliant field reports and see QRPer.com in full-swing.
What an amazing community you are! Thank you, thank you, thank you!
If you haven’t read my previous posts, here’s the situation in a nutshell: we live in a rural mountain community in Swannanoa, NC, where the bridge connecting us to the outside world was swept away during the 1 in 1,000-year flood event caused by Tropical Storm Helene. We’ve also confirmed that a tornado swept through our valley, which explains the large number of trees down on houses and roads.
Arborists in High Demand
One profession in particularly high demand here, post-Helene, is arborists.
As a community, we worked together to clear our road and driveways within days of the storm hitting—an enormous task. But some trees require professional equipment and expertise, especially those needing cranes.
About 80% of the homes in the upper part of our road had trees fall on them, including our two homes—our primary residence and our vacation rental cottage.
Difficult to see in this photo, but the tree that hit our house chopped off the top portion of one of our panels and likely damaged a couple more.
At our main house, three trees fell: two landed on our Subaru, and one hit our roof, damaging two solar panels.
We were able to fully uncover “Ella Sue” a few days ago.
Thankfully, after a thorough two-hour inspection by an insurance appraiser, we were relieved to learn there was no structural damage or water penetration.
The vacation cottage wasn’t as fortunate. A tree punched through the master bedroom ceiling. I attempted to trim the branches around the hole, but the weight and tension of the tree made it too dangerous to cut without risking further damage.
In both cases, we need a crane to safely remove the trees.
I’ve been in touch with arborists we’ve used before, but they’re a small company, and the wait could be up to two weeks. With perfectly clear and dry fall weather right now, we knew we had to act quickly before the rains return.
Most arborists in Western North Carolina are so overwhelmed that they’re only doing “chop and drop” jobs—removing trees from homes, dropping them to the side, and moving on. No debris cleanup or additional work.
After numerous calls, we’ve contracted a well-recommended arborist who may be able to remove the trees from both of our houses and two others in the neighborhood.
I should note that any job involving a crane is incredibly expensive, but neither of our insurance companies raised concerns about the cost.
Fingers crossed that the arborists keep their schedule and safely remove the trees. It will be a relief to stop hearing the tree groaning on our roof and to prevent more water damage in the vacation home!
Grid Restoration
As I’ve mentioned in previous posts, we’re incredibly fortunate to have solar power with battery backup. It allows us to live in relative comfort, keeping the fridge and freezer running if we manage our energy use carefully.
It’s now been two weeks without power on our road.
Duke Energy, along with line workers from across the U.S. and Canada, have been working around the clock to restore electricity in Buncombe County.
Yesterday, while we briefly had cell phone service, we received this text:
Duke Energy: We are making more progress than anticipated repairing the considerable damage left by Helene and restoring customers. Of the 50K remaining outages in NC mountains, we estimate restoring about half by Sunday night. The remaining outages will require significant construction of roads, bridges, and/or electrical infrastructure. We will provide you with additional details about your outage as soon as possible. Rest assured we will not stop working until we have restored every customer who is able to receive power.
We’re among those outages that will require major reconstruction of infrastructure.
While we’ve known this from the start, we’ve been holding out some hope as we’ve seen rapid progress on other areas. Some neighbors were thinking we might get power back in a few weeks.
For a few days, hope grew as we saw a parade of line workers along the two-mile stretch of road connecting us to the Bee Tree reservoir and the rest of the world.
Yesterday, while on our way to a 4:00 PM community meeting and potluck, we passed a Duke Energy vehicle on our road for the first time.
One neighbor stopped the worker and asked, “Are you surveying the damage?”
The lineman replied, “I came up here to count how many power poles were destroyed. I stopped counting after ten, further down the road.”
When asked about the timeline for restoration, he said, “I think we’ll be doing well if we can restore power here by Christmas.”
Sobering news, but we weren’t shocked. We’ve all adjusted our expectations, and most of us have some form of backup power. The community meeting and potluck helped keep spirits high.
Ham Radio Workbench
Last night, I had the pleasure of recording an episode of the Ham Radio Workbench podcast. While I’m a regular on the show, this time I was also the guest, sharing my experiences post-Helene and discussing how radio played a crucial role in emergency communication.
It was so energizing to hang out with friends—it was the first “normal” thing I’ve done in two weeks.
Our “priority bandwidth” renewed the previous day, so my connection via Skype was solid. We still have no mobile internet here, only voice and basic texting. So I couldn’t rely on my mobile hotspot as a backup.
The discussion was fantastic, and I feel fortunate we have solar power and satellite internet to make this possible. All other internet here is still down, and it could be that way for a while.
Feeling Fortunate
I was telling George, Vince, Mike, and Mark last night (sadly, Rod was traveling) that for most people, things improve each day after a disaster like this. Recovery is a process. I overheard a Samaritan’s Purse volunteer say to a homeowner whose house flooded, “What happened here was horrible, but you’re a survivor, and your life will improve each day from now.”
Scene from the neighborhood where I spoke with the amazing people with Samaritan’s Purse.
It’s a powerful sentiment, but it made me think of those in war zones. For them, there isn’t one event followed by recovery. It’s constant devastation. My friend Wlod (US7IGN) in Kyiv, Ukraine, has lived through years of uncertainty and attacks. Power outages, explosions, and devastation are part of daily life for him.
Natural disasters are tough, but I really feel for those in places where the struggle never seems to end.
Thank You
Once again, we’re overwhelmed by the kindness and support we’ve received. Thank you so much!
I apologize if I haven’t been able to reply to emails and comments—I’m spending most of my energy these days helping my family and neighbors navigate this challenging time.
Connecting an international community through low-power field radio adventures.
Please support QRPer by adding us to your whitelist in your ad blocker. Ads are what helps us stay online. All of our ads are ham radio related--no junk, we promise! Thank you!

 I could tell the site had some storm damage—some tree limbs down and evidence of flooding from the Davidson River, which wraps around the area. The park service recently upgraded the picnic table pads, but the gravel had washed away, and many tables had either shifted or washed away.
 That said, this site fared well compared to parks in Buncombe County. (Chimney Rock State Park is still inaccessible due to major flooding in the town of Chimney Rock.)
 Since no one was using the picnic shelter at the northeast end of the park (and it had no reservation sign), I set up there. I deployed my MM0OPX End-Fed Half-Wave antenna on a nearby tree, connected it to my TR-45L, and was ready to go!
 Note: All Amazon, CW Morse, ABR, Chelegance, eBay, and Radioddity links are affiliate links that support QRPer.com at no cost to you.
 I hopped on the air and started calling CQ POTA. After the RBN picked me up and the POTA website auto-spotted me, the contacts started rolling in! Continue reading My First Post-Helene POTA Activation!


