If you’ve been following QRPer or the SWLing Post for long, you’ve no doubt noticed that I am a certified pack geek.
I tend to buy high-quality packs from companies that both design and manufacture their products in the USA (i.e. Red Oxx, Tom Bihn, Spec Ops Brand, GoRuck, etc.).
In other words? The packs I evaluate are pricey, rugged, and backed by a lifetime warranty. Their quality is uncompromising and at the top of the market.
In addition, I’ve even helped some of these pack manufacturers during product design and development stages, much like I do for radio manufacturers.
Radioddity contacted me a few weeks ago and asked if I’d be interested in testing a backpack they’ve started selling that’s designed with field radio operators in mind. I checked out the info they sent me and the backpack design did, indeed, look bespoke–or custom–for field radio operators. In other words, it wasn’t a laptop bag merely labeled as a radio bag.
But the inner pack geek/snob in me worried that a $45 mass-produced backpack would only lead to disappointment. This is an area where I have tremendously high standards and feel like I get my money’s worth when I happily fork out $200-450 US for a pack.
Still, it’s difficult to find field backpacks that are designed to accommodate radio gear. So I told Radioddity to send me one–which they did for free (meaning, at absolutely no cost to me).
First impressions
 The Raddy backpack arrived in two days (basically, everything from Radioddity seems to arrive within two days with tracking and updates).
My first impression was that the Raddy pack was very lightweight, but then again, I tend to buy backpacks made with Ballistic Nylon or 1000 weight Cordura–i.e. materials that are on the heavier side.
Radioddity mentions that this pack is “dust and rainproof” but then go on to say that it’s ” [m]ade of durable water-resistant polyester fabric with metal zippers[…]. [N]ote it’s not totally waterproof.”
Thus I believe I would classify this pack as water resistant only. I have had the Raddy pack out in light rain and the water seemed to bead up on it. The zipper openings–while covered–have no proper weather seals, but I see where it would be more than adequate for most rains or showers you would encounter on a day hike. I’m not sure I’d feel comfortable leaving it out in the rain for an extended period of time, though. Part of its ability to keep rain out relies on wearing the pack in an upright position.
The outer polyester fabric feels durable and is pleasant to the touch–it’s not abrasive like some heavier grade materials.
Opening up
First thing I wanted to do was open the main compartment to look inside. But first, I had to find the main zippered compartment.

Seriously! Turns out, unlike most backpacks, the main compartment opens from the back or shoulder harness side of the pack rather than the front. They obviously used this design to give the Raddy backpack a better operating surface for the rig inside.

Unzipping the main panel is a little awkward when compared with other packs mainly because the shoulder straps feel like they’re a bit in the way. Still, once I got used to this unconventional design, it became second nature to open.
The zippers are metal, but not YYK–zipper pulls are included.
Main compartment
The main compartment opens to 180 degrees if you wish, but sits comfortably at a right angle so that your radio (which will likely live in the pocket mounted on the interior side of the shoulder harness panel) will rest on a padded surface.
There are Velcro flaps on the hinge points of the interior of the pack that you can detach to have the pack open fully.
Rig Pocket
There is one large padded interior pocket that is the obvious choice for most portable transceivers–especially those with a front faceplate like the IC-703 Plus, Yaesu FT-891, Xiegu G90, etc.
This main pocket has openings at the back corners so that the rig’s power cord, coax line, and accessory cords can all be managed within the pack if you’d actually like to operate from the pack. Admittedly, I’m not certain I’d leave cables and cords attached to the back of my transceiver during transport, though, as it could cause some stress at the connection points on the back of the radio; stand-offs and/or right angle connectors might help with this, however. The back of the pocket is padded and so is he floor of the backpack, so your rig should be otherwise very protected when the backpack is placed on the ground.
The main internal pocket also has two elastic straps designed to hold the radio in the pocket during transport. I think this is a great idea, however, I’ve found in practice they quite easily slip off all but the largest field radios. Speaking of which, the largest field radio I own is the Mission RGO One which is ever-so-slightly too large for this pocket. I assume similarily-sized radios like the Ten-Tec Eagle and Elecraft K2 would not fit.
I wish the pack had a frame sheet and the main pocket had at least one compression strap attached to it to hold a radio in more firmly. The pocket is large enough that even my IC-703 Plus slides around inside.
Of course, this main pocket could also hold a laptop or tablet.
The main interior pocket is not well suited for “blocky” transceivers like the Elecraft KX3, Icom IC-705, or Xeigu X5105 for example. Although the pocket can hold most of these, they would simply fall to the bottom and could not benefit from the full dimension.
Battery pocket
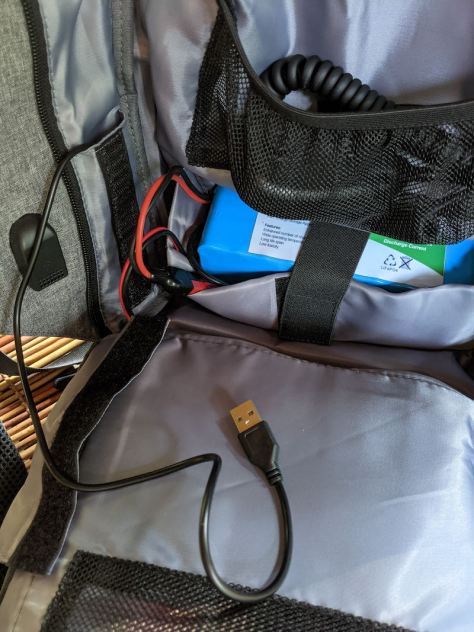
The second large padded pocket inside the Raddy backpack is ideal for holding a battery, ATU, or even the “blocky” transceivers mentioned above. I’m calling it a “battery pocket” but in truth it’s obviously designed to also hold transceivers.
This pocket is shorter and has one elastic strap (I’d prefer a compression strap) with a Velcro attachment to hold the contents inside. It’s attached to the front panel of the backpack and when the backpack is zipped closed, this pocket and the rig pocket fit side-by-side.
When I’m carrying the Icom IC-703 Plus in the Rig compartment, I place my 15 Ah LiFePo4 battery in this compartment.

If I’m carrying the Elecraft KX3, I place it in this battery compartment and my tablet and clipboard in the main pocket.

Like the main rig compartment, there are openings at the bottom corners to allow cable management and routing. I’m not so sure how convenient or practical it would be, however, to operate a radio from this particular internal pocket.

Mesh pockets
 There are also two internal mesh pockets: one attached to the front panel and the other attached to the large rig compartment pocket.
There pockets would be ideally-suited to hold small cords, a key/paddle, and possibly a small hand mike.
While the top of each pocket has an elastic band, I would not trust these open pockets to hold small items like adapters. They could easily fall out if the backpack were turned upside down.
In addition, if you have heavier items inside, the pocket may sag a bit and look more like an accessories “hammock.”
Exterior front pocket
 There’s also one large, flat exterior pocket on the front panel of the Raddy backpack. This pocket might be easy to overlook if the zipper is tucked inside.
The zipper is centered and oriented vertically. When opened, there’s a surprising amount of room inside, and all sides of the pocket are padded.
The opening isn’t large enough to fit my main clipboard (which is fine, because I would store it inside the main compartment), but it is large enough to allow one to store a tablet, notepads, pens, cables, etc. inside.
While the zipper opening has nearly overlapping seams which should help shed water, the vertical orientation of the zipper would potentially allow for heavy rains to penetrate the zipper opening, especially if that front pocket was bulging with gear. This is why conventional packs tend to have a horizontally-oriented front pocket zipper and rain flap over the zipper.
USB access
There’s also an USB access port on the pack that allows for a USB device to be plugged in on the outside and tethered to a device or battery on the inside. I assume this would mainly be used as a battery pack connection.

This would be handy during travels, but I doubt I would ever use it in the field.
Comfort
I’ve used the Raddy backpack on two short hikes and find it, overall, a very comfortable backpack. I do find the harness a little on the small side, but I have broad shoulders. For those with slightly smaller frames, I think this would work well.
The carry handle is attached across the top of the backpack/shoulder straps.
I also find this a bit odd, because if the pack is fully-loaded and heavy, it puts a lot of strain on the attachment points of the handles and at an angle–meaning, the double stitching isn’t providing the strength it otherwise could if the pack weight was distributed evenly on the top of the backpack body instead of the shoulder harness.
The back of the pack is padded with a mesh that allows for your back to relatively cool as you hike.

Overall, it’s a very comfortable pack, although I wish the shoulder straps felt more robust and I wish the main handle wasn’t attached to the shoulder straps.
Low profile
One real bonus with the Raddy pack is that it’s low profile, has an “urban” look–in other words, fairly nondescript. This pack does not look like a radio manpack, nor is it tactical in design. If I were to take this through a large city, no one would assume this pack was full of radio gear. It looks like a normal, modern backpack.
There’s real security in a low profile, stealthy design.
In addition, other than the front vertical pocket, this would be an incredibly difficult pack for a pickpocket to steal from..
Quality
The Raddy backpack is designed to hold up to 44lb/20kg of weight. I’m not sure I’d ever need or want exceed 20-30 lbs with it myself.
Radioddity also backs this pack with an 18 month warranty. Exceptional. Radioddity told me they would offer a replacement if any stress points on the pack fail during that warranty period. They also told me they’d handle any warranty replacements within 1 business day. Having worked with Radioddity now for a year, I do believe they’ll stick by this quick response/handling time.
Summary
Is the Raddy Multi-function Backpack for you?
Keeping in mind (again) that I normally review packs at the high end of the market, I’m not familiar with with what would be expected at this $45 price point.
What I can say is that if you’re looking for a compact pack that’s designed to hold and protect radio gear, this is a good option and certainly one of the most affordable I’ve seen on the market.
This pack would best suit the casual park activator that doesn’t need to pack in a lot of extra supplies like field safety gear. It’s designed to only hold a radio, battery, ATU, cables, and a few other accessories–I’ve configured it with a number of radios and found that I can easily pack an entire QRP station inside.
I would use this pack for drive-up parks and summits, and especially for urban outings-. This would be a great pack to wear into a park in or near a city where I wouldn’t want to appear as if I’m a radio operator preparing for field combat scenarios. You could wear this pack into a historic POTA site and politely ask staff if you could activate the park with the low-profile gear you have inside. It would be much less intimidating and conspicuous than a tactical or large hiking pack.
This would also be a great pack if you plan to fly and wish to keep all of your radio gear in a carry-on. Being a compact backpack, the size should easily fit the description of a “personal” carry-on for most airlines (always check before departing, though, as these dimensions will vary by airline). With your gear loaded, it’ll might appear “intentional” and more normal as you go through Airport security as opposed to your gear being simply tossed in a suitcase.
The Raddy pack is not perfect: I would like something more rugged, with a better suspension system and even better weather-proofing around the zippers. I’d also like more rigid padded pockets inside with adjustable straps. I assume all of these things, though, would substantially add to the cost of the pack and might be overkill for most casual operators. While I wouldn’t choose this pack for a 10 mile round-trip hike to a SOTA summit, I would choose it for some casual picnic table operations and, again, for travel.
I love the fact it can be configured so that you can operate directly from the backpack. You could simply open up your pack in the field, connect the antenna, and operate from the open backpack.
I do like Radioddity and find that they stand behind their products. I’m happy to see that they’re offering a competitively-priced radio pack to supplement their product line. I hope other retailers and manufacturers will do the same.
Click here to check out Raddy Multi-function Backpack the at Radioddity ($44.99 US).
PS: It’s my policy that if I receive a free review product from a retailer or manufacture–and they don’t want it returned–I either use it or give it away. Over the years I’ve had the pleasure of giving away review gear to readers and subscribers who I knew would appreciate it. In this case, I know exactly who I’ll be giving this pack to because she’ll give it a thorough workout and is need of a compact radio pack! Maybe I can even convince her to write her own review in a year or so–? We’ll see!


