Testing the Diamond RHM-8B portable screwdriver antenna
By Steve (MW0SAW)
I have seen many amazing K4SWL SPOTA pileups on YouTube using the AX1 antenna and the extension coil. I have fancied trying a small walkie talkie style whip antenna for a while now.
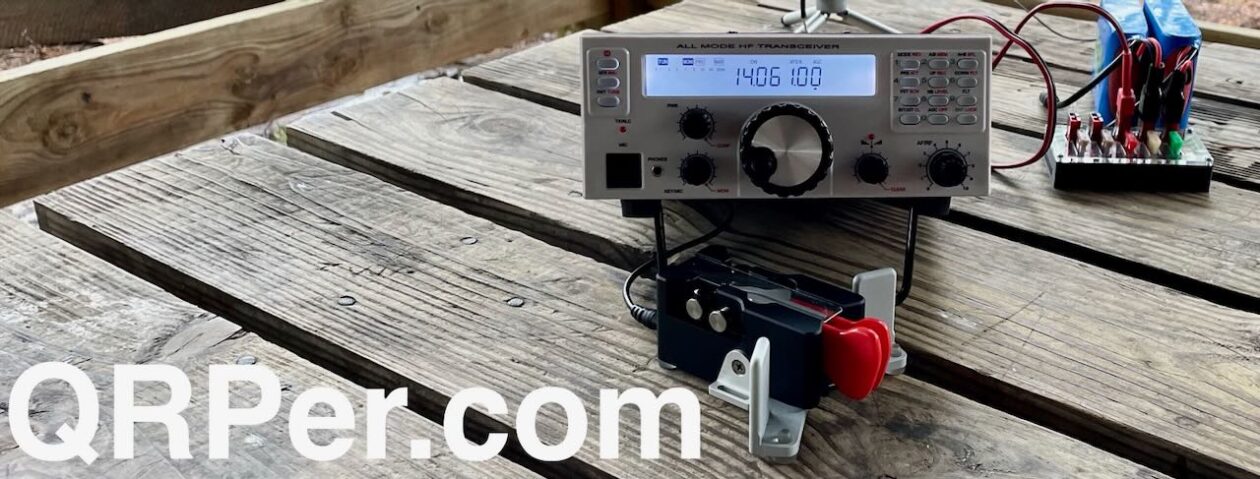
I have a AX1 and KX2, but my Yaesu FT-818 was the radio with a fully charged battery. So I pulled out The Diamond RHM-8B, an antenna I purchased a while ago but never used in the field. It has a BNC fitting and you tune the antenna by sliding the coil up and down for loudest signal and best SWR. They make one very chunky walkie talkie together! Diamond products do have a fantastic air of quality about their construction.
Radio conditions weren’t great, and bands were busy being the weekend of the CQ WW CW contest. So decided to go the my nearest summit that’s amount 12mins in the car and about a 25mins hike up. This was GW/SW-034 Garth Hill. On a clear day you can see out over the Bristol Channel into England, but mist/fog were the order of the day.
I wore the FT-818 and rubber duckie around my neck with the neck strap for a couple of 2m FM contacts, before setting up on 40m SSB sitting on the ground. Without a tablet or chair with me I found it most comfortable to support the radio between my knees.
I was really pleased to get 9 QSOs in the log, some 59 reports, some difficult contacts. Moving on to CW I managed another 8 QSOs with an S2S into Germany.
All the QSOs were UK and mainland Europe, but I was more than happy with the haul for such a small antenna.
So conclusion about the Diamond QRP antenna.
Can you qualify a SOTA summit on a short 1.5m whip antenna? Absolutely, no sweat!
Does it work as well as a full size wire antenna? Of course not. Nowhere close.
However, its makes such a great rapid deploy, ultra packable option with the Yaesu. Not quite as small as a AX1 but you have the bonus of not requiring a tuner. Definitely something for a travel bag if you own a FT-817/818.
Many thanks to Conrad (N2YCH) who shares the following field report:
Connecticut POTA/SOTA combined activation
By: Conrad Trautmann, N2YCH
November 24, 2023
The author, Conrad, N2YCH at POTA K-1717, Sleeping Giant State Park & SOTA Mt. Carmel, W1/HH-002
Looking for my next activation challenge, I wondered if there were any overlapping POTA parks with SOTA summits in the state of Connecticut. I’ve only done two SOTA activations to date, one in Maine and the other in New Hampshire. I thought, there must be a few in Connecticut.
On my home computer, I brought up both the POTA map and the SOTA mapping page and quickly realized that it would take too much time to try and compare the two maps. Instead, both sites offer KML exports, so I exported all of the Connecticut parks from the POTA site and the summits from the SOTA mapping page and imported both files into Google Earth Pro. A yellow push pin represented the POTA locations and a blue triangle the SOTA locations. It was easy to spot the overlapping sites. Mt. Carmel and Talcott Mountain are both POTA parks and Summits for SOTA. There are a few other SOTA sites that have POTA trails that cross over as well.
I decided to tackle Mt. Carmel, SOTA W1/HH-002 also POTA K-1717, Sleeping Giant State Park. I’d already activated Sleeping Giant for POTA before, but not from the summit. For a SOTA activation to count, the operator must be within the “Activation Zone” as defined by the SOTA rules.
The Connecticut state web site has good maps and information about the park and showed that the trail to get to the summit is an “easy” 1.6 mile hike. I thought that sounded like a reasonable distance. What they don’t tell you on the web site that it’s also a 600’ climb up in elevation from the trailhead to the summit. I knew it would require a climb, but I didn’t expect that. I made the trip up, but it was challenging, especially carrying my backpack with the radio, a VHF handheld, antenna, batteries, computer, water, etc. I plan to travel lighter the next time.
The Mt. Carmel trailhead
Before I get to the activation, a little about the park. It’s called Sleeping Giant because from a distance, the ridge looks like a person laying on their back.
It’s located in a mountain range called Hanging Hills which extends North from Long Island Sound through Connecticut and Massachusetts up to the Vermont border. Quinnipiac University is across from the entrance to the park and the Quinnipiac Indian Tribe once inhabited the area. Please indulge me as I also share the ghost story of “The Legend of the Black Dog of the Hanging Hills.”
“If a man shall meet the Black Dog once it shall be for joy; and if twice, it shall be for sorrow; and the third time he shall die.”
As the legend has it, the Hanging Hills area is haunted by the Black Dog. You don’t want him to cross your path three times. It’s this story that is the basis for the SOTA “Master of the Black Dog” certificate. “An activator must have entered valid activation logs from each and every summit in the Hanging Hills Region and must have survived all of the activations.” There are currently four summits in the Hanging Hills Region. I need this award.
So far, I have completed activating one of the four summits and did NOT see the black dog. Wish me luck on the remaining three.
The view about half way upThe Lookout Tower
The lookout tower at the summit is the main attraction of the park. Built in 1936, it is listed on the National Register of Historic Places. It stands four stories tall and is 739’ above sea level, providing a 360 degree view in all directions and a clear view over New Haven to Long Island sound. According to the Sleeping Giant Park Association, over 100,000 people visit it each year.
I’ll admit, after hiking the trail up, the last thing I wanted to do was climb four stories more. I did go up before I left to get some photos.
For the activation, I found a bench to set up on with space behind me to set up the Chelegance MC-750 antenna. I ran FT8 on 20 meters beginning around 10 am ET and after roughly 30 minutes, moved up to 10 meters. My experience running QRP on digital modes is that I will cover the Eastern half of the US and some Europe on 20 meters. I can usually make contacts out to the West Coast and into Europe on 10 meters especially later in the day. By activating on both frequencies, I tried to cover as much area as I could to provide the best opportunity for hunters and chasers to reach me.
Setup: MC-750 vertical antenna in grass behind bench and KX3 and computer on bench
Samsung Galaxy Book Flex2 Alpha 2 in 1 Laptop with Outdoor mode
Coverage from the summit: Yellow pins are 20 meters, Green pins are 10 meters
Looking at the map, you can see that I covered the Eastern portion of the US on 20 meters. It was also 10 am local time and still pretty early on the West coast. When I shortened up the antenna and retuned the KX3 for 10 meters, I started making contacts with Germany, Italy and other EU stations.
The hike down from the summit was much easier, the temperature had warmed up a bit and I stuffed my coat into the backpack for the trip down. When I got to my Jeep, I noticed a number of empty picnic tables nearby and decided to set up and get a few more POTA contacts while I was there. I ended up with 48 total for the day.
The summit I was at was an easy one (worth 1 point) compared to many and it was challenging to me. I came away from the experience with a new appreciation for the challenges SOTA activators face. I also came away with a new goal, to get the Master of the Black Dog certificate!
Many thanks to Bob (K4RLC) who shares the following POTA field report:
Woodbury Wildlife Management & Heritage Area (K-8151), Britton’s Neck, Marion County, South Carolina
by Bob (K4RLC)
Woodberry WMA (K-8151) is a 26,000 acre natural area over an hour inland from the Atlantic Ocean and formed by the confluence of the Great and Little Pee Dee rivers. Geologically, it is an area called the Coastal Plain given that in geologic time all this land was under the Atlantic Ocean. In North and South Carolina the Coastal Plain is basically land between Interstate 95 and the Atlantic Ocean. Historically, this land has importance as a site of many Revolutionary war battles. The namesake of Marion County is the famous American Revolutionary War General Francis Marion, known around here as the “Swamp Fox”. His military tactics against the British Army formed the origins of guerrilla fighting. Britton’s Neck is known named for the Britton family who settled the area around 1735 and operated the very important Ferry across the Pee Dee River, carrying farmers and their crops as well as soldiers. After this area had its timber harvested by a paper company, the state of South Carolina with help from the Nature Conservancy, acquired it.
I like to operate in such off the track places as it really feels closer to nature. Given that they have been activated only a few times, they are rare for POTA and many want to contact them, especially in CW. The dirt road coming in ran through an old cemetery, started in the early 1800s. On the other side of is a small cleared area with a kiosk that has a map and tells you what’s in season for hunting. In addition to the usual animals, the listing says that it’s always open season for feral pigs also known as wild Boar, given their destructive nature on the environment and nearby farmers’ fields. Near the kiosk is a metal mailbox like structure with a latch on it. When you open it, there is a sign in book where you list the date, your name, and what you’re hunting for. Five of the entries directly above me said they were “COON” hunting, and another hunter wrote “Hog”. For my listing I just wrote “radio” and thought that might puzzle a few hunters ?.
The set up was the usual with the old Alinco DX-70TH which is been used on the beach so many times, the beach sand and salt water in it now gives it a distinctive chirp on transmit. Old-timers let me know that a chirp was present (599C) but I think it’s just a unique part of the radio signal. The antenna was a 17 foot Chameleon MilSpec whip on a small metal tripod (no coil), set on top of a large aluminum screen wire mesh, now known as “the magic carpet”. As there were no picnic tables, I set up in the backseat of Alanna’s K4AAC van. Operating was pleasant with the cool day and no bugs. There were some other equipment issues. As the Alinco does not have an internal keyer, I used an old MFJ portable keyer with the key made from two stiff pieces of copper and rubber feet for pads. You get a forearm workout using this. (Apologies for my sending.)
Nevertheless, I quickly worked 40 stations all the way from Utah to Italy on 20 CW. This portable station was lighting up the Reverse Beacon with very strong signals up the East Coast and down in the Caribbean.
After activating, I wanted to explore more and drove the single lane dirt road further into the woods.
Cell service was pretty good and I got to talk with my uncle Randy who had been part of a hunting club here 40 years ago. Randy shared some stories of comradery, mostly hanging out with his young son Edward and friends, cooking around an open campfire, telling tall tales to each other. He knew the area well and told me I had about another 10 miles of dirt road before hitting a dead end at the river. As daylight was failing, it seemed wise to turn around and save the longer trip for another time. It was only fitting that in the dark, in the headlights in front of me, I saw a large black bear lumbering across the dirt road, dragging a dead deer behind it. This was truly nature.
Many thanks to Brain (K3ES) who shares the following guest post:
CW POTA activations can be enjoyable, and theraputic. This photo shows the me activating from a picnic shelter on a beautiful spring day.
Learning CW: Beyond the Basics
by Brian (K3ES)
I just finished my last class ever for learning Morse Code. It was a lot of work, but it really improved my ability to communicate using the CW operating mode. More importantly, this class taught me how to actually learn CW, by diagnosing the problems and barriers that inhibit improvement. Then it gave me tools I can use to overcome those problems and barriers at any stage of my CW journey. You see, I am not yet where I want to be, but I have made a giant leap forward, and I now know what I have to do to keep improving.
I guess it might help to tell you a bit about myself as a radio amateur, about the start of my CW journey, and about what motivates me to improve.
I got licensed in 2020, when I was working from home, and spending way too much time locked away from the rest of the world. I saw a video about amateur radio, and thought it might provide an opportunity for increased personal contact despite social distancing. I studied during my plentiful spare time, and passed the Technician, General and Amateur Extra license examinations in short order. Once I was licensed, Elmers at Skyview Radio Society near Pittsburgh, PA helped me to learn and explore the hobby, encouraging me to be radio-active.
I found a compelling niche hunting for Parks on the Air (POTA) activators, and I started hearing about all the benefits that CW brought for activating parks: tiny radios, efficient use of power, and automatic spotting via the reverse beacon network. That motivated me to work on learning Morse Code.
A full CW station packed for a hike weighs just a few pounds. This kit, based around an Elecraft KX2, fits in a small shoulder bag, includes all needed components and some spares, along with creature comforts for the activator.
I started my CW journey using a variety of apps and online tools. I practiced with club members. Thomas Witherspoon’s YouTube channel became a staple in my CW diet. Every character copied was a victory. All of this helped my ability and confidence.
I completed my first CW-only POTA activation in July of 2021, and have not looked back. But, during one of my early park activations, I had a defining experience. I could copy callsigns and standard exchanges with ease, but something off script would throw me off balance.
When a hunter finished his exchange and sent something followed by a question mark, I was lost. We worked through it, and after several slow repeats, I understood that he had sent “COUNTY?”. He wanted to know what county I was operating from. I easily sent him the name of my county, but the experience left me certain that I needed to improve my copy skills.
It doesn’t get much better than this. Operating CW under my favorite tree duing an activation of K-1345, Cook Forest State Park, in northwest Pennsylvania.
That certainty started me on a new phase of the journey, one involving formal training classes. I took a few classes, and each class helped – I could look back and see the progress. But none of them left me ready for CW communication beyond predictable exchanges. I knew there had to be an approach to me get there, and there had to be something more efficient than working endlessly to copy code bulletins or on-air QSOs between other operators.
CW Innovations provided just that method with their Comprehensive Instant Character Recognition (CICR) Course. CICR is not just a class, but a structured process for improvement, which includes self-diagnosis, targeted practice, a supportive learning environment, and partners working together to put new skills into practice on the air.
This figure provides an overview of the Comprehensive Instant Character Recognition Course. Modules focused on each of the elements are introduced as the 10-week course progresses. (Click image to enlarge)
Instantly recognizing a received character is liberating. Rather than performing mental translation, you learn to recognize each code sound pattern as a letter, number, or punctuation mark; in much the same manner that you immediately recognize the printed symbols making up the text on this page. CICR provides the tools and methods for achieving instant character recognition, but also emphasizes that new weaknesses in character recognition will continue to appear as your copying of code becomes more challenging. When that happens, it is time to circle back and further improve your recognition skills. The same tools continue to work. Continue reading Beyond the Basics with CW Innovations→
Many thanks to Conrad (N2YCH) who shares the following field report:
Top Band POTA Activation Field Report
By: Conrad Trautmann (N2YCH)
November 15, 2023
In February 2023, Brian, K3ES, wrote here on QRPer.com about designing and building his own QRP portable random wire antenna he called the VK160 to work on 160 meters to make parks on the air contacts. This was in order to achieve his goal of getting the James F. LaPorta N1CC award where activating on 10 bands at 10 parks is needed. It’s not as easy as it sounds. As an avid parks on the air activator myself wanting to try activating on 160 meters, I built my own antenna based on Brian’s design and used it to get my first contacts ever at a park on the “Top Band.”
The Antenna
Brian used a 9:1 unun that he built himself in his design. Rather than build my own from scratch, I took a short cut and bought a QRPGuys 40m-10m UnUnTenna to use as the starting point for my VK160. Even though it says 40m-10m, it works on 160 meters, as you’ll see.
With shipping, it cost $36.00. It comes with all of the parts you need to assemble the antenna except for the wire. The main thing I liked about the QRPguys design was that the circuit board also doubles as a wire winder, so it’s all self-contained.
I sourced the wire from Davis RF and ordered 200’ of “POLY STEALTH – 26 AWG, 19 0.22000 44.00 STRAND COPPER CLAD STEEL, BLACK PE JACKET.” It cost $50 including shipping. The polyethylene insulation prevents the wire from knotting up. I measured out 144’ for the radiator based on Brian’s design and used the remaining wire as the counterpoise.
The completed antenna
I did a back yard test once it was all assembled and it worked great. For $86, I had created my own VK160. I encourage you to read Brian’s detailed design/build report here.
The POTA Activation – November 14, 2023
Now that I had completed building and testing the antenna, the next challenge was how to actually put it to use at a park. 160 meters doesn’t really come to life until dusk or after dark. In Connecticut, most state parks close at dusk. The park rangers clear the parks to close them at the best time to activate the band. However, there is one park nearby my QTH, the Stuart B. McKinney National Wildlife Refuge, K-0228, that has an annex called the Great Meadows Unit in Stratford with a nice parking lot that is not gated and has no posted hours. I arrived and set up at sunset, around 4:30 pm ET and operated from 5 pm until 6 pm. It gets dark here early in the Northeast US in November.
Another challenge is how to manage and string up 144’ of wire. Brian suggested an inverted V over a tree branch in his write up. There were no trees nearby, so instead I used a Spiderbeam fiberglass pole secured to my Jeep to get the feed point up in the air about 25 feet. I used RG58 cable from the feed point to the radio.
Spiderbeam fiberglass pole supporting VK160
Finally, I used one of my $3.00 Home Depot electric fence posts to secure the far end to keep it tight and up in the air and set up the antenna as a sloper. I laid out the counterpoise on the ground under the sloping wire.
By the time I had all of this set up, it was getting dark. I connected my Elecraft KX3 to the other end of the RG58 cable and to my surprise and delight, I was already receiving stations.
My KX3 has a built-in ATU and one tap of that ATU button and it tuned to 1.0:1. I started the activation right at 5 pm local time and in about 15 minutes, I had six QSO’s on 160 meters.
The PSK Reporter map showed me being received by stations on the dark side of the gray line in the Northeast. It was pretty much what I expected for QRP power on the low frequency. Then, the next ten minutes things were quiet. It appeared I had gotten everyone who could hear me.
Since this is a random wire antenna, it should work on all bands so I decided to test it on 80 meters. Again, the KX3 tuned right up and I got six more QSO’s. I was surprised to see Del, N2NWK from Washington, DC pop up on JT Alert. I have a an alert set for stations calling CQ POTA. Del was also at a park. I called and he answered and we ended up with a park to park. Anyone who knows Del knows that when you hunt him, he’s usually activating at a two-fer, at least. When I checked my hunter log afterwards, I saw four parks listed from him (a four-fer?).
At this point in the activation, I had gotten the ten QSO’s that I needed to call the park activated. I thought, let me try the VK160 on 60 meters. I re-tuned the KX3 and got five more fast QSO’s. The antenna worked great.
Before I packed up, I decided that I really wanted at least ten contacts on 160 meters, which was my original goal. I went back to 160 meters, now close to an hour later than when I began the activation, and easily added five more new QSO’s to the log. Maybe propagation had changed the later/darker it got or some new hams were on the band who weren’t on earlier, but I was satisfied to have gotten more than 10 on the top band.
The Results
Here’s how I did. Green pins are QSO’s on 160 meters, blue pins are 80 meters and the pink ones are 60 meters (click image to enlarge).
The “Top Band” activation was a success! The VK160 worked flawlessly, thank you Brian, K3ES for posting your design and providing the inspiration to activate on 160 meters.
My POTA “My Stats” page now shows 11 digital QSOs on 160 meters that I didn’t have before. I love conquering new challenges and given the challenge of going mobile with an antenna that will actually work and tune up on that low of a frequency at a park that won’t make you leave at sunset, well… that was quite an accomplishment!
Thank you to the 22 hunters (11 on 160 meters) who helped make it a success, including my friend Del, N2NWK in Washington, DC.
Many thanks to Owen (M0KVI) who shares the following article about his portable field radio kit which will be featured on our Field Kit Gallery page. If you would like to share your field kit with the QRPer community, read this post.
M0KVI’s Mountain Topper MTR-3B SOTA Kit
by Owen (M0KVI)
A little about me:
My name is Owen, I live in Sussex in England. I’m a keen hiker and experienced general outdoor type and have dreams of becoming a SOTA Mountain Goat. Unfortunately, I don’t live near any mountains.
There are a few local hills which I activate from time to time. I set out to learn CW around 1.5 years ago starting one December. I spent around one hour every day practicing. Around eight months later, I was activating summits at around 15wpm. I’m still not great at longer QSOs, so some way to go, but pushing on with trying to get head copy there.
My method:
Having a young family I need to be strategic about trips. My nearest mountainous region is Wales. As I drive for work, I’m not afraid of driving the distance. Many in this country rarely leave their county!
I converted my work vehicle into a micro-camper type affair. Think flat space to sleep rather than any camp comforts. A simple camp stove to cook on and that’s it.
I plan trips lasting 48hrs at a time; drive to the area on day one, activate 1 or 2 summits, sleep stealthily close to target summits by roadside or in car parks, then typically get up at around 4:00 am to hike in the dark to activate at sunrise. I typically activate 1 or 2 more summits before driving the 4-7 hours home. Logistically, it’s fairly intense and I’m not sure it’s the calmest method. I think is a fairly unique if not un-hinged method of getting my SOTA fix.
I use Winlink to check in with Family and keep them up to date with any changes to plans which are communicated before I leave.
Radio is an MTR-3B kindly offered for private sale from Colin, (M1BUU). I’ve had the rig for a year or so. Nothing ground-breaking here; all of the kit is largely mirroring what a lot of others are doing for years now. I’m excellent at shortcutting by learning from others.
Having been licenced for a while, I already knew what an ultralight setup would look like. I could still slim this down by a few grams but really carrying water and food now is more of a burden. I’m not fully convinced the MTR-3B is the radio for all occasions as there are a number of connections, cables and fuss. (I think I have wanted the new Elecraft KH1 offering since before it was conceived).
As can be seen from one of my pics, I use a small micro sun-bathers tent for protecting gear in cloud/rain/wind. This allows me to use HAMRS to log even when its very cold.
List of contents:
Mountain Topper MTR-3B (early model lighter blue colour with x – screw not hex)
Homemade 3ah 18650 3s battery (BMS controlled with fused lead). Made from recovered cells.
Palm Mini key (with home made rugged braided cable).
Antenna system pictured is my regular. I have tried other setups recently but this is the stalwart EFHW composed of a SOTABeams Wire winder 20m lightweight wire and a 64:1 matching unit.
The matching unit is a 64:1 obtained from Colin Summers (MM0OPX) following his youtube series on research into the optimum performing toroid material/core. He offered units for sale at cost. It is very small and light and I like to buy stuff off makers what can I say. Guilty of spending money rather than making.
I use a 3m feed line–never bother to ensure the ends of antenna are over 1m off ground. Do not use a counterpoise and only use a single guy rope on my fibreglass pole, (SOTAbeams Tactical Mini). This way I have minimum gear and maximum speed to set up. On my most recent trip, my antenna fell down twice and I didn’t notice but continued to make contacts. Bit of a train wreck.
Set up and pack down times in the AZ (Activation Zone) is typically 10-15 minutes depending on terrain and conditions. In a sunny field, I could pitch in 5 minutes.
Many thanks to Joshua (N5FY) who shares the following article about his KX1 portable field radio kit which will be featured on our Field Kit Gallery page. If you would like to share your field kit with the QRPer community, read this post.
N5FY’S Elecraft KX1 Minimal CW Kit
by Joshua (N5FY)
I started operating CW this past August and am having a blast! One great thing, or maybe its a bit of a problem for the budget, is that when you can work CW, there is a whole new world of HF radios to collect…I mean operate!
Not to mention the ability to pack out a small portable kit that can be thrown in a bag at the last minute when headed out the door. I have a few such kits but lacked a throw line for each. So, I picked up some more Arborist Throw Line from Atwood Rope Manufacture so I could finish out the first kit.
I just snagged a used, inoperable, KXPD1 paddle to complete my KX1 radio. I had to rebuild the jack on the key but did so in quick order and decided to make it out to my local park for a POTA activation. My plan was to finish up the kit with the throw line and then test out the new complete kit. Suffice to say, all went well!
N5FY Beautiful Morning View with the KX1
The KX1, now out of production, has been a pleasure to operate CW with. This unit has the internal ATU option, 6xAA battery pack, and I updated the internals to add 80 and 30m. So this rig will run 20/30/40/80m.
There are 2 message memories, built in keyer, and even includes RF, AF, and bandwidth knobs for quick adjustment while operating. I’m no experienced CW operator, but this rig is hard to beat in my opinion. Then again, my KH1 hasn’t show up yet!
N5FY KX1 Complete Compact Kit
The antenna of choice here is my Tufteln 2 Wire No Transformer with a 41ft radiator and 17ft counterpoise. The internal ATU makes working 20, 30, and 40m simple and with no coax needed. I would use a much longer wire if I needed to work 80m. This antenna packs away very nice and not needing the Coax is a space saver. I have one version or another of my QRP antennas in each of my radio kits!
N5FY KX1 Complete Compact Kit Packed
Packing a kit with no room to spare is almost like playing Tetris. I have a good bit of gear from Go Ruck, its all fantastic. For this kit, the 3L would leave a bit more space for some additional gear. If you are looking for some pockets as well, I like the GR2 Field Pocket. For this KX1 though, with the cover installed, I happed to forgo the bit of extra protection for the lightweight small size.
N5FY KX1 Complete Compact Kit Closed Up with Pencil for Size Reference
In this modern era of radio technology, where even analog radio is largely digital, we amateurs are accustomed to perfect signal quality all the time.
Nevermind the perfunctory 599s that are handed out during contests, for activities like Parks On The Air and Summits On The Air I believe most of us like to send and receive an honest RST report.
R-S-T from the 1938 edition of the ARRL Handbook
Although subjective, readability (R) and signal strength (S) are pretty well understood quantities. But what about tone, the T in R-S-T ? When was the last time you sent or received a tone value other than “9” (the highest value) ?
Last evening, at the end of one of my frequent activations of the Presidio of San Francisco (K-7889), I struggled to pull a barely readable and very weak signal out of the noise. For what it’s worth, the natural noise floor was very low, with the geomagnetic field listed as “Inactive” on qrz.com.
One of these stations had a distorted signal ?
What made the signal particularly difficult was that it sounded quite distorted. The problem I faced was how to tell the OM that it sounded like his signal had been through a blender. The numbers in the Tone scale go from 1 to 9 but I did not have any understanding of the specific defects encoded by the scale. I needed to send a report, and quick, so I dashed out a “225” followed by “DISTORTED.” But I was unhappy that I needed to send an extra, unexpected word to explain the reason for the “5” tone.
Tone
1–Sixty cycle a.c or less, very rough and broad. 2–Very rough a.c., very harsh and broad. 3–Rough a.c. tone, rectified but not filtered. 4–Rough note, some trace of filtering. 5–Filtered rectified a.c. but strongly ripple-modulated. 6–Filtered tone, definite trace of ripple modulation. 7–Near pure tone, trace of ripple modulation. 8–Near perfect tone, slight trace of modulation. 9–Perfect tone, no trace of ripple or modulation of any kind.
When I got home I resolved to refresh my knowledge on the R-S-T system so that I could have it at my disposal while operating and on the rare occasion when a tone value other than 9 is warranted.
Many thanks to David (W8GM) for sharing the following guest post:
My CW QRP Journey Begins
by David (W8GM)
It is not really a beginning but for some reason it feels like it.
This a summary of my second ever CW QRP POTA activation which includes a summary of my radio path to this point and a unique encounter that shows how amateur radio operators can be so separated by distance but still somehow manage to build and maintain a sense of community.
Life can sometimes be so strange. I had an interest in amateur radio some 30 years ago but what stopped me? Morse Code.
No way would I learn a dead language so I could talk on a radio! Fast forward to the fall of 2021 when I discovered there was no longer a code requirement to become licensed.
It happened fast. I took the tests, explored the bands from 70cm to 80m and simply felt my way around amateur radio. I discovered POTA and I activated my first park on January 2nd, 2022. I have enjoyed camping, hiking and the outdoors my entire life and I realized that POTA had the potential to bring the outdoors and amateur radio together. However, I was simply a weekend POTA warrior. Most of my activations were from a car or sitting at a picnic table while I was camping.
During this time, I discovered websites such as QRPer.com and The Long Island CW Club and I watched oodles of videos of people combining hiking or remote camping with small radios and practicing amateur radio. I was jealous. However, I knew I only needed to put the pieces of the puzzle together and I could be like those YouTubers I was jealous of.
So really, this is where the journey began. I joined LICW completely ignorant of what a wealth of CW information and education this club offers. I soaked up a lot of that education and continued to follow the QRPers of the world.
Unfortunately, in June of 2022, I took off a full year from amateur radio. But in July of 2023 I was able to return, and I resumed my QRP goals. Once again LICW was there to support me and what follows is the story of my second ever CW QRP POTA activation.
Activation time
I pulled into my parking spot thinking “Wow, I’ve been coming here for over 15 years.” That thought quickly disappeared when I looked at my dash and saw it was 26 degrees Fahrenheit. Southwest Michigan’s first cold week of fall. I grabbed my pack and started heading to my secret spot.
My plan was to set up and then explore the woods most of the morning. Hiking around would keep me warm through the cold morning and I’d try to play radio in the afternoon after it had warmed up a bit. I arrived at my spot and, once again, I found it undisturbed. My leftover firewood was still sitting there in a neat pile. Over the last 15 years I have come here countless times, for as short as an hour and as long as 3 days and never once has anyone disturbed my little 20-foot patch of earth.
I set up my coffee kit, chair, antenna, and radio kit. I used a Packtenna 40m EFHW for an antenna and hung it in a sloper configuration. I did it just like all those QRPing YouTubers do it. I tossed a weighted throw line in the air and had the high end up about 40 feet. The radio was an Icom IC-705 and I put an Elecraft T1 ATU tuner in line for some extra insurance. I plugged in my cwmorse.us paddle and battery pack and I was good to go. But first I headed off to do some exploring before I returned and powered up the radio.
After getting back from exploring, I was ready for some coffee and that was made next. I powered up the radio and thought I’d try starting out on 10 meters. I had learned that a huge advantage of CW is you can be auto spotted on the POTA page. Cell reception at my spot is hit and miss. Some days it is there and others you have nothing but SOS on your phone.
No worries about spotting today. CW wins again.
I called CQ for quite some time and was starting to get nervous until a faint station broke through. And of course, it was the last thing a rookie CW operator needs. The call sign was wrong, or I was failing. Continue reading Guest Post: W8GM’s CW QRP Journey Begins→
Many thanks to Bob (K7ZB) who shares the following guest post:
QRP Operation with the QRP Labs QCX+ and ATU-100 on 20M CW
Bob Houf (K7ZB)
By now the QRP Labs QCX+ CW transceiver is well known, and many have been shipped by Hans.
The first unit I bought came fully assembled in the aluminum case but had a weird malfunction in the audio chain and after careful troubleshooting with Hans’ help a replacement unit was sent and worked well.
I have assembled plenty of electronics kits in 60 years of ham radio, building some from scratch and worked as an electronics design engineer for years so having someone else solder up a board now is a luxury I am happy to pay for – but if you like the smell of solder as smoke gets in your eyes and your hands don’t shake, by all means save some money and build one yourself.
I picked up a Malahit rendition of the N7DDC ATU – mine came from Amazon and is the 100W version that uses an external power supply.
My first setup was to see if I could power both the QCX+ and ATU-100 simultaneously from a portable 25800mAH charger bank with two USB ports. The addition of two USB-to-12VDC converter cables looked like an ideal way to minimize the size of the radio package for portable operation:
Unfortunately, although the power capability of the battery was far more than adequate, when transmitting CW for just a few seconds the battery BMS tripped the power unit offline.
So, my next move was to use my larger 12V, 6AH LiFePo4 battery to power both units which worked well.
The antenna used here is a longwire of 47’ running from the top of our second-floor balcony out to a tree. The wire is about 25’ above ground and runs between two of the 3-unit townhouse/loft condo building units. There seems to be little interaction noticed on the signal reports received due to the physical proximity. And, when not experimenting with QRP I routinely run 100W from my transceiver into the wire without a problem.
This time, however, I decided to use #26-gauge magnet wire instead of the far stealthier #28 wire I have run for the past year. A tree trimming gang went through earlier in the summer and took out my #28 monofilament tether line in the tree, so I decided to go with a larger diameter wire.
In both cases I sponge a thin layer of battleship gray paint on the line which helps conceal it when looking up in the sky.
One discovery from this version is that there is a BIG difference in visibility between #26 and #28 magnet wire as seen from the ground!
I took down the #26 and will revert to #28 – which is essentially invisible at 25’ above your head.
I run the wire directly into a Common Mode Choke which then drops down to another CMC designed for other bands so that with the two in series I have no shield currents and no circuit breaker tripping or RF in the shack issues on 40, 20, 15 and 10M, even running 100 Watts:
I have a very low noise level on receive and don’t use a Balun at the feedpoint of the antenna, but I do use an antenna tuner to match the impedance, either the built-in tuner of my Kenwood transceiver or the ATU-100 for the QRP rig.
The CMC’s were designed by a friend using the K9YC cookbook approach available online and are very effective.
QCX Operation
The band conditions over the past weekend were funky with high noise level and rapid fading at times.
Despite this, I made multiple contacts in the western USA with reasonable signal reports and only one station had to send “sri no cpi”.
On Sunday evening I stumbled into the K1USN Slow Speed Contest (SST) and enjoyed making contacts from the Midwest to the Pacific Northwest and everywhere in between.
Band conditions were much quieter and there were signals nearly every kilohertz from about 14.030 up to around 14.050+.
The QCX+ uses a CW filter design set at 200Hz and with 10Hz frequency resolution it was easy to copy one signal from another, despite the lack of more sophisticated filtering capability.
Since you only are putting out a 4-Watt signal you search and pounce with care and in a casual contest like the SST it makes for a very enjoyable way to spend an hour on Sunday evening before the SNF game steals you away.
Or a World Series game.
The ATU-100 was delightful to use. Once it tuned to a decent match (1.33:1) on the wire, it was good for the entire span from the bottom of the band up to 14.060 where the POTA gang and other low power stations hang out.
In conclusion, this is a very excellent low power station, simple to use and I am looking forward to matching it with a clever 20M elevated vertical with elevated radials a fellow ham has designed:
The elevated vertical with coax connector and radials.
Once that is working, it is off to the Lost Dutchman State Park for some POTA fun…