
by Thomas (DM1TBE)
During the past couple of months, I stumbled upon two or three documentaries about the mountain Zugspitze and the surrounding area. One day I thought, what it is that is preventing me from activating the Zugspitze (DL/WS-001) for the SOTA-program? The answer was rather short: a 3-hour drive. So, I waited for a good opportunity and accepted the challenge on a sunny and warm Saturday in June.
The Zugspitze, with an elevation of 2,962 m / 9,718 ft, is the highest peak in Germany and I think it is fair to say that it is also one of Europe’s highest mountains. Located in the Bavarian Alps near the German-Austrian border, the Zugspitze offers breathtaking panoramic views of the surrounding mountain ranges and picturesque landscapes. It is a popular destination for outdoor enthusiasts, attracting hikers, climbers, skiers, and snowboarders throughout the year. The Zugspitze is accessible via cogwheel train, cable car, and hiking trails. At the platforms on the summit, visitors can enjoy a range of facilities, including observation platforms, restaurants, a simple accommodation option, which specifically caters to hikers, and the international border between Austria and Germany across the platforms.
The lake in front of the mountain is called Eibsee. With its crystal-clear, but ice-cold waters, the lake is a popular destination for swimming, boating, and other water activities during the summer months.

Surrounded by majestic mountains and dense forests, like in a fairy tale, the Eibsee offers a picturesque and tranquil setting.

I started early in the morning on a nice Saturday. I must admit that a 3-hour drive for a SOTA summit might sound a bit extreme, but this is a special mountain for me, I have never been even close to such a high altitude – except in a plane. If you have ever been in the Alps, you probably remember the typical residential buildings that you see all around.

I arrived late in the morning at a parking place that is next to the cable car station.

Before going to the summit, I wanted to walk around the lake Eibsee. The hike around the lake is 7 km / 4.4 mi but took it longer than expected. The tour provides numerous opportunities to make incredible pictures.

Although I am a photographic noob and make pictures with the camera default settings, I quite like the results – all picture of this blog post are taken by me.
After completing the hike, I cracked on with my plan to activate the summit. In case you are asking, I did not intend to hike to the summit. The vertical distance from the parking place to the summit is 2 km / 1.2 mi. I think I will not master the skill alpine climbing during my life. So I took the cable car ;).

After some minutes I reached the peak. Although the temperature in the valley was around 25° C / 77° F, there was still snow all around at the summit.

The lake Eibsee still looks beautiful from above. When you are at the summit, you are usually on such a platform, as you can see here. There is no natural flat area where you can walk around.

If your alpine climbing skills are similar to mine, but you really want to get in touch with the mountains, you could try to reach the summit cross. There is an exit on a platform with big warning signs.

So my only option to activate the summit was to operate from the platforms. The platforms were very crowed. The following image depicts the Münchner Haus, which offers local food, German beer and basic accommodation for mountaineers.

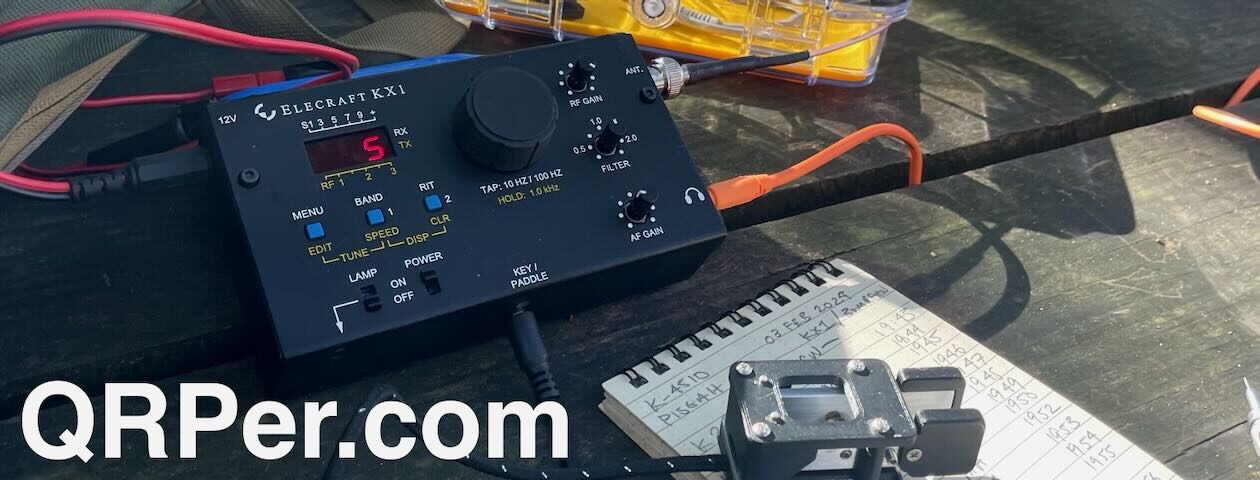
There was no option to span a wire antenna. The wind was too strong to use my 10 m / 33 ft fiberglass mast. The only option was a vertical tied to the metallic railing. I put a towel between the railing and the PAC-12 vertical antenna for insulation. I took the Elecraft KX3 rather than Icom’s IC-705 as the KX3 has an inbuilt ATU and I didn’t want to spend too much time making the antenna perfectly resonant or worry about one extra piece of equipment. My BaMaKeY TP-III twin paddle was attached to a plastic cardboard, which also held my paper logbook. Also as usual, I took a 4Ah LiFePo2 battery to get the 10W out of the KX3.

And now, the honest truth about operating there: It was a nightmare. I had to find a less crowded place, which still was heavily populated. Someone asked every 5 minutes if I receive satellites, measure humidity, speak with ET or something else. The whole structure is metallic, and you should stay away when operating HF, but I couldn’t. The summit station is packed with all kind of radio equipment, with antennas everywhere. On the 20-meter and 40-meter band, I had QRM at 9+. I had to sit on the ground when operating and write the log on my knees. The idea that hiding a bit behind a huge pile of snow seemed good…..until some kids started a snowball fight with me in the middle.

So I kept the activation time rather short.
I tried to operate on the 40-meter band, but the QRM was 9+, so after a few QSOs I switched to 30-meters, where I spent the majority of the time. After that, I thought giving the 20-meter band a try, but the noise was as bad as on 40-meter. So I ended the activation as it also became foggy and wet anyway when the platforms become covered by clouds.

In less than one hour, I made 30 QSOs across Europe, due to the QRM of 9+ only 2 in SSB.

If you are looking for an accessible, beautiful and picturesque environment with high mountains, this is your place. I guess there are not many places around the world where you can sit outside at an altitude of nearly 3 km / 10,000 ft and drink cold German beer while enjoying the beautiful view. If you enjoy long and quite operations, you would be wrong here.
Ausgezeichnet! Thanks for the pictures and description of the activation . I’m adding the Zugspitze to my to-do list for my next trip to Europe. Hams gravitate to summits for the same reason everyone else with a transceiver does: antenna coverage, resulting in lots of EMI & RFI. I see this locally where the number of antennas on buildings continues to increase, seemingly without engineering deconfliction.
Thank you so much for a wonderful report. I tried to activate Krozenplatz for SOTA in Northern Italy and its very similar. Propagation was horrible and lack of hunters during the time I was there means I have to go back.
This time a Venice, Bolzano, Vienna, Berlin trip is in order and maybe come back via Switzerland.
John VE3IPS
Thomas, thanks for another interesting and enjoyable field report. What a gorgeous location. I love it that you tried somewhere new and persevered thru tough conditions. This is the challenge of POTA and SOTA – you never know what circumstances will give you. I look forward to reading about your next activation.
Great story and photos! Thanks for sharing this adventure. It made me cold just reading it!
73 de Bill K7UTX
I have a PAC12, but have not played with it much. I am confused as to how to assemble it. Thomas, seems you assembled with 2 of the tube sections below the coax feed and 2 above, then the coil above this and then the whip.
The photos I have seen put the coax feed at the bottom, then all 4 tube sections, then the coil and then the whip. Not sure about a counterpoise or radial.
When I did play with it seems it did not do well and I thought there was a different assemble.
73, ron, n9ee
Hi Ron,
I am often experimenting with this antenna. I’d recommend you start with the antenna in this order: groundspike->coax connection->tubes->coil->whip. You can find a photo in this report
https://qrper.com/2023/03/return-to-office-policy-triggered-pota-activation/?swcfpc=1
I have ordered extra tubes and a 5m / 16 ft whip. With the latter you can leave all the tubes, coils and the supplied whip when building a quarter wave vertical from 6 to 20m.
Hope this help, Ron
If there is anything I can help you with, just drop me a mail.
Cheers
Thomas
Thomas, looks like you had some ground radials coming off he base coax feed unit, I assume connected to the ground state. How long were they.
Buddi has similar antenna, Buddi-Stick-Pro vertical. A friend had one of these at one of our park events, did work. Cost twice as much as the PAC12, hi.
73, ron, n9ee
Hi Ron,
the radials have a length of 5m / 16ft. They consist of a ribbon cable with 10 conductors, so you could make 10 radials. I’m working with 5 radials. During the operation described above, I did not use the radials, as the antenna ground was connected with the huge metallic platform.
I have the Buddistick Pro, but there are two things I don’t like. The adjustment of the coil is way easier with the PAC-12 and the Buddistick has one elevated radial, which you must adjust in length when switching bands.
Here is the Buddi-Stick pro
https://www.buddipole.com/buddistick.html
My friend worked with the coil and got good SWR on 20m. It was good on lower part, 1:1 and when moved up to 14250 or so was 1.3:1 with no more tuning. We made 2 CW QSOs and one phone from FL to CA SSB. We were using my friends LAB599/TX500 at 5W. That is a very nice rig.
I think with some work and looking at the Buddi-stick one could make the PAC12 work.
73, ron, n9ee