Many thanks to Chris (N8PEM) who shares the following article about his portable field radio kit which will be featured on our Field Kit Gallery page. If you would like to share your field kit with the QRPer community, check out this post.
MTR-3 Field Kit Build by N8PEM
Ham radio is a hobby best enjoyed in community with others.
Ever since I began operating QRP portable a few years back I had admired the Mountain Toppers. Granted my Elecraft KX2 is a perfect daily driver. I’ve been lucky to have that as my sole portable QRP rig for some time. That didn’t stop me from dreaming of an ultralight QRP portable kit centered on an MTR3. High resale prices and scarcity made it a purchase I had long put on the back burner. But then one day I saw my good friend Julia, KF8JBB, while walking my dog in the park. So I stopped to chat.

Like many of us, Julia is an avid QRP and CW enthusiast. She has numerous QRP and SWL radios. Life is also pretty busy for her. She doesn’t get out to operate as much as she would like. As we chatted on that warm August evening, she offered to gift me her MTR3. For her, it was time to move that rig on to a good home so it would get it’s proper use. But the shrewd negotiator in me knew to never accept a first offer. I countered. I’d take the MTR3 off her hands if she let me build her a QRP portable antenna in return (later I also threw in a built N6ARA TinySWR kit for good measure). She accepted. The next day she dropped off the rig. The fun of outfitting an ultralight (UL) QRP kit began.
I quickly determined that I wanted to build a trapped 20/30/40 meter EFHW antenna to match the three bands on the Mountain Topper. I prefer end feds, and I wanted the challenge of building traps for the first time. Keeping in mind I wanted an UL kit, I could also leave the coax at home with an end fed. I had read that a trapped EFHW can be shorter than a standard EFHW due to the inductance of the traps. This appealed to me as I knew from experience that getting a 40-ish foot antenna up in the air is much easier than a 60-ish foot antenna. It took nearly six weeks to research, procure parts and build out this antenna, partly due to the fact I had to build this antenna twice.
My first attempt at this antenna build wasn’t good. I couldn’t get SWR better than about 1.8:1 on any band. I hadn’t tested every component at every step of the build. Thus, I had a hard time determining what went wrong. I used 100 and 150 pF capacitors for the traps which proved to have marginal shortening effects. I needed more turns on the toroids! I decided to do more research and start over.
Thanks to advice and blogs from folks like Dan AI6XG and Fred KT5X, I settled on a different, better design of the trapped EFHW. I ordered more parts. Switched out to 15 and 33 pF capacitors. I took my time to build and test this antenna in a step by step manner. The results were much better the second time around. Overall 45 feet 8 inches long and weighing two ounces. SWR better than 1.5 to 1 on all three bands.
I had the idea to place a TinySWR kit in line between the RCA plug and the end fed matching unit. I know there are SWR kits which can be installed within the radio, but I didn’t want to modify the MTR3 in any way. The stock design is sublime. I also built a back-up emergency antenna into the design. If for some reason I have a trap fail, I installed a bullet connector right before the first trap. Thus, I can disconnect the 30 and 40 meter portions of the antenna and have a basic resonant 20M EFHW. These thoughtful touches seemed to perfect the antenna.

Photo 1: Completed miniSWR, matching unit, 30m trap, and 20m quick disconnect
I tried to be thoughtful with the other choices in my kit as well. At 3.5 ounces and the size of a bag of coffee, the LowePro CS40 padded case proved to be ideal. I found it cheapest from a UK-based eBay seller. I made my flight deck out of the steel housing from an old external CD Drive. I measured, cut and filed the edges. It’s perfectly sized for loose Rite in the Rain paper, lightweight and thin. A metal flight deck also can hold the magnetic base of my CW paddles. When it came to the battery, I decided to go with a RC airplane LiPo battery. Fuzzy math told me that the 650 mAh would give me more than enough operating time. Once complete, I was happy to find the entire kit weighed in at just 18 ounces, not counting a throw weight or collapsable mast.

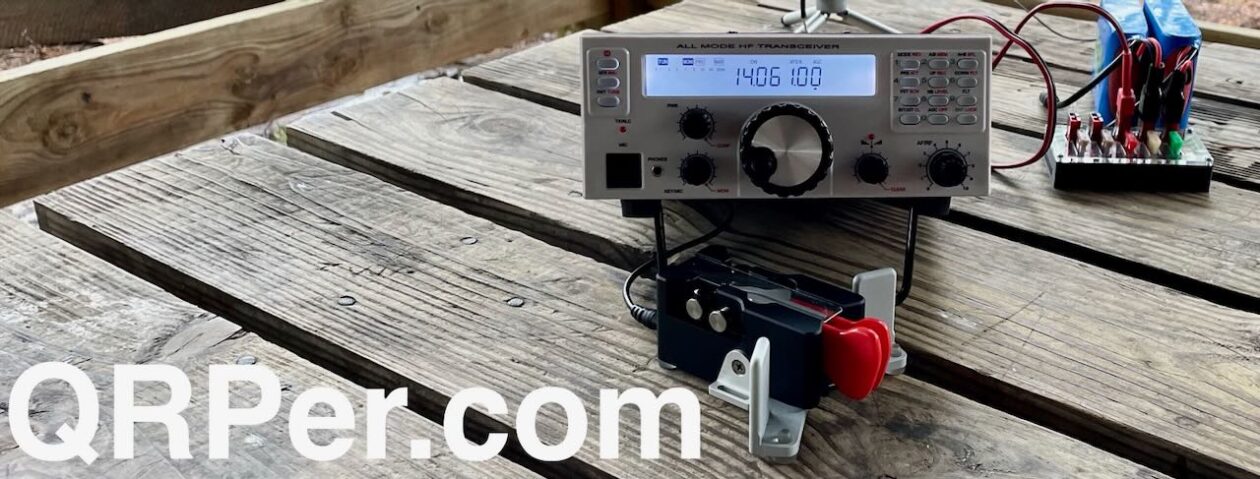
Photo 2: The completed MTR3 kit
My first activation with this kit was September 21st. I wasn’t sure how well I would do. Band conditions weren’t the best the previous two days. I went to my favorite spot, Bunker Hill (W8O/SE-009) located within Great Seal State Park (K-1954) in south central Ohio. It’s a short 20 minute hike to the high point on what was a partly cloudy 70 degree Thursday morning. I set the antenna up in a sloper configuration, gave my dog Togo some treats, ate half my sandwich, took a sip of coffee, and pulled up the POTA and SOTA spotting pages.
In just over an hour I had made 54 QSOs covering all 3 bands. The MTR3 combined with the trapped 20/30/40 EFHW worked flawlessly. It was an absolute joy to operate.
 Photo 3: First activation complete
That joy came from the sublime kit for sure. But enjoyment also came from the community carried within the kit itself. The MTR3 from Julia KF8JBB. The paddle and wire winder designs from Adam K6ARK. The MiniSWR Kit from Ara N6ARA. The Trap PCB boards from Tim N7KOM. The toroids, capacitors, and antenna advice from Dan AI6XG. The blog post from Fred KT5X. The 3D printing from my nephew Colin. Even the RigExpert I bought from Glen W1ND this Spring was integral. This kit is an homage to that community.
 Figure 2: First Activation QSO Map
If you made it to the end, thanks for reading! I hope it was interesting and helpful.
TU 73 EE,
Chris N8PEM
Radio Kit
- LowePro Viewpoint CS40 Case
- LNR Precision MTR3
- K6ARK Pico Paddle
- Bose SoundSport in-ear headphones
- Thingiverse 3D Printed MTR3 Case File
- Tattu 11.1V 650mAh 75C LiPo Battery Pack
- SUPULSE LiPo Battery Charger
- Scrap Sheet Metal and loose Rite in the Rain Paper
Antenna Build
- 26 AWG Polystealth Wire
- 26 AWG Magnet Wire
- N6ARA MiniSWR Kit
- N7KOM PCB Trap Boards, on sale soon!
- FT50-53 Toroids
- FT50-2 Toroids
- 15 and 33 pF 500v SMD Capacitors
- 3/4″ Clear Heat Shrink Tubing
- 2mm Gold Plated Banana Plugs
- 1.18 mm x 125’ neon green Paracord
- K6ARK 3D Printed Wire Winder Files
- Nite Ize Plastic Mini S-Biners
That’s a good looking kit Chris. Good work!
Thanks Jamie! It’s coming to to the W4G campout…
I love this, Chris.
I appreciate the level of research and time you put into making this kit a reality. I mean, this is the thing, isn’t it? If you buy an ultralight radio, you don’t want to bulk it up with heavy items.
The MTR-3 is a beautiful radio and I think Julia will be proud when she sees just how much you’re going to put that little rig to work!
Cheers,
Thomas
K4SWL
It was a fun project. Thanks for the chance to share!
Absolutely! And I look forward to seeing this kit in person at the W4 campout soon!
Cheers,
Thomas
That’s an orginal MTR Mountain Topp’r 3b… I had one I traded to Adam (K6ARK). He liked the original 3b for it’s circuitry. A purely Steve Weber design. Adam installed two of his capacitve keys (installed) into my QCX Mini 30m, and my little MTR2b (two bander 20/40m). I may showcase those kits here soon. Great kit Chris!
de W7UDT
GM Rand – Good point. Adam and others have commented in the SOTA slack channel how the original MTR3 has a lot of options to mod. We are all a little jealous of that MTR2b you still have. You should definitely do a show and tell!
FT50-43 not FT50-53
Keen eye Muhsin – yes it should be FT50-43 on the parts list. It is correct on Fig. 1 and the link does take you to the right part.
Thanks!
I’d sure like to get the trap antenna fabrication details, e. g. turns on toroids, if it’s feasible.
Gary –
Below are 2 articles that really helped me with my build. the one from Fred KT5X has a link to a presentation which has even more info.
https://www.ai6xg.com/post/trapped-20-30-40-meter-efhw-antenna
https://www.ke6mt.us/2018/12/ultra-lyte-summits-on-the-air-by-fred-kt5x/
Hope these help and best of luck!
Chris
Never mind. I should’ve looked at your diagram more closely.
Hi Chris, I’m really interested by the antenna. Did you can sell a complete kit without radiator mounted and tested ?
I need this for my SW-3B cause I’ve not the swr meter inside.
Best 73s de ON4LDU/qrp
Al