
When life gives you lemons, you make lemonade!
by Vince (VE6LK)
Dear readers, it’s been a hot minute since I’ve had time to activate POTA and write about it, and today I tried to activate a park, but a combination of equipment issues and nobody responding to my calls ended my activation. Anyways … when life gives you lemons you make lemonade, and accordingly the activation article is now a radio review article instead! <grin>
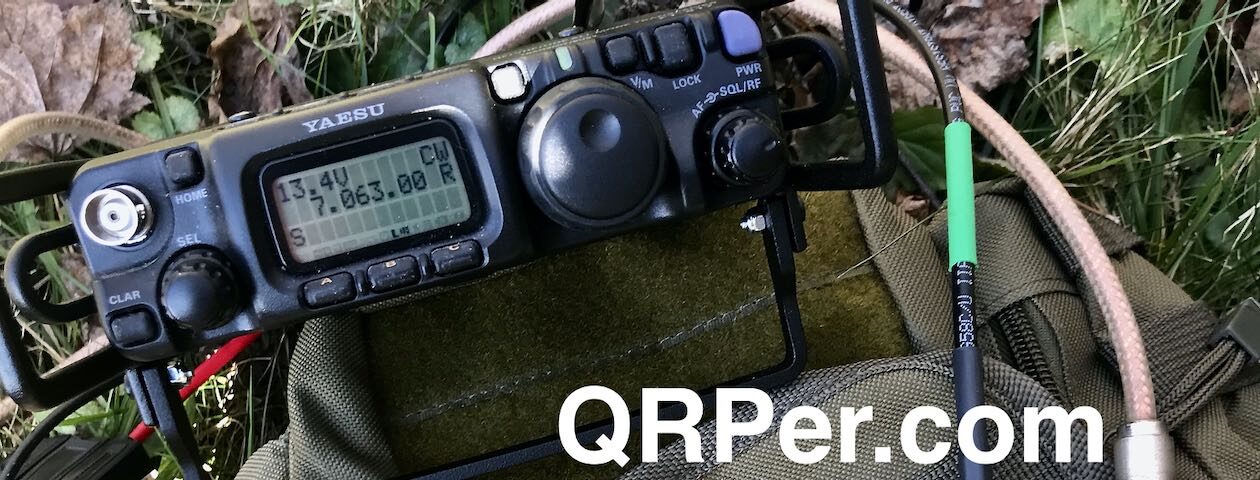
That radio is the HF Signals zBitx. An SDR radio, it was spoken about at 2024 Four Days In May and it opened up for orders on December 25 2024 – a Christmas present, if you will. Thomas and I both jumped on the ordering queue (two numbers apart, no less) as well as 248 others around the world. I thought to myself “an all-mode 80-10m QRP radio with a waterfall and weighing under 1 pound for under $200USD shipped? SIGN ME UP!” and pressed the order button. Honestly I thought about it for less than 45 seconds once I read the specs. I also thought to myself that it was an “experimenter’s radio” and not a fully finished product, meaning you can tweak it if you wish to dig into the bowels of the code on the built-in Raspberry Pi.
The 250 original orders were snapped up in two days and then the purchase button was turned off on the website. There were some shipping delays from the original date, as HF Signals discovered the Chinese New Year holiday of 3 weeks where, it seems, everything is shut down. I also discovered this with the Morse Tutor Kits my buddy and I sell, and we couldn’t ship product for a month as we could not get parts.

The radio arrived on March 31, about 4 weeks beyond the original estimate, and I was excited to open it up. I mean, who doesn’t like new radio day after all? I was so excited that I did an unboxing and first look video on YouTube and showed off a few quick things about the radio. TOP SECRET – it took me 5 takes to shoot, so it wasn’t quite a first look!
The radio promises much and delivers a lot. It transmits on 80 through 10 meters at around 5 watts driven by a pair of 18650 cells, or your 6 to 9V four amp power supply. It has two microprocessors, one is a Raspberry Pi Zero W and one is a Pi Pico to drive the display. It has integrated AM, SSB, CW, FT8, touch screen, built-in electret mic, built in CW keyer and keyboard, and weighing just 460g / 1 pound including the batteries. This radio seriously has lots to offer especially at the price point.

The source code, schematics and 3D print files are all available on a Github, and indeed I customized the front panel and replaced the knob with one that has a dimple on it, if only to spin the VFO more easily.
You must be made aware that I was really excited to get this radio. It has a history of many other Bitx radios before it. But I’m also aware that there’s the old axiom about “too good to be true” so I tempered my expectations. You must also be made aware that I really want this radio to work as its small form factor, low cost and integrated waterfall make it exciting an exciting prospect in my limited fleet of QRP rigs. And, for the record, I have nowhere near the QRP rig count that our gracious host has, nor are they individually named.
Besides all of that, it is the only HF radio I plan to pack for Hamvention 2025 so it’s gotta be right for that trip.
However, the zBitx may be best described as an early release and/or a work in progress.
To mitigate this “in process” part, I’ve been following the Groups.IO page several times a day and looking for news of firmware updates. I’ve applied two software patches and one firmware patch which have taken me very little time to do. I’m happy to report that each one improves the overall product.

At this time I’ve had the radio running in various test configurations for about 10 hours both in my shack and in the field. It’s not enough [for me] to say it’s been thoroughly tested, but enough to get a really good feel for it. For the record, I did complete one CW QSO but not without much difficulty with keying (see below).
At home it’s connected to my W3EDP EFRW via my LDG AT-200Pro II, and the one field test I gave it was with my 40-30-20m trapped EFHW. A fair amount of my bench and field testing included a dummy load and turning the Drive [power] control to zero to eliminate RF ingress as the source of any issues. I’ve also tried an external keyer with the radio set to straight key mode. I’ve checked into HF nets with it, and listened on nearby SDR receivers to hear what it sounds like over the air.

I’ll describe it here as the Pros, the Quirks and the Cons.
Here are the Pros:
- As I mentioned it’s small – well under one pound without the two 18650 batteries.
- It uses common easy-to-find 18650 batteries to run the radio. Note, you must source the batteries locally as they are not sold with the radio which minimizes shipping complexities. I purchased a 4 pack off Amazon and it came with a charger for $40CAD.
- It does a lot of stuff well right out of the box.
- It has an integrated touch screen interface and waterfall display.
- The CW decode function is really good, with the usual caveats that poor signal to noise ratio on your incoming signal impairs its ability to accurately decode. This is no different than FLDigi on a PC or your KX2/KX3’s built-in decoder.
- The FT8 function is quite good and surprisingly simple to use.
- It has a small built-in speaker measuring 18x25mm / 0.75×1.0″.
- It has an electret microphone built-in.
- It has connectors for CW Key, Power, External Mic, and Earphones/External speaker.
- It has connectors for an HDMI monitor, USB keyboard/mouse, and USB for CAT Control. Yes, this radio can be used on your desktop and controlled via rig control software.
- Thanks to the Raspberry Pi Zero 2W processor, it has built-in WiFi to synchronize time and interface to the user.
- It has a built-in N1MM style logbook. FT8 is logged automagically and you can enter your other contacts via the on-screen keyboard.
- It has a built-in CW keyer and you can easily adjust the macros behind it. Ditto for the FT8 preloaded macros.
- The on-screen keyboard means you can send CW without a key or paddle.
- The CW reception is very clear even with the 50Hz filter thanks to the DSP in behind it. It truly is a pleasure to listen to CW on this – more so than my beloved FT-857 and just as clean as my KX3.
- There is an Integrated SWR and power meter during transmit.
- It has a built-in webserver. Seriously. You can operate the radio hands-off using this feature, or you can connect to it via VNC and get a different view of things.
- If that’s not enough, hook up a keyboard, mouse and HDMI monitor and see even more stuff.
- AGC and IF are adjustable for each mode. Thus far I’ve been leaving AGC off but that means I wind the volume up to 90% or higher to hear things. It’s not unpleasant and I have more experimentation to do in this area.
Here are the Quirks:
- The radio does not have a power switch. To turn it on or off you apply or remove power via the DC5521 (5.5mm x 2.1mm) barrel connector. The IT guys among us know that this will corrupt a memory card one day. There is some discussion about this potential SD corruption on the Groups.IO page if you dig around a bit. I’ve already backed mine up using the RPi’s built-in SD Card copy function and it took about a half hour. I then stuck it on the underside of the lid with some Kapton tape.
- It runs on 6-9VDC, not 12VDC. There are some mentions of 12V on the Groups.IO page, but highly advised against using it as the 5V regulators will get too hot. Some folks have reported using this Drok Buck Converter from their shack power, and I have one on order.
- The touchscreen is a quirk to me as it directly affects how the radio can be operated. To adjust a control, first you touch that spot on the screen and then you adjust the knob. For example, if you choose the VFO step you must the remember to choose the frequency before adjusting it. All too often I choose the Step function, select a step and then begin spinning the knob only to frustrate myself with the VFO not changing because I neglected to choose the VFO after I selected Step.
- Software and firmware updates require a little more finesse than some manufacturers which have you plug in a file on a USB stick. This radio wants you to get into the Raspberry Pi shell and execute commands. This is not hard to do, but to the uninitiated could look like an alien language. The commands work, but sometimes users report that they need to re-apply the command in order for it to complete properly. To me this is like any other RPi in this regard and I don’t pay too much attention to it. Firmware update for the Pico processor is done via the CAT port and is a matter of dragging/dropping a file onto it from your computer; this is known as the front panel update and it has never failed me.
- The Sidetone function also sets the volume at which you hear the FT8 tones when it transmits. With the small integrated .75×1″ speaker, it can be unpleasant to the ear. Pro-tip: set the FT8 pitch to around 500Hz and it won’t be near as piercing to your ear when you transmit.
- Like the foregoing, I set the CW pitch to 770Hz as it seems to be optimal for the built-in speaker.
Here are the Cons:
- It is a hungry radio in terms of power consumption. It draws 500mA (4.5 Watts) just when it is turned on and I’ve seen peaks up to 4A on transmit. That brings me to the next point…
- It can get hot when running some digital modes like FT8 which drives not only the CPU on the Pi Zero but also the RF finals. Some users are reporting it as being too hot to touch, but I have not seen that; perhaps they are FT8 users as my limited testing there really made the rear panel warm up. The rear panel is 0.08″ thick aluminium upon which a the power regulators and the RF final are bolted. This panel acts as a heat sink. Some users have added on a finned heat sink and I’m considering doing the same to mine, however I haven’t seen it get too hot in CW or SSB modes. I really don’t want to have to do this and add to the overall profile of the radio.
- The radio does not have an internal fuse, but it does have a reverse protection diode. This means if you insert your batteries backwards, it will draw maximum current and hurt something inside. Oh and that reverse protection diode is on the opposite corner of the circuit board, meaning the trace between the jack and the diode likely becomes a fuse and may smoke. You must be really certain to not reverse the polarity on your voltage input. Thanks to Mark N6MTS for this input.
- There is no low voltage cut-off function. Keep an eye on your battery voltage folks.
- Some users are reporting RF ingress into the CW key port, resolved with ferrite cores on the input cable. This could be improved with 0.1uF cap between the paddle contacts and ground.
- I received a report of RF ingress into the microphone when the audio drive was set at the mid-way point. I think this could be improved by a 0.1uF cap across the mic line as I’ve done with older radios.
- The software isn’t perfect. As I select different operating modes, the lower menu is supposed to change as the macros change to become a TX/RX switch when going from FT8 to SSB for example, but sometimes this doesn’t happen. Some people are up in arms about this, but I’ve taken a more graceful approach and I think it’s just part of the charm of the rig.
- The CW sending is still being worked upon at the time I’m writing this article. It’s not perfect by a long shot as you can see here from this video from AE5X. I’m told straight key has been resolved, but paddle keying has not as there are still timing issues. My testing with an external keyer also did not go very well I’m afraid.
Things I still have to try include the aforementioned Drok Buck Converter, adding some 0.1uF capacitors to the CW lines, and a 100pF on the microphone.

Things I’ve added/changed on the radio include a face plate swap with my callsign engraved on it, the VFO shaft was shortened by 5mm (side cutters and Dremel tool to smooth it out) which allowed a dimpled VFO knob to be placed on the radio, and I added some 3M adhesive-backed polyurethane feet so that it won’t slide about on my desk. The original 3D Printing STL files are available on the Github so you can modify your own as I did, or you can look at the one created by Toshi JA3IRK of PockeTech. Sidebar: you can see all of the fabulous products Toshi sells on his website, but you may need Google Translate to assist. I have several of his products and they are top-notch.
Should you wait to buy or plunge right into the purchase?
I’m going to channel my best efforts from The Candy Store(tm) where I help customers to spend their money wisely. First off, I’m going to be that guy and remind you to RTFM or Read The Freakin’ Manual. The excellent user manual can be found on HF Signals website and it’s only 25 pages long so it’s not going to take you all that long to review it, and it will give you a great idea of what the radio is capable of doing. With that preamble out of the way, here’s my thoughts.
If you want a fully working out-of-the-box radio and don’t operate CW, and you recognize that this is a low-cost radio that isn’t perfect, then break out your credit card and get in line and enjoy it for what it can do which is, frankly, a lot.
However if you are someone who wants a polished product, or primarily a CW operator, I suggest you wait until the bugs are worked out unless you have a good sense of humour and/or experimentation built into your DNA.
I’m happy with my purchase, but had I known I’d likely have waited. Then again, it gives me something to write and/or YouTube about so that’s not a bad thing in my world.
Summary
I like this radio, a lot. I also like experimenting with things and am unafraid to get under the hood to see what makes it tick. I have some filter capacitors to add and report back. And I have to decide for myself if I’m likely to reverse the polarity on it and want to circuit hack to add a fuse, or just forego that. I also want to try the USB-C PD 9V power cable with my Charmast USB-C PD battery pack as a power source. Oh, and I really want to get a POTA activation in the log with this radio.
As I have more to try, you will no doubt hear from me again about this very versatile radio. Meanwhile watch the progress on HF Signals’ Groups.IO page.
72 and dit dit,
…Vince
First introduced to the magic of radio by a family member in 1969, Vince has been active in the hobby since 2002. He is an Accredited examiner in Canada and the USA, operates on almost all of the modes, and is continually working on making his CW proficiency suck less. He participates in public service events around Western Canada and is active on the air while glamping, mobile, at home or doing a POTA activation. You can hear him on the Ham Radio Workbench podcast, follow him on Twitter @VE6LK, check out his YouTube channel, and view the projects and articles on his website.
The online manual tells how to set the time. You need a keyboard, mouse, and display to join a WIFI network and set the time.
I have a question: After joining the WIFI, will it reconnect and sync the time without needing the extra stuff? That would be important for people who do portable FT8.
There is a battery-backed realtime clock in the radio that will hold the time for field work. Further, each time it connects to whatever wifi you define, it will re-synchronize auotmatically via NTP. As I understand it, the RPi can be configured to connect to multiple different wifi and it will select them based on what’s available. So, look for home, then cellular tether in that order. I still need to figure that part out. And that will mean dead on accuracy in the field. But, FT8 will run with some difference in time between the two stations.
Thanks for the review Vince. This largely lines up with my experience. I have had a few QSOs with it on CW – the first with the original software it shipped with with a station in France. To get it to work I had to slow down to 18 WPM but I was excited to have a DX QSO as the inaugural communication for the radio. The second was a brief ragchew after a software update with a station in SC (I am in VA) at 25 WPM. The software update improved the keying but the problems are still significant. I hope they get to the bottom of it soon.
I have been using the JacobsParts USB PD 9V Trigger Cable from Amazon rated for 5A and it has worked solidly for me. I have heard from another user that a 3A cable caused some ill timed reboots. I have been using a little PD bank with it and it definitely depletes it faster than my other rigs, but still provides reasonable run-time.
I think the rig has great potential. As long as they can get the keying fixed.
The Jacob Parts 9V cable is showing 5.5×2.5 mm plug on it on the one I found on Amazon. Is this the one you are using? The power input on the zBitx is specified as a 5.5×2.1 mm jack so are you using an adapter or does it “just fit”?
I have another brand 9v with a 5.5×2.1 plug on it but it is stating 3A limit. Just trying to minimize my frustrations.
Thanks for a great review. !!
Hi Vince,
Nice write-up taking a broad, Thomas-like, perspective on the pros, cons and quirks. You should write more product reviews
I’m planning a July trip to Alaska which will be my 49th state for POTA activations over the past 3 years. I’d like to bring a QRP rig as a backup (you know the motto about backup gear on a trip like this). I’m reconsidering my QCX-mini and exploring other options.
So, thanks for the review – hope to see you in my log again soon.
73
Pat NØHR
Thanks for your comments (and compliment!) Pat, and I hope you have a great trip north. Hit me up if you are driving via Alberta.
72,
.Vince
In some ways, to judge the usefulness of QRP Xcvrs, you have to check out how well the manufacturer understands how a QRP Xcvr should work. A lot of the designers seem interested in creating radios, but not in operating, so their radios tend to be deficient operationally.
On the one hand, a company like Elecraft and QRP Labs consistently put out radios ready for CW operators (the most important mode for QRP field operations IMHO) pretty much from first principals because they know first hand how they should function.
On the other, Xiegu, HF Signals, BG2FX etc seem to not be savvy enough operators to know how a QRP rig should work in the first place. Sometimes, they eventually get it right, but as an example Xiegu seems to never get CW right the first time. Finding a local DXer/Contester to evaluate things before release would be a step in the right direction.
I haven’t laid hands on KM4CFT’s rig, but I would expect it would work pretty well since he seems to be active on the air and has experience with many different radios.
73, Kevin K3OX
The KM4CFT rig is brilliant and does things very well. We interviewed Jonathan for Ham Radio Workbench a little while ago and his next radio will be SDR based. I can’t wait to see it.
72,
..Vince
Mine arrived yesterday, I had one of the last orders before they closed purchases. I opened the box and briefly handled it and am pleased with the construction. Due to time commitments, will be a week or so before I power it up to do software and firmware updates and operate. Looking forward to some POTA and camping operation.
KI4DUK
Joey
Hey, I went on QRZ and didn’t see an email address. We’re probably related!
KI7URL
THANKS Vince for your very thorough review. Between you and AE5X who lives nearby, I’ll wait a bit, due to my CW only adventures.
Despite the CW difficulties, there’s a lot to like about the rig. The thoroughness of your review certainly helps in that regard.
Thanks!
Curious as to how ? You load up to the
Antenna I can see the SWR but is there an
Antenna tuner inside unit ?
No tuner in the unit, so you’ll need resonant antennas and/or a transmatch unit. Full specs are on the manufacturer’s page https://www.hfsignals.com/index.php/zbitx/
Glen KC8LA here
I saw this post and watched some videos. And said for 169.00 why not. So i picked one up at hamvention. Pretty cool little radio. Once I got it set up and the clock set. Made a couple phsone contacts, a few ft8 and some cw. Worked great from the house. Field??? I always use my kh1 but on 5/22 I took the zbitx with me also. For a park activation. After I had made 25 cw with the kh1 set up this radio and made 15 ft8. Today 5/23 i used just the zbitx for 38 cw. HB 40m efhw cft 49:1 20ft abr coax begali key. I think it’ll be a good backup and toy to play with
Thanks for the inspiration lol
Gracias!!
I’m a few days ago looking for my first equipment to experience my entry to radio frequencies and your review convinced me that it is a good model for me to start breaking equipments (not very expensive) while waiting for my ham radio callsign. The analysis detail is excellent and allowed me to understand several things I didn’t understand about these test equipment.