On Friday, September 10, 2021, I made a detour to the Table Rock Fish Hatchery (K-8012) on my way back to the QTH.
I love this site: it’s fairly remote, has tall trees, loads of space to set up antennas, convenient picnic tables, incredibly friendly park rangers and, most importantly, a welcoming party.
Welcoming party
These two greet me each time I’m at Table Rock. They’re incredibly friendly and now that they know I’m a complete and total sucker for dogs, they hang around and get attention for quite a while.
Shortly after acquiring a lab599 Discovery TX-500 earlier this year, I did what I always do: invest an insane amount of time in researching and configuring a dedicated field radio kit.
As I’ve mentioned numerous times, I’m a serious pack geek, so this is incredibly fun for me even though the choice is often difficult.
I like to buy packs and cases from manufacturers in the US and Canada when possible, so started searching through all of the options.
Requirements
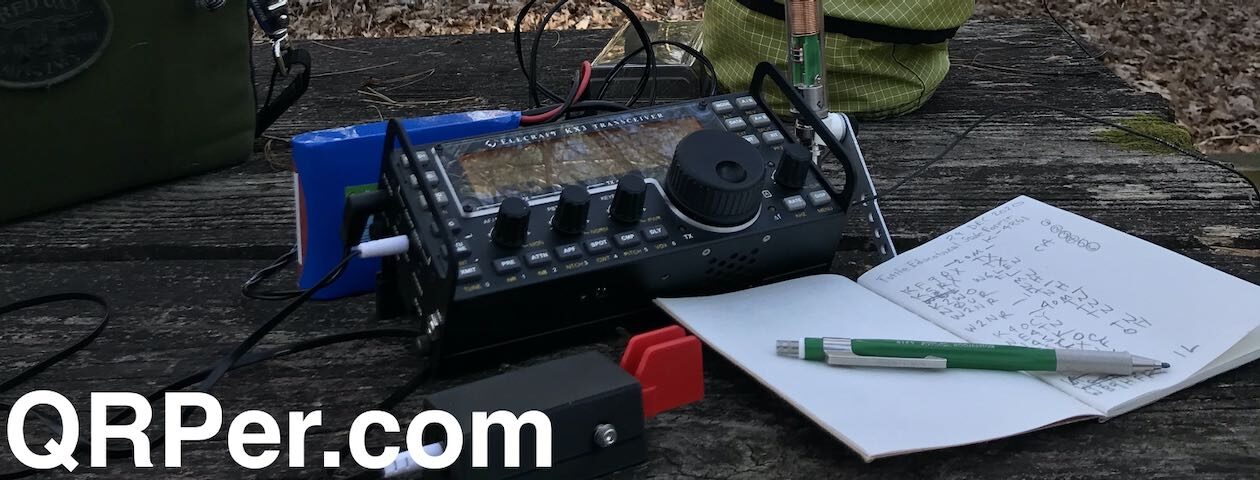
The Discovery TX-500
I wanted a pack that was compact, versatile, and offered proper padding (even knowing the TX-500 is a rugged little transceiver). I don’t handle my packs with kid gloves, so I expect them to cope with sometimes rough field conditions and still protect the gear inside. I also like a certain level of organization inside the pack.
I wanted the kit to be relatively compact, but large enough to hold the transceiver, all accessories and connections, logging pad and pencil, paddles, a proper arborist throw line, portable ATU, and a 3Ah LiFePo4 battery. A the end of the day, I wanted this TX-500 field kit to be fully self-contained.
In the end, I adopted a pack with which I’m already very familiar…
The Red Oxx Micro Manager
Product image via Red Oxx
Red Oxx is my favorite pack company and if you’ve been a reader for any length of time, you’ve obviously seen a number of their bags and packs in my field reports.
Back in 2016, when they introduced the first iteration of the Micro Manager EDC bag, they actually reached out to me–as an existing customer–knowing that I had been looking for a good radio pack with proper padding (many packs don’t require side padding and internal padding). They sent me a prototype of the Micro Manager for my feedback and then incorporated some of my suggestions.
I also purchased a Micro Manager for my wife who quickly turned hers into a mobile art studio!
She chose a red Micro Manager!Her field-ready art kit
Much like my buddy Steve (AC5F)–whose XYL creates some amazing water color art in the field–my wife (K4MOI) is also an artist and loves to paint/draw during park and summit activations. Her art kit is always at the ready and she’s traveled with it extensively over the past five years.
The Micro Manager is a pack carried over the shoulder, much like a messenger or laptop bag. Those times when my field activations require a lengthy hike, I’ve simply pulled all of the items out of the Micro Manager (since I do modular packing, this is super easy), else I’ve even been known to stick the entire Micro Manager pack into a backpack!
Over the years, Red Oxx has made iterative upgrades to the Micro Manager including a pleated front pocket, slip-in external pocket, and they started lining the internal pocket with a more flexible and thinner dense foam padding. The new padding not only fits the TX-500 better than the first Micro Manager version did, but I believe it will have enough dimension to accommodate the TX-500 battery pack when that’s available next year.
Inside the Micro Manager I also use a Tom Bihn Large Travel Tray to hold all of the TX-500 accessories: key, microphone, ATU, battery, and cables.
I own a number of these large travel trays and highly recommend them. I especially like the ballistic nylon versions for radio kits as they open and close so smoothly.
Video tour
I made a short video tour of the TX-500 Micro Manager kit before a recent activation at Table Rock:
I’ve used this pack for a number of field activations and couldn’t be more pleased. Looking back at the contents, it’s funny: the pack and almost every single item inside (save the notepad and pencil) are made in the USA while the radio is made in Russia! A bit of international harmony going on here!
If you have a field pack for the TX-500 (or any radio), I’d love to know more about it. Please consider commenting with details or even submitting a guest post with photos!
This morning, I finally remembered to do a firmware upgrade on the lab599 Discovery TX-500. I’ve been in the terrible habit of only remembering to do a firmware upgrade when I’m in the field. Much like remembering to repair your roof while it’s raining! 🙂
New TX-500 Firmware
Fortunately, Lab599 just published their 1.10.10 firmware release this weekend, so my TX-500 will sport all of the latest upgrades including (in this upgrade) corrected AGC, improved receiver parameters, and (from previous upgrades) SWR analysis tool and message memory beacon mode.
I’ve been so incredibly impressed with the Lab599 team’s dedication to continuously upgrading and improving this already phenomenal little radio. It’s such a pleasure to take to the field.
UK TX-500 availability
I also understand that lab599’s UK distributors, Nevada Radio and Waters & Stanton, will soon have their first batch of Discovery TX-500s (first part of October 2021, if I recall). Waters & Stanton (and possible Nevada) may even have a handful of units unallocated yet. It’s best to call them to check status and possibly reserve one.
Upcoming RadCom Review
Speaking of the UK, my full review of the Discovery TX-500 will appear in the November 2021 issue of RadCom.
After completing a successful activation at Fort Dobbs State Historic Site on Wednesday, August 25, 2021, I decided to fit in one more activation that day. I thought about heading out to one of the game lands I hadn’t hit in a while, but frankly, I needed a park a little closer to home due to my time constraints that day, so Lake Norman State Park it was!
Lake Norman State Park (K-2740)
Lake Norman is such an effortless park to activate. Their main picnic area has numerous tables (including two large covered areas), and tall trees providing support for antennas and much needed shade from the NC summer sun!
One thing I had not decided upon was what antenna I’d use at Lake Norman. Earlier, I used my trusty speaker wire antenna at Fort Dobbs, but I like to shake things up. I checked the trunk of my car and found the Chameleon MPAS Lite. Seeing how propagation plummeted after my previous activation, I decided that I wanted a large wire antenna deployed rather than a vertical.
The MPAS Lite can be configured as a wire antenna, of course: instead of attaching the 17′ whip to the “Hybrid Micro” transformer, you attach the 60′ wire that might normally be used as a counterpoise.
Setting it up was quite easy, in fact. I used my arborist throw line to snag a tree branch about 45′ high, then attached the throw line to the floating dielectric ring on the Chameleon wire spool. I stretched the entire length of wire out, attached the end to a tree, then hoisted up the center, forming an inverted vee shape.
Wire antennas are so low-profile and simply disappear in trees.
Even thought the 50′ coax shield would act as a counterpoise, I really wanted another ground wire attached, so I pulled one of the wires off of my speaker wire antenna and attached it to the grounding post of the MPAS Lite’s stainless spike. I figured a little extra counterpoise wouldn’t hurt.
Although I’d never used the CHA MPAS Lite quite like this, I was pretty confident my Elecraft T1 would find a match. The Chameleon transformer (the Hybrid Micro) brings most any (but not all) lengths of wire within reasonable matching range of an ATU.
I started on 40 meters and found that, without employing the ATU, I had a match that was slightly below 2:1. Not terribly surprising since I had a good 60′ of wire in the tree. Still, I hit the tune button on the T1 and easily achieved a 1:1 match.
I will add here, though, that perfect 1:1 matches are not that important–especially at QRP levels. I’m certain the TX-500 would plug along with a match of 2.5:1 or higher and still radiate perfectly fine. I’ve known hams that truly equate that 1:1 match with an antenna that’s performing efficiently, but that’s not always the case. Keep in mind a dummy load will give you a 1:1 match but is hardly efficient. The ATU’s job isn’t to make the antenna radiate better–it’s to match impedance.
The CHA MPAS Lite will get you within matching range across the HF bands and, many times, it’s close enough that an ATU isn’t really needed.
I started calling CQ POTA on 40 meters and within 28 minutes had logged the ten contacts needed for a valid park activation–all with 5 watts, of course. I was very pleased with these results because, as I had suspected, the bands were still pretty darn rough.
I then moved up to the 30 meter band where I worked a couple of stations and then, for fun, found a match on 80 meters and worked one NC station (possibly on ground wave!).
Here’s a screenshot of my logs from the POTA website:
I must say that I do love using the Discovery TX-500. It’s such a brilliant little field radio. I’m just itching to take it on another SOTA activation soon!
I’m also loving the TX-500 field kit that I built around a Red Oxx Micro Manager pack.
I used the same bag (different color) for my KX2 NPOTA field kit in 2016. It’s such a great size and can even easily hold my arborist throw line along with all of the station accessories and rig, of course. I’ve made a short video showing how I pack it and will upload that video when I have a little bandwidth!
Video
I did make a real-time, no-edit video of my entire Lake Norman activation. Feel free to check it out below or via this YouTube link. No need to worry about ads popping up–my videos have no YouTube ads!
A Brief Public Service Announcement…
If I have a little advice for you this week, it’s this: don’t wait to play radio because someone says you don’t have the right gear for the job.
I received an email this morning from a ham that’s new to field operation and just received an antenna he had ordered. He was upset because a YouTuber claimed his antenna was basically a dummy load. To add insult to injury, he also found a blogger or YouTuber was also highly critical of his recently-acquired Yaesu FT-818. [Note that the FT-817ND–the 818’s predecessor–is one of my favorite field rigs.]
Keep in mind that many of these YouTubers are trying to produce “click bait” videos that will stir up a reaction and, thus, increase their readership numbers which will have a direct and positive impact on their ad revenue. It’s a red flag when someone doesn’t have real-world examples and comparisons proving their points and typically a sign that they’ve never even used the products in question.
I’ve been told antennas I use don’t work, yet I’ve snagged some incredible QRP DX with them. I’ve been told that some radios I use are junk, yet I’ve hundreds of successful field activations with them. And funniest of all are those who tell me that QRP is ineffective and–quoting from an actual message recently–“a complete waste of time.”
My advice is to simply ignore these folks. The proof is in the pudding! Get out there and play radio! In the words of Admiral Farragut, “Damn the torpedoes. Full speed ahead!” 🙂
Thank you!
As always, thank you for reading this field report and a special thanks to those of you who are supporting the site and channel through Patreon and the Coffee Fund. While certainly not a requirement–my content is always free–I really appreciate the support.
Lab599 has just announced that firmware v1.10.04 has been published for the Discovery TX-500 and is available for download on their website.
New: Audio modes
The new firmware adds two switchable audio modes: 1W “Normal” mode and 3W “Outdoor” mode. Although I’ve always felt the audio gain on the TX-500 was excellent, this will give even more granular control of volume levels.
New: Antenna SWR Monitor
Lab599 has also added an SWR monitor and display. They describe it on Twitter:
“This new function will provide you a graph to determine characteristics of the antenna (SWR) in the range of the selected band.”
They shared the image above of the TX-500 display and have already added this along with details in their downloadable user manual.
Of course, the benefit of camping at a state park is being able to play radio pretty much anytime while on the park grounds. For a few days, it’s like you’re living in a park activation and can actually set up an antenna and use it over the course of multiple days.
It’s such a big departure from my typically short (45-90 minute) park activations.
When we first arrived at the New River State Park campground, I deployed my PackTenna 9:1 UNUN random wire antenna.
I brought two transceivers with me: the Xeigu X5105 and the Discovery TX-500–I pretty much split my operating the time equally between the two radios.
New River State Park (K-2748)
Although I spent much more time on the air than I normally do, I didn’t make videos of each session. One reason is I wanted to operate with earphones–especially since some of my sessions were later in the evening or early in the morning. I didn’t want to disturb my neighbors at the campground.
That and, especially with the X5105, I wanted to see what it would be like to operate with earphones for extended sessions. Prior to making videos of my activations, I almost exclusively used earphones in the field. I appreciate the sound isolation earphones offer–I also find they help tremendously with weak signal work. When I make videos, however, I don’t want to go through the hassle of recording the line-out audio separately in order to use headphones, so I use an external speaker.
I decided to record my Wednesday, June 23, 2021 evening session with the Discovery TX-500.
This session started only a few minutes prior to the end of the UTC day which meant I had to watch the clock very carefully and clear my logs at the beginning of the UTC day (20:00 EDT).
In POTA and other field activities, if your activation straddles the UTC day change, you must keep in mind that any contacts made after 0:00 UTC can only be counted on the next day’s logs. This was not a problem for me because I had logged dozens of stations earlier in the day, but if you ever start an activation close to the UTC day change, you need to make sure you log your 10 contacts for a valid activation prior to 0:00 UTC.
Auto-spotting help
Another thing complicating my sessions at New River State Park was that I chose not to schedule my activation via the POTA website prior to our trip.
If you schedule your activation via the POTA website, anytime the Reverse Beacon Network picks up your CQ calls (in CW), the POTA spots website will scrape that information and auto-spot you. It’s an amazing convenience for those of us who operate CW.
I chose not to schedule my activation days at New River because I had also planned to operate at another nearby park during my stay and I didn’t want the system to spot me incorrectly. That, and I thought I would have mobile phone coverage to self-spot.
It turned out that–contrary to my mobile phone company’s coverage maps–I had no internet service at the park. None.
In order to get spotted, I relied on my Garmin InReach GPS/satellite device to send short text messages to my buddies Mike (K8RAT) and Eric (WD8RIF). My pre-formatted message would prompt them to check the RBN for my frequency, then spot me to the POTA site manually.
I’m incredibly grateful to have had them helping me in the background. Everyone should have a Mike and Eric as friends!
Video
I made a real-time, real-life, no-edit video of the entire activation. Note that it took a while to get spotted, so the first ten minutes are simply me talking (it’s alright to skip that bit…it won’t hurt my feelings!).
Also, here’s a QSO map of that day’s contacts. Note that this includes stations I logged later in the UTC day (i.e. the following morning/day.
Due to some unexpected conflicts, our camping trip was shorter than we would have liked. We plan to visit New River later this year and spend much more time there. It’s a beautiful park!
Thanks for reading this short field report and here’s hoping you get a chance to play radio in the field soon!
That’s what my grandpa used to say and he was right. It was certainly the theme on Tuesday, June 15, 2021, when I decided to activate Crowders Mountain (W4C/WP-011).
If memory serves, it was about 80F/27C that day–pretty reasonable for late spring in the Piedmont of North Carolina. But the humidity was quite high. I’m no meteorologist, but I’m guessing it was 7,400%. (That number may be a bit of an exaggeration.)
Still, I was eager to fit in a decent hike and I knew Crowders would be fun and easy in the sense that I wouldn’t need to carry a map or do bushwhacking to get to the summit. In fact, Crowders Mountain is possibly one of the busiest parks I ever visit; being so close to Shelby, Gastonia, and Charlotte, it can get crowded especially on weekends.
The amazing thing about Crowders Mountain State Park, to the amateur radio operator, is that it contains not one but two SOTA summits! And, of course, the park can be activated during the SOTA activation. Earlier this year, I activated The Pinnacle–it was amazing fun–and now I was ready to activate Crowders Mountain as well.
I arrived at the park visitor’s center around 11:30 AM local time and hit the trail.
I opted to take the longer trail to the summit which is about 6 miles round trip. There’s a shorter path to the summit via the Linwood Access, but I wanted a bit more trail time despite the humidity.
The hike was amazing and the trail very, very well-worn and marked.
The hike was overall what I would call moderate and very gentle. In fact, at about 2/3 into the trail, I was curious when I’d truly start gaining a bit of elevation. Turns out: all near the very end!
The final portion of the hike was pretty steep–mostly steps up to the summit. The humidity was thick enough, I took my time going up the steps.
In the end, you will put in a bit of effort to bag this one point SOTA summit if it’s hot and humid.
Crowders Mountain (W4C/WP-011)
Having been on the summit of The Pinnacle earlier this year, there was no mistaking the summit of Crowders Mountain, since it, too, has ominous warning signs!
I’m sure the sign is in response to people acting foolishly. Crowders Mountain is not a treacherous place, but like many summits, there’re ample opportunities to fall to your death, I reckon.
I’ve heard that even the summits of Crowders Mountain can get quite busy–this is why I chose a Tuesday to do the activation. Even then, I’m guessing there were anywhere from 8-12 other hikers on the summit with me at various times during the activation that day.
I was banking on the fact that Crowders Mountain had trees, so I only packed my short PackTenna random wire–no self-supporting vertical of any sort.
After a quick site search, I found an ideal spot to play radio just beneath the radio/TV towers on the summit.
Deploying the PackTenna was incredibly easy with my arborist throw line. I meant to make a video showing the antenna deployment, but was distracted by some curious hikers who asked a load of questions as I launched the line. Somehow, I managed to snag the perfect tree branch despite an audience and a mild case of performance anxiety!
Next, I set up the Discovery TX-500 transceiver and paired it with my Elecraft T1 ATU since random wire antennas require matching and the TX-500 has no internal ATU.
I’ll admit here that each time I use the Elecraft T1 it reinforces why I like this ATU so much: it’s incredibly compact, runs for ages on a 9V cell, pairs with all of my transceivers, and it has a very wide matching range (although, in this case, the 9:1 UNUN doesn’t need a wide range ATU). The T1 gets the job done each and every time.
As with many of my activations, I made a real-time, real-life video and didn’t edit out a thing. If I had any self-respect, I would have edited out all of my keying errors that day, because I made numerous ones. (For the record, I blame the humidity!) 🙂
Joking aside, I’m not ashamed of my keying mistakes. We all make them. No one is a perfect CW operator and, trust me, the op at the other end can sympathize. If I let my sloppy fist sessions prevent me from operating, I’d never get on the air.
On The Air
I hopped on the 20 meter band in CW and wow! I made 30 contacts in 39 minutes.
Since I had cell phone service, I also decided to spot myself to the SOTA network and do a little SSB on the 17 meter band. I made four contacts in four minutes.
Of course, this was not only a summit activation, but also a park activation (K-2726), so logs were submitted to both programs.
Here’s a QSO Map of my contacts (click to enlarge):
In truth, I would have liked to hang around on the summit a bit longer and work more stations, but I needed to start my hike back to the car. I had a number of errands in the afternoon and also needed to be back in time for a live stream interview with Red Summit RF (click here to watch the archive of that show).
As I was packing up my radio gear, two young women stopped by and one asked, “Was that Morse Code we wear hearing earlier?” I confirmed this and she looked at her friend and said, “Yes, I knew it was!” I asked them if it was the first time they’d heard Morse Code “in the wild,” and they both nodded their heads. They then asked a load of questions that I was happy to answer.
Meeting Max
One of our readers, Max (W4GZ), had asked that I contact him next time I activated Crowders Mountain State Park as it’s not too far from his QTH. I sent him a message earlier in the day and when I got back to the car, I found Max set up with his IC-705 and vertical antenna next to my parking spot.
Max had just started his own park activation.
It was great meeting you, Max!
Photos
Of course, I snapped a few photos on the summit and the trail, so here they are in no particular order:
Thank you reading this field report! I hope you have an opportunity to play a little radio in the great outdoors this week!
Lab599 have informed me that Nevada Radio will be the exclusive distributor of the TX-500 in the UK.
In addition, Waters and Stanton will be a TX-500 dealer and distrubutor.
The price will be £899 and both retailers are taking deposits (Nevada a £83.33 deposit, Waters and Stanton a £100 deposit) for the first delivery due in September 2021.
Last time I visited Table Rock Fish Hatchery–this activation–it was a struggle to get the ten contacts I needed for a valid activation. Propagation was horrible that day, making it a proper struggle.
On Thursday, May 20, 2021, I thought I’d go back to the fish hatchery for another try! I really like the site: it’s open, has lots of trees, and the staff (and neighborhood dogs) are all very friendly.
My not-so-QRP diesel truck!
Thing is, as I drove to Table Rock, my buddy Mike informed me that propagation took a nose dive. Earlier in the day, it had been reasonably stable, but he noted that POTA activators were struggling in the afternoon and the propagation numbers were in the dumps.
There’s a beautiful little creek next to the picnic area.
My secret weapon: The Chameleon CHA LEFS
Shortly after I posted my “unboxing” video of the lab599 Discovery TX-500, Carl at Chameleon Antenna made a comment on my YouTube channel that he was going to send me their CHA LEFS (Lightweight End Fed Sloper) wire antenna since it’s resonant on 40, 20, 17, 15, 12 and 10 meters. In many ways, it’s ideally suited to pair with the TX-500 since this transceiver lacks an internal ATU. Side note: there is a cool project in the works called the DIY599 that adds a 60 watt amp and ATU to the TX-500 .
I had only recently received the CHA LEFS and had not yet taken it to the field. Table Rock was the perfect opportunity.
When I know in advance that propagation is poor, I try to make my portable set up as efficient as possible, so that’s when I 1.) make sure I pull out a resonant wire antenna and 2.) use a wire antenna with longer radiators. The CHA LEFS fits both of these bills.
The CHA LEFS has a 63 foot radiator made of 20 gauge PTFE antenna KEVLAR wire. The winder has a large efficient transformer to match impedance, and there is an inline coil to make the most of the 63′ radiator. They also include 50′ of Micro 90 paracord.
Like all Chameleon antennas I’ve used, it’s built to military specs.
Table Rock Fish Hatchery (K-8012)
Table Rock is ideally-suited for a long-ish sloping wire antenna, too. The site has tall trees and open spaces that make stretching out the sloping radiator quite easy. Just watch those power lines!
The CHA LEFS takes longer to deploy that end-fed antennas with a feedpoint near the ground. I find it quicker to deploy, however, than dipoles.
I deployed the LEFS by first stretching out its radiator wire in the direction I planned to deploy it.
Next, I connected the coax feedline to the SO-239 on the LEFS winder and stretched it in the opposite direction of the radiator. Why do this? It helps keep the radiator and coax from twisting together as I raise the winder/feedpoint into the tree.
This is not a difficult antenna to deploy as one person. Of course, if you have a helper, it’ll go even faster (I’ve yet to convince Hazel to help me with antenna deployment).
I had launched the arborist line quite high into a tree at the picnic table where I planned to operate. I was able to elevate the LEFS feedpoint/winder about 47′ into the tree.
I used the supplied paracord to attach the radiator to a nearby branch. The end of the sloper was perhaps 6 feet off the ground (if memory serves).
Knowing how poor conditions were from real-life K8RAT observations, I didn’t expect to actually validate my activation by logging the required 10 contacts. As I stated in my activation video, I was fully prepared to walk away with three or four contacts–I didn’t have a few hours to burn on an activation. I was simply happy to play with a new antenna, the TX-500, hang with the local canine welcome committee and enjoy the fine weather.
First, I hopped on 40 meters and discovered the LEFS provided a perfect 1:1 match on 7063 kHz. Very promising!
Next, I started calling CQ and the Reverse Beacon Network functionality of the POTA spots page must have quickly auto-spotted me.
Within 13 minutes, I logged six contacts! I was impressed. Mike (K8RAT) was in that first six contacts and he later told me it was one of the strongest signals he’d ever heard from me at a POTA activation. He asked what I was using as an antenna that day and said, “it was working!”
Next, I moved to the 30 meter band and worked K8RAT again (a rarity on 30 meters!) along with four other stations.
I ran out of time, so called it quits with 11 stations logged.
I did not expect to not only walk away with a valid activation, but to have completed it in such short order.
QSO Map
Here’s the QSO Map of my contacts all made with 5 watts of power:
As Carl suggested, I’m going to keep the CHA LEFS tucked away along with my PackTenna EFHW in the Discovery TX-500 pack.
When conditions are poor, I’ll spend the modest amount of extra time deploying this fine antenna.
The only CHA LEFS criticism I noted–and it’s a minor one–is that the in-line trap/coil isn’t very low-profile and takes a little attention to make it fall in the right spot when reeling the antenna up post-activation. Seriously. A minor criticism and I’m guessing Chameleon has a reason for it being on the large size–likely for power handling reasons.
Field Day is coming up, and I think I’m going to make the CHA LEFS one of Team Baklava‘s main antennas (Team Baklava = my buddy N3CZ and me!).
QRP radios, product announcements, reviews, news and more. Low power amateur radio fun!
Please support QRPer by adding us to your whitelist in your ad blocker. Ads are what helps us stay online. All of our ads are ham radio related--no junk, we promise! Thank you!
 On Friday, September 10, 2021, I made a detour to the Table Rock Fish Hatchery (K-8012) on my way back to the QTH.


