Activating Anderson Mountain: My first drive-up one point summit

As AA6XA wrote on his blog:

To quote the W4C association manager Pat, KI4SVM, “Anderson is a drive-up with no other redeeming qualities.” This perfectly describes the mountain. It is easy to get to, at the top of Tower Road, right off of Route 16. The road to the top get a bit rough in places, but is passable in any car.

He had me at “no other redeeming qualities”–!

I must admit that all of the summits I’ve activated so far have been pretty amazing: offering up spectacular views, wildlife, and wonderful hiking opportunities. All of them were also on protected public lands like state/national/county parks.

Anderson Mountain (W4C/WP-012)

Earlier this year, I made a spreadsheet of summits I planned to activate. Anderson Mountain was one of them because of its convenient location in my travels to visit family each week. I had also been saving it for the day that I planned to activate a nearby park–Tuesday, July 6, 2021 was that day!

Earlier, I had an amazing activation at Mountain Island Educational State Forest using the Yaesu FT-817ND, T1, and my speaker wire antenna. I completed Mountain Island in enough time I could also pop by Anderson Mountain for a quick activation.  It was literally a six minute detour from my route, if that.

The mountain is directly off of US 16–the main highway between Newton/Conover and Charlotte.

You turn off of the highway onto a dead end road that leads to the summit. About halfway up, it turns into a single lane privately-maintained road that, as AA6XA noted above, is rough but passable in any car (well, save a Lamborghini but I’m guessing most SOTA ops don’t own one of those!).

The road to the summit is a straight–there’re no confusing forks in the road and it’s impossible to get lost.

Once on top, you’re greeted by a few clusters of communications towers. This is actually pretty common sight with smaller one point summits because they typically have superb line-of-sight to populated areas and are easily accessible by vehicle.

When you look around, you can understand why Pat would say it has no redeeming qualities: towers, rusty transmitter buildings, razor wire on chain link fences, and litter all over the place.

Not the sort of spot that would inspire Ansel Adams.

Judgement call

It’s worth noting here that, unlike POTA, you’re not allowed to operate from a vehicle during a SOTA activation–even at a “drive-up” summit. There’s no such thing as a mobile SOTA activation.

Indeed, you’re not supposed to operate in “the vicinity” of your vehicle either (although, there’s no distance noted and I’m guessing this is on purpose to allow leeway and the op to make a judgement call).

I set up in a little island of trees in the middle of a road loop on the summit. While I wouldn’t call it a hike, I did walk the entire summit after arriving to check for other operating spots, but decided to set up near where I parked the car. In fact, it’s really the only safe spot I noted in the activation zone to park since the road is single lane and you would otherwise block access to one of the transmitter sites. I thought about parking further down the road next to one of the transmitter fences, but I felt like that would have been on private property.

Side note: SOTA forbids operators from trespassing on private property without the owner’s permission. I checked the road very carefully for “no trespassing” signs, but the only ones I found were to keep people out of and away from the fenced-in transmitter sites.

I also thought about trying to operate in a spot on that little island where I couldn’t see my car as easily in the cluster of trees–to remove myself from the “vicinity” of the car–but that would have been awkward, too and only separated me an additional 10-15 meters or so. I chose the option where others could see me and I could see them if, for example, a Duke Energy service vehicle approached.

I was fully outside of my car, though, and not using it to support my antenna or any equipment–another important factor.

Sometimes as an operator you have to make a judgement call when you arrive at a site to stay within the rules and the spirit of the program. I’ve never had a SOTA or POTA activation where I felt I was splitting hairs until this one. I decided that this was the best scenario to activate Anderson Mountain in a way that wouldn’t inconvenience other property owners, nor cause suspicion that might lead to a future no trespassing sign on the road. It was the safest set up and I’m willing to bet most previous activators did exactly the same thing. I felt it was within the spirit of the program.

Now where was I–? Oh yes…

Gear:

On The Air

Since I used the speaker wire antenna at Mountain Island, I used it on Anderson Mountain as well. I deployed the entire station within 5 minutes max: herein lies the advantage of using an arborist throw line, a shack-in-a-box transceiver like the KX2, and a simple wire antenna.

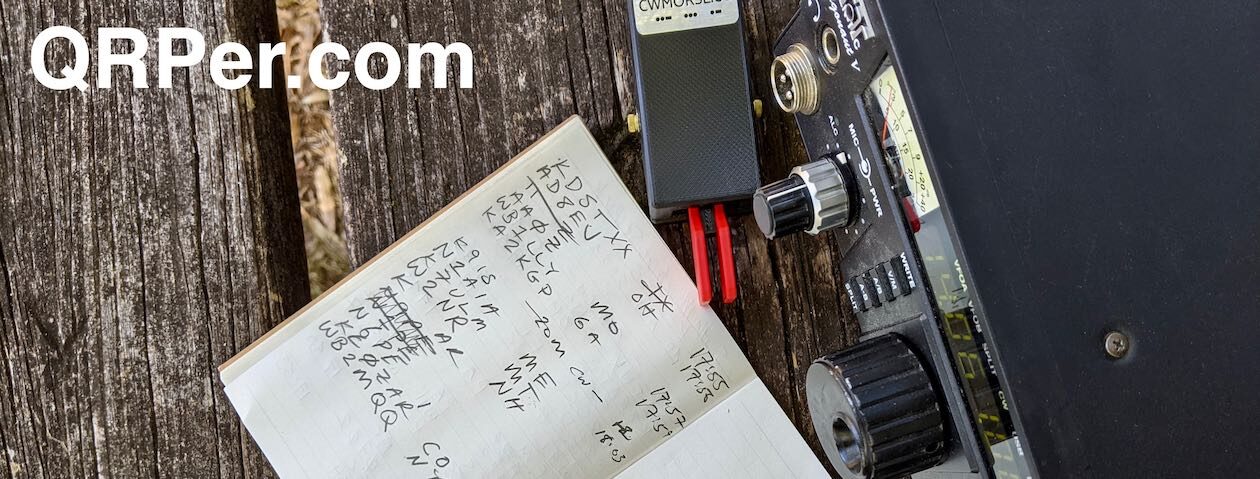
I first hopped on 20 meters CW, spotted myself to the SOTA network (mobile phone reception was superb, by the way) and started calling CQ SOTA.

Within three minutes I logged K6YK, KT5X, W5GDW, and K0LAF which already validated this SOTA activation.

Wow–validating this activation was, as my daughters used to say, “easy peasy lemon squeezy.” 🙂

I added WB6POT and N0RZ for a total of six stations on 20 meters within five minutes.

I then moved to 40 meters SSB and worked K8RAT, W4NA, and WN4AT all within about three minutes.

Finally, I moved up to the 17 meter band and worked F4WBN (our well-known French SOTA chaser) and K2LT.

Packing up my gear was as quick as setting it up.

Video

I did make one of my real-time, real-life videos of the entire Anderson Mountain activation with no edits. If you need a cure for insomnia, I encourage you to watch or listen to it:

At least one redeeming quality…

I mention in the video that some readers and subscribers have confessed that they feel SOTA is less accessible to them than POTA or WWFF.  I would have to agree that summit activations are much less accessible than park activations.

For one thing, there are flat regions on our planet that lack prominences that qualify for the SOTA program. If you live in the middle of a prairie state, you may have to drive a great distance to reach the closest qualifying summit (although you might have a number of POTA and WWFF parks nearby).

In addition, summit activating generally involves hiking–which is actually the motivating factor for many of us (certainly for me as I love hiking).

Some would-be SOTA activators have mobility issues, however, and simply can’t hike great distances with gear on their backs.

This is where “drive-up” summits like Anderson Mountain come in: they’re much more accessible for those with health considerations.

If you live in an area with SOTA summits, but haven’t attempted an activation because you can’t do strenuous hikes, connect with local SOTA activators and ask for a list of “drive-up” summits. There are many of these around–some, like Anderson, are accessible because there are radio towers on top, other are accessible because they’re on a park with accessible vistas, or some are even in a mountaintop neighborhood.

Thank you

I’d like to thank all of you for reading this field report and I’d especially like to thank those of you who contribute to QRPer.com via Patreon and our Coffee Fund. While my content will always be free and QRPer is very much a labor of love, your support helps me purchase gear and supports my radio travels. With that said, if you’re saving up for your first radio or need to invest in your own kit, I’d rather you support yourself!

My goal with QRPer is to champion field radio operations and encourage others to discover the benefits of playing radio outdoors!

73,

Thomas (K4SWL)


Do you enjoy QRPer.com?

Please consider supporting us via Patreon or our Coffee Fund!

Your support makes articles like this one possible. Thank you!

Phillip discovers the TPA-817 B pack frame

Many thanks to Phillip (VE3OMI) who writes:

Hello Thomas,

[…]I came upon this interesting mount setup for the Yaesu FT-818 via Armando – KP4YO. I saw his setup on his QRZ page and was intrigued, as the rig seems to be able to stand up on its back side even with a pretty large whip installed.

(via KP4YO on QRZ.com)

Seems the gist of it is to bring all of the rear mounts and connections to the front.

Quite interesting and certainly looks “beefy”!

Product description from Armoloq:

The TPA pack frame provides a modular platform for configuring your Yaesu FT-817 and FT-818 into a quickly deployable base, mobile, field or mil style man pack configuration.

The concept was to design an effective, small form factor frame that when installed, would allow relocation of all rear inputs, minus power and ACC connection, to the front of the radio, provide standoff at the rear of the radio for permanent cable attachment, and also provide protection when used in the field.

The relocation platforms provide a sturdy mounting point for attaching commercial or mil type VHF/UHF whip antennas. All accessory mounts are interchangeable and can be oriented to suit your operating situation.

The TPA pack frame is a 2 piece frame that is secured to the radio via 8, side chassis mounts. The frame is CNC laser cut from 5052 aluminum and powder coated with a matte black finish. The TPA provides protection to the radio body and control head with a wrap around design while allowing access to the top oriented MODE and BAND buttons, as well as the battery compartment.

Click here for full details and photos.

Thank you for sharing this, Phillip! I’ve never seen this pack frame/cage before and I’m not even sure how I’d use it for the type of field work I do, but I’m willing to bet that it’s the perfect solution for those wanting an uber-rugged cage for Emcomm and/or as a manpack. I love products like this that transform gear into military-grade kit!

Anyone out there use the TPA-817 B? Please comment!

Portable Ops Challenge: September 4-5, 2021

If you’d like to participate in a contest that balances the playing field between fixed, high-power stations and QRP portable stations, you might take a look at the 2nd annual Portable Operations Challenge.

The POC will take place September 4-5 during three, 4 hour periods. The exchange is very simple: your 4 character Maidenhead Grid Square. You can even combine this event with a scheduled summit or park activation. 

This contest even includes prizes for the winners.

Check out the POC webpage for full details. I’ve pasted details from the POC page below:


PORTABLE OPS CHALLENGE

The Fox Mike Hotel Portable Operations Challenge is designed to optimize equal operating conditions for portable operating during a contest involving non-portable stations. The scoring allows and encourages regular home-based station operations to take part while offering a handicap-style scoring algorithm to be more equalized for portable stations. The approach is akin to the handicap index in the sport of golf. More difficult courses are scored with a higher slope value, indicating a greater challenge to achieve a normal par score of 72 on that course with a handicap of subtracting strokes for golfers who do not typically shoot as low a score as other golfers. A number of factors go into deriving the slope rating for a golf course but they represent the challenge that the course presents to each participant golfer and the golfer’s capability for playing the course.

The POC aims to make portable operations “on par” with more typical fixed-based operations while preserving the enjoyment of being in a new operating environment. Moreover, fixed-based operators can also easily participate in the action, challenging the handicapped-scoring for portable ops. Can the Super Station contester best the Little Pistol portable operation? If we use a scoring metric that reduces the advantages of fixed stations to that of pure radio sport operating, is there a chance that an efficient portable operator or team can come out ahead of the current winning contest station operators? That’s why this is called the Portable Operations Challenge!

Frank K4FMH

THEORY OF THE CONTEST SCORING FACTORS

Several aspects of fixed (permanent)-station contesting can be stacked in the operator(s) favor when compared to most portable operations. One is the use of greater RF power output. Another is a permanent tower with directional, gain producing beams. A third is that it is easier to have multiple transceivers and operators, allowing for a “per-transmitter production” that yields superior scores. A fourth is the mutual attractiveness for fixed-station ops to work other fixed-station ops and ignore the weaker (especially QRP) signals. The addition of having the full force of Internet communications (when allowed), spotting sources, better ergonomics for operating positions, food/drink conveniences, and climate-controlled shelter all add-up to give “course advantages.”

While some portable operations (an example can be some large Field Day teams) can meet or exceed the advantages to contesting identified above, the vast majority do not.

Our scoring metric equalizes some of these advantages. Four factors are used in scoring each contest operation submission. These are the same regardless of whether it is a single operator or a team of operators, unassisted or assisted through the use of operation spotting. These include:

a. Kilometers-per-watt (KPW). Using the Maidenhead Grid Square, the distance in miles divided by the reported power output in watts for the reporting contest participant.

b. Fixed (permanent) vs Portable operation (favoring portable).

c. Mode of contact: Phone vs. CW vs. Digital (favoring phone over CW over digital)

d. Number of transmitters in use (points X 1/t where t = # transmitters)

The logic underlying this metric is as follows:

The KPW metric will tend to equalize power used as well as antenna gain. The km-per-watt is computed per-contact using the centroid lat-lon of the Maidenhead grid square exchanged during the contact. Favor goes to the greater miles-per-watt which equalizes to some degree the antenna gain, power, and point-to-point propagation conditions. The MPW is the basic contact score. Fixed (permanent) station operators have their resident setup which gives an advantage over portable ops, although a team could replicate a Field Day setting with portable crank-up towers, amps, generators, and so forth. Favor goes to the portable operator. The amount of this multiplier can be adjusted much as a competitive “tuning parameter” in future contests.

All things being equal in a QSO, phone is most challenging, followed by CW and then digital (especially weak signal modes like FT8). Favor goes to phone first, CW second, and digital third.

The more transmitters shape the number of contacts so more transmitters get increasing decrements in the points awarded, regardless of the number of ops. This emphasizes the per-transmitter production rather than just the amount of equipment and number of operators. We are experimenting with what seems appropriate discounts for the number of transmitters in simultaneous so as to render a more equitable competition, favoring sport over equipment.

POC DATES

SEPTEMBER 4-5, 2021
CONTEST OBJECTIVE:
For portable and fixed stations to work as many other portable and fixed stations as possible during the contest
period.

CONTEST PERIOD:
The contest consists of three individual and separate 4-hour periods on September 4 & 5, 2021 UTC.

The sessions are:
Session 1: 0800 – 1159 September 4, 2021 UTC
Session 2: 1600 – 1959 September 4, 2021 UTC
Session 3: 0000 – 0359 September 5, 2021 UTC

Stations may be worked once per band and mode by session for a maximum of 15 contacts between stations per session. Duplicate contacts will be removed without penalty. Scoring will be done by each individual session. Participants may operate one, two or all three sessions. Overall champion will be determined by aggregating scores from the three separate sessions. The Individual with the highest aggregated score will be crowned Grand Champion. The single station with the longest distance in KM per watt will be the Distance Champion.

BANDS:
80, 40, 20, 15 and 10 meters

MODES:
CW, Phone (SSB), and Digital
Digital mode is any data mode that can transmit the required contest exchange. Cross mode contacts are not permitted.

EXCHANGE:
4-character Maidenhead grid square

SCORING:
Total score for the session is the sum of all QSO Values.

See Rules Document for official details.

943 Miles Per Watt with the Yeasu FT-817ND, Elecraft T1, and 28.5 feet of speaker wire

When it comes to parks, I haven’t picked up many new-to-me “uniques” lately.

In truth, though, I’ve put more effort into activating unique summits which takes more time to plan, plot, and activate. SOTA has taken a bite out of my park uniques, but I’m good with that because to me it’s less about my park/summit numbers and more about the exploration and outdoor radio time.

On Tuesday (July 6, 2021) however, I added one more unique to my 2021 park count: Mountain Island Educational State Forest (K-4858).

This park is actually a modest detour during my weekly travels, but I’ve never popped by for an activation. You see, unlike other state parks I visit, Mountain Island isn’t yet open to the public on a daily basis. On their website, they state that visits must be arranged in advance, so I reached out to them the morning of July 6 and they promptly replied, welcoming me for a visit and activation that very same day!

Off the beaten path

Since this state park isn’t yet open to the public, I didn’t see the typical brown highway signs pointing me to the park entrance, but Google Maps steered me right to the front gate where there’s a sign.

The gates were unlocked and open, so I pulled into the property and met with two of the park staff who were incredibly kind and accommodating. They were both familiar with the Parks On The Air (POTA) program which made it much easier for me to ask about spots where I could set up my station.

First, though, I wanted to know more about Mountain Island Educational State Forest so I asked ranger Laura about the history of the site.

Turns out, Mountain Island is the newest Educational State Forest in North Carolina and has been in the works for more than 20 years.

The Forest is a vast conservation area that protects 12 miles of shoreline on Mountain Island Lake in the Catawba River Basin. This lake is the primary drinking water supply area for Charlotte, Mecklenburg and Gaston Counties. She told me that one in 23 North Carolinians rely on this area for their source of water.

Much of the land was originally owned by Duke Power who put it up for sale in 1998. Conservation groups purchased the land from Duke’s real estate agency in 1998 and put it into a conservation easement. The land is actually in two counties (Gaston and Lincoln) and a portion in the city limits of Gastonia.

The NC Forest Service now manages the forest and supports the public-private partnership with the counties, municipalities, and conservation groups.

Mountain Island has been actively educating school groups and the public about the river basin and local flora/fauna for many years by appointment. Currently, a new education center is being built on the property and will soon be open to the public with regular business hours. Being so close to population centers, I imagine they’ll stay busy!

Shade

Park ranger Laura was kind enough to allow me to set up under a huge tree in front of their ranger station.

I was grateful for the shade: it was 92F (33.3C) and humid.

There were no picnic tables under the tree, but I happened to have two folding chairs in my car. I used one as a table and the other as a chair. I flipped over my GoRuck GR1 backpack to make a stable base for the Yaesu FT-817ND.

Gear list:

On The Air

I was super pleased to put the Yaesu FT-817ND back on the air. It’s been a while since I’d used it in the field because my review radios (TX-500, X5105, etc.) have taken priority.

I love the FT-817ND and believe it’s actually an exceptional transceiver for CW and SSB ops. The CW full break-in QSK is wonderful and I actually like the mechanical sound of the T/R relay switching (if you like pin diode switching, you should look the other way, though!). With the 500Hz CW filter installed, the front end is pretty bullet-proof, too!

This was the first time I had paired the FT-817ND with my 28.5 foot speaker wire antenna. The random wire antenna needs a good ATU to match impedance, so I employed the Elecraft T1 this time (soon I’ll also try the LDG Z-100A).

I had planned to do a little SSB work, but quickly realized I’d forgotten the FT-817ND microphone. A shame because this site actually has excellent mobile phone service so I could have spotted myself to the network. Next time–!

I started on 40 meters CW and worked ten stations in 21 minutes. That’s a perfect pace for me!

Next, I moved to 20 meters where I worked six more in 9 minutes.

I was incredibly pleased with how well the speaker wire antenna performed–especially on 20 meters.

From the Piedmont of North Carolina, I worked Montana, Texas, New Hampshire, and Italy with 5 watts into $4 worth of speaker wire.

I did a quick back-of-the-envelop calculation and discovered that I yielded about 943 miles per watt!

To be clear, IK4IDF did all of the heavy lifting in our contact with his 9 element Yagi, but still it’s awfully exciting to put DX in the logs with only fair propagation.

Video

Of course, I made a real-time, real-life video of the entire activation (save the set-up and take-down):

Click here to view on YouTube.

Onward and upward!

I packed up quickly because I had a SOTA activation planned that afternoon on Anderson Mountain. I’ll post a field report and video of that activation soon.

Rev 4 FT-817 Buddy Board

Also, I’m about to start soldering together G7UHN’s new Rev 4 FT-817 Buddy Board! Revision 2 worked wonderfully, but revision 4 now includes a CW memory keyer among other upgrades! (Woo hoo!)  All of the components are now in the shack–just a matter of soldering them together and programing the Arduino Nano. Andy, if you’re reading this, expect a call from me soon, OM!

Thank you!

I’d like to thank all of you for reading this field report and I’d especially like to thank those of you who contribute to QRPer.com via Patreon and our Coffee Fund. While my content will always be free and QRPer is very much a labor of love, your support helps me purchase gear and supports my radio travels. With that said, if you’re saving up for your first radio or need to invest in your own kit, I’d rather you support yourself.

My goal with QRPer is to champion field radio operations and encourage others to discover the benefits of playing radio outdoors!

Have a wonderful week!

73,

Thomas (K4SWL)


Do you enjoy QRPer.com?

Please consider supporting us via Patreon or our Coffee Fund!

Your support makes articles like this one possible. Thank you!

How to pack a compact Arborist Throw Line Storage Bag

Since last year, I’ve become a bit of an arborist throw line evangelist.  Arborist throw lines have made my wire antenna deployments so quick and easy compared with using monofilament fishing line or more complicated systems.

Since purchasing this arborist throw line last year, I’ve never looked back. The throw line never gets caught in tree branches, it’s reusable hundreds of times, and with it I can easily snag branches 50’+ above the ground to hang my wire antennas.

When I purchased my first arborist throw line, I also purchased this folding throw line packing cube:

It has a huge opening, is stable on the ground, and makes for an incredibly quick deployment and pack-up.

While the cube folds into a compact triangle, it’s a little too bulky for backpacks I use during SOTA and other trailside activations.

A smaller throw line storage bag

A few months ago, I purchased a second throw line for backpacking and this compact Weaver Leather throw line storage bag (note: Amazon affiliate link).

If I’m being honest, I was very skeptical about how easily this bag would work in the field. One of the reasons my throw line storage cube works so well is the opening is large allowing the line to deploy without tangling. Packing up is so fast because the line can be flaked back into the cube in a matter of seconds.

Before purchasing, I was afraid the compact throw line bag might get tangled when being stored in such a small stuff sack. I was really concerned packing the line in the storage bag might take too much time.

I purchased the the throw line bag and a new throw line from Weaver.

At home, I did a full break-in of the new throw line (attaching it to a tree, stretching it to full length, then pulling it for enough tension that some of the bend “memory” is removed). Then I attempted to simply stuff the line in my throw bag–it took ages, because the whole idea of a throw line is that it doesn’t easily tangle. The line wanted to “spring” from the bag as I tried stuffing it in.

A much better way: The “Figure 8” stuffing method

After a field activation this spring, I received a game-changing tip from one of my subscribers and I hope they step up to take credit! (Update: it was NW3S!–thank you!).

When stuffing the line back in the bag, wind it on your hand using the figure 8 method. I wind almost all of my lighter-weight cables and antenna wires in a figure 8 so that they deploy without getting tangled. I’ve been doing this for years and it works brilliantly.

I’d never thought about using this method on the arborist throw line. I was amazed with how effectively it worked.

Video demo

I made a short video (thank you for requesting this, Scott!) to better demonstrate how I pack my throw line storage bag now:

This method works amazingly well and I can usually pack the entire line within one or two minutes.

Again, I’m incredibly grateful to the subscriber who first suggested this method!

SOTA Activation Report: Crowders Mountain (W4C/WP-011)

“It’s not the heat. It’s the humidity.”

That’s what my grandpa used to say and he was right. It was certainly the theme on Tuesday, June 15, 2021, when I decided to activate Crowders Mountain (W4C/WP-011).

If memory serves, it was about 80F/27C that day–pretty reasonable for late spring in the Piedmont of North Carolina. But the humidity was quite high. I’m no meteorologist, but I’m guessing it was 7,400%. (That number may be a bit of an exaggeration.)

Still, I was eager to fit in a decent hike and I knew Crowders would be fun and easy in the sense that I wouldn’t need to carry a map or do bushwhacking to get to the summit. In fact, Crowders Mountain is possibly one of the busiest parks I ever visit; being so close to Shelby, Gastonia, and Charlotte, it can get crowded especially on weekends.

The amazing thing about Crowders Mountain State Park, to the amateur radio operator, is that it contains not one but two SOTA summits! And, of course, the park can be activated during the SOTA activation. Earlier this year, I activated The Pinnacle–it was amazing fun–and now I was ready to activate Crowders Mountain as well.

I arrived at the park visitor’s center around 11:30 AM local time and hit the trail.

I opted to take the longer trail to the summit which is about 6 miles round trip. There’s a shorter path to the summit via the Linwood Access, but I wanted a bit more trail time despite the humidity.

The hike was amazing and the trail very, very well-worn and marked.

The hike was overall what I would call moderate and very gentle. In fact, at about 2/3 into the trail, I was curious when I’d truly start gaining a bit of elevation. Turns out: all near the very end!

The final portion of the hike was pretty steep–mostly steps up to the summit. The humidity was thick enough, I took my time going up the steps.

In the end, you will put in a bit of effort to bag this one point SOTA summit if it’s hot and humid.

Crowders Mountain (W4C/WP-011)

Having been on the summit of The Pinnacle earlier this year, there was no mistaking the summit of Crowders Mountain, since it, too, has ominous warning signs!

I’m sure the sign is in response to people acting foolishly. Crowders Mountain is not a treacherous place, but like many summits, there’re ample opportunities to fall to your death, I reckon.

I’ve heard that even the summits of Crowders Mountain can get quite busy–this is why I chose a Tuesday to do the activation. Even then, I’m guessing there were anywhere from 8-12 other hikers on the summit with me at various times during the activation that day.

I was banking on the fact that Crowders Mountain had trees, so I only packed my short PackTenna random wire–no self-supporting vertical of any sort.

After a quick site search, I found an ideal spot to play radio just beneath the radio/TV towers on the summit.

Gear:

Deploying the PackTenna was incredibly easy with my arborist throw line. I meant to make a video showing the antenna deployment, but was distracted by some curious hikers who asked a load of questions as I launched the line. Somehow, I managed to snag the perfect tree branch despite an audience and a mild case of performance anxiety!

Next, I set up the Discovery TX-500 transceiver and paired it with my Elecraft T1 ATU since random wire antennas require matching and the TX-500 has no internal ATU.

I’ll admit here that each time I use the Elecraft T1 it reinforces why I like this ATU so much: it’s incredibly compact, runs for ages on a 9V cell, pairs with all of my transceivers, and it has a very wide matching range (although, in this case, the 9:1 UNUN doesn’t need a wide range ATU). The T1 gets the job done each and every time.

As with many of my activations, I made a real-time, real-life video and didn’t edit out a thing. If I had any self-respect, I would have edited out all of my keying errors that day, because I made numerous ones.  (For the record, I blame the humidity!) 🙂

Joking aside, I’m not ashamed of my keying mistakes. We all make them. No one is a perfect CW operator and, trust me, the op at the other end can sympathize. If I let my sloppy fist sessions prevent me from operating, I’d never get on the air.

On The Air

I hopped on the 20 meter band in CW and wow! I made 30 contacts in 39 minutes.

Since I had cell phone service, I also decided to spot myself to the SOTA network and do a little SSB on the 17 meter band. I made four contacts in four minutes.

Of course, this was not only a summit activation, but also a park activation (K-2726), so logs were submitted to both programs.

Here’s a QSO Map of my contacts (click to enlarge):


In truth, I would have liked to hang around on the summit a bit longer and work more stations, but I needed to start my hike back to the car.  I had a number of errands in the afternoon and also needed to be back in time for a live stream interview with Red Summit RF (click here to watch the archive of that show).

As I was packing up my radio gear, two young women stopped by and one asked, “Was that Morse Code we wear hearing earlier?” I confirmed this and she looked at her friend and said, “Yes, I knew it was!” I asked them if it was the first time they’d heard Morse Code “in the wild,” and they both nodded their heads. They then asked a load of questions that I was happy to answer.

Meeting Max

One of our readers, Max (W4GZ), had asked that I contact him next time I activated Crowders Mountain State Park as it’s not too far from his QTH. I sent him a message earlier in the day and when I got back to the car, I found Max set up with his IC-705 and vertical antenna next to my parking spot.

Max had just started his own park activation.

It was great meeting you, Max!

Photos

Of course, I snapped a few photos on the summit and the trail, so here they are in no particular order:

Thank you reading this field report! I hope you have an opportunity to play a little radio in the great outdoors this week!


Do you enjoy QRPer.com?

Please consider supporting us via Patreon or our Coffee Fund!

Your support makes articles like this one possible. Thank you!

Discovery TX-500 UK distributors and dealers

If you live in the UK and have been waiting for the arrival of the lab599 Discovery TX-500 transceiver, this is a positive development:

Lab599 have informed me that Nevada Radio will be the exclusive distributor of the TX-500 in the UK.

In addition, Waters and Stanton will be a TX-500 dealer and distrubutor.

The price will be £899 and both retailers are taking deposits (Nevada a £83.33 deposit, Waters and Stanton a £100 deposit) for the first delivery due in September 2021.

Click here to check out the TX-500 at Nevada Radio and here for Waters and Stanton.

Guest Post: Field Day – 200 QSOs with a Flashlight Battery

The PowerFilm LightSaver (Image: PowerFilm Solar)

Many thanks to Jim Cluett (W1PID) who has kindly allowed me to share this recent post from his website:


Field Day – 200 QSOs with a Flashlight Battery

June 2021

by Jim Cluett (W1PID)

Field Day was an experiment this year. I operated for nine hours using a 5V 18650 battery and made 200 QSOs before calling it quits.

I operated on the deck with an MTR 4-B designed by KD1JV. The antenna was an 88 foot doublet up about 45 feet. I used the ZM-2 tuner. For power I used the PowerFilm LightSaver. This is a 5 watt roll-up solar panel that charges a 3.7V 18650 battery rated at 3.2 Ahr. The battery inside the Powerfilm product is commonly used in flashlights. The combination of the rig and the power supply is crucial.

The MTR rigs will operate from 6 to 12 volts. The Powerfilm puts out 5V to a USB socket. The secret ingredient required to bring the USB voltage up to the operating voltage of the rig is a Baofeng USB charging dongle. This device takes a 5V input and outputs 10.3 volts… perfect for the MTR transceiver. With this voltage the MTR puts out a little less than 3 watts.

The PowerFilm LightSaver is designed to charge cell phones for hikers and campers. It weighs only about 5 oz. and rolls up into a tiny package. Any USB 5V cell phone charging battery could be used with the Baofeng dongle.

This year my whole station operated on 5V. I used a Samsung tablet for logging.

In New Hampshire it was cloudy for most of Field Day, but fortunately the amorphous solar panel provides some charging even when it’s cloudy. I’m guessing that after 9 hours of operating the battery was down to about half capacity. The beauty of this system is that one could operate indefinitely with moderate sunshine.

I’ve been experimenting with this setup during hikes and bike rides for the last couple of months with a view to using it for Field Day. This year’s emergency exercise proves that it is viable for an extended grid-down power outage.

Click here to check out Jim’s website!


What a brilliant challenge and test for Field Day, Jim! Thank you for allowing me to share it here on QRPer. Also, a hat tip to Eric (WD8RIF) for bringing this article to my attention!

Field Report: Let’s build a super simple antenna on-site and activate this park!

Until 2016, I had never purchased a commercial field antenna; I built all the ones I had ever used.

These days, I take a number of commercial antennas to the field and use them in my real-time videos and I really enjoy deploying and using them. My buddy Eric (WD8RIF) reminded me, though, that I hadn’t actually used a homebrew antenna in ages. He was right!

You see, while I believe commercial field antennas can be incredibly durable and compact, it’s important to note that antennas are one of the easiest components of an amateur radio system to build yourself. They require only the most simple of tools and are very affordable. And the best part? They can perform as well as those that are available commercially.

I also get a great deal of pleasure out of building things.

A simple goal

I’ve mentioned in previous posts that I often set a little goal that runs in the back of my mind for each park or summit activation I make.

On Monday, June 14, 2021, I made a simple goal: buy my antenna wire en route to Lake James State Park, build the antenna on site, and complete a valid Parks On The Air (POTA) activation.

A very simple antenna

I also decided to employ my Xiegu X5105 since 1.) it’s one of the most affordable general coverage QRP transceivers I own and 2.) it has a built-in antenna tuner (ATU).

One of the cool things about having an ATU is that, if it has the matching range, you can allow it to do the “heavy lifting” in terms of matching impedance.

Although I’d never put the X5105 to the test, I suspected its internal ATU would have the matching range to forgo building a 4:1 or 9:1 transformer and simply pair it directly with a random wire.

All I would need was a 28.5 foot length of wire for a radiator, at least a 17 foot length for a counterpoise, and a BNC to binding post adapter.

The antenna would benefit from multiple 17′ counterpoises, but I really wanted to keep this setup dead simple to prove that anyone can build an effective field antenna with a very minimum amount of components.

Even though I have plenty of wire lying around the house to build this simple antenna, I wanted to pretend I had none to prove that any wire would work.

And to add just a wee bit more challenge, I also limited myself to shopping for antenna wire between my home and the park without making a serious detour from my route. That really limited my options because there isn’t much in terms of commercial areas between me and Lake James State Park.

The wire

As I left the QTH, I decided that the best spot to shop was a Walmart in Marion, NC. It would only be a four minute round-trip detour at most.  I had a hunch that Walmart would even have speaker wire which would be ideal for this application.

In my head, I imagined I would have at least three or four choices in speaker wire (various gauges and lengths), but turns out I had a difficult time finding some at Walmart. We live in such a Bluetooth world, I suppose there isn’t much demand for it these days. A store associate helped me find the only speaker wire they had which was basically a 100 foot roll of the “premium” stuff for $17 US.

While I would like to have paid a fraction of that, in the end it’s not a bad price because once you separate the two conductors, you have double the amount of wire: 200 feet.

Although the frugal guy in me cringed, I bit the bullet and purchased their speaker wire. To be clear, though, I could have found another source of wire in that Walmart, but I preferred speaker wire for this application. And $17 to (hopefully!) prove a point? That’s a deal! 🙂

Lake James State Park (K-2739)

Once I arrived on site, I found a picnic site I’d used before with some tall trees around it.

Here’s how I prepared the antenna:

First, I cut 28.5 feet of the speaker wire from the roll and split the paired wires so that I’d have two full 28.5 foot lengths.

Next, I stripped the ends of the wire and attached banana jacks I found in my junk drawer. Although these aren’t necessary as the binding post adapter can pair directly with the wire, I though it might make for a cleaner install. In the end, though, I wasn’t pleased with the connection to the radiator, so dispensed with one of the banana jacks on site, and later dispensed with the other one as well. The connection is actually stronger without the banana jacks.

I then deployed the 28.5 radiator with my arborist throw line, and laid the other 28.5 half on the ground (the ground of this antenna would pair with the black binding post, the radiator with the red post).  I only needed 17 feet of counterpoise, but once it couples with the ground, I don’t think any extra length makes a difference (although less than 17 feet likely would).

The antenna was essentially set up as a vertical random wire with one counterpoise.

I then plugged the BNC binding post adapter into the rig, hit the ATU button, and was on the air.

It’s that simple!

My new speaker wire antenna in all its glory.

Gear:

On The Air

I’ll admit: I was a bit nervous putting this antenna on the air. Although I felt the X5105 ATU *should* match this antenna, I had no idea if it actually would.

Fortunately? It did.

At this point, if you don’t want any spoilers, I suggest you watch my real-time, real-life, no-edit, no-ad, video of the entire activation (including buying and building the antenna!).

Click here to watch the video.

Otherwise, scroll for my activation summary…

I was very pleased that the X5105 found a match on the 40 meter band.

I started calling CQ in CW and validated my activation by logging 10 stations in 13 minutes.

Honestly: it doesn’t get much better than this.

I logged three more stations on 40 meters CW, then moved up to the 30 meter band where the X5105 easily found a match.

I worked one station on 30 meters before heading back down to the 40 meter band to do a little SSB. I logged three SSB stations in five minutes.

Mission accomplished!

In the end, I logged a total of 17 stations including a P2P with K4NYM.

Not bad at all for speaker wire!

After the activation, I tested the X5105 ATU by trying to find matches on other bands–I was able to find great matches from 60 meters to 6 meters. Most impressive!

X5105 battery

You might recall that I attempted to deplete my X5105 internal battery at my last (rather long) activation of Lake Norman State Park.  I wasn’t able to deplete the battery at that activation, but I finally did at this one.

All I can say is that I’m incredibly impressed with the X5105 internal battery.  This was my fourth activation from one initial charge on May 16.  The battery lasted for 20 minutes, taking me well beyond the 10 contacts needed to validate this park. I’ll now consider taking the X5105 on a multiple SOTA summit run!

Short Hike

Even thought the heat was intense and the humidity even more intense, I decided to take in a 2 mile hike post-activation. I snapped a few shots along the way.

This is the Christmas Fern which derives its name from a few characteristics: its resilience to early season snows maintaining a dark green color beyond Christmas, and because folks believe its leaves are shaped like Santa’s boots or even Santa on his sleigh.

Improvements

I’ll plan to add more counterpoises to the speaker wire antenna as I know this will only help efficiency.

In addition, I’ll plan to build even more antennas with this roll of speaker wire. If you have some suggestions, feel free to comment!

Thank you for reading this field report!

Cheers,

Thomas (K4SWL)


Do you enjoy QRPer.com?

Please consider supporting us via Patreon or our Coffee Fund!

Your support makes articles like this one possible. Thank you!

Max’s super simple feet for the Icom IC-705

Speaking of low-cost simple feet for the IC-705, I recently ran into Max (WG4Z) at a summit/park activation. He had an incredibly simple solution for his ‘705. Max noted that his approach:

“only uses two 4 mm bolts just the correct length to make the radio tilt up so the back of the radio is flat against the bottom surface as well. I leave the bolts attached all the time. However, I do put a thin piece of cardboard under the bolts to keep them from scratching the LDG tuner thats always is under the 705.”

I love it! Of course, it would also be easy enough to unscrew the bolts when not in use. Thanks for the tip, Max!

QRP radios, product announcements, reviews, news and more. Low power amateur radio fun!