Category Archives: Antennas

Honing my mag loop tuning skills

Yesterday, I posted the photo above on Twitter.

I couldn’t help it: I’m not an “Instagram Moment” kind of guy, but the fall leaf colors this year have simply been stellar. Any excuse.

Where was I? Oh yes…

Truth is, I was in the front yard practicing my loop tuning skills by hunting parks across 30, 20, and 17 meters.

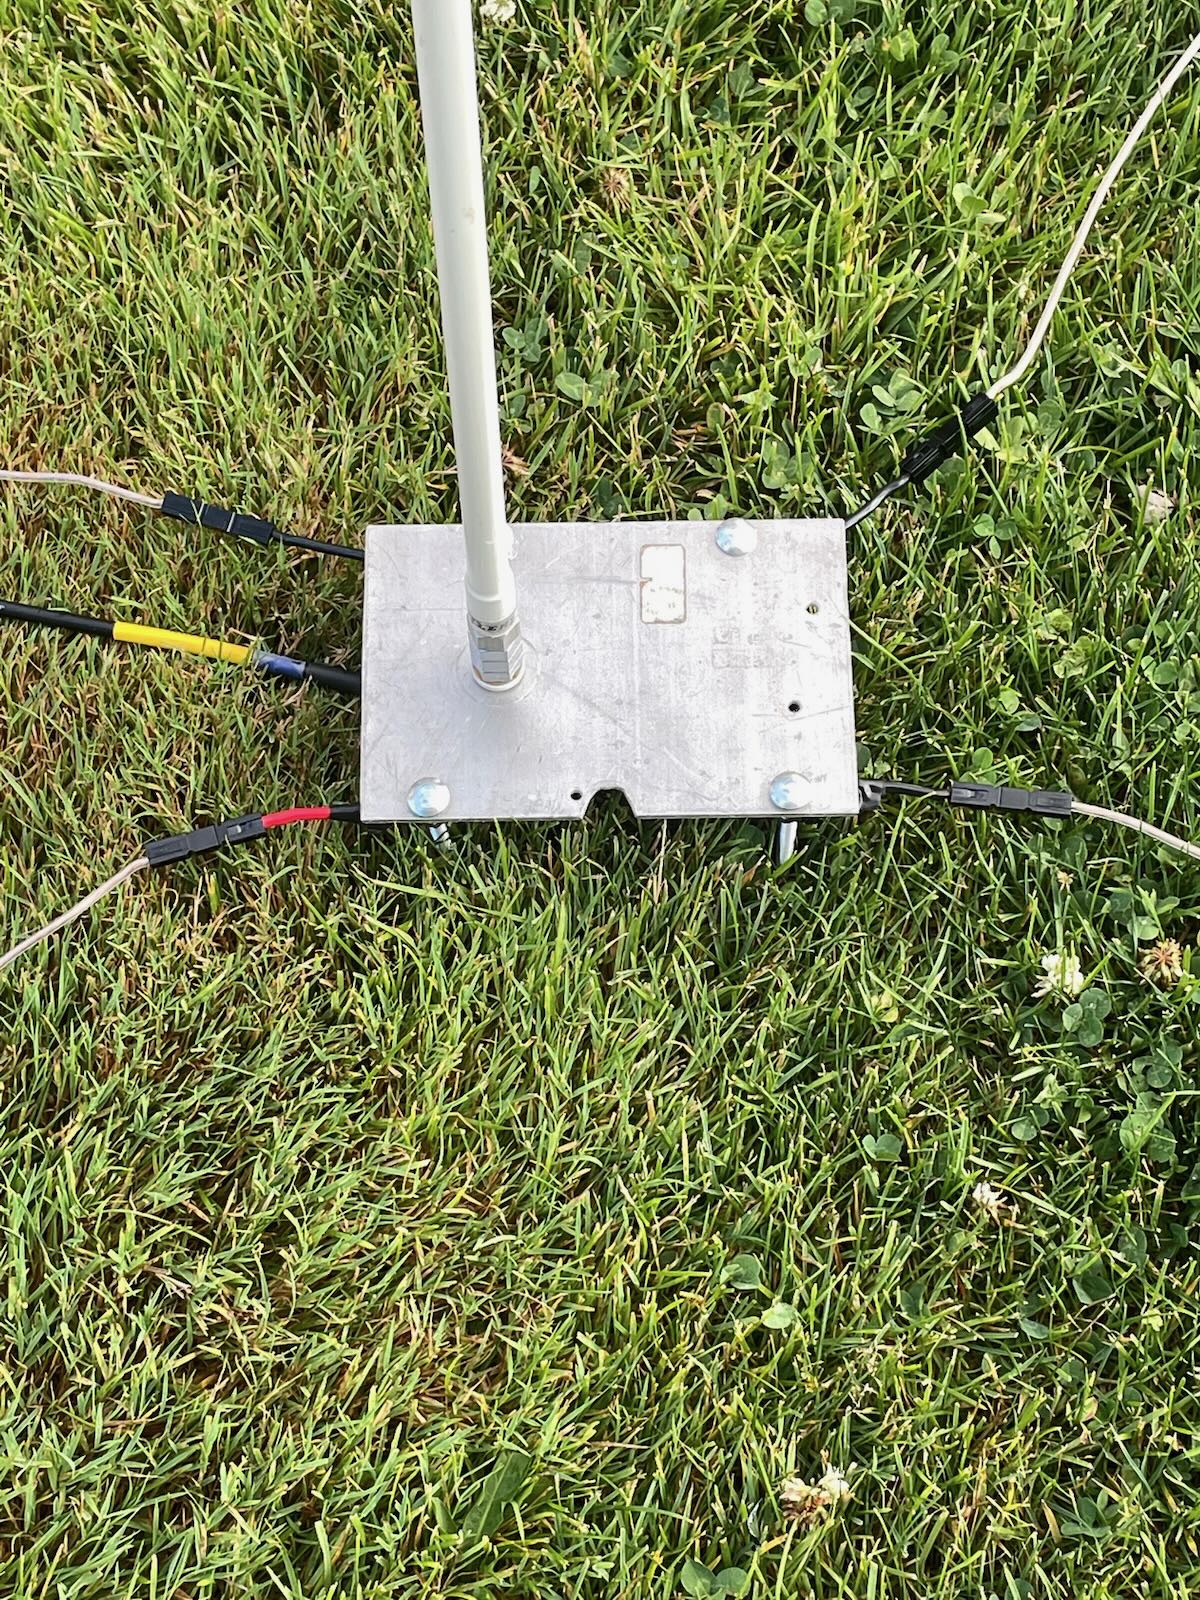
The loop is the excellent Chameleon F-Loop 2.0 (which has since been replaced by Chameleon with the 3.0 version).

I’ve used this loop a few times in the field and even once from inside a large brick community building while doing an FT8 demo.

Loops are a brilliant solution when you have:

  • QRM from local noise sources,
  • limited space to deploy an antenna,
  •  or need a very low-impact and small footprint antenna (very handy for those historic and archeological POTA sites).

The trade-off, of course, is that they have a high “Q”–meaning very, very narrow bandwidth. Basically, anytime you move frequency? Yeah, it’s time to re-tune.

The environment around a loop can also have a pretty significant impact on your ability to tune it as well. For example, metal support structure in a building, window frames, metal poles, vehicles–anything like this nearby can have an impact on your ability to tune a loop and obtain a low SWR.

It’s for this reason I use them so little in the field–where I live, wire antennas are so easy to deploy and use.

But sometimes loops are the perfect tool, so knowing how to efficiently and effectively use them is important.

The F-Loop packed

I thought I had posted an activation video using the F-Loop, but looking back I realize I have not.

Yesterday, I decided to pack the F-Loop in my larger Spec-Ops Brand T.H.E. Pack which can easily hold the entire loop, folding tripod, and antenna analyzer.

I always fully set up an antenna before packing it in a new pack just to make sure I’ve included all components.  I used this as an excuse to improve my loop tuning skills by intentionally chasing POTA stations across the HF bands. I worked all of the stations I hunted (five, if memory serves).

Twice I obtained a brilliant match just by using my ear (listening for the HF band noise level to increase as I tuned the variable cap) and the rest of the time I turned to my RigExpert handheld analyzer to find a low SWR.

I’m looking forward to taking the F-Loop to the field soon just to see how well it performs. After my practice today, I do believe I’ll keep the antenna analyzer packed with the loop–it makes it so easy to find a good match.

I find the F-Loop a wee bit easier to tune than my W4OP loop. The W4OP loop is also a brilliant loop if you can find one–I recently gifted mine to a friend. Here’s my review from a few years ago.

I’ve used an AlexLoop once and was impressed as well. That’s another antenna I may review at some point.

Commercially-produced mag loops are pretty expensive though. I do plan to build a 20M mag loop antenna before end of year.  They’re surprisingly easy to build if you have a good variable cap.

Curious how many of you regularly use mag loop antennas. If you do, what make and model? Or is your loop homebrewed? Please comment!

QRP DX: Pairing the MM0OPX EFHW & Icom IC-705 during an impromptu activation

Turns out, if you go to Canada for nearly two months, when you return home you’re going to have about two months worth of catch up.

It’s all explained in one of Einstein’s theories. If memory serves, Einstein stated:

“One cannot simply ignore stuff for two months and expect no repercussions. Time lost must be accounted for due to the principles of the conservation of energy. Plus…what in creation were you thinking?”

When we returned from Canada in early August I had some pretty big plans about the parks and (especially) summits I would hit here in North Carolina. But after returning, I quickly realized I had so much work to do around the house and a number of DIY jobs I’d postponed at our investment property. They all immediately took priority.

Indeed, in the one month span after returning from Canada, I only performed three park and no summit activations. There was a three week period of time without activations of any sort. I simply didn’t have the time to fit anymore in my schedule. This all gave me a serious case of activation withdrawal.

If you’ve been following my field reports, you’ve no doubt noticed that I never do multi-hour activations at one site unless I happen to be camping at a POTA park.

I’m asked about this fairly regularly (why I don’t do longer activations to achieve Kilo awards, etc.) but the truth is I make POTA/SOTA fit in my busy family schedule. This often equates to short (30-60 minute) activation windows.

Then quite often, I’m on the road or doing errands in town and realize I have a short opening for an activation, so I squeeze it into the day. This is why I always have a fully self-contained field radio kit in my car. At a moment’s notice, I can set up a station, and play radio.

In a way, I find this style of quick activation fun, too. “Can I seriously validate a park during this short window of time–?”

These activations remind me of that scene in A Christmas Story where the father gets a small thrill out of timing himself as he changes a flat tire on the side of the road. I totally get that.

Except with me it’s deploying antennas instead of managing lug nuts.

Hamfest time!

Friday, September 2, 2022 was a big day for me. On the way back from visiting my folks that morning, I spent a couple of hours at the Shelby Hamfest.

The Shelby Hamfest typically has the largest outdoor tailgate market in all of North Carolina and likely one of the larger ones in the southeast US. I had no items on my wish list, I just wanted to see what was there.

This was the first hamfest I’d attended in a little over a year. It was a lot of fun and I got to meet a number of friends and readers/subscribers.

If you’d like to see the treasure I found at the Shelby Hamfest, by the way, check out the large photo gallery I posted over on the SWLing Post.

Back to the topic of impromptu activations…

South Mountains State Park (K-2753)

Driving home after the Shelby Hamfest that early afternoon, I realized I was passing dangerously close to the Clear Creek access of South Mountains State Park.

I had a couple of errands to run back home before the post office closed at 17:00 that day, but in my head I believe I had just enough time for a quick activation. The total amount of detour driving would only be about 15 minutes; I’d just need to keep the activation (including most set up and pack up) under 45 minutes or so.

At the last minute, I took a right turn and headed to the park!

Fortunately, the one lonely picnic table at the Clear Creek access was unoccupied.

I grabbed my IC-705 kit and a new antenna!

The MM0OPX QRP End-Fed Half-Wave (EFHW)

A few weeks prior, Colin (MM0OPX) reached out to me and asked if I would consider testing a new high-quality, highly-efficient QRP EFHW he’d designed.

Of course, there’s nothing new about an EFHW–it’s one of the most popular field antenna designs on the planet–but Colin’s goal was to make one with the lowest insertion loss possible in a compact, lightweight (50g), and durable format.

I say he succeeded.

In fact, this activation was actually the second one where I used Colin’s QRP EFHW. The previous day, I paired it with a then very Beta version of the Penntek TR-45L at Tuttle Educational State Forest (K-4861).

In short, the antenna made for a wildly successful QRP activation. Here’s the QSO Map (you’ll need to click and enlarge to see the number of contacts):

QSO Map from the previous day with the MM0OPX QRP EFHW

The Penntek TR-45L was still quite new at the time and even though  I got John’s (WA3RNC) blessing, I didn’t post the activation video and mini overview on YouTube. Keep in mind the TR-45L was still in Beta so not all features had been finalized.

I did, however, post the entire TR-45L activation video on Patreon.

Quick side note: Why this video only on Patreon?

As I mentioned in a previous post, I’ve now invested in a Pro account with Vimeo that allows me to post completely ad-free videos  that my Patreon supporters can enjoy and even download. I recently discovered that YouTube unfortunately inserts ads even though I have monetization turned off. I pay for Vimeo’s bandwidth and server space, so I also can control the ad experience completely (basically eliminating any possibility of ads!).

My Patreon supporters are the ones making it possible for me to pay the annual $420 fee to Vimeo and I am incredibly grateful, so I pass along the benefit to them.

Continue reading QRP DX: Pairing the MM0OPX EFHW & Icom IC-705 during an impromptu activation

Taking the Mountain Topper MTR-4B on a quickie activation at South Mountains State Park!

The entire time I was in Canada this summer–about two months–I  used two field transceivers: the Elecraft KX2 and the Discovery TX-500.

I did sneak in two extra radios under the floor of my trunk/boot space, but they both were limited to three watts and conditions were so rough during many of my activations, I wanted the option of a QRP “Full Gallon” (5 watts). Thus, I stuck with the TX-500 and KX2 (which are both actually capable of 10 watts output).

When I got back to the States, I was eager to do a POTA activations with my other radios–many of you know I like to rotate them–but there was one, in particular, I was eager to put back on the air…

The Mountain Topper MTR-4B.

This MTR-4B V2 is on loan to me from a very generous reader/subscriber. In fact, get this: he ordered the MTR-4B early this year and had it drop-shipped to me directly from LnR Precision. He knew I’d be in Canada for the summer, so has been incredibly flexible with the loan period (basically leaving it open ended).

My review of the MTR-4B will be published in the November or December (2022) issue of The Spectrum Monitor magazine. Then I’ll be sending the MTR-4B to its rightful owner!

In the meantime, I built an ultra- compact field radio kit around the MTR-4B and in my Tom Bihn HLT2 EDC pouch.

This kit is nearly identical to the one I made for my MTR-3B (just a different color, really).

It contains the radio, a battery, an antenna (although I used a different one during this activation), fused power cord, paddles, earphones, RF choke, RG-316, logbook, pencil, and even a full throw line and weight. I’ve listed all of the components with links below.

It’s hard to believe it all fits in such a compact kit and it works so well. It’s nice to know that with the kit it in my backpack, I’ve got everything I need to play SOTA or POTA at the drop of a hat.

South Mountains State Park (K-2753)

On August 8, 2022, I drove to my hometown to check in on my parents. I didn’t have a lot of time, but I wanted to fit in a quick activation with the MTR-4B along the way.

One of the easiest parks for me to hit en route is the South Mountains State Park Clear Creek Access–it’s maybe a 10-15 minute detour off of Interstate 40.

The weather was amazing that day, although I’ll admit I had to get used to the heat and humidity after spending so much time in Canada this summer!

This access point of South Mountains only has one picnic table. I’m always prepared with a folding chair if that table is occupied, but so far it’s always been available. I’m sure the reason is because this particular South Mountains access point is way less popular than the main entrances. Most of the visitors here come to fish at the reservoir.

Setting up

The great thing about having your whole station in a pouch is that setup is quick and easy.

Continue reading Taking the Mountain Topper MTR-4B on a quickie activation at South Mountains State Park!

7 SOTA Summits, 4 Firsts & 1 Scorpion

A SOTA road trip from Berlin to Tuscany via the Alps and back

sota-flag-mountain-panorama
On the summit of Kellerjoch OE/TI-311

by Leo (DL2COM)

Flashback March 2021: I am sitting on a couch in the countryside 2h north of Berlin, Germany. It’s a rainy day and my 1-year-old kid just fell asleep on my chest. I am watching Youtube and enjoying the feeling of just having maintained the chainsaw after a productive run preparing firewood.

Then suddenly something special got washed into my feed: Adam K6ARK activating a summit in CW somewhere on the U.S. West Coast. I thought: I have no idea what this wizardry is but this is exactly what I want to do. Right here, right now. Well I have a child to take care of, the next mountain with a prominence of >150m (~500 feet, min. requirement to be a valid SOTA summit) is 3h away, I don’t know what ham radio is, I have no license and what the heck is CW. 

sota-backpack
Complete SOTA kit incl. 6m mast

Jump to July 2022: I am sitting in my car commencing a vacation road trip to the south of Tuscany, Italy. Due to the chaotic luggage situation at EU airports and unreal prices for rental cars my family and I had decided that we would be better off if I drove down while my wife and kids took the plane without having to check in any bags (btw: best decision ever).

alps-panorama
Innsbruck embedded in the Inn valley

Our schedule allowed for me to leave a few days early so I could make room to do a little bit of hiking and throw in a few casual SOTA activations because why not. On top I saw that there were a few never activated summits in close proximity to where we planned to stay. I could feel my heart pumping already followed by a strong reassuring feeling radiating from the well-thought-through contents of my backpack in the trunk. Am I ready? Who cares. I am on my own now. I had completed a quick 1-pointer activation in May and a few POTAs but what was planned now was a different level.

sota-road-trip
From Berlin to Cortona (Tuscany) via Brenner pass (Alps) (Source: Sotl.as)

Going into detail about every summit would go beyond the scope of this article so here are just a few highlights: The first leg down to the Garmisch-Partenkirchen area went by in a wink (7h drive). I passed most of the time rehearsing CW by singing license plates out loud. The fun peaked with plates along the lines of M-OT-9990 or E-SI-5545. It’s all about melody and timing, remember. I met up with my buddy Chris whom I hadn’t seen in a long time and who agreed to join me on the first hike up Zirbelkopf (8-points summit) to witness the cult activity I had tried and failed to explain to him beforehand.

Continue reading 7 SOTA Summits, 4 Firsts & 1 Scorpion

Joshua’s ATU-10 review update after new firmware upgrades

Many thanks to Joshua (KO4AWH) who shares the following update to his previous guest review of the ATU-10 automatic antenna tuner:


Update on the ATU-10: new firmware released

by Joshua (KO4AWH)

The short story is that David N7DDC has a Firmware update with a new tuning algorithm that seems to fix the previously seen failure to find a decent match. As noted earlier in comparison with the Elecraft T1, the ATU-10 still does not necessarily get as close a match to 1:1 SWR but it now does indeed find a good match making this tuner my go to for use with my IC-705.

Not previously mentioned, the ATU-10 is also designed to work with the IC-705 for tuning commands when connected with a TRS 3.5mm cable, not just as an auto tuner when given a signal. And, in practice it works just as it should. I actually took the IC-705 and the ATU-10 and worked a SOTA/POTA with the beta version of this new firmware. I ran a 35’ wire and it worked great allowing me to work 40m, 20m, 15m and 6m for a total of 26 contacts. As a followup to my previous testing with the prior firmware 1.4, below are my results with the current new 1.5 firmware.

Testing on August 20th, 2022

The only difference from the original testing is the 31.5’ radiator was replaced with a 35’ and I did not tune and record results with the T1.

Conclusion on the ATU-10

I now feel very comfortable recommending this ATU. newdiytech.com has a great price and the build quality seems just fine. With the new algorithm update, a good match is found. The ATU-10 works great stand alone and also works fully automatically when used with a IC-705. This configuration means you can put the ATU at the antenna feed point and run a control cable back to the IC-705 and have a 50 ohm across the coax to help minimize loss, making for a nice portable setup with great band hopping flexibility.

Of course, if interested, I sell a protection cover for the ATU-10 just as I do for the T1.

If your curiosity is strong, here is some testing I did for David as he was updating the Algorithm now used in firmware 1.5.

UPDATE August 3rd 2022:

David Fainitski N7DDC has released a test firmware with a new tuning Algorithm with some promising initial results. A quick test on each band in the table has been added to reflect the new algorithm. This is not a firmware update yet but I suspect it will be soon. Results are great as tested. I hope to see this in a new FW soon.

August 6th, 2022

A second test firmware from David Fainitski N7DDC with the ability to increase or decrease the L and C manually allowed me to verify if a better match could be made. Turns out in a few cases it could. After testing again with a Tufteln 9:1 T80-2X2 on a 41ft sloping radiator I was able to achieve much better results than with the current version 1.4. In two cases I was able to find a better match manually. I realized later that if I were to tune a second time the ATU-10 would find the same, better match, on its own. Again, not a full firmware update, i.e. you have to flash back to 1.4 if you want to be able to turn off the turner.

(Click to enlarge.)

August 7th, 2022

Another test firmware David asked me to check. This version seemed more likely to find the best match. I did have the ATU go to L0, C0 twice but then find a match on a second try. This happened once on 40m and once on 10m. Almost like it faulted but there was some switching/clicking involved before stopping, it just landed at a 3:1 or higher with 0 for L and C. A second tune however straightened it out. I did not record those two cases. Below are the results. I was able to find a slightly better match twice but I am sure one would never notice the difference during normal use. The improvement both times was within the error of SWR across the three device measurements.

(Click to enlarge.)

Arborist throw lines: Ideal lengths, weights, and packs for field radio

Many thanks to Barry (WD4MSM) who writes:

Thomas,

I thoroughly enjoy the website and movies!

Could you answer one question?

How much arborist throw line do you take into the field? 150’ – 100’ – less?

Thanks for taking the time to answer.

Barry WD4MSM

Great question, Barry!

I basically have four variations of throw line kits.

You’ve asked about line lengths, but I’m also asked frequently about the throw weight sizes and throw line bags as well.

First, let’s take a look at my kit variations, then I’ll share my thoughts on throw line lengths, weights, and bags. Note that many of these products are Amazon so there are affiliate links:

Throw Line with folding cube

One is my original Weaver throw line kit made up of two parts:

The line length is 150 feet (45.72 meters).

I tend to use this throw line when I’m doing a POTA activation very close to my vehicle. It’s lightweight, but a bit bulky to take on a long hike.

Compact Arborist Throw Line Kit

This kit is identical to my large folding cube kit above, but the throw weight is 12 oz and I store it in a small Weaver stuff sack.

Continue reading Arborist throw lines: Ideal lengths, weights, and packs for field radio

Steve’s Homebrew Vertical Antenna for POTA

Many thanks to Steve (KM4FLF/VA3FLF) for sharing the following guest post:


A Great Homebrew Vertical Antenna

by Steve (KM4FLF/VA3FLF)

Last spring, I was going through my many boxes of ham “stuff” looking for items to sell at our club tail gate sale. I came across a couple of Hustler SM Series Resonators (20 /40 Meters) that I had acquired. I am not sure where I obtained them, but I decided they were keepers.  That decision turned out to be the first step in a year long process that has given me an awesome homebrew vertical antenna.

After doing a little research I found the resonators and accessories at most of the online ham dealers. They are used primarily as mobile and marine antennas. I had seen where a ham had used these on a ground stake as a portable antenna as well. I ordered a Hustler MO1 mast which is 54 inches tall and thought I would attempt to make a portable POTA antenna.

Antenna base

I had a couple of small aluminum plates that I drilled out a few holes. I cut out a notch to put a SO-239 Stud Mount on the plate as my antenna base. I now had a ground plate, connector, and antenna with resonator. By putting a stake in the bottom of the plate, I was able to get the antenna to stand up. The Hustler resonators have a hex screw for tuning that can be loosened. The antenna can be adjusted for resonance by lengthening or shortening the radiator length. After adjusting the radiator my SWR was still horrible on the two bands.

Antenna base close-up

I had some 14-gauge wire laying around and attached it to the plate using carriage bolts and nuts for my ground radials. I didn’t think about the length of the wires at this point but went with three or four lines around 20 to 30 ft. I was able to use my vertical a few times with moderate success. My SWR on 20 and 40 Meters was around 2:0 to 1 at best. It was bulky and very delicate. Sometimes screwing in or unscrewing the MO1 the SO239 would slide off the edge of the aluminum plate. I put away my contraption for the winter and decided to move on to something else.

In April of this year, I wanted to revisit my project. Continue reading Steve’s Homebrew Vertical Antenna for POTA

Joshua explores Unun insertion loss (efficiency) comparison testing

Many thanks to Joshua (KO4AWH) who shares the following guest post:


Unun Insertion Loss (Efficiency) Testing

by Joshua (KO4AWH)

A simple “side-by-side’ method can be deployed with the use of a Calibrated NanoVNA to read back “S21 Gain” which is, in this case, signal loss from the output of S11 back into S21 through the identical windings. The gain (loss) reading in negative dB gives us the total signal loss through the windings. We can then divide by 2 to get the loss through one winding and then convert with a bit of math to an efficiency number.

p = 10^(x/10) * 100 where p = percentage 0-100% and x = loss in dB

Example: -2dB reading on “S21 Gain” on the NanoVNA divide by 2 for a loss of -1dB on each winding would be 10^(-1/10) * 100 = 79.4%

We have a 50 ohm signal coming out on S11 of the NanoVNA through the first winding to some unknown exact impedance but that is then converted back through the second unun into the S21 port where the signal is measured. It is therefore necessary to use identical windings for each test to ideally match the impedance change.

I like to run the signal test with the top and bottom of each band, take the average of the two, and then convert to efficiency, 100% being perfect. I record these values to then chart each band’s efficiency for the winding pairs. The goal here is to compare the different windings. For example, with a 9:1 used for a long/random wire, compare toroid sizes, number of toroids and in some cases the number of windings. One nice advantage to a 9:1 Trifilar winding is that you can increase or decrease the winding count in multiples of 3 while maintaining a 3:1 winding ratio. Take the square of the windings ratio (3) to find the impedance ratio of 9:1.

Here is one example of two different windings compared. Both are Trifilar but one with a single T80-2 toroid and 9 sets of turns and the second with a Double T80-2 and 12 sets of turns. 100% would be zero signal loss through the windings, 0% would be full signal loss. -3dB (loss) per winding would equate to a 50% efficiency in either single winding.

The difference between these two windings across the Amature Bands was quite surprising to me. I assume typical, often used windings will be decent across the bands. Here we saw a large improvement in access to the bands by adding several extra turns.

When each component of the station induces loss to the radiated signal, or the ability to receive, you have to improve each area for the best transmit and receive capability. This test is not foolproof, it is not the most accurate way to measure efficiency and maybe not the easiest but it gives me a comparative analysis of various windings with the tools available to me. If I can increase the performance of my windings, I can increase the performance of my station. Time to wind some more transformers!

Joshua

KO4AWH

Tufteln Antennas

Tufteln.net

Joshua tests the ATU-10 portable automatic antenna tuner

ATU-10 with TufteIn protection case

Many thanks to Joshua (KO4AWH) who shares the following guest post:


UPDATE: Please check out Joshua’s most recent review after updating the ATU-10 with new firmware. The results have improved dramatically.

ATU-10 Random Wire Testing

by Joshua (KO4AWH)

I had a bit of time to do some field tests and I recently acquired an ATU-10. So I jumped right in and did some ATU-10 Random Wire Testing. The testing was completed with a Tufteln 9:1 QRP Antenna configured with an elevated feed point sloper and a counterpoise hanging straight down. The coax feed was RG316 17′ with the ATU at the radio with a short jumper. Several different radiator lengths are used as mentioned below. The ATU-10 was sourced from newdiytech.com, price was $120.24 shipped to me in GA USA, Ordered June 25, delivered July 8th.

A quick list of ATU-10 Features:

  • 0.91″ OLED Display that shows Power, SWR and internal battery remaining.
  • USB-C Rechargeable LiPo 1.7Ah
  • Grounding Lug
  • Bypass Mode (When I set to this mode however it would tune anyways)
  • Latching Relays (No power needed to keep in position. Hold tune with ATU off)
  • Input port for communication with IC705 (and potentially others)
  • 7 Inductors, 7 capacitors
    • (Elecraft QRP)
      • C array, pF 10, 20, 39, 82, 160, 330, 660
      • L array, uH 0.05, 0.11, 0.22, 0.45, 0.95, 1.9, 3.8
    • ATU-10
      • C array, pF 22, 47, 100, 220, 470, 1000, 2220
      • L array, uH 0.1, 0.22, 0.45, 1.0, 2.2, 4.5, 10.0
  • USB-C firmware update (ATU shows up as a drive, simply copy the new firmware file to the device and it will automatically update)
  • Weight 232g (8.1oz)
    • Tufteln Case adds 23g (.8oz) for a Total of 255g (8.9oz)
    • Compared to the T1 with cover for a total weight of 187g (6.5oz)

SWR measured with a RigExpert RigStick 320, Lab599 Discovery TX-500 and the ATU-10

The test process was to first check the SWR on the antenna with no tuner. SWR values recorded from the TX500 and RigExpert Stick 320. Values recorded in the 2 columns under the “No Tuner” section. This was completed for each of the Bands listed in the table rows (see below). SWR values were the lowest in the band range for all recorded numbers. Continue reading Joshua tests the ATU-10 portable automatic antenna tuner

The arborist throw line is an invaluable field radio kit tool

Two days ago, I activated Parc national des Grands-Jardins (VE-0499)–a stunning national park here in the Charlevoix region of Québec, Canada.

As soon as we drove up to the activation site I had researched in advance, I surveyed the picnic area and mentally noted the best spot to deploy an end-fed half-wave using my trusty arborist throw line.

With the throw line’s assistance, I had an antenna deployed within a couple of minutes max.

It hit me then just how invaluable a tool the arborist throw line has become for the types of park and summit activations I do.

Pre-Throw Line Activations

During NPOTA (National Parks On The Air) in 2016, I wasn’t aware of arborist throw lines and had been using some high test monofilament fishing line attached to a weight.

The fishing line was strong enough to support my QRP antennas and I could typically reuse the same length of line for 2-3 activations. Eventually, the line stretches and weakens thus it must be cut off and discarded.

Never again

I’m a big Leave No Trace kind of guy, so am embarrassed to admit that during one activation, my fishing line snagged high up in a tree and left a bundle of broken monofilament in a spot where I could not retrieve it. This was deep in a forest and although I doubt anyone will ever see it, I know it’s there. It bugs me to this day and if I ever sort out a way to remove it, I certainly will.

This occurrence was one of the catalysts for purchasing my first arborist throw line kit.

That throw line kit absolutely revolutionized my antenna deployments by:

  • increasing the speed deployment,
  • increasing accuracy,
  • allowing me to re-use the same line hundreds of times,
  • and being orders of magnitude more reliable and stronger than fishing line.

It changed everything and I’ve never looked back.

Since that first throw line kit (which I’ve lent to a newly-minted active ham), I’ve built four more throw line kits.

Compact Weaver Throw Bag

In early 2021, I purchased a second throw line and 12oz weight (identical to my first) for backpacking along with this compact Weaver Leather throw line storage bag (affiliate links).

I was searching for a more SOTA-friendly/backpack-able solution than the arborist throw line cube.

I was very skeptical about how easily this bag would work in the field. One of the reasons my throw line storage cube works so well is because the opening is large allowing the line to deploy without tangling. Packing up is fast because the line can be flaked back into the cube in a matter of seconds. Continue reading The arborist throw line is an invaluable field radio kit tool